
User Manual
Page 6
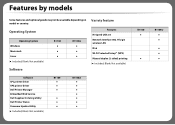
...) Manual duplex (2-sided) printing (●: Included, Blank: Not available) Software SPL printer driver XPS printer driver Dell Printer Manager Embedded Web Service Dell Supplies Ordering Utility Dell Printer Status Firmware Update Utility (●: Included, Blank: Not available) B1160 ● ● ● ● ● ● B1160w B1160 ● ● B1160w ● ● ● ● ● Features by models Some...
...) Manual duplex (2-sided) printing (●: Included, Blank: Not available) Software SPL printer driver XPS printer driver Dell Printer Manager Embedded Web Service Dell Supplies Ordering Utility Dell Printer Status Firmware Update Utility (●: Included, Blank: Not available) B1160 ● ● ● ● ● ● B1160w B1160 ● ● B1160w ● ● ● ● ● Features by models Some...
User Manual
Page 103
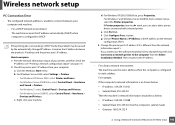
...3 Change the printer port's IP address if it is configured to DHCP. b For Windows Server 2000, select Settings > Printers. • For Windows XP/Server 2003, select Printer and Faxes. • For Windows Server 2008/Vista, select Control Panel > Hardware and Sound > Printers. • For Windows... to change the port IP, click Connect to a network printer to static address. e Click Port tab. If you can select other printer drivers connected with selected printer. c Right-click your computer and machine. - f Click Configure Port.. For a Static network environment The machine uses...
...3 Change the printer port's IP address if it is configured to DHCP. b For Windows Server 2000, select Settings > Printers. • For Windows XP/Server 2003, select Printer and Faxes. • For Windows Server 2008/Vista, select Control Panel > Hardware and Sound > Printers. • For Windows... to change the port IP, click Connect to a network printer to static address. e Click Port tab. If you can select other printer drivers connected with selected printer. c Right-click your computer and machine. - f Click Configure Port.. For a Static network environment The machine uses...

User Manual
Page 108
If you can select other printer drivers connected to change the settings for each tab. 6 Click OK. Changing the default print settings 1 Click the Windows Start menu. 2 For Windows Server 2000, select Settings > Printers. • For Windows XP/Server 2003, select Printer and Faxes. • For Windows Server 2008/Vista, select Control Panel..., select Printing preferences. Special Features 108 If Printing preferences has a ▶, you want to the selected printer. 5 Change the settings on your machine. 4 For Windows XP/Server 2003/Server 2008/Vista, select Printing Preferences.
If you can select other printer drivers connected to change the settings for each tab. 6 Click OK. Changing the default print settings 1 Click the Windows Start menu. 2 For Windows Server 2000, select Settings > Printers. • For Windows XP/Server 2003, select Printer and Faxes. • For Windows Server 2008/Vista, select Control Panel..., select Printing preferences. Special Features 108 If Printing preferences has a ▶, you want to the selected printer. 5 Change the settings on your machine. 4 For Windows XP/Server 2003/Server 2008/Vista, select Printing Preferences.
User Manual
Page 109
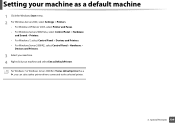
... Set as Default Printer. Setting your machine as a default machine 1 Click the Windows Start menu. 2 For Windows Server 2000, select Settings > Printers. • For Windows XP/Server 2003, select Printer and Faxes. • For Windows Server 2008/Vista, select Control Panel > Hardware and Sound > Printers. • For Windows 7, select Control Panel... Panel > Hardware > Devices and Printers. 3 Select your machine. 4 Right-click your machine and select Set as default printer has a ▶, you can select other printer drivers connected to the selected printer. 3. Special Features 109
... Set as Default Printer. Setting your machine as a default machine 1 Click the Windows Start menu. 2 For Windows Server 2000, select Settings > Printers. • For Windows XP/Server 2003, select Printer and Faxes. • For Windows Server 2008/Vista, select Control Panel > Hardware and Sound > Printers. • For Windows 7, select Control Panel... Panel > Hardware > Devices and Printers. 3 Select your machine. 4 Right-click your machine and select Set as default printer has a ▶, you can select other printer drivers connected to the selected printer. 3. Special Features 109
User Manual
Page 110
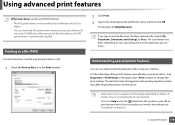
... you are using your printer driver, click Properties or Preferences in use advanced printing features when using . 2 Understanding special printer features You can install the XPS printer driver when you install the Dell software, the XPS printer driver is automatically saved in the destination... path and the file name, and then click OK. Using advanced print features XPS printer driver: used to print XPS file format. • The XPS printer driver can...
... you are using your printer driver, click Properties or Preferences in use advanced printing features when using . 2 Understanding special printer features You can install the XPS printer driver when you install the Dell software, the XPS printer driver is automatically saved in the destination... path and the file name, and then click OK. Using advanced print features XPS printer driver: used to print XPS file format. • The XPS printer driver can...

User Manual
Page 115
c Select the overlay you exit the Print window. You can delete page overlays that you use . e When a confirming message window appears, click Yes. a. b Select Edit in the Text drop down list. This option is not available when you no longer use XPS driver. 3. f Click OK or Print until you want to delete from the Overlay List box. Special Features 115 d Click Delete. Using advanced print features Item Description Overlay (Deleting a page overlay) a In the Printing Preferences window, click the Advanced tab.
c Select the overlay you exit the Print window. You can delete page overlays that you use . e When a confirming message window appears, click Yes. a. b Select Edit in the Text drop down list. This option is not available when you no longer use XPS driver. 3. f Click OK or Print until you want to delete from the Overlay List box. Special Features 115 d Click Delete. Using advanced print features Item Description Overlay (Deleting a page overlay) a In the Printing Preferences window, click the Advanced tab.


