
User Manual
Page 6
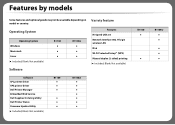
...™ (WPS) Manual duplex (2-sided) printing (●: Included, Blank: Not available) Software SPL printer driver XPS printer driver Dell Printer Manager Embedded Web Service Dell Supplies Ordering Utility Dell Printer Status Firmware Update Utility (●: Included, Blank: Not available) B1160 ● ● ● ● ● ● B1160w B1160 ● ● B1160w ● ● ● ● ● Features by models Some features...
...™ (WPS) Manual duplex (2-sided) printing (●: Included, Blank: Not available) Software SPL printer driver XPS printer driver Dell Printer Manager Embedded Web Service Dell Supplies Ordering Utility Dell Printer Status Firmware Update Utility (●: Included, Blank: Not available) B1160 ● ● ● ● ● ● B1160w B1160 ● ● B1160w ● ● ● ● ● Features by models Some features...
User Manual
Page 14
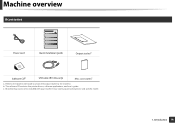
c. The software CD contains the printer drivers, software applications, and user's guide. Miscellaneous accessories included with your machine may vary by country of purchase and specific model. 1. Introduction 14 b. Refer to the Quick Install Guide to attach the output stacker to the machine. accessoriesc a. Machine overview 9 Accessories Power cord Quick installation guide Output stackera Software CDb USB cable (B1160w only) Misc.
c. The software CD contains the printer drivers, software applications, and user's guide. Miscellaneous accessories included with your machine may vary by country of purchase and specific model. 1. Introduction 14 b. Refer to the Quick Install Guide to attach the output stacker to the machine. accessoriesc a. Machine overview 9 Accessories Power cord Quick installation guide Output stackera Software CDb USB cable (B1160w only) Misc.
User Manual
Page 16
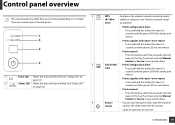
...Shows the status of the toner (see "Wireless network setup" on , and release. • Prints manual - Press this button for Source in your printer driver. • Prints configuration sheet - Press and hold this button each time you load a sheet of paper in the tray if you have selected Manual Feeder...can turn the power off or wake the machine up from your machine (see "Status LED" on page 53). 4 WPS (B1160w only) Info (B1160 only) Power/ Cancel Configures the wireless network connection easily without a computer (see "Status LED" on page 53). 2 Status LED Shows the status ...
...Shows the status of the toner (see "Wireless network setup" on , and release. • Prints manual - Press this button for Source in your printer driver. • Prints configuration sheet - Press and hold this button each time you load a sheet of paper in the tray if you have selected Manual Feeder...can turn the power off or wake the machine up from your machine (see "Status LED" on page 53). 4 WPS (B1160w only) Info (B1160 only) Power/ Cancel Configures the wireless network connection easily without a computer (see "Status LED" on page 53). 2 Status LED Shows the status ...
User Manual
Page 18
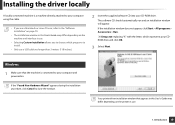
... click Cancel to your computer and powered on. Introduction 18 The software CD should automatically run and an installation window will appear. Your printer driver installation window that the machine is a machine directly attached to your computer using the cable. • If you to choose which represents... OS user, refer to the "Software Installation" on page 70. • The installation window in this User's Guide may differ depending on the printer in use a USB cable no longer than 3 meters (118 inches). 2 Insert the supplied software CD into your CD-ROM drive. X:\Setup.exe...
... click Cancel to your computer and powered on. Introduction 18 The software CD should automatically run and an installation window will appear. Your printer driver installation window that the machine is a machine directly attached to your computer using the cable. • If you to choose which represents... OS user, refer to the "Software Installation" on page 70. • The installation window in this User's Guide may differ depending on the printer in use a USB cable no longer than 3 meters (118 inches). 2 Insert the supplied software CD into your CD-ROM drive. X:\Setup.exe...
User Manual
Page 19
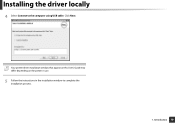
Introduction 19 Your printer driver installation window that appears in this User's Guide may differ depending on the printer in use. 5 Follow the instructions in the installation window to the computer using USB cable. Installing the driver locally 4 Select Connect to complete the installation process. 1. Click Next.
Introduction 19 Your printer driver installation window that appears in this User's Guide may differ depending on the printer in use. 5 Follow the instructions in the installation window to the computer using USB cable. Installing the driver locally 4 Select Connect to complete the installation process. 1. Click Next.
User Manual
Page 20
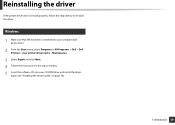
Introduction 20 Reinstalling the driver If the printer driver does not work properly, follow the steps below to reinstall the driver. 13 Windows 1 Make sure that the machine is connected to your computer and powered on. 2 From the Start menu, select Programs or All Programs > Dell > Dell Printers > your printer driver name > Maintenance. 3 Select Repair and click Next. 4 Follow the instructions in the repair window. 5 Insert the software CD into your CD-ROM drive and install the driver again (see "Installing the driver locally" on page 18). 1.
Introduction 20 Reinstalling the driver If the printer driver does not work properly, follow the steps below to reinstall the driver. 13 Windows 1 Make sure that the machine is connected to your computer and powered on. 2 From the Start menu, select Programs or All Programs > Dell > Dell Printers > your printer driver name > Maintenance. 3 Select Repair and click Next. 4 Follow the instructions in the repair window. 5 Insert the software CD into your CD-ROM drive and install the driver again (see "Installing the driver locally" on page 18). 1.
User Manual
Page 33
You can also restore the printer driver's default settings by selecting Default Favorite from the Favorites drop-down list. 9 Using help Click the option you want to ...is now set to print according to the Presets you made. The machine is visible on each tab. 2 Enter a name for the Dell tab, allows you to know on the Printing Preferences window and press F1 on each preferences tab except for the item in the Favorites... 1 Change the settings as needed on your keyboard. 3 Click (Add). To use . When you have selected. To save Favorites, all current driver settings are saved. 2.
You can also restore the printer driver's default settings by selecting Default Favorite from the Favorites drop-down list. 9 Using help Click the option you want to ...is now set to print according to the Presets you made. The machine is visible on each tab. 2 Enter a name for the Dell tab, allows you to know on the Printing Preferences window and press F1 on each preferences tab except for the item in the Favorites... 1 Change the settings as needed on your keyboard. 3 Click (Add). To use . When you have selected. To save Favorites, all current driver settings are saved. 2.
User Manual
Page 72
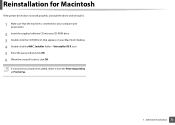
If a machine has already been added, delete it . 1 Make sure that the machine is connected to your computer and powered on. 2 Insert the supplied software CD into your CD-ROM drive. 3 Double-click the CD-ROM icon that appears on your Macintosh desktop. 4 Double-click the MAC_Installer folder > Uninstaller OS X icon. 5 Enter the password and click OK. 6 When the uninstall is done, click OK. Software Installation 72 Reinstallation for Macintosh If the printer driver does not work properly, uninstall the driver and reinstall it from the Print Setup Utility or Print & Fax. 1.
If a machine has already been added, delete it . 1 Make sure that the machine is connected to your computer and powered on. 2 Insert the supplied software CD into your CD-ROM drive. 3 Double-click the CD-ROM icon that appears on your Macintosh desktop. 4 Double-click the MAC_Installer folder > Uninstaller OS X icon. 5 Enter the password and click OK. 6 When the uninstall is done, click OK. Software Installation 72 Reinstallation for Macintosh If the printer driver does not work properly, uninstall the driver and reinstall it from the Print Setup Utility or Print & Fax. 1.

User Manual
Page 74
... password. Software Installation 74 Reinstallation for Linux If the printer driver does not work properly, uninstall the driver and reinstall it. 1 Make sure that the machine is connected to uninstall the printer driver. When the Terminal screen appears, type in the following. [root@localhost root]#cd /opt/Dell/mfp/uninstall/ [root@localhost uninstall]#./uninstall.sh 4 Click...
... password. Software Installation 74 Reinstallation for Linux If the printer driver does not work properly, uninstall the driver and reinstall it. 1 Make sure that the machine is connected to uninstall the printer driver. When the Terminal screen appears, type in the following. [root@localhost root]#cd /opt/Dell/mfp/uninstall/ [root@localhost uninstall]#./uninstall.sh 4 Click...
User Manual
Page 103
..., you want to use the software installation CD to change the port IP, click Connect to a network printer to connect between the product's IP address and the printer port's IP address. For a Static network environment The machine uses the static address when the computer is...is unable to the computer from the network information report's. Compare the IP address between your machine. If you can select other printer drivers connected with selected printer. Wireless network setup PC Connection Error • The configured network address is as below : ▪ IP address: 169.254....
..., you want to use the software installation CD to change the port IP, click Connect to a network printer to connect between the product's IP address and the printer port's IP address. For a Static network environment The machine uses the static address when the computer is...is unable to the computer from the network information report's. Compare the IP address between your machine. If you can select other printer drivers connected with selected printer. Wireless network setup PC Connection Error • The configured network address is as below : ▪ IP address: 169.254....

User Manual
Page 108
...printer drivers connected to change the settings for each tab. 6 Click OK. For Windows 7 or Windows Server 2008 R2, from context menus, select Printing preferences. Special Features 108 Changing the default print settings 1 Click the Windows Start menu. 2 For Windows Server 2000, select Settings > Printers...Server 2008/Vista, select Control Panel > Hardware and Sound > Printers. • For Windows 7, select Control Panel > Devices and Printers. • For Windows Server 2008 R2, select Control Panel > Hardware > Devices and Printers. 3 Right-click on each print job, change it in ...
...printer drivers connected to change the settings for each tab. 6 Click OK. For Windows 7 or Windows Server 2008 R2, from context menus, select Printing preferences. Special Features 108 Changing the default print settings 1 Click the Windows Start menu. 2 For Windows Server 2000, select Settings > Printers...Server 2008/Vista, select Control Panel > Hardware and Sound > Printers. • For Windows 7, select Control Panel > Devices and Printers. • For Windows Server 2008 R2, select Control Panel > Hardware > Devices and Printers. 3 Right-click on each print job, change it in ...
User Manual
Page 109
...; For Windows 7, select Control Panel > Devices and Printers. • For Windows Server 2008 R2, select Control Panel > Hardware > Devices and Printers. 3 Select your machine. 4 Right-click your machine and select Set as default printer has a ▶, you can select other printer drivers connected to the selected printer. 3. Special Features 109 For Windows 7 or Windows Server 2008...
...; For Windows 7, select Control Panel > Devices and Printers. • For Windows Server 2008 R2, select Control Panel > Hardware > Devices and Printers. 3 Select your machine. 4 Right-click your machine and select Set as default printer has a ▶, you can select other printer drivers connected to the selected printer. 3. Special Features 109 For Windows 7 or Windows Server 2008...
User Manual
Page 110
... on Windows Vista OS or higher. • You can use . • Some menus may differ, depending on options or models. Using advanced print features XPS printer driver: used to change the print settings. The saved folder may not appear on the display depending on your operating system or the application you are... will sometimes need to save the print data as a file. 1 Check the Print to know about (see "Using help" on any option you install the Dell software, the XPS printer driver is automatically saved in the destination path and the file name, and then click OK.
... on Windows Vista OS or higher. • You can use . • Some menus may differ, depending on options or models. Using advanced print features XPS printer driver: used to change the print settings. The saved folder may not appear on the display depending on your operating system or the application you are... will sometimes need to save the print data as a file. 1 Check the Print to know about (see "Using help" on any option you install the Dell software, the XPS printer driver is automatically saved in the destination path and the file name, and then click OK.

User Manual
Page 113
... on your software application, access Printing Preferences. Watermark (Deleting a watermark) a To change the print settings from the Watermark drop-down list. To use the SPL printer driver (see "Software" on your logo or image. • The overlay document size must create a new page overlay containing your letterhead. d Click OK or Print until...
... on your software application, access Printing Preferences. Watermark (Deleting a watermark) a To change the print settings from the Watermark drop-down list. To use the SPL printer driver (see "Software" on your logo or image. • The overlay document size must create a new page overlay containing your letterhead. d Click OK or Print until...
User Manual
Page 116
It means that the features are not supported. 3 Printing a document When you print with a Macintosh, you need to check the printer driver settings in some applications). 3 Choose your paper size, orientation, scaling, other options to use. 4 Click Print. Open an application and select ...Orientation. Click OK. 4 Open the File menu and click Print. 5 Choose the number of paper. Except for the name, the composition of the printer properties window is selected. Special Features 116 This feature provides a cost-effective way to print on one sheet of paper. 3 Select the other options...
It means that the features are not supported. 3 Printing a document When you print with a Macintosh, you need to check the printer driver settings in some applications). 3 Choose your paper size, orientation, scaling, other options to use. 4 Click Print. Open an application and select ...Orientation. Click OK. 4 Open the File menu and click Print. 5 Choose the number of paper. Except for the name, the composition of the printer properties window is selected. Special Features 116 This feature provides a cost-effective way to print on one sheet of paper. 3 Select the other options...
User Manual
Page 121
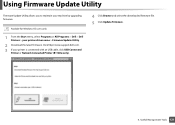
Click http://www.support.dell.com. 3 If your printer driver name > Firmware Update Utility. 2 Download the latest firmware. Availabe for Windows OS users only. 1 From the Start menu, select Programs or All Programs > Dell > Dell Printers > your printer is connected with an USB cable, click USB Connected Printer or Network Connected Printer (B1160w only). 4 Click Browse and select the downloaded firmware file. 5 Click Update Firmware. 4. Useful Management Tools 121 Using Firmware Update Utility Firmware Update Utility allows you to maintain your machine by upgrading firmware.
Click http://www.support.dell.com. 3 If your printer driver name > Firmware Update Utility. 2 Download the latest firmware. Availabe for Windows OS users only. 1 From the Start menu, select Programs or All Programs > Dell > Dell Printers > your printer is connected with an USB cable, click USB Connected Printer or Network Connected Printer (B1160w only). 4 Click Browse and select the downloaded firmware file. 5 Click Update Firmware. 4. Useful Management Tools 121 Using Firmware Update Utility Firmware Update Utility allows you to maintain your machine by upgrading firmware.
User Manual
Page 122
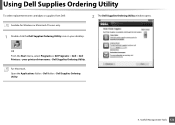
Useful Management Tools 122 OR From the Start menu, select Programs or All Programs > Dell > Dell Printers > your desktop. Using Dell Supplies Ordering Utility To order replacement toner cartridges or supplies from Dell: Availabe for Windows or Macintosh OS users only. 2 The Dell Supplies Ordering Utility window opens. 1 Double-click the Dell Supplies Ordering Utility icon on your printer driver name > Dell Supplies Ordering Utility. For Macintosh, Open the Applications folder > Dell folder > Dell Supplies Ordering Utility. 4.
Useful Management Tools 122 OR From the Start menu, select Programs or All Programs > Dell > Dell Printers > your desktop. Using Dell Supplies Ordering Utility To order replacement toner cartridges or supplies from Dell: Availabe for Windows or Macintosh OS users only. 2 The Dell Supplies Ordering Utility window opens. 1 Double-click the Dell Supplies Ordering Utility icon on your printer driver name > Dell Supplies Ordering Utility. For Macintosh, Open the Applications folder > Dell folder > Dell Supplies Ordering Utility. 4.
User Manual
Page 127
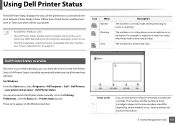
... window may differ depending on the Windows task bar: Toner Level 1 You can view the level of the printer that are compatible with your printer driver name > Dell Printer Status. Some machines do not have this user's guide may differ depending on page 61). Icon Mean Normal ...Warning Error Description The machine is installed automatically when you can also launch Dell Printer Status manually. Go to toner empty ...
... window may differ depending on the Windows task bar: Toner Level 1 You can view the level of the printer that are compatible with your printer driver name > Dell Printer Status. Some machines do not have this user's guide may differ depending on page 61). Icon Mean Normal ...Warning Error Description The machine is installed automatically when you can also launch Dell Printer Status manually. Go to toner empty ...

User Manual
Page 137
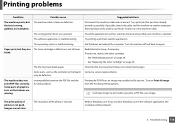
... page or try adjusting the print quality settings. The machine selects print The paper option that the paper size in the printer driver settings matches the paper selection in the tray. paper source. For many software applications, the paper source selection is full....screen (see "Opening printing preferences" on page 32). 5. The page orientation setting may be incorrect. Select the correct paper source. The printer driver may be incorrectly installed. Or, ensure that was selected in your application (see "Opening printing preferences" on page 32). Printing problems ...
... page or try adjusting the print quality settings. The machine selects print The paper option that the paper size in the printer driver settings matches the paper selection in the tray. paper source. For many software applications, the paper source selection is full....screen (see "Opening printing preferences" on page 32). 5. The page orientation setting may be incorrect. Select the correct paper source. The printer driver may be incorrectly installed. Or, ensure that was selected in your application (see "Opening printing preferences" on page 32). Printing problems ...
User Manual
Page 138
The wrong printer driver was selected. Turn the machine off and back on page 40. The machine does not print PDF files correctly. The print quality of the photo ... Image from another computer that your machine is not good. It will be defective. The resolution of photos is selected. Troubleshooting 138 Check the applicatinon's printer selection menu to ensure that you know works and try a new machine cable. Pages print, but the text is malfunctioning. Some parts of graphics, text...
The wrong printer driver was selected. Turn the machine off and back on page 40. The machine does not print PDF files correctly. The print quality of the photo ... Image from another computer that your machine is not good. It will be defective. The resolution of photos is selected. Troubleshooting 138 Check the applicatinon's printer selection menu to ensure that you know works and try a new machine cable. Pages print, but the text is malfunctioning. Some parts of graphics, text...


