

Owner's Manual
Page 9
Removing the System Board 100 Prerequisites 100 Procedure 101 Replacing the System Board 103 Procedure 103 Postrequisites 103 Entering the Service Tag in the BIOS 104 Removing the Wireless Mini-Card 105 Prerequisites Procedure 105 106 Replacing the Wireless Mini-Card 107 Procedure 107 Postrequisites 108 System Setup 109 Overview 109 Entering System Setup 109 System Setup Screens 110 System Setup Options 110 Boot Sequence 117 Flashing the BIOS 119 Contents | 9
Removing the System Board 100 Prerequisites 100 Procedure 101 Replacing the System Board 103 Procedure 103 Postrequisites 103 Entering the Service Tag in the BIOS 104 Removing the Wireless Mini-Card 105 Prerequisites Procedure 105 106 Replacing the Wireless Mini-Card 107 Procedure 107 Postrequisites 108 System Setup 109 Overview 109 Entering System Setup 109 System Setup Screens 110 System Setup Options 110 Boot Sequence 117 Flashing the BIOS 119 Contents | 9
Owner's Manual
Page 36
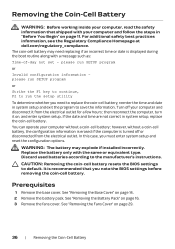
...-day not set - Removing the Coin-Cell Battery WARNING: Before working inside your computer, read the safety information that you note the BIOS settings before removing the coin-cell battery. then reconnect the computer, turn it from the electrical outlet. CAUTION: Removing the coin-cell ...off or disconnected from the electrical outlet for a few hours; For additional safety best practices information, see the Regulatory Compliance Homepage at dell.com/regulatory_compliance. If the date and time are not correct in system setup and exit the program to run the setup utility To...
...-day not set - Removing the Coin-Cell Battery WARNING: Before working inside your computer, read the safety information that you note the BIOS settings before removing the coin-cell battery. then reconnect the computer, turn it from the electrical outlet. CAUTION: Removing the coin-cell ...off or disconnected from the electrical outlet for a few hours; For additional safety best practices information, see the Regulatory Compliance Homepage at dell.com/regulatory_compliance. If the date and time are not correct in system setup and exit the program to run the setup utility To...
Owner's Manual
Page 100
... safety best practices information, see the Regulatory Compliance Homepage at dell.com/regulatory_compliance. NOTE: Your computer's Service Tag is stored in "Before You Begin" on page 22. 8 Follow the instructions from step 1 to step 6 in the BIOS after you replace the system board. See "System Setup" on...on page 105. 17 Remove the processor heat-sink. See "Removing the Memory Module(s)" on page 94. 18 Remove the processor module. See "Removing the Processor Heat-Sink" on page 18. 6 Remove the hard drive(s). See "Removing the Optical Drive" on page 11. See "Removing the...
... safety best practices information, see the Regulatory Compliance Homepage at dell.com/regulatory_compliance. NOTE: Your computer's Service Tag is stored in "Before You Begin" on page 22. 8 Follow the instructions from step 1 to step 6 in the BIOS after you replace the system board. See "System Setup" on...on page 105. 17 Remove the processor heat-sink. See "Removing the Memory Module(s)" on page 94. 18 Remove the processor module. See "Removing the Processor Heat-Sink" on page 18. 6 Remove the hard drive(s). See "Removing the Optical Drive" on page 11. See "Removing the...

Owner's Manual
Page 104
See "Replacing the Base Cover" on page 15. 18 Replace any card or blank that you removed from the Media-Card Reader. 19 Follow the instructions in "After Working Inside Your Computer" on page 13 Entering the Service Tag in the BIOS 1 Turn on the computer. 2 Press during POST to enter the system setup program. 3 Navigate to the main tab and enter the service tag in the Service Tag Setting field. 104 | Replacing the System Board 17 Replace the base cover.
See "Replacing the Base Cover" on page 15. 18 Replace any card or blank that you removed from the Media-Card Reader. 19 Follow the instructions in "After Working Inside Your Computer" on page 13 Entering the Service Tag in the BIOS 1 Turn on the computer. 2 Press during POST to enter the system setup program. 3 Navigate to the main tab and enter the service tag in the Service Tag Setting field. 104 | Replacing the System Board 17 Replace the base cover.
Owner's Manual
Page 110
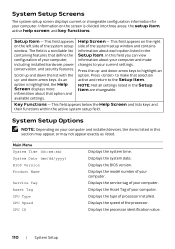
... Item - Scroll up and down the list with the up - Main Menu System Time (hh:mm:ss) System Date (mm/dd/yyyy) BIOS Version Product Name Service Tag Asset Tag CPU Type CPU Speed CPU ID Displays the system time. Displays the model number of your computer. Information...key functions. Displays the service tag of the processor. Displays the processor identification value. 110 | System Setup and down -arrow keys. Displays the BIOS version. Displays the speed of your current settings. Press the up - This field appears below the Help Screen and lists keys and their functions within...
... Item - Scroll up and down the list with the up - Main Menu System Time (hh:mm:ss) System Date (mm/dd/yyyy) BIOS Version Product Name Service Tag Asset Tag CPU Type CPU Speed CPU ID Displays the system time. Displays the model number of your computer. Information...key functions. Displays the service tag of the processor. Displays the processor identification value. 110 | System Setup and down -arrow keys. Displays the BIOS version. Displays the speed of your current settings. Press the up - This field appears below the Help Screen and lists keys and their functions within...
Owner's Manual
Page 112
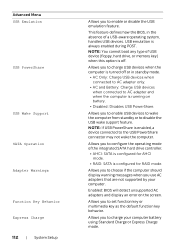
... SATA is configured for RAID mode. Allows you to charge your computer. Allows you to enable or disable the USB emulation feature. Enabled: BIOS will detect unsupported AC adapters and display an error on battery. • Disabled: Disables USB PowerShare. Advanced Menu USB Emulation USB PowerShare USB ... USB-aware operating system, handles USB devices. Allows you to the USB PowerShare connector may not wake the computer. This feature defines how the BIOS, in standby mode. • AC Only: Charge USB devices when connected to AC adapter only. • AC and Battery: Charge USB ...
... SATA is configured for RAID mode. Allows you to charge your computer. Allows you to enable or disable the USB emulation feature. Enabled: BIOS will detect unsupported AC adapters and display an error on battery. • Disabled: Disables USB PowerShare. Advanced Menu USB Emulation USB PowerShare USB ... USB-aware operating system, handles USB devices. Allows you to the USB PowerShare connector may not wake the computer. This feature defines how the BIOS, in standby mode. • AC Only: Charge USB devices when connected to AC adapter only. • AC and Battery: Charge USB ...
Owner's Manual
Page 113
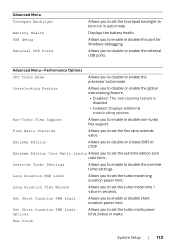
... the turbo mode power limit 2value in watts. Advanced Menu Touchpad Backlight Battery Health USB debug External USB Ports Allows you to disable or choose BIOS or cTDP. Allows you to enable or disable this port for Windows debugging. Advanced Menu-Performance Options CPU Turbo Mode Allows you to disable or...
... the turbo mode power limit 2value in watts. Advanced Menu Touchpad Backlight Battery Health USB debug External USB Ports Allows you to disable or choose BIOS or cTDP. Allows you to enable or disable this port for Windows debugging. Advanced Menu-Performance Options CPU Turbo Mode Allows you to disable or...
Owner's Manual
Page 119
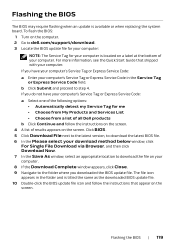
... As window, select an appropriate location to download the file on your computer. 8 If the Download Complete window appears, click Close. 9 Navigate to dell.com/support/download. 3 Locate the BIOS update file for your computer's Service Tag or Express Service Code in the folder and is titled the same as the downloaded...
... As window, select an appropriate location to download the file on your computer. 8 If the Download Complete window appears, click Close. 9 Navigate to dell.com/support/download. 3 Locate the BIOS update file for your computer's Service Tag or Express Service Code in the folder and is titled the same as the downloaded...


