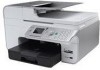
User Guide
Page 26
... cartridges. Tray that you use a DSL modem for your printer to do a variety of blank paper A few important things to note: If the printer is connected to a computer or not) must install a DSL filter on the telephone line attached to your printer to a computer to print, scan, or use the Save Photos to Computer function...
... cartridges. Tray that you use a DSL modem for your printer to do a variety of blank paper A few important things to note: If the printer is connected to a computer or not) must install a DSL filter on the telephone line attached to your printer to a computer to print, scan, or use the Save Photos to Computer function...
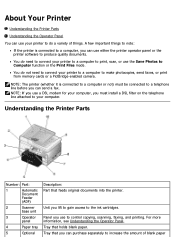
User Guide
Page 32
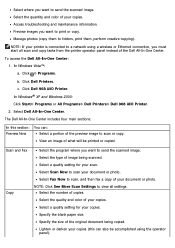
...Dell All-In-One Center: 1. Click Dell 968 AIO Printer. Lighten or darken your scan. Manage photos (copy them to send the scanned image. c. Select a quality setting for your document or photo. NOTE: Click See More Scan Settings to send the scanned image. Specify the blank paper size. Select where you want to folders, print...copy of copies. Select the quantity and color of your copies. Click Dell Printers. Select the quality and color of your copies. Select a quality setting for your copies (this section: You can also be printed or copied. In Windows® XP ...
...Dell All-In-One Center: 1. Click Dell 968 AIO Printer. Lighten or darken your scan. Manage photos (copy them to send the scanned image. c. Select a quality setting for your document or photo. NOTE: Click See More Scan Settings to send the scanned image. Specify the blank paper size. Select where you want to folders, print...copy of copies. Select the quantity and color of your copies. Click Dell Printers. Select the quality and color of your copies. Select a quality setting for your copies (this section: You can also be printed or copied. In Windows® XP ...
User Guide
Page 42
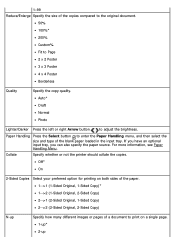
... 2-->2 (2-Sided Original, 2-Sided Copy) N-up Off* On 2-Sided Copies Select your preferred option for printing on a single page. 1-up* 2-up Specify how many different images or pages of the blank paper loaded in the input tray. 1-99 Reduce/Enlarge Specify the size of the copies compared to the...button to Page 2 x 2 Poster 3 x 3 Poster 4 x 4 Poster Borderless Quality Specify the copy quality. Collate Specify whether or not the printer should collate the copies. If you have an optional input tray, you can also specify the paper source. For more information, see Paper Handling Menu....
... 2-->2 (2-Sided Original, 2-Sided Copy) N-up Off* On 2-Sided Copies Select your preferred option for printing on a single page. 1-up* 2-up Specify how many different images or pages of the blank paper loaded in the input tray. 1-99 Reduce/Enlarge Specify the size of the copies compared to the...button to Page 2 x 2 Poster 3 x 3 Poster 4 x 4 Poster Borderless Quality Specify the copy quality. Collate Specify whether or not the printer should collate the copies. If you have an optional input tray, you can also specify the paper source. For more information, see Paper Handling Menu....

User Guide
Page 48
... Using Date Print only photos created in the input tray. If you have an optional input tray, you can also specify the paper source. One Photo Centered 1 per page 2 per page 3 per page 4 per page 6 per page 8 per page 16 per page Quality Specify the quality of the blank paper loaded in a certain...
... Using Date Print only photos created in the input tray. If you have an optional input tray, you can also specify the paper source. One Photo Centered 1 per page 2 per page 3 per page 4 per page 6 per page 8 per page 16 per page Quality Specify the quality of the blank paper loaded in a certain...

User Guide
Page 50
Handling and type of the blank paper loaded in the input tray. From the main menu, press the up or down Arrow button to scroll to an active analog telephone line. Contact your Internet Service Provider for faxing to function properly: The printer's FAX connector ( -left connector) must be connected...History Phone Book Auto Answer Schedule Paper Handling Blocked Fax Name Search Blocked Fax Add Entry Print Blocked Fax Entry Number Search To view or change the Fax Mode menu: 1. See Setting Up the Printer With External Devices for setup details. NOTE: You cannot fax with a DSL (digital ...
Handling and type of the blank paper loaded in the input tray. From the main menu, press the up or down Arrow button to scroll to an active analog telephone line. Contact your Internet Service Provider for faxing to function properly: The printer's FAX connector ( -left connector) must be connected...History Phone Book Auto Answer Schedule Paper Handling Blocked Fax Name Search Blocked Fax Add Entry Print Blocked Fax Entry Number Search To view or change the Fax Mode menu: 1. See Setting Up the Printer With External Devices for setup details. NOTE: You cannot fax with a DSL (digital ...

User Guide
Page 59
...fax header of the blank paper loaded in the input tray. Use the keypad to include a cover page on the cover page of your outgoing faxes. Standard* Fine Superfine Ultrafine Lighter/Darker Press the left or right Arrow button is shown on outgoing faxes. 2 Sided Print Paper Press the ...Menu You can also specify the paper source. This number is default). No* Yes Color Specify the color of outgoing faxes. Touch-tone* Pulse Behind PBX (Dial Tone Detect Off) Redial Time Specify the time the printer waits before redialing failed faxes. 1 Minute If you have an optional input tray, you...
...fax header of the blank paper loaded in the input tray. Use the keypad to include a cover page on the cover page of your outgoing faxes. Standard* Fine Superfine Ultrafine Lighter/Darker Press the left or right Arrow button is shown on outgoing faxes. 2 Sided Print Paper Press the ...Menu You can also specify the paper source. This number is default). No* Yes Color Specify the color of outgoing faxes. Touch-tone* Pulse Behind PBX (Dial Tone Detect Off) Redial Time Specify the time the printer waits before redialing failed faxes. 1 Minute If you have an optional input tray, you...

User Guide
Page 66
...Copy Default Settings Press the Select button to enter the PictBridge Default Settings menu. Change Scan Default Settings Press the Select button to print a list of the blank paper loaded in the input tray. 8.5x11"* 8.5x14" A4* B5 A5 A6 L 2L Hagaki 3x5" For more information,... item Paper Handling menu for printer with one input tray Size Specify the size of the paper loaded in the input tray from the Setup menu, Copy Mode menu, Photo Print Settings menu, Photo Default Settings menu, Print File Default Settings menu, Fax Printing menu, or Bluetooth Default Settings...
...Copy Default Settings Press the Select button to enter the PictBridge Default Settings menu. Change Scan Default Settings Press the Select button to print a list of the blank paper loaded in the input tray. 8.5x11"* 8.5x14" A4* B5 A5 A6 L 2L Hagaki 3x5" For more information,... item Paper Handling menu for printer with one input tray Size Specify the size of the paper loaded in the input tray from the Setup menu, Copy Mode menu, Photo Print Settings menu, Photo Default Settings menu, Print File Default Settings menu, Fax Printing menu, or Bluetooth Default Settings...

User Guide
Page 77
Automatic* Borderless (1 per page) One Photo Centered 1 per page 2 per page 3 per page 4 per page 6 per page 8 per page 16 per page Quality Specify the quality of the printed photos. If you have an optional input tray, you selected during initial setup. Layout Specify the size of your printed photos. For more information, see.... Auto* Draft Normal Photo Paper Press the Select button to enter the Paper Handling menu, and then select the size Handling and type of the blank paper loaded in the input tray.
Automatic* Borderless (1 per page) One Photo Centered 1 per page 2 per page 3 per page 4 per page 6 per page 8 per page 16 per page Quality Specify the quality of the printed photos. If you have an optional input tray, you selected during initial setup. Layout Specify the size of your printed photos. For more information, see.... Auto* Draft Normal Photo Paper Press the Select button to enter the Paper Handling menu, and then select the size Handling and type of the blank paper loaded in the input tray.

User Guide
Page 116
... dialog box closes. 9. Turn on the front sides of the paper. 1. With your computer and printer, and make sure they are connected. 2. Reload the document with the blank side of the paper facing down, and print the even-numbered pages of the document on your computer screen. After customizing your settings, click OK...
... dialog box closes. 9. Turn on the front sides of the paper. 1. With your computer and printer, and make sure they are connected. 2. Reload the document with the blank side of the paper facing down, and print the even-numbered pages of the document on your computer screen. After customizing your settings, click OK...

User Guide
Page 154
... 1. From the main menu, press the up or down Arrow button to scroll to print on envelopes, card stock, or photo paper. 1. With an optional duplex unit, there is still blank. It picks the paper and allows the printer to 2-Sided Copies. 4. Do not make duplex copies on the side that is no...
... 1. From the main menu, press the up or down Arrow button to scroll to print on envelopes, card stock, or photo paper. 1. With an optional duplex unit, there is still blank. It picks the paper and allows the printer to 2-Sided Copies. 4. Do not make duplex copies on the side that is no...


