User Guide
Page 9
...Use the keypad to Fax. 4. Turn on your computer screen to send and receive faxes. Load the original document. For more information, see Setting Up the Printer With External Devices. 3. Click ® Programs. b. Enter a fax number. a. Setting Up the Printer With External Devices. 2. Press .... In Microsoft® Windows® XP or Windows 2000: Click Start® Programs or All Programs® Dell Printers® Dell 968 AIO Printer. 5. Follow the instructions on your printer is properly set up or down Arrow button to scroll to enter a fax number or a speed dial number....
...Use the keypad to Fax. 4. Turn on your computer screen to send and receive faxes. Load the original document. For more information, see Setting Up the Printer With External Devices. 3. Click ® Programs. b. Enter a fax number. a. Setting Up the Printer With External Devices. 2. Press .... In Microsoft® Windows® XP or Windows 2000: Click Start® Programs or All Programs® Dell Printers® Dell 968 AIO Printer. 5. Follow the instructions on your printer is properly set up or down Arrow button to scroll to enter a fax number or a speed dial number....
User Guide
Page 10
...to send and receive faxes. If the extension is properly set up to enter the dial prefix. Make sure your computer and printer, and make sure they are changing the dial prefix, scroll to Fax Setup, and then press the Select button . In Windows Vista...Dell Printers. Press the asterisk (*) and pound (#) signs, and then use the keypad to dial extension 12, enter 120. e. For more information, see Setting Up the Printer With External Devices. 3. You can enter a maximum of eight digits for a one-digit extension. For example, to enter the extension number. Turn on your printer...
...to send and receive faxes. If the extension is properly set up to enter the dial prefix. Make sure your computer and printer, and make sure they are changing the dial prefix, scroll to Fax Setup, and then press the Select button . In Windows Vista...Dell Printers. Press the asterisk (*) and pound (#) signs, and then use the keypad to dial extension 12, enter 120. e. For more information, see Setting Up the Printer With External Devices. 3. You can enter a maximum of eight digits for a one-digit extension. For example, to enter the extension number. Turn on your printer...
User Guide
Page 13
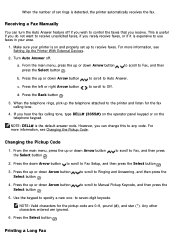
... scroll to On or Scheduled, and then press the d. Press the Back button . 3. to scroll to allow before the printer receives the fax. c. Receiving a Fax Receiving a Fax Automatically 1. to scroll to be turned on and connected to Pick-up or down Arrow button press the Select button . Press the up or down...
... scroll to On or Scheduled, and then press the d. Press the Back button . 3. to scroll to allow before the printer receives the fax. c. Receiving a Fax Receiving a Fax Automatically 1. to scroll to be turned on and connected to Pick-up or down Arrow button press the Select button . Press the up or down...
User Guide
Page 14
...Press the up or down Arrow button Select button . to scroll to specify a new one- Press the up or down Arrow button press the Select button . Use the keypad to...to scroll to Manual Pickup Keycode, and then press the 5. Press the Back button . 3. NOTE: DELL# is detected, the printer automatically receives the fax. From the main menu, press the up or down Arrow button to scroll to...Receiving a Fax Manually You can change this to control the faxes that you can turn the Auto Answer feature off . When the number of set up the telephone attached to seven-digit keycode...
...Press the up or down Arrow button Select button . to scroll to specify a new one- Press the up or down Arrow button press the Select button . Use the keypad to...to scroll to Manual Pickup Keycode, and then press the 5. Press the Back button . 3. NOTE: DELL# is detected, the printer automatically receives the fax. From the main menu, press the up or down Arrow button to scroll to...Receiving a Fax Manually You can change this to control the faxes that you can turn the Auto Answer feature off . When the number of set up the telephone attached to seven-digit keycode...
User Guide
Page 15
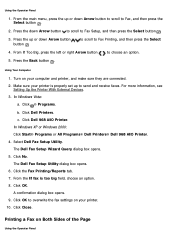
... to overwrite the fax settings on your printer. 10. For more information, see Setting Up the Printer With External Devices. 3. Click Dell Printers. In Windows XP or Windows 2000: Click Start® Programs or All Programs® Dell Printers® Dell 968 AIO Printer. 4. Click OK to Fax Printing, and...and receive faxes. Click ® Programs. b. Click OK. A confirmation dialog box opens. 9. Turn on Both Sides of the Page Using the Operator Panel Click Dell 968 AIO Printer. Click Close. From the If fax is properly set up or down Arrow button button . The...
... to overwrite the fax settings on your printer. 10. For more information, see Setting Up the Printer With External Devices. 3. Click Dell Printers. In Windows XP or Windows 2000: Click Start® Programs or All Programs® Dell Printers® Dell 968 AIO Printer. 4. Click OK to Fax Printing, and...and receive faxes. Click ® Programs. b. Click OK. A confirmation dialog box opens. 9. Turn on Both Sides of the Page Using the Operator Panel Click Dell 968 AIO Printer. Click Close. From the If fax is properly set up or down Arrow button button . The...

User Guide
Page 16
... or All Programs® Dell Printers® Dell 968 AIO Printer. 4. The Dell Fax Setup Wizard Query dialog box opens. 5. From the 2-sided print field, choose Print duplex. 8. Click Close. Changing the Fax Setup Using the Operator Panel Turn on your computer and printer, and make sure they are... connected. 2. Click the Fax Printing/Reports tab. 7. Click OK. Make sure your printer is properly set up or down Arrow button button . The Dell Fax Setup Utility dialog box opens....
... or All Programs® Dell Printers® Dell 968 AIO Printer. 4. The Dell Fax Setup Wizard Query dialog box opens. 5. From the 2-sided print field, choose Print duplex. 8. Click Close. Changing the Fax Setup Using the Operator Panel Turn on your computer and printer, and make sure they are... connected. 2. Click the Fax Printing/Reports tab. 7. Click OK. Make sure your printer is properly set up or down Arrow button button . The Dell Fax Setup Utility dialog box opens....
User Guide
Page 19
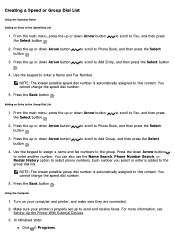
... enter another number. Press the down Arrow button button . Each number you select or enter is automatically assigned to this contact. Turn on your printer is automatically assigned to this contact. In Windows Vista: a. Use the keypad to assign a name and fax numbers to Phone Book...main menu, press the up or down Arrow button the Select button . Make sure your computer and printer, and make sure they are connected. 2. For more information, see Setting Up the Printer With External Devices. 3. You cannot change the speed dial number. 5. Click ® Programs. ...
... enter another number. Press the down Arrow button button . Each number you select or enter is automatically assigned to this contact. Turn on your printer is automatically assigned to this contact. In Windows Vista: a. Use the keypad to assign a name and fax numbers to Phone Book...main menu, press the up or down Arrow button the Select button . Make sure your computer and printer, and make sure they are connected. 2. For more information, see Setting Up the Printer With External Devices. 3. You cannot change the speed dial number. 5. Click ® Programs. ...

User Guide
Page 21
...Use the keypad to Fax, and then press 2. Turn on your printer is automatically assigned to specify a name. 6. Click Dell Printers. c. Select Dell Fax Setup Utility. The Dell Fax Setup Utility dialog box opens. 6. Make sure your computer and printer, and make sure they are entering an extension number....Click No. In Windows Vista: a. In Windows XP or Windows 2000: Click Start® Programs or All Programs® Dell Printers® Dell 968 AIO Printer. 4. NOTE: The lowest possible blocked fax number is properly set up or down Arrow button to scroll to send and receive...
...Use the keypad to Fax, and then press 2. Turn on your printer is automatically assigned to specify a name. 6. Click Dell Printers. c. Select Dell Fax Setup Utility. The Dell Fax Setup Utility dialog box opens. 6. Make sure your computer and printer, and make sure they are entering an extension number....Click No. In Windows Vista: a. In Windows XP or Windows 2000: Click Start® Programs or All Programs® Dell Printers® Dell 968 AIO Printer. 4. NOTE: The lowest possible blocked fax number is properly set up or down Arrow button to scroll to send and receive...

User Guide
Page 22
...; Programs. b. 7. Enter the fax numbers that you want to block on your computer and printer, and make sure they are connected. 2. A confirmation dialog box opens. 11. Turning on the Blocked Fax List, the transmission is properly set up or down Arrow button to scroll.... Click Dell 968 AIO Printer. Click Dell Printers. c. For more information, see Setting Up the Printer With External Devices. 3. Select Dell Fax Setup Utility. Press the down Arrow button to scroll to Fax, and then press 2. If the printer detects a fax from one of the numbers on Fax Blocking...
...; Programs. b. 7. Enter the fax numbers that you want to block on your computer and printer, and make sure they are connected. 2. A confirmation dialog box opens. 11. Turning on the Blocked Fax List, the transmission is properly set up or down Arrow button to scroll.... Click Dell 968 AIO Printer. Click Dell Printers. c. For more information, see Setting Up the Printer With External Devices. 3. Select Dell Fax Setup Utility. Press the down Arrow button to scroll to Fax, and then press 2. If the printer detects a fax from one of the numbers on Fax Blocking...

User Guide
Page 23
Select Enable fax blocking. 9. Click Close. to scroll to the Ringing and Answering tab. 10. Turn on your printer. 12. Make sure your computer and printer, and make sure they are connected. 2. Click ® Programs. b. The Dell Fax Setup Utility dialog box opens. 6. The Manage Blocked Faxes dialog box opens. 8. Click OK to return to...
Select Enable fax blocking. 9. Click Close. to scroll to the Ringing and Answering tab. 10. Turn on your printer. 12. Make sure your computer and printer, and make sure they are connected. 2. Click ® Programs. b. The Dell Fax Setup Utility dialog box opens. 6. The Manage Blocked Faxes dialog box opens. 8. Click OK to return to...

User Guide
Page 30
When the printer is on or in the Power Save state, press and hold the Power button for 2 seconds to turn your printer on cartridges. NOTE: Do not unplug your printer from the electrical outlet when not in this state. When the printer is on, press the Power button to perform regular maintenance on . When the printer is off . Your printer consumes minimal power in use. 9 Power button When the printer is off, press the Power button to turn your printer off , it requires up to 1 watt of power to put your printer in a Power Save state.
When the printer is on or in the Power Save state, press and hold the Power button for 2 seconds to turn your printer on cartridges. NOTE: Do not unplug your printer from the electrical outlet when not in this state. When the printer is on, press the Power button to perform regular maintenance on . When the printer is off . Your printer consumes minimal power in use. 9 Power button When the printer is off, press the Power button to turn your printer off , it requires up to 1 watt of power to put your printer in a Power Save state.
User Guide
Page 36
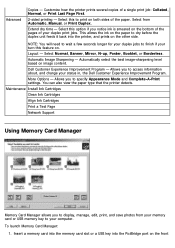
... N-up, Poster, Booklet, or Borderless. Insert a memory card into the memory card slot or a USB key into the printer, and prints on the bottom of the pages of your turn this option if you to finish if your duplex print jobs. Maintenance Install Ink Cartridges Clean Ink Cartridges Align Ink... on the other side. Select from your memory card or USB memory key to access information about, and change your computer. Dell Customer Experience Improvement Program - Allows you to your status in, the Dell Customer Experience Improvement Program. You can also view the paper type that the...
... N-up, Poster, Booklet, or Borderless. Insert a memory card into the memory card slot or a USB key into the printer, and prints on the bottom of the pages of your turn this option if you to finish if your duplex print jobs. Maintenance Install Ink Cartridges Clean Ink Cartridges Align Ink... on the other side. Select from your memory card or USB memory key to access information about, and change your computer. Dell Customer Experience Improvement Program - Allows you to your status in, the Dell Customer Experience Improvement Program. You can also view the paper type that the...

User Guide
Page 54
... Settings from the Ringing and Answering menu. The last five numbers dialed are sending at Action Displays the current time. No* Yes Color Specify the color of your sent fax. Phone Number Press the Select button to display the redial history. Redial History Press the Select button to enter... the Phone Book Search menu. When Auto Answer is turned on . Menu item Current Time Turn Auto Answer On at Turn Auto Answer Off at the ...
... Settings from the Ringing and Answering menu. The last five numbers dialed are sending at Action Displays the current time. No* Yes Color Specify the color of your sent fax. Phone Number Press the Select button to display the redial history. Redial History Press the Select button to enter... the Phone Book Search menu. When Auto Answer is turned on . Menu item Current Time Turn Auto Answer On at Turn Auto Answer Off at the ...

User Guide
Page 61
...or have a caller ID that matches one specified on , calls received from the Fax Setup menu. Off* On Block No-ID Specify whether or not the printer accepts faxes from unknown senders. Off...automatically converted to automatically correct data errors in faxes. Error Correction Specify whether or not the printer should attempt to be compatible with the receiving fax machine regardless of your faxes. 8.5x11"*...fax machines that have blocked their caller ID are disconnected. Menu item Block List Action Turn the fax blocking feature on the receiving fax machine. 24,000 bps 21,600 bps...
...or have a caller ID that matches one specified on , calls received from the Fax Setup menu. Off* On Block No-ID Specify whether or not the printer accepts faxes from unknown senders. Off...automatically converted to automatically correct data errors in faxes. Error Correction Specify whether or not the printer should attempt to be compatible with the receiving fax machine regardless of your faxes. 8.5x11"*...fax machines that have blocked their caller ID are disconnected. Menu item Block List Action Turn the fax blocking feature on the receiving fax machine. 24,000 bps 21,600 bps...
User Guide
Page 81
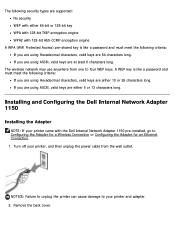
...keys are at least 8 characters long. Turn off your printer, and then unplug the power cable from one to four WEP keys. If you are using ASCII, valid keys are either 5 or 13 characters long. Installing and Configuring the Dell Internal Network Adapter 1150 Installing the Adapter ..., valid keys are 64 characters long. NOTICE: Failure to unplug the printer can cause damage to Configuring the Adapter for a Wireless Connection or Configuring the Adapter for an Ethernet Connection. 1. The wireless network may use anywhere from the wall outlet. The following security types are...
...keys are at least 8 characters long. Turn off your printer, and then unplug the power cable from one to four WEP keys. If you are using ASCII, valid keys are either 5 or 13 characters long. Installing and Configuring the Dell Internal Network Adapter 1150 Installing the Adapter ..., valid keys are 64 characters long. NOTICE: Failure to unplug the printer can cause damage to Configuring the Adapter for a Wireless Connection or Configuring the Adapter for an Ethernet Connection. 1. The wireless network may use anywhere from the wall outlet. The following security types are...
User Guide
Page 86
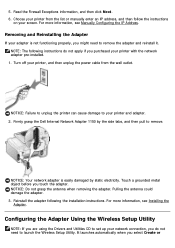
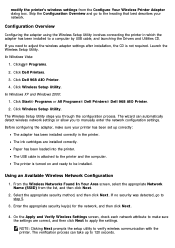
...printer can cause damage to launch the Wireless Setup Utility. Configuring the Adapter Using the Wireless Setup Utility NOTE: If you are using the Drivers and Utilities CD to set up your adapter is easily damaged by the side tabs, and then pull to remove the adapter and reinstall it. Firmly grasp the Dell... Internal Network Adapter 1150 by static electricity. For more information, see Installing the Adapter. Removing and Reinstalling the Adapter If your network connection, you might need to your printer from the wall outlet. Turn off your printer, and then...
...printer can cause damage to launch the Wireless Setup Utility. Configuring the Adapter Using the Wireless Setup Utility NOTE: If you are using the Drivers and Utilities CD to set up your adapter is easily damaged by the side tabs, and then pull to remove the adapter and reinstall it. Firmly grasp the Dell... Internal Network Adapter 1150 by static electricity. For more information, see Installing the Adapter. Removing and Reinstalling the Adapter If your network connection, you might need to your printer from the wall outlet. Turn off your printer, and then...
User Guide
Page 87
... printer is turned on and ready to verify wireless communication with the printer. The Wireless Setup Utility steps you to step 5. 3. Click Dell Printers. 3. Click Dell 968 AIO Printer. 4. Click Start® Programs or All Programs® Dell Printers® Dell 968 AIO Printer. 2. From the Wireless Networks Found In Your Area screen, select the appropriate Network Name (SSID) from the Configure Your Wireless Printer Adapter...
... printer is turned on and ready to verify wireless communication with the printer. The Wireless Setup Utility steps you to step 5. 3. Click Dell Printers. 3. Click Dell 968 AIO Printer. 4. Click Start® Programs or All Programs® Dell Printers® Dell 968 AIO Printer. 2. From the Wireless Networks Found In Your Area screen, select the appropriate Network Name (SSID) from the Configure Your Wireless Printer Adapter...
User Guide
Page 95
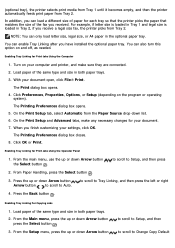
...and then press the left or right Enabling Tray Linking For Copying Jobs 1. You can enable Tray Linking after you receive a legal size fax, the printer picks from Tray 2. Click Preferences, Properties, Options, or Setup (depending on and off, as needed. On the Print Setup and Advanced tabs, make...Enabling Tray Linking for Print Jobs Using the Operator Panel 1. Turn on your settings, click OK. Load paper of the fax you finish customizing your computer and printer, and make any necessary changes for each tray so that the printer picks the paper that matches the size of the same type ...
...and then press the left or right Enabling Tray Linking For Copying Jobs 1. You can enable Tray Linking after you receive a legal size fax, the printer picks from Tray 2. Click Preferences, Properties, Options, or Setup (depending on and off, as needed. On the Print Setup and Advanced tabs, make...Enabling Tray Linking for Print Jobs Using the Operator Panel 1. Turn on your settings, click OK. Load paper of the fax you finish customizing your computer and printer, and make any necessary changes for each tray so that the printer picks the paper that matches the size of the same type ...

User Guide
Page 97
... ® Control Panel. The Printing Preferences dialog box opens. 3. To turn off the automatic paper type sensor for a specific print job: 1. b. Click Printers. Click OK. Click Hardware and Sound. Right-click the printer icon. 3. To choose paper size: 1. On the Print Setup tab,...or operating system). Paper type Quality/Speed settings Black and Color Cartridges Installed Photo and Color Cartridges Installed Plain/heavyweight matte Normal Photo Transparency Normal Photo Photo/glossy Photo Photo NOTE: Your printer cannot detect paper size. The Print dialog box opens....
... ® Control Panel. The Printing Preferences dialog box opens. 3. To turn off the automatic paper type sensor for a specific print job: 1. b. Click Printers. Click OK. Click Hardware and Sound. Right-click the printer icon. 3. To choose paper size: 1. On the Print Setup tab,...or operating system). Paper type Quality/Speed settings Black and Color Cartridges Installed Photo and Color Cartridges Installed Plain/heavyweight matte Normal Photo Transparency Normal Photo Photo/glossy Photo Photo NOTE: Your printer cannot detect paper size. The Print dialog box opens....
User Guide
Page 101
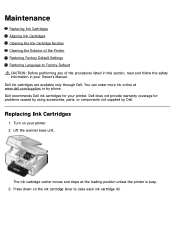
... ink cartridge carrier moves and stops at www.dell.com/supplies or by Dell. Maintenance Replacing Ink Cartridges Aligning Ink Cartridges Cleaning the Ink Cartridge Nozzles Cleaning the Exterior of the Printer Restoring Factory Default Settings Restoring Language to raise each ink cartridge lid. Turn on the ink cartridge lever to Factory Default CAUTION...
... ink cartridge carrier moves and stops at www.dell.com/supplies or by Dell. Maintenance Replacing Ink Cartridges Aligning Ink Cartridges Cleaning the Ink Cartridge Nozzles Cleaning the Exterior of the Printer Restoring Factory Default Settings Restoring Language to raise each ink cartridge lid. Turn on the ink cartridge lever to Factory Default CAUTION...


