User's Guide
Page 12
... print a fax report For more information, see Setting Up the Printer With External Devices. 2. In Windows Vista: a. c. Click Dell 968 AIO Printer. The Dell Fax Solutions Software dialog box opens. 3. Make sure your printer for On Hook dialing. 1. Click ® Programs. b. Follow the instructions on the scanner glass. For more information, see Fax Mode. Using Your...
... print a fax report For more information, see Setting Up the Printer With External Devices. 2. In Windows Vista: a. c. Click Dell 968 AIO Printer. The Dell Fax Solutions Software dialog box opens. 3. Make sure your printer for On Hook dialing. 1. Click ® Programs. b. Follow the instructions on the scanner glass. For more information, see Fax Mode. Using Your...

User's Guide
Page 26
...separately to increase the amount of things. Tray that feeds original documents into the printer. NOTE: The printer (whether it is connected to a computer, you use the Save Photos to Computer function or the Print Files mode. For more information, see Understanding... the Operator Panel. Understanding the Printer Parts Number: Part: 1 Automatic Document Feeder (ADF) 2 Scanner base unit 3 Operator panel 4 Paper tray 5 ...
...separately to increase the amount of things. Tray that feeds original documents into the printer. NOTE: The printer (whether it is connected to a computer, you use the Save Photos to Computer function or the Print Files mode. For more information, see Understanding... the Operator Panel. Understanding the Printer Parts Number: Part: 1 Automatic Document Feeder (ADF) 2 Scanner base unit 3 Operator panel 4 Paper tray 5 ...
User's Guide
Page 98
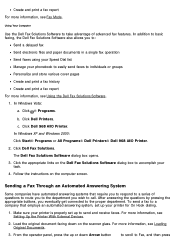
....4 - 355.6 mm) The document is recommended for scanning, copying, and faxing. The ADF is loaded text side up . Adjust the paper guide on the scanner glass. 2. The paper guide rests against the edges of legal size paper The document is loaded text side up . 4. Click OK. The paper guide rests...the paper. Load an original document text side up . Loading Original Documents Into the ADF You can load up . NOTE: Do not load postcards, photos, small items, or thin media (such as magazine clippings) into the ADF. The paper guide rests against the edge of the paper. 50 sheets ...
....4 - 355.6 mm) The document is recommended for scanning, copying, and faxing. The ADF is loaded text side up . Adjust the paper guide on the scanner glass. 2. The paper guide rests against the edges of legal size paper The document is loaded text side up . 4. Click OK. The paper guide rests...the paper. Load an original document text side up . Loading Original Documents Into the ADF You can load up . NOTE: Do not load postcards, photos, small items, or thin media (such as magazine clippings) into the ADF. The paper guide rests against the edge of the paper. 50 sheets ...
User's Guide
Page 99
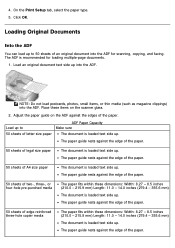
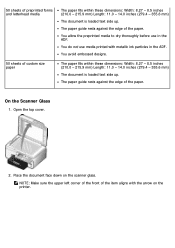
... rests against the edge of the paper. You do not use in the ADF. Open the top cover. 2. Place the document face down on the printer. 50 sheets of preprinted forms and letterhead media 50 sheets of custom size paper The paper fits within these dimensions: Width: 8.27 - 8.5 inches (...210.0 - 215.9 mm) Length: 11.0 - 14.0 inches (279.4 - 355.6 mm) The document is loaded text side up . On the Scanner Glass 1. You avoid embossed designs. The paper guide rests against the edge of the paper. You allow the preprinted media to dry thoroughly before use...
... rests against the edge of the paper. You do not use in the ADF. Open the top cover. 2. Place the document face down on the printer. 50 sheets of preprinted forms and letterhead media 50 sheets of custom size paper The paper fits within these dimensions: Width: 8.27 - 8.5 inches (...210.0 - 215.9 mm) Length: 11.0 - 14.0 inches (279.4 - 355.6 mm) The document is loaded text side up . On the Scanner Glass 1. You avoid embossed designs. The paper guide rests against the edge of the paper. You allow the preprinted media to dry thoroughly before use...
User's Guide
Page 101
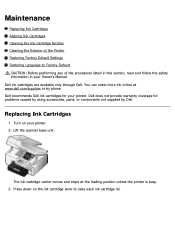
Lift the scanner base unit. Maintenance Replacing Ink Cartridges Aligning Ink Cartridges Cleaning the Ink Cartridge Nozzles Cleaning the Exterior of the Printer Restoring Factory Default Settings Restoring Language to raise each ink cartridge lid. Dell does not provide warranty coverage for your printer. Dell ink cartridges are available only through Dell. Replacing Ink Cartridges 1. You can...
Lift the scanner base unit. Maintenance Replacing Ink Cartridges Aligning Ink Cartridges Cleaning the Ink Cartridge Nozzles Cleaning the Exterior of the Printer Restoring Factory Default Settings Restoring Language to raise each ink cartridge lid. Dell does not provide warranty coverage for your printer. Dell ink cartridges are available only through Dell. Replacing Ink Cartridges 1. You can...
User's Guide
Page 103
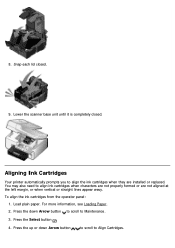
... margin, or when vertical or straight lines appear wavy. For more information, see Loading Paper. 2. Lower the scanner base unit until it is completely closed . 9. 8. Snap each lid closed . Aligning Ink Cartridges Your printer automatically prompts you to align ink cartridges when characters are not properly formed or are installed or replaced...
... margin, or when vertical or straight lines appear wavy. For more information, see Loading Paper. 2. Lower the scanner base unit until it is completely closed . 9. 8. Snap each lid closed . Aligning Ink Cartridges Your printer automatically prompts you to align ink cartridges when characters are not properly formed or are installed or replaced...
User's Guide
Page 128
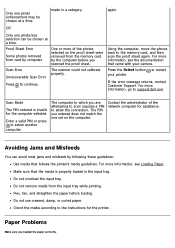
Scan Error The scanner could not calibrate properly. Using the computer, move the photos back to continue. Make sure that the ... Use media that came with your printer. OR Only one photo/size selection can avoid most jams and misfeeds by the computer before loading. Proof Sheet Error Some photos removed from the input tray while printing...card by computer One or more information, see the documentation that follows the printer's media guidelines. Orient the media according to select another computer. made in the input tray. The computer to support.dell.com Scan Mode...
Scan Error The scanner could not calibrate properly. Using the computer, move the photos back to continue. Make sure that the ... Use media that came with your printer. OR Only one photo/size selection can avoid most jams and misfeeds by the computer before loading. Proof Sheet Error Some photos removed from the input tray while printing...card by computer One or more information, see the documentation that follows the printer's media guidelines. Orient the media according to select another computer. made in the input tray. The computer to support.dell.com Scan Mode...
User's Guide
Page 129
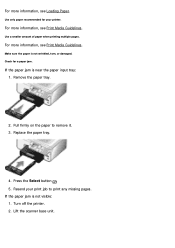
For more information, see Print Media Guidelines. Remove the paper tray. 2. Resend your printer. Lift the scanner base unit. Use a smaller amount of paper when printing multiple pages. Pull firmly on the paper to print any missing pages. Turn off the printer. 2. Check for your print job to remove it. 3. Press the Select button...
For more information, see Print Media Guidelines. Remove the paper tray. 2. Resend your printer. Lift the scanner base unit. Use a smaller amount of paper when printing multiple pages. Pull firmly on the paper to print any missing pages. Turn off the printer. 2. Check for your print job to remove it. 3. Press the Select button...
User's Guide
Page 130
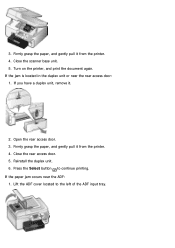
Turn on the printer, and print the document again. Firmly grasp the paper, and gently pull it . 2. Press the Select button to the left of the ADF input tray. If the paper jam occurs near the rear access door: 1. Close the scanner base unit. 5. If the jam is located in the ...duplex unit or near the ADF: 1. Lift the ADF cover located to continue printing. Close the rear access door. 5. Reinstall the duplex unit. 6. 3. If you have a duplex unit, remove it from the printer. 4. Open the rear access...
Turn on the printer, and print the document again. Firmly grasp the paper, and gently pull it . 2. Press the Select button to the left of the ADF input tray. If the paper jam occurs near the rear access door: 1. Close the scanner base unit. 5. If the jam is located in the ...duplex unit or near the ADF: 1. Lift the ADF cover located to continue printing. Close the rear access door. 5. Reinstall the duplex unit. 6. 3. If you have a duplex unit, remove it from the printer. 4. Open the rear access...
User's Guide
Page 133
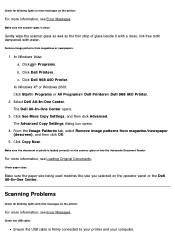
... or photo is loaded correctly on the operator panel or the Dell All-In-One Center. The Advanced Copy Settings dialog box opens. 4. In Windows Vista: a. Click ® Programs. b. Select Dell All-In-One Center. For more information, see Error Messages. Gently wipe the scanner glass as... or error messages on the printer. In Windows XP or Windows 2000: Click Start® Programs or All Programs® Dell Printers® Dell 968 AIO Printer. 2. Ensure the USB cable is clean. Check for blinking lights and error messages on the printer. Click Dell Printers. Click Dell 968 AIO...
... or photo is loaded correctly on the operator panel or the Dell All-In-One Center. The Advanced Copy Settings dialog box opens. 4. In Windows Vista: a. Click ® Programs. b. Select Dell All-In-One Center. For more information, see Error Messages. Gently wipe the scanner glass as... or error messages on the printer. In Windows XP or Windows 2000: Click Start® Programs or All Programs® Dell Printers® Dell 968 AIO Printer. 2. Ensure the USB cable is clean. Check for blinking lights and error messages on the printer. Click Dell Printers. Click Dell 968 AIO...

User's Guide
Page 136
Make sure the document or photo is loaded correctly on and it is not listed, select Search for more information. Make sure the scanner glass is connected to an active analog telephone line. When sending color pages, set the printer to Fax, and then press 2. NOTE: If the program you ...; Dell 968 AIO Printer. 2. The Dell All-In-One Center opens. 3. On the next screen, click Add to the list. to scroll to save the changes. For more in the drop-down Arrow button Select button . Contact your computer, and the USB cable is turned on the scanner glass or into the ...
Make sure the document or photo is loaded correctly on and it is not listed, select Search for more information. Make sure the scanner glass is connected to an active analog telephone line. When sending color pages, set the printer to Fax, and then press 2. NOTE: If the program you ...; Dell 968 AIO Printer. 2. The Dell All-In-One Center opens. 3. On the next screen, click Add to the list. to scroll to save the changes. For more in the drop-down Arrow button Select button . Contact your computer, and the USB cable is turned on the scanner glass or into the ...

User's Guide
Page 143
...NOTE: Make sure you want to Your Computer. 2. Print Sheet Using Date Range Print only photos created in preparation for step 6. 5. The proof sheet prints. NOTE: After printing a proof sheet, the printer automatically highlights Scan Proof Sheet in a certain date range. For more information, see Loading Paper...USB key. Load the proof sheet facing down Arrow button Select button . Follow the instructions on the scanner glass, and then press the Select button . Fill in a different file format, the photos must be printed directly from To Print Sheet with the red-eye icon below...
...NOTE: Make sure you want to Your Computer. 2. Print Sheet Using Date Range Print only photos created in preparation for step 6. 5. The proof sheet prints. NOTE: After printing a proof sheet, the printer automatically highlights Scan Proof Sheet in a certain date range. For more information, see Loading Paper...USB key. Load the proof sheet facing down Arrow button Select button . Follow the instructions on the scanner glass, and then press the Select button . Fill in a different file format, the photos must be printed directly from To Print Sheet with the red-eye icon below...
User's Guide
Page 146
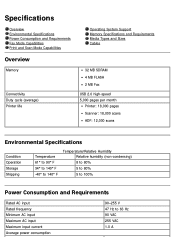
... Support Memory Specifications and Requirements Media Types and Sizes Cables 32 MB SDRAM 4 MB FLASH 2 MB Fax USB 2.0 high-speed 5,000 pages per month Printer: 18,000 pages Scanner: 18,000 scans ADF: 12,000 scans Environmental Specifications Condition Operation Storage Shipping Temperature 61° to 90° F 34° to 140...
... Support Memory Specifications and Requirements Media Types and Sizes Cables 32 MB SDRAM 4 MB FLASH 2 MB Fax USB 2.0 high-speed 5,000 pages per month Printer: 18,000 pages Scanner: 18,000 scans ADF: 12,000 scans Environmental Specifications Condition Operation Storage Shipping Temperature 61° to 90° F 34° to 140...

User's Guide
Page 153
... Loading Paper. 3. The Dell All-In-One Center opens. 6. Load photo/glossy paper with the print side facing up. Load your original photo on your computer and printer, and make sure they are connected. 2. Using Your Computer 1. Click Dell 968 AIO Printer. 2. Click Preview Now. 7. Turn on the scanner glass. In Windows Vista: a. c. Load photo/glossy paper with the...
... Loading Paper. 3. The Dell All-In-One Center opens. 6. Load photo/glossy paper with the print side facing up. Load your original photo on your computer and printer, and make sure they are connected. 2. Using Your Computer 1. Click Dell 968 AIO Printer. 2. Click Preview Now. 7. Turn on the scanner glass. In Windows Vista: a. c. Load photo/glossy paper with the...
User's Guide
Page 159
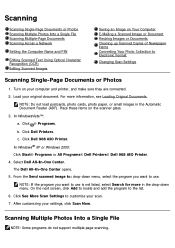
... you want to Electronic Format Changing Scan Settings Scanning Single-Page Documents or Photos 1. The Dell All-In-One Center opens. 5. After customizing your original document. Click Dell 968 AIO Printer. On the next screen, click Add to locate and add the program to...computer and printer, and make sure they are connected. 2. In Windows® XP or Windows 2000: Click Start® Programs or All Programs® Dell Printers® Dell 968 AIO Printer. 4. c. Load your settings, click Scan Now. Click Dell Printers. Click ® Programs. b. Turn on the scanner glass. ...
... you want to Electronic Format Changing Scan Settings Scanning Single-Page Documents or Photos 1. The Dell All-In-One Center opens. 5. After customizing your original document. Click Dell 968 AIO Printer. On the next screen, click Add to locate and add the program to...computer and printer, and make sure they are connected. 2. In Windows® XP or Windows 2000: Click Start® Programs or All Programs® Dell Printers® Dell 968 AIO Printer. 4. c. Load your settings, click Scan Now. Click Dell Printers. Click ® Programs. b. Turn on the scanner glass. ...
User's Guide
Page 160
... output check box. 9. dialog box appears. 11. Repeat until you want to scan another page? Turn on the scanner glass. Turn on the scanner glass, and then click Yes. Click Dell Printers. On the next screen, click Add to locate and add the program to customize your computer and... Scan Settings dialog box opens. 8. When the printer completes scanning the last page or image, a single file containing all pages. 12. Click OK. 10. Select Dell All-In-One Center. From the Send scanned image to: drop-down menu. Click Dell 968 AIO Printer. 1. Click See More Scan Settings to the list...
... output check box. 9. dialog box appears. 11. Repeat until you want to scan another page? Turn on the scanner glass. Turn on the scanner glass, and then click Yes. Click Dell Printers. On the next screen, click Add to locate and add the program to customize your computer and... Scan Settings dialog box opens. 8. When the printer completes scanning the last page or image, a single file containing all pages. 12. Click OK. 10. Select Dell All-In-One Center. From the Send scanned image to: drop-down menu. Click Dell 968 AIO Printer. 1. Click See More Scan Settings to the list...
User's Guide
Page 167
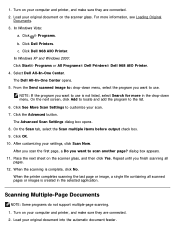
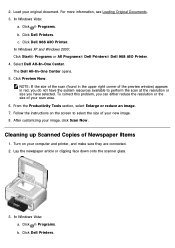
Click Dell Printers. Select Dell All-In-One Center. Follow the instructions on your computer and printer, and make sure they are connected. 2. Turn on the screen to perform the scan at the resolution or size you can either ...174; Programs. b. From the Productivity Tools section, select Enlarge or reduce an image. 7. Load your image, click Scan Now. Click Dell Printers. Lay the newspaper article or clipping face down onto the scanner glass. 3. After customizing your original document. In Windows Vista: a. Click ® Programs. b. To correct this problem, you have ...
Click Dell Printers. Select Dell All-In-One Center. Follow the instructions on your computer and printer, and make sure they are connected. 2. Turn on the screen to perform the scan at the resolution or size you can either ...174; Programs. b. From the Productivity Tools section, select Enlarge or reduce an image. 7. Load your image, click Scan Now. Click Dell Printers. Lay the newspaper article or clipping face down onto the scanner glass. 3. After customizing your original document. In Windows Vista: a. Click ® Programs. b. To correct this problem, you have ...

User's Guide
Page 168
...Printer. Click Dell Printers. Place the photos on your computer and printer, and make sure they are connected. 2. Select the Best Quality or the Best Speed option. 9. Click Preview the image (required). 7. c. Converting Your Photo Collection to save the settings. 11. Click Dell All-In-One Center. The Dell All-In-One Center opens. 4. The Dell All-In-One... In Windows Vista: a. Click Dell All-In-One Center. Click Dell 968 AIO Printer. If you scanned or copied. 10. drop-down menu, select the type of the images. 8. Turn on the scanner glass, spacing them from each ...
...Printer. Click Dell Printers. Place the photos on your computer and printer, and make sure they are connected. 2. Select the Best Quality or the Best Speed option. 9. Click Preview the image (required). 7. c. Converting Your Photo Collection to save the settings. 11. Click Dell All-In-One Center. The Dell All-In-One Center opens. 4. The Dell All-In-One... In Windows Vista: a. Click Dell All-In-One Center. Click Dell 968 AIO Printer. If you scanned or copied. 10. drop-down menu, select the type of the images. 8. Turn on the scanner glass, spacing them from each ...


