Owner's Manual
Page 1
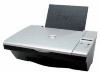
Dell™ Photo All-In-One Printer 922 Owner's Manual Look Inside For: • Ordering Supplies • Getting Started • Using Your Printer • Understanding the Software • Maintenance and Troubleshooting www.dell.com/supplies | support.dell.com
Dell™ Photo All-In-One Printer 922 Owner's Manual Look Inside For: • Ordering Supplies • Getting Started • Using Your Printer • Understanding the Software • Maintenance and Troubleshooting www.dell.com/supplies | support.dell.com
Owner's Manual
Page 2
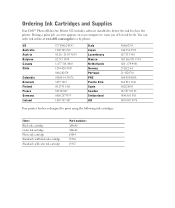
Item: Black ink cartridge Color ink cartridge Photo ink cartridge Standard yield black ink cartridge Standard yield color ink cartridge Part number: M4640 M4646 J4844 J5566 J5567 You can order ink online at www.dell.com/supplies or by phone. During a print job, a screen appears on your computer to print... 800-858-0888 866 851 1760 902120385 08 587 705 81 0848 801 888 0870 907 4574 Your printer has been designed to warn you of low ink levels. Ordering Ink Cartridges and Supplies Your Dell™ Photo All-In-One Printer 922 includes software installed to detect the ink levels in the...
Item: Black ink cartridge Color ink cartridge Photo ink cartridge Standard yield black ink cartridge Standard yield color ink cartridge Part number: M4640 M4646 J4844 J5566 J5567 You can order ink online at www.dell.com/supplies or by phone. During a print job, a screen appears on your computer to print... 800-858-0888 866 851 1760 902120385 08 587 705 81 0848 801 888 0870 907 4574 Your printer has been designed to warn you of low ink levels. Ordering Ink Cartridges and Supplies Your Dell™ Photo All-In-One Printer 922 includes software installed to detect the ink levels in the...
Owner's Manual
Page 3
...) of the Rights in Technical Data and Computer Software clause at DFARS 252.227-7013 and in applicable FAR provisions: Dell Inc., One Dell Way, Round Rock, Texas, 78682, USA. Trademarks used in this document to refer to change without the written permission of... Dell Inc. CAUTION: A CAUTION indicates a potential for property damage, personal injury, or death. is subject to avoid the problem. Microsoft and Windows are trademarks of your printer....
...) of the Rights in Technical Data and Computer Software clause at DFARS 252.227-7013 and in applicable FAR provisions: Dell Inc., One Dell Way, Round Rock, Texas, 78682, USA. Trademarks used in this document to refer to change without the written permission of... Dell Inc. CAUTION: A CAUTION indicates a potential for property damage, personal injury, or death. is subject to avoid the problem. Microsoft and Windows are trademarks of your printer....
Owner's Manual
Page 5
... Paper 18 Print Media Guidelines for the Paper Support 19 Placing Your Document on the Scanner Glass 21 2 Using Your Printer Printing 24 Printing a Document 24 Printing Photos 24 Printing Borderless Photos 25 Printing Other Projects 26 Copying 26 Copying Documents Using the Operator Panel 26 Copying Documents Using Your Computer 27 Copying...
... Paper 18 Print Media Guidelines for the Paper Support 19 Placing Your Document on the Scanner Glass 21 2 Using Your Printer Printing 24 Printing a Document 24 Printing Photos 24 Printing Borderless Photos 25 Printing Other Projects 26 Copying 26 Copying Documents Using the Operator Panel 26 Copying Documents Using Your Computer 27 Copying...
Owner's Manual
Page 6
Scanning 30 Scanning Photos 30 Scanning Multiple Pages or Images 31 Editing Scanned Text Using Optical Character Recognition (OCR) 31 Saving an Image on Your Computer 32 E-mailing a Scanned ... XP 34 Configuring Microsoft Fax 35 Changing the Fax Configuration 36 3 Understanding the Software Understanding the Printer Software 38 Using the Dell Printer Solution Center 38 Using the Dell All-In-One Center 39 Using Print Properties 40 Using Dell Picture Studio v2.0 41 4 Ink Cartridge Maintenance Replacing Ink Cartridges 44 Aligning Ink Cartridges 47 Cleaning...
Scanning 30 Scanning Photos 30 Scanning Multiple Pages or Images 31 Editing Scanned Text Using Optical Character Recognition (OCR) 31 Saving an Image on Your Computer 32 E-mailing a Scanned ... XP 34 Configuring Microsoft Fax 35 Changing the Fax Configuration 36 3 Understanding the Software Understanding the Printer Software 38 Using the Dell Printer Solution Center 38 Using the Dell All-In-One Center 39 Using Print Properties 40 Using Dell Picture Studio v2.0 41 4 Ink Cartridge Maintenance Replacing Ink Cartridges 44 Aligning Ink Cartridges 47 Cleaning...

Owner's Manual
Page 11
SECTION 1 Getting Started Understanding the Printer Parts Accessing Your User's Guide Setting Up Your Printer Using the Operator Panel Understanding the Automatic Paper Type Sensor Loading Paper 1
SECTION 1 Getting Started Understanding the Printer Parts Accessing Your User's Guide Setting Up Your Printer Using the Operator Panel Understanding the Automatic Paper Type Sensor Loading Paper 1
Owner's Manual
Page 12
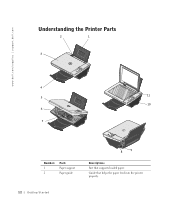
www.dell.com/supplies | support.dell.com Understanding the Printer Parts 2 1 3 4 11 5 10 6 7 Number: 1 2 Part: Paper support Paper guide 8 9 Description: Part that helps the paper feed into the printer properly. 12 Getting Started Guide that supports loaded paper.
www.dell.com/supplies | support.dell.com Understanding the Printer Parts 2 1 3 4 11 5 10 6 7 Number: 1 2 Part: Paper support Paper guide 8 9 Description: Part that helps the paper feed into the printer properly. 12 Getting Started Guide that supports loaded paper.
Owner's Manual
Page 13
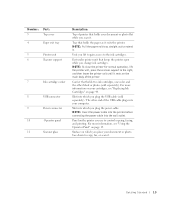
...USB connector 9 Power connector 10 Operator panel 11 Scanner glass Description: Top of printer that holds your document or photo flat while you use to control copying, faxing, and printing. Tray that holds two ink cartridges, one color and the other end of the USB cable plugs into the wall outlet.... NOTE: Insert the power cable into the printer before connecting the power cable ...
...USB connector 9 Power connector 10 Operator panel 11 Scanner glass Description: Top of printer that holds your document or photo flat while you use to control copying, faxing, and printing. Tray that holds two ink cartridges, one color and the other end of the USB cable plugs into the wall outlet.... NOTE: Insert the power cable into the printer before connecting the power cable ...
Owner's Manual
Page 14
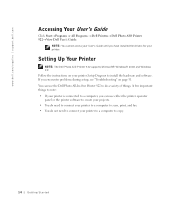
... the Dell Photo All-In-One Printer 922 to copy. 14 Getting Started If you encounter problems during setup, see "Troubleshooting" on your printer to a computer to do not need to connect your printer Setup Diagram to a computer, you have installed the drivers for your printer. Follow the instructions on page 51. Setting Up Your Printer NOTE: The Dell Photo AIO Printer 922...
... the Dell Photo All-In-One Printer 922 to copy. 14 Getting Started If you encounter problems during setup, see "Troubleshooting" on your printer to a computer to do not need to connect your printer Setup Diagram to a computer, you have installed the drivers for your printer. Follow the instructions on page 51. Setting Up Your Printer NOTE: The Dell Photo AIO Printer 922...

Owner's Manual
Page 15
...View the number of copies selected. • View settings for Quality, Dark, and Resize. NOTE: If using your printer is on page 16. 2 Menu button • Scroll through the available menus. The printer is connected to scan, copy, and customize documents. Each time you to a computer). Using the Operator Panel The ...appears on the display. • Feed newly loaded paper. 3 Color Copy button Make a color copy. 4 Scan button Start the scanning process and open the Dell All-In-One Center (if your printer without a computer, this button does not function. Getting Started 15
...View the number of copies selected. • View settings for Quality, Dark, and Resize. NOTE: If using your printer is on page 16. 2 Menu button • Scroll through the available menus. The printer is connected to scan, copy, and customize documents. Each time you to a computer). Using the Operator Panel The ...appears on the display. • Feed newly loaded paper. 3 Color Copy button Make a color copy. 4 Scan button Start the scanning process and open the Dell All-In-One Center (if your printer without a computer, this button does not function. Getting Started 15
Owner's Manual
Page 16
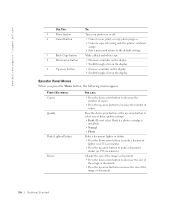
... increase the size of copies. Press the down arrow button or the up arrow button to select one of these quality settings. • Draft (Do not select Draft if a photo cartridge is installed.) • Normal • Photo Make a document lighter or darker. • Press the down arrow button to decrease the number of...; Increase a number on the display. • Scroll through a list on or off. 6 Cancel button • Cancel a scan, print, or copy job in 25% increments). www.dell.com/supplies | support.dell.com Use the: To: 5 Power button Turn your printer on the display.
... increase the size of copies. Press the down arrow button or the up arrow button to select one of these quality settings. • Draft (Do not select Draft if a photo cartridge is installed.) • Normal • Photo Make a document lighter or darker. • Press the down arrow button to decrease the number of...; Increase a number on the display. • Scroll through a list on or off. 6 Cancel button • Cancel a scan, print, or copy job in 25% increments). www.dell.com/supplies | support.dell.com Use the: To: 5 Power button Turn your printer on the display.
Owner's Manual
Page 17
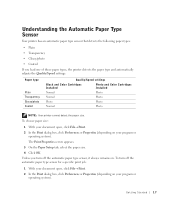
... Quality/Speed settings Black and Color Cartridges Installed Photo and Color Cartridges Installed Normal Photo Normal Photo Photo Photo Normal Photo NOTE: Your printer cannot detect the paper size. To choose paper size: 1 With your document open , ...click File→ Print. 2 In the Print dialog box, click Preferences or Properties (depending on your program or operating system). Unless you load one of these paper types, the printer...
... Quality/Speed settings Black and Color Cartridges Installed Photo and Color Cartridges Installed Normal Photo Normal Photo Photo Photo Normal Photo NOTE: Your printer cannot detect the paper size. To choose paper size: 1 With your document open , ...click File→ Print. 2 In the Print dialog box, click Preferences or Properties (depending on your program or operating system). Unless you load one of these paper types, the printer...
Owner's Manual
Page 18
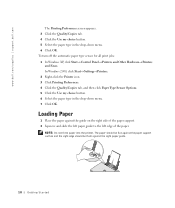
... on the right side of the paper support. 2 Squeeze and slide the left paper guide to the left edge of the paper. www.dell.com/supplies | support.dell.com The Printing Preferences screen appears. 3 Click the Quality/Copies tab. 4 Click the Use my choice button. 5 Select the paper type... in the drop-down menu. 6 Click OK. NOTE: Do not force paper into the printer. Loading Paper 1 Place the paper against the right paper guide. ...
... on the right side of the paper support. 2 Squeeze and slide the left paper guide to the left edge of the paper. www.dell.com/supplies | support.dell.com The Printing Preferences screen appears. 3 Click the Quality/Copies tab. 4 Click the Use my choice button. 5 Select the paper type... in the drop-down menu. 6 Click OK. NOTE: Do not force paper into the printer. Loading Paper 1 Place the paper against the right paper guide. ...
Owner's Manual
Page 19
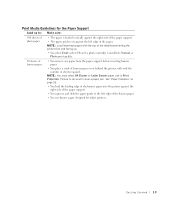
...in Print Properties. NOTE: Load letterhead paper with the top of the letterhead entering the printer first and facing up to: Make sure: 100 sheets of plain paper • The paper is installed), Normal, or Photo print quality. 20 sheets of banner paper • You remove any paper from the ...paper support before inserting banner paper. • You place a stack of banner paper on page 55. • You load the leading edge of the banner paper into the printer against the left ...
...in Print Properties. NOTE: Load letterhead paper with the top of the letterhead entering the printer first and facing up to: Make sure: 100 sheets of plain paper • The paper is installed), Normal, or Photo print quality. 20 sheets of banner paper • You remove any paper from the ...paper support before inserting banner paper. • You place a stack of banner paper on page 55. • You load the leading edge of the banner paper into the printer against the left ...

Owner's Manual
Page 22
www.dell.com/supplies | support.dell.com NOTE: Make sure the upper left corner of the front of the item aligns with the arrow on the printer. 3 Close the top cover. 22 Getting Started
www.dell.com/supplies | support.dell.com NOTE: Make sure the upper left corner of the front of the item aligns with the arrow on the printer. 3 Close the top cover. 22 Getting Started

Owner's Manual
Page 23
SECTION 2 Using Your Printer Printing Copying Scanning Faxing 2
SECTION 2 Using Your Printer Printing Copying Scanning Faxing 2
Owner's Manual
Page 24
...more information, see details about a setting, right-click the setting on page 19. 2 Make sure you have a color cartridge and a photo cartridge (sold separately) installed. The Print Properties dialog box appears. d On the Print Layout tab, select the layout and duplexing settings....(depending on your computer and printer, and make sure they are connected. 2 Load paper with the print (glossy) side facing up . www.dell.com/supplies | support.dell.com Printing Printing a Document 1 Turn on the program or operating system). Printing Photos 1 Load the photo paper with the print side facing...
...more information, see details about a setting, right-click the setting on page 19. 2 Make sure you have a color cartridge and a photo cartridge (sold separately) installed. The Print Properties dialog box appears. d On the Print Layout tab, select the layout and duplexing settings....(depending on your computer and printer, and make sure they are connected. 2 Load paper with the print (glossy) side facing up . www.dell.com/supplies | support.dell.com Printing Printing a Document 1 Turn on the program or operating system). Printing Photos 1 Load the photo paper with the print side facing...

Owner's Manual
Page 25
...For more information, see "Print Media Guidelines for the Paper Support" on page 19. 2 Make sure you have a color cartridge and a photo cartridge installed. 3 With your document open, click File→ Print. 4 To customize your print settings, click Preferences, Properties, Options, or... printing photos. 7 On the Print Layout tab, select the photo layout. 8 When finished customizing your photo, click OK. 9 Click OK or Print (depending on the program or operating system). NOTE: Before placing your photos from sticking together or smudging, remove each photo after it exits the printer. ...
...For more information, see "Print Media Guidelines for the Paper Support" on page 19. 2 Make sure you have a color cartridge and a photo cartridge installed. 3 With your document open, click File→ Print. 4 To customize your print settings, click Preferences, Properties, Options, or... printing photos. 7 On the Print Layout tab, select the photo layout. 8 When finished customizing your photo, click OK. 9 Click OK or Print (depending on the program or operating system). NOTE: Before placing your photos from sticking together or smudging, remove each photo after it exits the printer. ...

Owner's Manual
Page 26
... panel or your printer. 2 Load the paper. NOTE: If you want to print a photo, print on the operator panel to copy face down on your computer. Printing Other Projects The I Want To menu. 3 Select one -touch color or black and white copies, press Color Copy or Black Copy on the program or... Your Document on the Scanner Glass" on page 21. 5 Close the top cover. 6 If you are using the Dell software on a computer instead of the available projects or click See more than one copy, press the up arrow on an envelope, print a banner, make more printing ideas. 4 Follow the instructions on...
... panel or your printer. 2 Load the paper. NOTE: If you want to print a photo, print on the operator panel to copy face down on your computer. Printing Other Projects The I Want To menu. 3 Select one -touch color or black and white copies, press Color Copy or Black Copy on the program or... Your Document on the Scanner Glass" on page 21. 5 Close the top cover. 6 If you are using the Dell software on a computer instead of the available projects or click See more than one copy, press the up arrow on an envelope, print a banner, make more printing ideas. 4 Follow the instructions on...
Owner's Manual
Page 27
... document on page 21. 5 Close the top cover. 6 Click Start→ Programs or All Programs → Dell Printers→ Dell Photo AIO Printer 922→ Dell All-In-One Center. For more information, see "Placing Your Document on the Scanner Glass" on the display. Make sure the ...21. 4 Click Start→ Programs or All Programs → Dell Printers→ Dell Photo AIO Printer 922→ Dell All-In-One Center. For more information, see "Placing Your Document on the Scanner Glass" on the scanner glass. The Dell All-In-One Center appears. 7 Select a copy quantity (1-99) and color. ...
... document on page 21. 5 Close the top cover. 6 Click Start→ Programs or All Programs → Dell Printers→ Dell Photo AIO Printer 922→ Dell All-In-One Center. For more information, see "Placing Your Document on the Scanner Glass" on the display. Make sure the ...21. 4 Click Start→ Programs or All Programs → Dell Printers→ Dell Photo AIO Printer 922→ Dell All-In-One Center. For more information, see "Placing Your Document on the Scanner Glass" on the scanner glass. The Dell All-In-One Center appears. 7 Select a copy quantity (1-99) and color. ...


