Owner's Manual
Page 1
Dell™ Photo All-In-One Printer 922 Owner's Manual Look Inside For: • Ordering Supplies • Getting Started • Using Your Printer • Understanding the Software • Maintenance and Troubleshooting www.dell.com/supplies | support.dell.com
Dell™ Photo All-In-One Printer 922 Owner's Manual Look Inside For: • Ordering Supplies • Getting Started • Using Your Printer • Understanding the Software • Maintenance and Troubleshooting www.dell.com/supplies | support.dell.com
Owner's Manual
Page 2
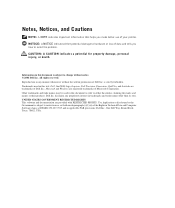
... black ink cartridge Standard yield color ink cartridge Part number: M4640 M4646 J4844 J5566 J5567 Ordering Ink Cartridges and Supplies Your Dell™ Photo All-In-One Printer 922 includes software installed to print using the following ink cartridges. US Australia Austria Belgium Canada Chile Colombia Denmark Finland France Germany ... 64 21 4220710 800-858-0888 866 851 1760 902120385 08 587 705 81 0848 801 888 0870 907 4574 Your printer has been designed to detect the ink levels in the printer. During a print job, a screen appears on your computer to warn you of low ink levels.
... black ink cartridge Standard yield color ink cartridge Part number: M4640 M4646 J4844 J5566 J5567 Ordering Ink Cartridges and Supplies Your Dell™ Photo All-In-One Printer 922 includes software installed to print using the following ink cartridges. US Australia Austria Belgium Canada Chile Colombia Denmark Finland France Germany ... 64 21 4220710 800-858-0888 866 851 1760 902120385 08 587 705 81 0848 801 888 0870 907 4574 Your printer has been designed to detect the ink levels in the printer. During a print job, a screen appears on your computer to warn you of low ink levels.
Owner's Manual
Page 3
... death. is subject to restrictions as set forth in applicable FAR provisions: Dell Inc., One Dell Way, Round Rock, Texas, 78682, USA. All rights reserved. Trademarks used in this text: Dell, the DELL logo, Inspiron, Dell Precision, Dimension, OptiPlex, and Latitude are trademarks of your printer. Use, duplication or disclosure by the Government is strictly forbidden. NOTICE...
... death. is subject to restrictions as set forth in applicable FAR provisions: Dell Inc., One Dell Way, Round Rock, Texas, 78682, USA. All rights reserved. Trademarks used in this text: Dell, the DELL logo, Inspiron, Dell Precision, Dimension, OptiPlex, and Latitude are trademarks of your printer. Use, duplication or disclosure by the Government is strictly forbidden. NOTICE...
Owner's Manual
Page 5
... Paper 18 Print Media Guidelines for the Paper Support 19 Placing Your Document on the Scanner Glass 21 2 Using Your Printer Printing 24 Printing a Document 24 Printing Photos 24 Printing Borderless Photos 25 Printing Other Projects 26 Copying 26 Copying Documents Using the Operator Panel 26 Copying Documents Using Your Computer 27 Copying...
... Paper 18 Print Media Guidelines for the Paper Support 19 Placing Your Document on the Scanner Glass 21 2 Using Your Printer Printing 24 Printing a Document 24 Printing Photos 24 Printing Borderless Photos 25 Printing Other Projects 26 Copying 26 Copying Documents Using the Operator Panel 26 Copying Documents Using Your Computer 27 Copying...
Owner's Manual
Page 6
Scanning 30 Scanning Photos 30 Scanning Multiple Pages or Images 31 Editing Scanned Text Using Optical Character Recognition (OCR) 31 Saving an Image on Your Computer 32 E-mailing a Scanned ... XP 34 Configuring Microsoft Fax 35 Changing the Fax Configuration 36 3 Understanding the Software Understanding the Printer Software 38 Using the Dell Printer Solution Center 38 Using the Dell All-In-One Center 39 Using Print Properties 40 Using Dell Picture Studio v2.0 41 4 Ink Cartridge Maintenance Replacing Ink Cartridges 44 Aligning Ink Cartridges 47 Cleaning...
Scanning 30 Scanning Photos 30 Scanning Multiple Pages or Images 31 Editing Scanned Text Using Optical Character Recognition (OCR) 31 Saving an Image on Your Computer 32 E-mailing a Scanned ... XP 34 Configuring Microsoft Fax 35 Changing the Fax Configuration 36 3 Understanding the Software Understanding the Printer Software 38 Using the Dell Printer Solution Center 38 Using the Dell All-In-One Center 39 Using Print Properties 40 Using Dell Picture Studio v2.0 41 4 Ink Cartridge Maintenance Replacing Ink Cartridges 44 Aligning Ink Cartridges 47 Cleaning...

Owner's Manual
Page 11
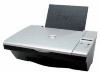
SECTION 1 Getting Started Understanding the Printer Parts Accessing Your User's Guide Setting Up Your Printer Using the Operator Panel Understanding the Automatic Paper Type Sensor Loading Paper 1
SECTION 1 Getting Started Understanding the Printer Parts Accessing Your User's Guide Setting Up Your Printer Using the Operator Panel Understanding the Automatic Paper Type Sensor Loading Paper 1
Owner's Manual
Page 12
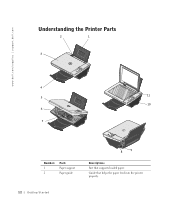
www.dell.com/supplies | support.dell.com Understanding the Printer Parts 2 1 3 4 11 5 10 6 7 Number: 1 2 Part: Paper support Paper guide 8 9 Description: Part that helps the paper feed into the printer properly. 12 Getting Started Guide that supports loaded paper.
www.dell.com/supplies | support.dell.com Understanding the Printer Parts 2 1 3 4 11 5 10 6 7 Number: 1 2 Part: Paper support Paper guide 8 9 Description: Part that helps the paper feed into the printer properly. 12 Getting Started Guide that supports loaded paper.
Owner's Manual
Page 13
... on page 15. Part under printer unit that keeps the printer open while you lift to gain access to the ink cartridges. Carrier that holds two ink cartridges, one color and the other end of printer that holds the paper as it . The other black or photo (sold separately). Slot into the... wall outlet. NOTE: To close the printer for normal operation, lift the printer unit, press the scanner support to copy, fax...
... on page 15. Part under printer unit that keeps the printer open while you lift to gain access to the ink cartridges. Carrier that holds two ink cartridges, one color and the other end of printer that holds the paper as it . The other black or photo (sold separately). Slot into the... wall outlet. NOTE: To close the printer for normal operation, lift the printer unit, press the scanner support to copy, fax...
Owner's Manual
Page 14
...Printer NOTE: The Dell Photo AIO Printer 922 supports Microsoft® Windows® 2000 and Windows XP. Follow the instructions on page 51. www.dell.com/supplies | support.dell.com Accessing Your User's Guide Click Start→ Programs or All Programs → Dell Printers→ Dell Photo AIO Printer 922→ View Dell User's Guide. You can use the Dell Photo All-In-One Printer 922... to do not need to connect your printer Setup Diagram ...
...Printer NOTE: The Dell Photo AIO Printer 922 supports Microsoft® Windows® 2000 and Windows XP. Follow the instructions on page 51. www.dell.com/supplies | support.dell.com Accessing Your User's Guide Click Start→ Programs or All Programs → Dell Printers→ Dell Photo AIO Printer 922→ View Dell User's Guide. You can use the Dell Photo All-In-One Printer 922... to do not need to connect your printer Setup Diagram ...

Owner's Manual
Page 15
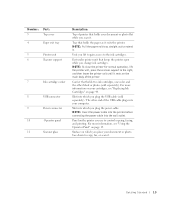
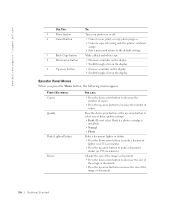
... the display. • Feed newly loaded paper. 3 Color Copy button Make a color copy. 4 Scan button Start the scanning process and open the Dell All-In-One Center (if your printer is on page 16. 2 Menu button • Scroll through the available menus. For more information, see "Operator Panel Menus" on when the Power... for Quality, Dark, and Resize. Getting Started 15 Using the Operator Panel The operator panel buttons allow you press this button does not function. The printer is connected to scan, copy, and customize documents.
... the display. • Feed newly loaded paper. 3 Color Copy button Make a color copy. 4 Scan button Start the scanning process and open the Dell All-In-One Center (if your printer is on page 16. 2 Menu button • Scroll through the available menus. For more information, see "Operator Panel Menus" on when the Power... for Quality, Dark, and Resize. Getting Started 15 Using the Operator Panel The operator panel buttons allow you press this button does not function. The printer is connected to scan, copy, and customize documents.
Owner's Manual
Page 16
www.dell.com/supplies | support.dell.com Use the: To: 5 Power button Turn your printer on the display. Operator Panel Menus When you press the Menu button, the following menus appear. From ...• Normal • Photo Make a document lighter or darker. • Press the down arrow button to make a document lighter (in 25% increments). • Press the up arrow button to make a document darker (in progress. • Cancel a copy job (using only the printer) and eject a page. ... image or document. • Press the down arrow button or the up arrow button to select one of copies.
www.dell.com/supplies | support.dell.com Use the: To: 5 Power button Turn your printer on the display. Operator Panel Menus When you press the Menu button, the following menus appear. From ...• Normal • Photo Make a document lighter or darker. • Press the down arrow button to make a document lighter (in 25% increments). • Press the up arrow button to make a document darker (in progress. • Cancel a copy job (using only the printer) and eject a page. ... image or document. • Press the down arrow button or the up arrow button to select one of copies.
Owner's Manual
Page 17
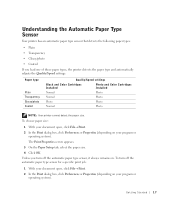
...one of these paper types, the printer detects the paper type and automatically adjusts the Quality/Speed settings. Paper type Plain Transparency Glossy/photo Coated Quality/Speed settings Black and Color Cartridges Installed Photo and Color Cartridges Installed Normal Photo Normal Photo Photo Photo Normal Photo NOTE: Your printer... on . Understanding the Automatic Paper Type Sensor Your printer has an automatic paper type sensor that detects the following paper types: • Plain • Transparency • Glossy/photo • Coated If you turn off the automatic paper...
...one of these paper types, the printer detects the paper type and automatically adjusts the Quality/Speed settings. Paper type Plain Transparency Glossy/photo Coated Quality/Speed settings Black and Color Cartridges Installed Photo and Color Cartridges Installed Normal Photo Normal Photo Photo Photo Normal Photo NOTE: Your printer... on . Understanding the Automatic Paper Type Sensor Your printer has an automatic paper type sensor that detects the following paper types: • Plain • Transparency • Glossy/photo • Coated If you turn off the automatic paper...
Owner's Manual
Page 18
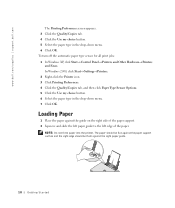
In Windows 2000, click Start→ Settings→Printers. 2 Right-click the Printer icon. 3 Click Printing Preferences. 4 Click the Quality/Copies tab, and then click Paper Type Sensor Options. 5 Click the Use my choice button. 6 Select the paper ... automatic paper type sensor for all print jobs: 1 In Windows XP, click Start→ Control Panel→ Printers and Other Hardware→ Printers and Faxes. NOTE: Do not force paper into the printer. www.dell.com/supplies | support.dell.com The Printing Preferences screen appears. 3 Click the Quality/Copies tab. 4 Click the Use my choice...
In Windows 2000, click Start→ Settings→Printers. 2 Right-click the Printer icon. 3 Click Printing Preferences. 4 Click the Quality/Copies tab, and then click Paper Type Sensor Options. 5 Click the Use my choice button. 6 Select the paper ... automatic paper type sensor for all print jobs: 1 In Windows XP, click Start→ Control Panel→ Printers and Other Hardware→ Printers and Faxes. NOTE: Do not force paper into the printer. www.dell.com/supplies | support.dell.com The Printing Preferences screen appears. 3 Click the Quality/Copies tab. 4 Click the Use my choice...
Owner's Manual
Page 19
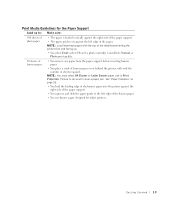
... paper size in Print Properties. Getting Started 19 Print Media Guidelines for the Paper Support Load up . • You select Draft (select Photo if a photo cartridge is loaded vertically against the right side of the paper support. • The paper guide rests against the right side of the paper... the left edge of the banner paper. • You use banner paper designed for inkjet printers. See "Paper Problems" on or behind the printer, with the top of the letterhead entering the printer first and facing up to do so will cause a paper jam. NOTE: Load letterhead paper with only...
... paper size in Print Properties. Getting Started 19 Print Media Guidelines for the Paper Support Load up . • You select Draft (select Photo if a photo cartridge is loaded vertically against the right side of the paper support. • The paper guide rests against the right side of the paper... the left edge of the banner paper. • You use banner paper designed for inkjet printers. See "Paper Problems" on or behind the printer, with the top of the letterhead entering the printer first and facing up to do so will cause a paper jam. NOTE: Load letterhead paper with only...

Owner's Manual
Page 22
www.dell.com/supplies | support.dell.com NOTE: Make sure the upper left corner of the front of the item aligns with the arrow on the printer. 3 Close the top cover. 22 Getting Started
www.dell.com/supplies | support.dell.com NOTE: Make sure the upper left corner of the front of the item aligns with the arrow on the printer. 3 Close the top cover. 22 Getting Started

Owner's Manual
Page 23
SECTION 2 Using Your Printer Printing Copying Scanning Faxing 2
SECTION 2 Using Your Printer Printing Copying Scanning Faxing 2
Owner's Manual
Page 24
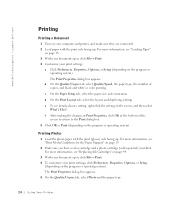
... What's This?. The Print Properties dialog box appears. 5 On the Quality/Copies tab, select Photo and the paper type. 2 4 Us ing Yo ur Pri n te r www.dell.com/supplies | support.dell.com Printing Printing a Document 1 Turn on your computer and printer, and make sure they are connected. 2 Load paper with the print (glossy) side...
... What's This?. The Print Properties dialog box appears. 5 On the Quality/Copies tab, select Photo and the paper type. 2 4 Us ing Yo ur Pri n te r www.dell.com/supplies | support.dell.com Printing Printing a Document 1 Turn on your computer and printer, and make sure they are connected. 2 Load paper with the print (glossy) side...

Owner's Manual
Page 25
...page 19. 2 Make sure you have a color cartridge and a photo cartridge installed. 3 With your document open, click File→ Print. 4 To customize your photos from sticking together or smudging, remove each photo after it exits the printer. 6 On the Paper Setup tab, select the paper size and ...orientation. NOTE: Photo/glossy or coated paper is facing up. U si n g Yo u r Pri...
...page 19. 2 Make sure you have a color cartridge and a photo cartridge installed. 3 With your document open, click File→ Print. 4 To customize your photos from sticking together or smudging, remove each photo after it exits the printer. 6 On the Paper Setup tab, select the paper size and ...orientation. NOTE: Photo/glossy or coated paper is facing up. U si n g Yo u r Pri...

Owner's Manual
Page 26
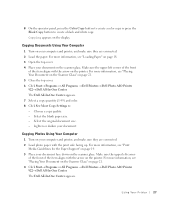
... the upper left corner of the front of the available projects or click See more printing ideas. 4 Follow the instructions on the screen to print a photo, print on an envelope, print a banner, make a poster, create a booklet, or print a greeting card. 1 With your document open, click File→ ... top cover. 4 Place the item you are using the Dell software on a computer instead of copies (1-99). 7 Change any copy settings. www.dell.com/supplies | support.dell.com 7 Click OK or Print (depending on your printer. 2 Load the paper. For easy one copy, press the up arrow on page 16. For more...
... the upper left corner of the front of the available projects or click See more printing ideas. 4 Follow the instructions on the screen to print a photo, print on an envelope, print a banner, make a poster, create a booklet, or print a greeting card. 1 With your document open, click File→ ... top cover. 4 Place the item you are using the Dell software on a computer instead of copies (1-99). 7 Change any copy settings. www.dell.com/supplies | support.dell.com 7 Click OK or Print (depending on your printer. 2 Load the paper. For easy one copy, press the up arrow on page 16. For more...
Owner's Manual
Page 27
... with the arrow on page 21. 5 Close the top cover. 6 Click Start→ Programs or All Programs → Dell Printers→ Dell Photo AIO Printer 922→ Dell All-In-One Center. For more information, see "Placing Your Document on the Scanner Glass" on your document. 8 On the operator panel,...a color copy or press the Black Copy button to : - Copying Photos Using Your Computer 1 Turn on page 21. 4 Click Start→ Programs or All Programs → Dell Printers→ Dell Photo AIO Printer 922→ Dell All-In-One Center. Make sure the upper left corner of the front of the ...
... with the arrow on page 21. 5 Close the top cover. 6 Click Start→ Programs or All Programs → Dell Printers→ Dell Photo AIO Printer 922→ Dell All-In-One Center. For more information, see "Placing Your Document on the Scanner Glass" on your document. 8 On the operator panel,...a color copy or press the Black Copy button to : - Copying Photos Using Your Computer 1 Turn on page 21. 4 Click Start→ Programs or All Programs → Dell Printers→ Dell Photo AIO Printer 922→ Dell All-In-One Center. Make sure the upper left corner of the front of the ...


