

User Guide
Page 34
...S-Video signal. to detect HDMI signal. HDMI-Press to enable or disable S-Video input. If you press the Source button when the projector is set to Off, you press the Source button when the Auto Source mode is on, it automatically finds the next available input ...Off (the default) to detect VGA-A signal. INPUT SELECT ADVANCED The Input Select Advanced menu allows you to select your projector's input source. If you can manually select the input signal. DISPLAYPORT-Press to detect Composite Video signal. COMPOSITE VIDEO-Press to detect DisplayPort signal. VGA-A-Use ...
...S-Video signal. to detect HDMI signal. HDMI-Press to enable or disable S-Video input. If you press the Source button when the projector is set to Off, you press the Source button when the Auto Source mode is on, it automatically finds the next available input ...Off (the default) to detect VGA-A signal. INPUT SELECT ADVANCED The Input Select Advanced menu allows you to select your projector's input source. If you can manually select the input signal. DISPLAYPORT-Press to detect Composite Video signal. COMPOSITE VIDEO-Press to detect DisplayPort signal. VGA-A-Use ...

User Guide
Page 37
...to adjust the display white intensity. The Picture Advanced menu provides the following options: ASPECT RATIO-Allows you can adjust the display settings of your projector. When you to adjust the color temperature. COLOR SPACE-Allows you to select the color space, options are saved in the Color Adjust menu...activated. COLOR TEMP-Allows you adjust the values in the Custom mode. CUSTOM COLOR ADJUST-Allows you can adjust the display settings of your projector. PICTURE ADVANCED Using the Picture Advanced menu, you to manually adjust the colors red, green, and blue. Using Your...
...to adjust the display white intensity. The Picture Advanced menu provides the following options: ASPECT RATIO-Allows you can adjust the display settings of your projector. When you to adjust the color temperature. COLOR SPACE-Allows you to select the color space, options are saved in the Color Adjust menu...activated. COLOR TEMP-Allows you adjust the values in the Custom mode. CUSTOM COLOR ADJUST-Allows you can adjust the display settings of your projector. PICTURE ADVANCED Using the Picture Advanced menu, you to manually adjust the colors red, green, and blue. Using Your...
User Guide
Page 41
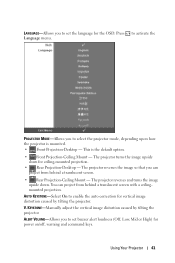
...-mounted projection. • Rear Projection-Desktop - This is mounted. • Front Projection-Desktop - KEYSTONE-Manually adjust the vertical image distortion caused by tilting the projector. Using Your Projector 41 PROJECTOR MODE-Allows you to activate the Language menu. The projector reverses and turns the image upside down for power on/off, warning and command keys.
...-mounted projection. • Rear Projection-Desktop - This is mounted. • Front Projection-Desktop - KEYSTONE-Manually adjust the vertical image distortion caused by tilting the projector. Using Your Projector 41 PROJECTOR MODE-Allows you to activate the Language menu. The projector reverses and turns the image upside down for power on/off, warning and command keys.

User Guide
Page 42
Press to which the projector is Off, manually set the next item. See "NETWORK" on page 42. SUBNET ... NETWORK-Select On to configure the network connection settings. NETWORK The Network menu allows you configure it manually. DNS-Check the DNS Server IP address with your network/system administrator if you select DHCP On. ... will automatically be acquired when you configure it manually. Select Off to reset network configuration. 42 Using Your Projector IP ADDRESS-Automatically or manually assigns the IP address to the projector connected to save the changes made in Enter...
Press to which the projector is Off, manually set the next item. See "NETWORK" on page 42. SUBNET ... NETWORK-Select On to configure the network connection settings. NETWORK The Network menu allows you configure it manually. DNS-Check the DNS Server IP address with your network/system administrator if you select DHCP On. ... will automatically be acquired when you configure it manually. Select Off to reset network configuration. 42 Using Your Projector IP ADDRESS-Automatically or manually assigns the IP address to the projector connected to save the changes made in Enter...
User Guide
Page 52
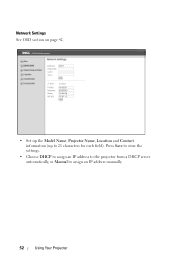
Network Settings See OSD section on page 42. • Set up the Model Name, Projector Name, Location and Contact information (up to assign an IP address manually. 52 Using Your Projector Press Save to store the settings. • Choose DHCP to assign an IP address to the projector from a DHCP server automatically, or Manual to 21 characters for each field).
Network Settings See OSD section on page 42. • Set up the Model Name, Projector Name, Location and Contact information (up to assign an IP address manually. 52 Using Your Projector Press Save to store the settings. • Choose DHCP to assign an IP address to the projector from a DHCP server automatically, or Manual to 21 characters for each field).


