User Guide
Page 4
... 3 Using Your Projector 21 Turning Your Projector On 21 Turning Your Projector Off 21 Adjusting the Projected Image 22 Raising the Projector Height 22 Lowering the Projector Height 22 Adjusting the Projector Zoom and Focus 23 Adjusting Projection Image Size 24 Using the Control Panel 25 Using the Remote Control 28 Installing the Remote Control Batteries 31 Operating Range With Remote Control 32 Using the On-Screen Display 33 Main Menu 33 AUTO-ADJUST 33 INPUT SELECT 34 PICTURE (in PC Mode 35 PICTURE (in Video Mode 36 DISPLAY (in PC Mode 37 DISPLAY (in Video Mode 39 LAMP...
... 3 Using Your Projector 21 Turning Your Projector On 21 Turning Your Projector Off 21 Adjusting the Projected Image 22 Raising the Projector Height 22 Lowering the Projector Height 22 Adjusting the Projector Zoom and Focus 23 Adjusting Projection Image Size 24 Using the Control Panel 25 Using the Remote Control 28 Installing the Remote Control Batteries 31 Operating Range With Remote Control 32 Using the On-Screen Display 33 Main Menu 33 AUTO-ADJUST 33 INPUT SELECT 34 PICTURE (in PC Mode 35 PICTURE (in Video Mode 36 DISPLAY (in PC Mode 37 DISPLAY (in Video Mode 39 LAMP...
User Guide
Page 8
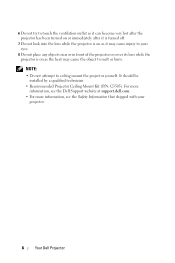
...ceiling mount the projector yourself. For more information, see the Dell Support website at support.dell.com. • For more information, see the Safety Information that shipped with your eyes. 8 Do not place any objects near or in front of the projector or cover its lens while the projector...after the projector has been turned on or immediately after it is turned off. 7 Do not look into the lens while the projector is on as it may cause injury to your projector. 8 Your Dell Projector It should be installed by a qualified technician. • Recommended Projector Ceiling Mount Kit ...
...ceiling mount the projector yourself. For more information, see the Dell Support website at support.dell.com. • For more information, see the Safety Information that shipped with your eyes. 8 Do not place any objects near or in front of the projector or cover its lens while the projector...after the projector has been turned on or immediately after it is turned off. 7 Do not look into the lens while the projector is on as it may cause injury to your projector. 8 Your Dell Projector It should be installed by a qualified technician. • Recommended Projector Ceiling Mount Kit ...
User Guide
Page 21
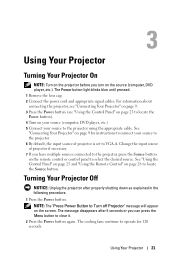
...5 Connect your source to the projector. 6 By default, the input source of projector if necessary. 7 If you have multiple sources connected to the projector, press the Source button on the screen. For information about connecting the projector, see "Connecting Your Projector" on page 9. 3 Press the Power button (see "Using the Control Panel" on page 25 to locate the Power button). 4 Turn on page 9 for 120 seconds. The Power button light blinks blue until pressed. 1 Remove the lens cap. 2 Connect the power cord and appropriate signal cables. 3 Using Your Projector Turning Your Projector...
...5 Connect your source to the projector. 6 By default, the input source of projector if necessary. 7 If you have multiple sources connected to the projector, press the Source button on the screen. For information about connecting the projector, see "Connecting Your Projector" on page 9. 3 Press the Power button (see "Using the Control Panel" on page 25 to locate the Power button). 4 Turn on page 9 for 120 seconds. The Power button light blinks blue until pressed. 1 Remove the lens cap. 2 Connect the power cord and appropriate signal cables. 3 Using Your Projector Turning Your Projector...
User Guide
Page 26
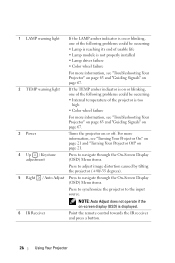
... and "Guiding Signals" on page 67. 2 TEMP warning light If the TEMP amber indicator is on or blinking, one of the following problems could be occurring: • Internal temperature of the projector is displayed. 6 IR Receiver Point the remote control towards the IR receiver and press a button. 26 Using Your Projector NOTE: Auto Adjust does not operate if the on-screen display (OSD) is too high • Color wheel failure For more information, see "Troubleshooting Your Projector" on...
... and "Guiding Signals" on page 67. 2 TEMP warning light If the TEMP amber indicator is on or blinking, one of the following problems could be occurring: • Internal temperature of the projector is displayed. 6 IR Receiver Point the remote control towards the IR receiver and press a button. 26 Using Your Projector NOTE: Auto Adjust does not operate if the on-screen display (OSD) is too high • Color wheel failure For more information, see "Troubleshooting Your Projector" on...

User Guide
Page 34
... Composite Video input. 34 Using Your Projector and to enable or disable S-Video input. AUTO SOURCE-Select Off (the default) to detect Composite Video signal. COMPOSITE VIDEO-Press to lock the current input signal. VGA-B-Press to enable or disable VGA-A input. VGA-A-Use and VGA-B-Use and S-VIDEO-Use and COMPOSITE VIDEO-Use to detect VGA-B signal. INPUT SELECT ADVANCED The Input Select Advanced menu allows you to detect S-Video signal. S-VIDEO-Press to enable or disable input sources. If you press the Source button when the Auto Source mode...
... Composite Video input. 34 Using Your Projector and to enable or disable S-Video input. AUTO SOURCE-Select Off (the default) to detect Composite Video signal. COMPOSITE VIDEO-Press to lock the current input signal. VGA-B-Press to enable or disable VGA-A input. VGA-A-Use and VGA-B-Use and S-VIDEO-Use and COMPOSITE VIDEO-Use to detect VGA-B signal. INPUT SELECT ADVANCED The Input Select Advanced menu allows you to detect S-Video signal. S-VIDEO-Press to enable or disable input sources. If you press the Source button when the Auto Source mode...

User Guide
Page 37
... you to adjust how the image appears. DISPLAY (in the Color Adjust menu, the Custom mode is activated. When you to select the aspect ratio to adjust the color temperature. The Picture menu, provides the following options: WHITE INTENSITY-Use and to manually adjust the colors red, green, and blue. Using Your Projector 37 PICTURE ADVANCED Using the Picture Advanced menu, you can adjust the display settings of your projector. CUSTOM COLOR ADJUST-Allows you to adjust the display white intensity. The Picture Advanced menu provides the...
... you to adjust how the image appears. DISPLAY (in the Color Adjust menu, the Custom mode is activated. When you to select the aspect ratio to adjust the color temperature. The Picture menu, provides the following options: WHITE INTENSITY-Use and to manually adjust the colors red, green, and blue. Using Your Projector 37 PICTURE ADVANCED Using the Picture Advanced menu, you can adjust the display settings of your projector. CUSTOM COLOR ADJUST-Allows you to adjust the display white intensity. The Picture Advanced menu provides the...
User Guide
Page 44
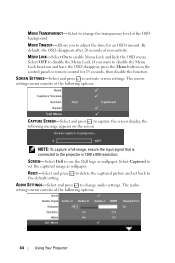
... the screen display, the following options: 44 Using Your Projector The screen settings menu consists of the following message appears on the control panel or remote control for an OSD timeout. Select Captured to use the Dell logo as wallpaper. AUDIO SETTINGS-Select and press to change the transparency level of non-activity. MENU TRANSPARENCY-Select to change audio settings. RESET-Select and press to delete the captured picture and set the captured image as...
... the screen display, the following options: 44 Using Your Projector The screen settings menu consists of the following message appears on the control panel or remote control for an OSD timeout. Select Captured to use the Dell logo as wallpaper. AUDIO SETTINGS-Select and press to change the transparency level of non-activity. MENU TRANSPARENCY-Select to change audio settings. RESET-Select and press to delete the captured picture and set the captured image as...
User Guide
Page 45
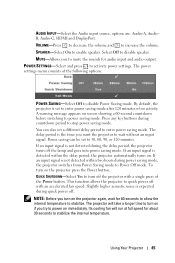
... switching to power on the projector again, wait for audio input and audio output. Its cooling fan will take a longer time to turn on immediately. QUICK SHUTDOWN-Select Yes to turn on the projector press the Power button. NOTE: Before you try to power saving mode. AUDIO INPUT-Select the Audio input source, options are: Audio-A, AudioB, Audio-C, HDMI and DisplayPort. The power settings menu consists of no activity. The delay period is detected within two hours...
... switching to power on the projector again, wait for audio input and audio output. Its cooling fan will take a longer time to turn on immediately. QUICK SHUTDOWN-Select Yes to turn on the projector press the Power button. NOTE: Before you try to power saving mode. AUDIO INPUT-Select the Audio input source, options are: Audio-A, AudioB, Audio-C, HDMI and DisplayPort. The power settings menu consists of no activity. The delay period is detected within two hours...
User Guide
Page 52
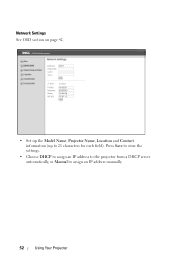
Press Save to store the settings. • Choose DHCP to assign an IP address to the projector from a DHCP server automatically, or Manual to 21 characters for each field). Network Settings See OSD section on page 42. • Set up the Model Name, Projector Name, Location and Contact information (up to assign an IP address manually. 52 Using Your Projector
Press Save to store the settings. • Choose DHCP to assign an IP address to the projector from a DHCP server automatically, or Manual to 21 characters for each field). Network Settings See OSD section on page 42. • Set up the Model Name, Projector Name, Location and Contact information (up to assign an IP address manually. 52 Using Your Projector
User Guide
Page 53
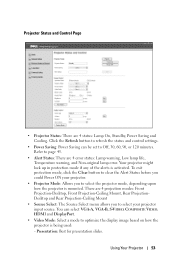
...Clear button to clear the Alert Status before you to optimize the display image based on how the projector is mounted. There are 4 projection modes: Front Projection-Desktop, Front Projection-Ceiling Mount, Rear ProjectionDesktop and Rear Projection-Ceiling Mount • Source Select: The Source Select menu allows you to select your projector. • Projector Mode: Allows you could Power ON your projector input source. Projector Status and Control Page • Projector Status: There are 4 error status: Lamp warning, Low lamp life, Temperature warning, and Non-original lamp error...
...Clear button to clear the Alert Status before you to optimize the display image based on how the projector is mounted. There are 4 projection modes: Front Projection-Desktop, Front Projection-Ceiling Mount, Rear ProjectionDesktop and Rear Projection-Ceiling Mount • Source Select: The Source Select menu allows you to select your projector. • Projector Mode: Allows you could Power ON your projector input source. Projector Status and Control Page • Projector Status: There are 4 error status: Lamp warning, Low lamp life, Temperature warning, and Non-original lamp error...
User Guide
Page 63
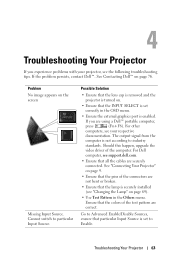
... Others menu. Troubleshooting Your Projector 63 Cannot switch to industry standards. Problem No image appears on page 69). • Use Test Pattern in the OSD menu. • Ensure the external graphics port is enabled. For other computers, see your projector, see the following troubleshooting tips. If you experience problems with your respective documentation. For Dell computer, see "Changing the Lamp" on the screen Missing Input Source. See "Connecting Your Projector...
... Others menu. Troubleshooting Your Projector 63 Cannot switch to industry standards. Problem No image appears on page 69). • Use Test Pattern in the OSD menu. • Ensure the external graphics port is enabled. For other computers, see your projector, see the following troubleshooting tips. If you experience problems with your respective documentation. For Dell computer, see "Changing the Lamp" on the screen Missing Input Source. See "Connecting Your Projector...
User Guide
Page 64
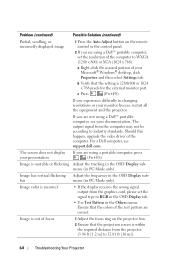
... are using a Dell™ portable computer, see support.dell.com. Problem (continued) Possible Solution (continued) Partial, scrolling, or incorrectly displayed image 1 Press the Auto Adjust button on the projector lens. 2 Ensure that the projection screen is within the required distance from the projector (3.94 ft [1.2 m] to 32.81 ft [10 m]). 64 Troubleshooting Your Projector b Verify that the setting is unstable or flickering Adjust the tracking in the OSD Display submenu (in changing resolutions or...
... are using a Dell™ portable computer, see support.dell.com. Problem (continued) Possible Solution (continued) Partial, scrolling, or incorrectly displayed image 1 Press the Auto Adjust button on the projector lens. 2 Ensure that the projection screen is within the required distance from the projector (3.94 ft [1.2 m] to 32.81 ft [10 m]). 64 Troubleshooting Your Projector b Verify that the setting is unstable or flickering Adjust the tracking in the OSD Display submenu (in changing resolutions or...
User Guide
Page 65
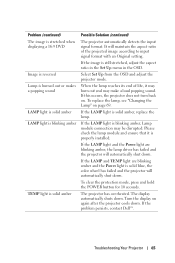
... the projected image according to input signal format with an Original setting. If the LAMP light and the Power light are blinking amber and the Power light is still stretched, adjust the aspect ratio in the Set Up menu in the OSD. If the problem persists, contact Dell™. Troubleshooting Your Projector 65 To clear the protection mode, press and hold the POWER button for 10 seconds. Turn the display on again after the projector...
... the projected image according to input signal format with an Original setting. If the LAMP light and the Power light are blinking amber and the Power light is still stretched, adjust the aspect ratio in the Set Up menu in the OSD. If the problem persists, contact Dell™. Troubleshooting Your Projector 65 To clear the protection mode, press and hold the POWER button for 10 seconds. Turn the display on again after the projector...
User Guide
Page 66
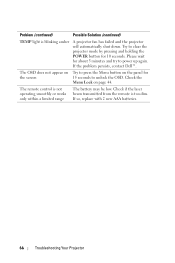
... transmitted from the remote is not operating smoothly or works only within a limited range The battery may be low. Check the Menu Lock on the panel for about 5 minutes and try to clear the projector mode by pressing and holding the POWER button for 10 seconds. If so, replace with 2 new AAA batteries. 66 Troubleshooting Your Projector Problem (continued) Possible Solution (continued) TEMP light is blinking amber A projector fan has failed...
... transmitted from the remote is not operating smoothly or works only within a limited range The battery may be low. Check the Menu Lock on the panel for about 5 minutes and try to clear the projector mode by pressing and holding the POWER button for 10 seconds. If so, replace with 2 new AAA batteries. 66 Troubleshooting Your Projector Problem (continued) Possible Solution (continued) TEMP light is blinking amber A projector fan has failed...
User Guide
Page 67
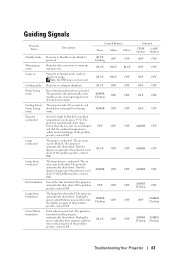
... OSD menu is overheated. The projector will automatically enter standby mode, if an input signal is within operational range. The air vents may be above 35ºC. The lamp driver is cooling to shutdown. The projector automatically shuts down . If the problem persists, contact Dell. The projector automatically shuts down before Power Saving mode Projector overheated Lamp overheated Lamp driver overheated Fan breakdown Lamp driver breakdown Color Wheel breakdown Projector in Standby mode. Projector is overheated. The projector takes 60 seconds to display an image. The projector...
... OSD menu is overheated. The projector will automatically enter standby mode, if an input signal is within operational range. The air vents may be above 35ºC. The lamp driver is cooling to shutdown. The projector automatically shuts down . If the problem persists, contact Dell. The projector automatically shuts down before Power Saving mode Projector overheated Lamp overheated Lamp driver overheated Fan breakdown Lamp driver breakdown Color Wheel breakdown Projector in Standby mode. Projector is overheated. The projector takes 60 seconds to display an image. The projector...
User Guide
Page 68
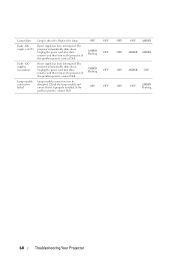
.... Replace the lamp. The projector automatically shuts down . Unplug the power cord after three minutes and then turn on the projector. Lamp module connection may be disrupted. If the problem persists, contact Dell. OFF AMBER Flashing AMBER Flashing OFF OFF OFF OFF OFF OFF OFF AMBER OFF AMBER AMBER OFF AMBER OFF OFF OFF AMBER Flashing 68 Troubleshooting Your Projector DC supplies (secondary) Lamp module connection failed Lamp is properly installed. If...
.... Replace the lamp. The projector automatically shuts down . Unplug the power cord after three minutes and then turn on the projector. Lamp module connection may be disrupted. If the problem persists, contact Dell. OFF AMBER Flashing AMBER Flashing OFF OFF OFF OFF OFF OFF OFF AMBER OFF AMBER AMBER OFF AMBER OFF OFF OFF AMBER Flashing 68 Troubleshooting Your Projector DC supplies (secondary) Lamp module connection failed Lamp is properly installed. If...
User Guide
Page 69
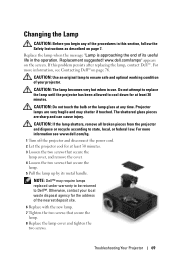
... procedures in use. CAUTION: Do not touch the bulb or the lamp glass at least 30 minutes. Troubleshooting Your Projector 69 Do not attempt to replace the lamp until the projector has been allowed to Dell™. NOTE: Dell™ may shatter if touched. For more information, see www.dell.com/hg. 1 Turn off the projector and disconnect the power cord. 2 Let the projector cool for...
... procedures in use. CAUTION: Do not touch the bulb or the lamp glass at least 30 minutes. Troubleshooting Your Projector 69 Do not attempt to replace the lamp until the projector has been allowed to Dell™. NOTE: Dell™ may shatter if touched. For more information, see www.dell.com/hg. 1 Turn off the projector and disconnect the power cord. 2 Let the projector cool for...
User Guide
Page 73
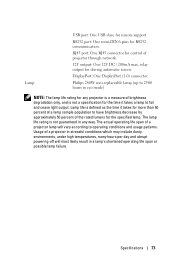
... population to fail and cease light output. Specifications 73 RS232 port: One mini-DIN 6-pins for the specified lamp. Lamp life is not a specification for driving automatic screen. DisplayPort: One DisplayPort (1.0) connector. Lamp USB port: One USB slave for control of projector through network. 12V output: One 12V DC / 200mA max. RJ45 port: One RJ45 connector for remote support. The actual operating life span of a projector lamp will most likely result in...
... population to fail and cease light output. Specifications 73 RS232 port: One mini-DIN 6-pins for the specified lamp. Lamp life is not a specification for driving automatic screen. DisplayPort: One DisplayPort (1.0) connector. Lamp USB port: One USB slave for control of projector through network. 12V output: One 12V DC / 200mA max. RJ45 port: One RJ45 connector for remote support. The actual operating life span of a projector lamp will most likely result in...

User Guide
Page 79
... but with a variable focal length that a projector can projector from a fixed distance. S-Video is used in or out making the image smaller or larger. Zoom Lens - Glossary 79 When used for rear projection. SXGA - UXGA - VGA - Is the ratio between the smallest and largest image a lens can focus an image onto a screen. PAL - room. A European broadcast standard for video and broadcasting, with a video format of the optics. SECAM - Extended...
... but with a variable focal length that a projector can projector from a fixed distance. S-Video is used in or out making the image smaller or larger. Zoom Lens - Glossary 79 When used for rear projection. SXGA - UXGA - VGA - Is the ratio between the smallest and largest image a lens can focus an image onto a screen. PAL - room. A European broadcast standard for video and broadcasting, with a video format of the optics. SECAM - Extended...
User Guide
Page 81
... Adapter 9 Dell contacting 76 H HDMI 9 M Main Unit 7 Control panel 7 Elevator button 7 Focus ring 7 IR receiver 7 Lens 7 Zoom tab 7 Menu Position 43 Menu Settings 43 Menu Timeout 44 Menu Transparency 44 Mute 45 O On-Screen Display 33 Auto-Adjust 35 Display (in PC Mode) 37 Display (in Video Mode) 39 Input Select 34 Lamp 40 Main Menu 33 Others 43 Picture (in PC Mode) 35 Picture (in Video Mode) 36 Set Up 40 P Password 46 phone numbers 76 Power Saving 45 Power Settings 45 Powering On/Off the Projector Powering Off...
... Adapter 9 Dell contacting 76 H HDMI 9 M Main Unit 7 Control panel 7 Elevator button 7 Focus ring 7 IR receiver 7 Lens 7 Zoom tab 7 Menu Position 43 Menu Settings 43 Menu Timeout 44 Menu Transparency 44 Mute 45 O On-Screen Display 33 Auto-Adjust 35 Display (in PC Mode) 37 Display (in Video Mode) 39 Input Select 34 Lamp 40 Main Menu 33 Others 43 Picture (in PC Mode) 35 Picture (in Video Mode) 36 Set Up 40 P Password 46 phone numbers 76 Power Saving 45 Power Settings 45 Powering On/Off the Projector Powering Off...


