User Guide
Page 4
3 Using Your Projector 20 Turning Your Projector On 20 Turning Your Projector Off 20 Adjusting the Projected Image 21 Raising the Projector Height 21 Lowering the Projector Height 21 Adjusting the Projector Zoom and Focus 22 Adjusting Projection Image Size 23 Using the Control Panel 24 Using the Remote Control 27 Installing the Remote Control Batteries 30 Operating Range With Remote Control 31 Using...
3 Using Your Projector 20 Turning Your Projector On 20 Turning Your Projector Off 20 Adjusting the Projected Image 21 Raising the Projector Height 21 Lowering the Projector Height 21 Adjusting the Projector Zoom and Focus 22 Adjusting Projection Image Size 23 Using the Control Panel 24 Using the Remote Control 27 Installing the Remote Control Batteries 30 Operating Range With Remote Control 31 Using...
User Guide
Page 6
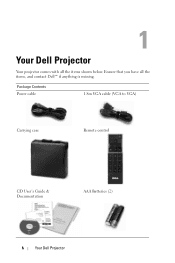
1 Your Dell Projector Your projector comes with all the items, and contact Dell™ if anything is missing. Package Contents Power cable 1.8m VGA cable (VGA to VGA) Carrying case Remote control CD User's Guide & Documentation AAA Batteries (2) 6 Your Dell Projector Ensure that you have all the items shown below.
1 Your Dell Projector Your projector comes with all the items, and contact Dell™ if anything is missing. Package Contents Power cable 1.8m VGA cable (VGA to VGA) Carrying case Remote control CD User's Guide & Documentation AAA Batteries (2) 6 Your Dell Projector Ensure that you have all the items shown below.
User Guide
Page 10
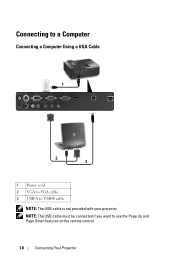
NOTE: The USB cable must be connected if you want to USB-B cable NOTE: The USB cable is not provided with your projector. Connecting to a Computer Connecting a Computer Using a VGA Cable 1 2 3 1 Power cord 2 VGA to VGA cable 3 USB-A to use the Page Up and Page Down features on the remote control. 10 Connecting Your Projector
NOTE: The USB cable must be connected if you want to USB-B cable NOTE: The USB cable is not provided with your projector. Connecting to a Computer Connecting a Computer Using a VGA Cable 1 2 3 1 Power cord 2 VGA to VGA cable 3 USB-A to use the Page Up and Page Down features on the remote control. 10 Connecting Your Projector
User Guide
Page 12
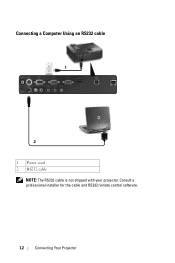
Connecting a Computer Using an RS232 cable 1 2 1 Power cord 2 RS232 cable NOTE: The RS232 cable is not shipped with your projector. Consult a professional installer for the cable and RS232 remote control software. 12 Connecting Your Projector
Connecting a Computer Using an RS232 cable 1 2 1 Power cord 2 RS232 cable NOTE: The RS232 cable is not shipped with your projector. Consult a professional installer for the cable and RS232 remote control software. 12 Connecting Your Projector
User Guide
Page 20
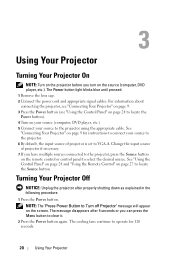
... necessary. 7 If you have multiple sources connected to the projector, press the Source button on page 27 to locate the Source button. See "Using the Control Panel" on page 24 and "Using the Remote Control" on the remote control or control panel to select the desired source. The Power button light blinks blue until pressed. 1 Remove the...
... necessary. 7 If you have multiple sources connected to the projector, press the Source button on page 27 to locate the Source button. See "Using the Control Panel" on page 24 and "Using the Remote Control" on the remote control or control panel to select the desired source. The Power button light blinks blue until pressed. 1 Remove the...
User Guide
Page 25
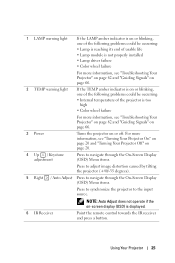
... 5 Right / Auto Adjust Press to navigate through the On-Screen Display (OSD) Menu items. Press to synchronize the projector to the input source. Using Your Projector 25 1 LAMP warning light If the LAMP amber indicator is on or blinking, one of the following problems could be ..."Troubleshooting Your Projector" on page 62 and "Guiding Signals" on page 66. 2 TEMP warning light If the TEMP amber indicator is on or blinking, one of the following problems could be occurring: • Internal temperature of the projector is displayed. 6 IR Receiver Point the remote control towards the...
... 5 Right / Auto Adjust Press to navigate through the On-Screen Display (OSD) Menu items. Press to synchronize the projector to the input source. Using Your Projector 25 1 LAMP warning light If the LAMP amber indicator is on or blinking, one of the following problems could be ..."Troubleshooting Your Projector" on page 62 and "Guiding Signals" on page 66. 2 TEMP warning light If the TEMP amber indicator is on or blinking, one of the following problems could be occurring: • Internal temperature of the projector is displayed. 6 IR Receiver Point the remote control towards the...
User Guide
Page 27
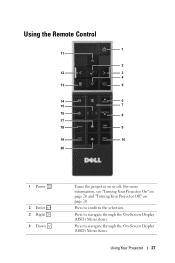
For more information, see "Turning Your Projector On" on page 20 and "Turning Your Projector Off" on or off. Press to navigate through the On-Screen Display (OSD) Menu items. Press to confirm the selection. Press to navigate through the On-Screen Display (OSD) Menu items. Using Your Projector 27 Using the Remote Control 1 11 2 12 3 4 13 5 14 6 15 7 16 8 17 18 9 19 10 20 1 Power 2 Enter 3 Right 4 Down Turns the projector on page 20.
For more information, see "Turning Your Projector On" on page 20 and "Turning Your Projector Off" on or off. Press to navigate through the On-Screen Display (OSD) Menu items. Press to confirm the selection. Press to navigate through the On-Screen Display (OSD) Menu items. Using Your Projector 27 Using the Remote Control 1 11 2 12 3 4 13 5 14 6 15 7 16 8 17 18 9 19 10 20 1 Power 2 Enter 3 Right 4 Down Turns the projector on page 20.
User Guide
Page 28
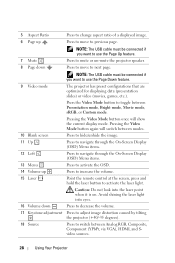
...move to previous page. NOTE: The USB cable must be connected if you want to use the Page Down feature. 9 Video mode The projector has preset configurations that are optimized for displaying data (presentation slides) or video (movies, games, etc.). Press the Video Mode button to ..., Component (YPbPr, via VGA), HDMI, and Svideo sources. 28 Using Your Projector 5 Aspect Ratio Press to change aspect ratio of a displayed image. 6 Page up Press to increase the volume. 15 Laser Point the remote control at the screen, press and hold the laser button to activate the laser light...
...move to previous page. NOTE: The USB cable must be connected if you want to use the Page Down feature. 9 Video mode The projector has preset configurations that are optimized for displaying data (presentation slides) or video (movies, games, etc.). Press the Video Mode button to ..., Component (YPbPr, via VGA), HDMI, and Svideo sources. 28 Using Your Projector 5 Aspect Ratio Press to change aspect ratio of a displayed image. 6 Page up Press to increase the volume. 15 Laser Point the remote control at the screen, press and hold the laser button to activate the laser light...
User Guide
Page 30
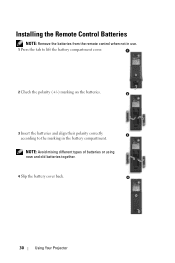
Installing the Remote Control Batteries NOTE: Remove the batteries from the remote control when not in use. 1 Press the tab to lift the battery compartment cover. 1 2 Check the polarity (+/-) marking on the batteries. 2 3 Insert the batteries and align their polarity correctly 3 according to the marking in the battery compartment. NOTE: Avoid mixing different types of batteries or using new and old batteries together. 4 Slip the battery cover back. 4 30 Using Your Projector
Installing the Remote Control Batteries NOTE: Remove the batteries from the remote control when not in use. 1 Press the tab to lift the battery compartment cover. 1 2 Check the polarity (+/-) marking on the batteries. 2 3 Insert the batteries and align their polarity correctly 3 according to the marking in the battery compartment. NOTE: Avoid mixing different types of batteries or using new and old batteries together. 4 Slip the battery cover back. 4 30 Using Your Projector
User Guide
Page 31
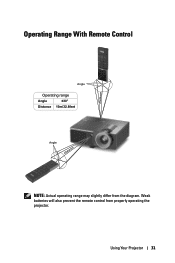
Weak batteries will also prevent the remote control from the diagram. Using Your Projector 31 Operating Range With Remote Control Distance Angle Operating range Angle ±30° Distance 10m/32.8feet Angle Distance NOTE: Actual operating range may slightly differ from properly operating the projector.
Weak batteries will also prevent the remote control from the diagram. Using Your Projector 31 Operating Range With Remote Control Distance Angle Operating range Angle ±30° Distance 10m/32.8feet Angle Distance NOTE: Actual operating range may slightly differ from properly operating the projector.
User Guide
Page 32
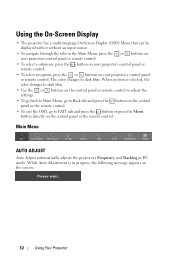
... the tabs in the Main Menu, press the or buttons on your projectors control panel or remote control. • To select a submenu, press the button on your projector's control panel or remote control. • To select an option, press the or buttons on the control panel or the remote control. While Auto Adjustment is selected, the color changes to dark blue...
... the tabs in the Main Menu, press the or buttons on your projectors control panel or remote control. • To select a submenu, press the button on your projector's control panel or remote control. • To select an option, press the or buttons on the control panel or the remote control. While Auto Adjustment is selected, the color changes to dark blue...
User Guide
Page 43
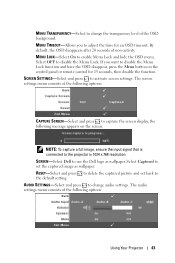
By default, the OSD disappears after 20 seconds of the following message appears on the control panel or remote control for an OSD timeout. MENU LOCK-Select On to activate screen settings. SCREEN SETTINGS-Select and press to enable Menu Lock and hide the OSD ... and press to adjust the time for 15 seconds, then disable the function. If you to capture the screen display, the following options: Using Your Projector 43 Select OFF to the projector is 1024 x 768 resolution. The screen settings menu consists of the OSD background. RESET-Select and press to use the...
By default, the OSD disappears after 20 seconds of the following message appears on the control panel or remote control for an OSD timeout. MENU LOCK-Select On to activate screen settings. SCREEN SETTINGS-Select and press to enable Menu Lock and hide the OSD ... and press to adjust the time for 15 seconds, then disable the function. If you to capture the screen display, the following options: Using Your Projector 43 Select OFF to the projector is 1024 x 768 resolution. The screen settings menu consists of the OSD background. RESET-Select and press to use the...
User Guide
Page 60
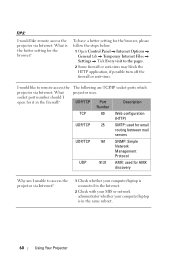
...firewall? What projector uses. I would like to remote access the The following are TCP/IP socket ports which projector via Internet. TIPS: I would like remote access the projector via Internet. To have a better setting for it in the same subnet. 60 Using Your Projector UDP/TCP ...Open Control Panel Internet Options General tab Temporary Internet Files Settings Tick Every visit to the Internet. 2 Check with your MIS or network administrator whether your computer/laptop is the better setting for the browser? socket port number should I unable to access the projector via...
...firewall? What projector uses. I would like to remote access the The following are TCP/IP socket ports which projector via Internet. TIPS: I would like remote access the projector via Internet. To have a better setting for it in the same subnet. 60 Using Your Projector UDP/TCP ...Open Control Panel Internet Options General tab Temporary Internet Files Settings Tick Every visit to the Internet. 2 Check with your MIS or network administrator whether your computer/laptop is the better setting for the browser? socket port number should I unable to access the projector via...
User Guide
Page 63
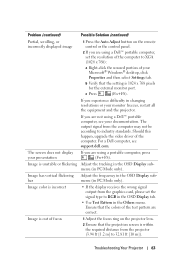
c Press (Fn+F8). If you are using a Dell™ portable computer, set the signal type to XGA (1024 x 768): a Right-click the unused portion of focus 1 Adjust the focus ring on the remote control or the control panel. 2 If you are not using a portable computer, press (Fn+F8). Image has vertical ...is incorrect • If the display receives the wrong signal output from the computer may not be according to industry standards. Troubleshooting Your Projector 63 The output signal from the graphics card, please set the resolution of the computer to RGB in the OSD Display tab. &#...
c Press (Fn+F8). If you are using a Dell™ portable computer, set the signal type to XGA (1024 x 768): a Right-click the unused portion of focus 1 Adjust the focus ring on the remote control or the control panel. 2 If you are not using a portable computer, press (Fn+F8). Image has vertical ...is incorrect • If the display receives the wrong signal output from the computer may not be according to industry standards. Troubleshooting Your Projector 63 The output signal from the graphics card, please set the resolution of the computer to RGB in the OSD Display tab. &#...
User Guide
Page 65
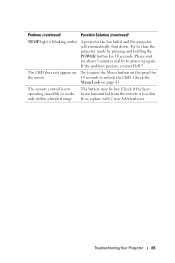
... the OSD. If the problem persists, contact Dell™. If so, replace with 2 new AAA batteries. Troubleshooting Your Projector 65 Check if the laser beam transmitted from the remote is blinking amber A projector fan has failed and the projector will automatically shut down. Check the Menu Lock...panel for 10 seconds. Try to clear the projector mode by pressing and holding the POWER button for the screen 15 seconds to power up again. Problem (continued) Possible Solution (continued) TEMP light is too dim. The remote control is not operating smoothly or works only within...
... the OSD. If the problem persists, contact Dell™. If so, replace with 2 new AAA batteries. Troubleshooting Your Projector 65 Check if the laser beam transmitted from the remote is blinking amber A projector fan has failed and the projector will automatically shut down. Check the Menu Lock...panel for 10 seconds. Try to clear the projector mode by pressing and holding the POWER button for the screen 15 seconds to power up again. Problem (continued) Possible Solution (continued) TEMP light is too dim. The remote control is not operating smoothly or works only within...
User Guide
Page 72
... and abrupt powering-off will vary according to operating conditions and usage patterns. Usage of a projector in eco mode) NOTE: The lamp life rating for any way. The lamp life rating ...or possible lamp failure. 72 Specifications The actual operating life span of a projector lamp will most likely result in any projector is a measure of brightness degradation only, and is defined as the time...of the rated lumens for more than 50 percent of projector through network. 12V output: One 12V DC / 200mA max. relay output for control of a lamp sample population to fail and cease ...
... and abrupt powering-off will vary according to operating conditions and usage patterns. Usage of a projector in eco mode) NOTE: The lamp life rating for any way. The lamp life rating ...or possible lamp failure. 72 Specifications The actual operating life span of a projector lamp will most likely result in any projector is a measure of brightness degradation only, and is defined as the time...of the rated lumens for more than 50 percent of projector through network. 12V output: One 12V DC / 200mA max. relay output for control of a lamp sample population to fail and cease ...
User Guide
Page 80
... D DC Adapter 9 Dell contacting 75 H HDMI 9 M Main Unit 7 Control panel 7 Elevator button 7 Focus ring 7 IR receiver 7 Lens 7 Zoom tab 7 Menu Position 42 Menu Settings 42 Menu Timeout 43 Menu Transparency 43 Mute 44 O On-...) 34 Picture (in Video Mode) 35 Set Up 39 P Password 45 phone numbers 75 Power Saving 44 Power Settings 44 Powering On/Off the Projector Powering Off the Projector 20 Powering On the Projector 20 Q Quick Shutdown 44 R Remote Control 27 IR receiver 25 Reset 43 Reset, Factory 48 RJ45 9 S Screen 43 Screen Settings 43
... D DC Adapter 9 Dell contacting 75 H HDMI 9 M Main Unit 7 Control panel 7 Elevator button 7 Focus ring 7 IR receiver 7 Lens 7 Zoom tab 7 Menu Position 42 Menu Settings 42 Menu Timeout 43 Menu Transparency 43 Mute 44 O On-...) 34 Picture (in Video Mode) 35 Set Up 39 P Password 45 phone numbers 75 Power Saving 44 Power Settings 44 Powering On/Off the Projector Powering Off the Projector 20 Powering On the Projector 20 Q Quick Shutdown 44 R Remote Control 27 IR receiver 25 Reset 43 Reset, Factory 48 RJ45 9 S Screen 43 Screen Settings 43


