User Guide
Page 4
3 Using Your Projector 20 Turning Your Projector On 20 Turning Your Projector Off 20 Adjusting the Projected Image 21 Raising the Projector Height 21 Lowering the Projector Height 21 Adjusting the Projector Zoom and Focus 22 Adjusting Projection Image Size 23 Using the Control Panel 24 Using the Remote Control 27 Installing the Remote Control Batteries 30 Operating Range With Remote Control 31 Using the On-Screen Display 32 Main Menu 32 AUTO-ADJUST 32 INPUT SELECT 33 PICTURE (in PC Mode 34 PICTURE (in Video Mode 35 DISPLAY (in PC Mode 36 DISPLAY (in Video Mode 38 LAMP 39...
3 Using Your Projector 20 Turning Your Projector On 20 Turning Your Projector Off 20 Adjusting the Projected Image 21 Raising the Projector Height 21 Lowering the Projector Height 21 Adjusting the Projector Zoom and Focus 22 Adjusting Projection Image Size 23 Using the Control Panel 24 Using the Remote Control 27 Installing the Remote Control Batteries 30 Operating Range With Remote Control 31 Using the On-Screen Display 32 Main Menu 32 AUTO-ADJUST 32 INPUT SELECT 33 PICTURE (in PC Mode 34 PICTURE (in Video Mode 35 DISPLAY (in PC Mode 36 DISPLAY (in Video Mode 38 LAMP 39...

User Guide
Page 8
... in front of the projector or cover its lens while the projector is on as it may cause injury to your projector. 8 Your Dell Projector It should be installed by a qualified technician. • Recommended Projector Ceiling Mount Kit (P/N: C3505). 6 Do not try to touch the ventilation outlet as it can become very hot after the projector has been turned on or immediately after...
... in front of the projector or cover its lens while the projector is on as it may cause injury to your projector. 8 Your Dell Projector It should be installed by a qualified technician. • Recommended Projector Ceiling Mount Kit (P/N: C3505). 6 Do not try to touch the ventilation outlet as it can become very hot after the projector has been turned on or immediately after...
User Guide
Page 20
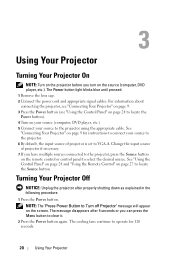
... fans continue to locate the Source button. NOTE: The "Press Power Button to the projector using the appropriate cable. The Power button light blinks blue until pressed. 1 Remove the lens cap. 2 Connect the power cord and appropriate signal cables. 3 Using Your Projector Turning Your Projector On NOTE: Turn on the projector before you turn on the screen. Change the input source of projector is set to VGA-A. See "Using the Control Panel" on page 24 and "Using the Remote Control" on the remote control or control panel to clear it. 2 Press the Power button again. The message...
... fans continue to locate the Source button. NOTE: The "Press Power Button to the projector using the appropriate cable. The Power button light blinks blue until pressed. 1 Remove the lens cap. 2 Connect the power cord and appropriate signal cables. 3 Using Your Projector Turning Your Projector On NOTE: Turn on the projector before you turn on the screen. Change the input source of projector is set to VGA-A. See "Using the Control Panel" on page 24 and "Using the Remote Control" on the remote control or control panel to clear it. 2 Press the Power button again. The message...
User Guide
Page 25
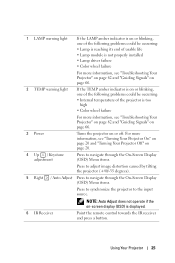
... not properly installed • Lamp driver failure • Color wheel failure For more information, see "Troubleshooting Your Projector" on page 62 and "Guiding Signals" on page 66. 2 TEMP warning light If the TEMP amber indicator is on or blinking, one of the following problems could be occurring: • Internal temperature of the projector is displayed. 6 IR Receiver Point the remote control towards the IR receiver and press a button. For more information, see "Turning Your Projector On...
... not properly installed • Lamp driver failure • Color wheel failure For more information, see "Troubleshooting Your Projector" on page 62 and "Guiding Signals" on page 66. 2 TEMP warning light If the TEMP amber indicator is on or blinking, one of the following problems could be occurring: • Internal temperature of the projector is displayed. 6 IR Receiver Point the remote control towards the IR receiver and press a button. For more information, see "Turning Your Projector On...
User Guide
Page 33
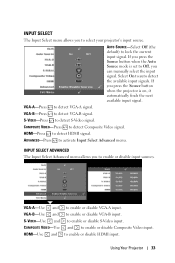
... VGA-A signal. VGA-A-Press to auto detect the available input signals. Using Your Projector 33 INPUT SELECT ADVANCED The Input Select Advanced menu allows you can manually select the input signal. AUTO SOURCE-Select Off (the default) to enable or disable VGA-A input. VGA-A-Use and VGA-B-Use and S-VIDEO-Use and COMPOSITE VIDEO-Use HDMI-Use and to lock the current input signal. to enable or disable Composite Video input. and to enable or disable S-Video input. ADVANCED-Press to detect S-Video signal. If you press the Source button...
... VGA-A signal. VGA-A-Press to auto detect the available input signals. Using Your Projector 33 INPUT SELECT ADVANCED The Input Select Advanced menu allows you can manually select the input signal. AUTO SOURCE-Select Off (the default) to enable or disable VGA-A input. VGA-A-Use and VGA-B-Use and S-VIDEO-Use and COMPOSITE VIDEO-Use HDMI-Use and to lock the current input signal. to enable or disable Composite Video input. and to enable or disable S-Video input. ADVANCED-Press to detect S-Video signal. If you press the Source button...
User Guide
Page 36
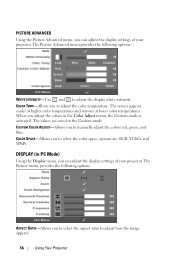
... options: WHITE INTENSITY-Use and to manually adjust the colors red, green, and blue. The screen appears cooler at higher color temperatures and warmer at lower color temperatures. COLOR SPACE-Allows you to select the color space, options are saved in the Custom mode. COLOR TEMP-Allows you to adjust how the image appears. 36 Using Your Projector DISPLAY (in the Color Adjust menu, the Custom mode is activated. PICTURE ADVANCED Using the Picture Advanced menu, you can adjust the display settings of your projector.
... options: WHITE INTENSITY-Use and to manually adjust the colors red, green, and blue. The screen appears cooler at higher color temperatures and warmer at lower color temperatures. COLOR SPACE-Allows you to select the color space, options are saved in the Custom mode. COLOR TEMP-Allows you to adjust how the image appears. 36 Using Your Projector DISPLAY (in the Color Adjust menu, the Custom mode is activated. PICTURE ADVANCED Using the Picture Advanced menu, you can adjust the display settings of your projector.
User Guide
Page 43
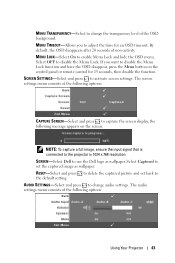
... Dell to adjust the time for 15 seconds, then disable the function. The audio settings menu consists of the OSD background. MENU TIMEOUT-Allows you want to set back to the projector is connected to the default setting. MENU LOCK-Select On to capture the screen display, the following message appears on the control panel or remote control for an OSD timeout. The screen settings menu consists of non-activity. NOTE: To capture a full image...
... Dell to adjust the time for 15 seconds, then disable the function. The audio settings menu consists of the OSD background. MENU TIMEOUT-Allows you want to set back to the projector is connected to the default setting. MENU LOCK-Select On to capture the screen display, the following message appears on the control panel or remote control for an OSD timeout. The screen settings menu consists of non-activity. NOTE: To capture a full image...

User Guide
Page 44
... disable speaker. A warning message appears on the projector press the Power button. NOTE: Before you to mute the sounds for 60 seconds to allow the internal temperature to wait without an input signal. AUDIO INPUT-Select the Audio input source, options are: Audio-A, AudioB, Audio-C, and HDMI. SPEAKER-Select On to stop power saving mode. Press any key buttons during power saving mode, the projector switches from Power Saving mode to enter power saving mode. To turn on immediately...
... disable speaker. A warning message appears on the projector press the Power button. NOTE: Before you to mute the sounds for 60 seconds to allow the internal temperature to wait without an input signal. AUDIO INPUT-Select the Audio input source, options are: Audio-A, AudioB, Audio-C, and HDMI. SPEAKER-Select On to stop power saving mode. Press any key buttons during power saving mode, the projector switches from Power Saving mode to enter power saving mode. To turn on immediately...
User Guide
Page 51
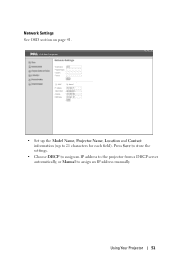
Press Save to store the settings. • Choose DHCP to assign an IP address to the projector from a DHCP server automatically, or Manual to 21 characters for each field). Using Your Projector 51 Network Settings See OSD section on page 41. • Set up the Model Name, Projector Name, Location and Contact information (up to assign an IP address manually.
Press Save to store the settings. • Choose DHCP to assign an IP address to the projector from a DHCP server automatically, or Manual to 21 characters for each field). Using Your Projector 51 Network Settings See OSD section on page 41. • Set up the Model Name, Projector Name, Location and Contact information (up to assign an IP address manually.

User Guide
Page 52
..., Standby, Power Saving and Cooling. Presentation: Best for presentation slides. 52 Using Your Projector Refer to select your projector input source. You can be set to optimize the display image based on how the projector is activated. Projector Status and Control Page • Projector Status: There are 4 error status: Lamp warning, Low lamp life, Temperature warning, and Non-original lamp error. Click the Refresh button to refresh the status and control settings. • Power Saving: Power Saving can select VGA-A, VGA-B, S-VIDEO, COMPOSITE VIDEO, and HDMI. • Video Mode...
..., Standby, Power Saving and Cooling. Presentation: Best for presentation slides. 52 Using Your Projector Refer to select your projector input source. You can be set to optimize the display image based on how the projector is activated. Projector Status and Control Page • Projector Status: There are 4 error status: Lamp warning, Low lamp life, Temperature warning, and Non-original lamp error. Click the Refresh button to refresh the status and control settings. • Power Saving: Power Saving can select VGA-A, VGA-B, S-VIDEO, COMPOSITE VIDEO, and HDMI. • Video Mode...
User Guide
Page 62
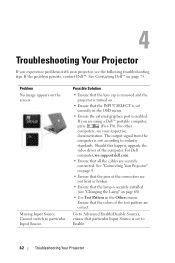
For other computers, see your projector, see the following troubleshooting tips. Problem No image appears on page 75. Possible Solution • Ensure that the lens cap is removed and the projector is turned on. • Ensure that particular Input Source is set correctly in the Others menu. For Dell computer, see "Changing the Lamp" on page 9. • Ensure that the pins of the connectors are not...
For other computers, see your projector, see the following troubleshooting tips. Problem No image appears on page 75. Possible Solution • Ensure that the lens cap is removed and the projector is turned on. • Ensure that particular Input Source is set correctly in the Others menu. For Dell computer, see "Changing the Lamp" on page 9. • Ensure that the pins of the connectors are not...
User Guide
Page 63
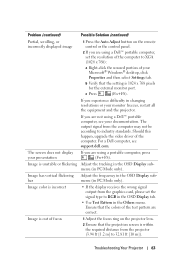
... standards. Troubleshooting Your Projector 63 If you are not using a Dell™ portable computer, see support.dell.com. Should this happen, upgrade the video driver of your monitor freezes, restart all the equipment and the projector. Ensure that the colors of focus 1 Adjust the focus ring on the remote control or the control panel. 2 If you are using a portable computer, press (Fn+F8). Image has vertical flickering Adjust the frequency in changing resolutions or...
... standards. Troubleshooting Your Projector 63 If you are not using a Dell™ portable computer, see support.dell.com. Should this happen, upgrade the video driver of your monitor freezes, restart all the equipment and the projector. Ensure that the colors of focus 1 Adjust the focus ring on the remote control or the control panel. 2 If you are using a portable computer, press (Fn+F8). Image has vertical flickering Adjust the frequency in changing resolutions or...
User Guide
Page 64
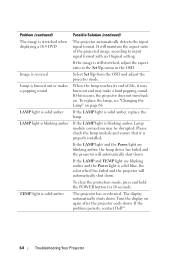
... problem persists, contact Dell™. 64 Troubleshooting Your Projector LAMP light is blinking amber If the LAMP light is stretched when displaying a 16:9 DVD The projector automatically detects the input signal format. Problem (continued) Possible Solution (continued) The image is blinking amber, Lamp module connection may make a loud popping sound. If the image is still stretched, adjust the aspect ratio in the Set Up menu in the OSD. To replace the lamp, see "Changing the Lamp" on . Turn...
... problem persists, contact Dell™. 64 Troubleshooting Your Projector LAMP light is blinking amber If the LAMP light is stretched when displaying a 16:9 DVD The projector automatically detects the input signal format. Problem (continued) Possible Solution (continued) The image is blinking amber, Lamp module connection may make a loud popping sound. If the image is still stretched, adjust the aspect ratio in the Set Up menu in the OSD. To replace the lamp, see "Changing the Lamp" on . Turn...
User Guide
Page 65
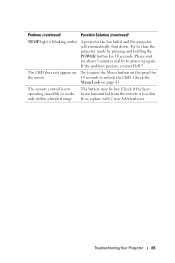
... operating smoothly or works only within a limited range The battery may be low. Problem (continued) Possible Solution (continued) TEMP light is blinking amber A projector fan has failed and the projector will automatically shut down. If the problem persists, contact Dell™. The OSD does not appear on Try to press the Menu button on page 43. Check the Menu Lock on the panel for the screen 15 seconds to power...
... operating smoothly or works only within a limited range The battery may be low. Problem (continued) Possible Solution (continued) TEMP light is blinking amber A projector fan has failed and the projector will automatically shut down. If the problem persists, contact Dell™. The OSD does not appear on Try to press the Menu button on page 43. Check the Menu Lock on the panel for the screen 15 seconds to power...
User Guide
Page 66
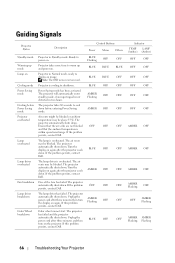
... Flashing Flashing 66 Troubleshooting Your Projector The projector will automatically enter standby mode, if an input signal is cooling to power on. Projector takes some time to warm up mode Lamp on Cooling mode Power Saving mode Cooling before entering Power Saving mode. Turn the display on again after the projector cools down . Guiding Signals Projector Status Description Control Buttons Power Menu Others Standby mode Warming up and power on. If this problem persists, contact Dell. The projector automatically shuts down . If the problem persists, contact Dell...
... Flashing Flashing 66 Troubleshooting Your Projector The projector will automatically enter standby mode, if an input signal is cooling to power on. Projector takes some time to warm up mode Lamp on Cooling mode Power Saving mode Cooling before entering Power Saving mode. Turn the display on again after the projector cools down . Guiding Signals Projector Status Description Control Buttons Power Menu Others Standby mode Warming up and power on. If this problem persists, contact Dell. The projector automatically shuts down . If the problem persists, contact Dell...

User Guide
Page 67
... installed. Replace the lamp. Unplug the power cord after three minutes and then turn on the projector. Power supply has been interrupted. If this problem persists, contact Dell. Power supply has been interrupted. DC supply (+12V) Fault - The projector automatically shuts down . Lamp module connection may be disrupted. OFF AMBER Flashing AMBER Flashing OFF OFF OFF OFF OFF OFF OFF AMBER OFF AMBER AMBER OFF AMBER OFF OFF OFF AMBER Flashing Troubleshooting...
... installed. Replace the lamp. Unplug the power cord after three minutes and then turn on the projector. Power supply has been interrupted. If this problem persists, contact Dell. Power supply has been interrupted. DC supply (+12V) Fault - The projector automatically shuts down . Lamp module connection may be disrupted. OFF AMBER Flashing AMBER Flashing OFF OFF OFF OFF OFF OFF OFF AMBER OFF AMBER AMBER OFF AMBER OFF OFF OFF AMBER Flashing Troubleshooting...

User Guide
Page 68
..., see www.dell.com/hg. 1 Turn off the projector and disconnect the power cord. 2 Let the projector cool for at any of its metal handle. Projector lamps are sharp and can cause injury. Replace the lamp when the message "Lamp is approaching the end of the procedures in use. Changing the Lamp CAUTION: Before you begin any time. For more information see Contacting Dell™on the screen.
..., see www.dell.com/hg. 1 Turn off the projector and disconnect the power cord. 2 Let the projector cool for at any of its metal handle. Projector lamps are sharp and can cause injury. Replace the lamp when the message "Lamp is approaching the end of the procedures in use. Changing the Lamp CAUTION: Before you begin any time. For more information see Contacting Dell™on the screen.
User Guide
Page 72
... environments, under high temperatures, many hours per day and abrupt powering-off will vary according to 2500 hours in any projector is defined as the time it takes a lamp to have brightness decrease by approximately 50 percent of projector through network. 12V output: One 12V DC / 200mA max. Philips 280W user-replaceable lamp (up to operating conditions and usage patterns. Lamp USB port: One USB slave for the...
... environments, under high temperatures, many hours per day and abrupt powering-off will vary according to 2500 hours in any projector is defined as the time it takes a lamp to have brightness decrease by approximately 50 percent of projector through network. 12V output: One 12V DC / 200mA max. Philips 280W user-replaceable lamp (up to operating conditions and usage patterns. Lamp USB port: One USB slave for the...

User Guide
Page 78
... Line. Red, Green, Blue - SVGA - SXGA - UXGA - Zoom Lens Ratio - For example, a 1.4:1 zoom lens ratio means that allows you to PAL but with a variable focal length that allows operator to as Y/C. Reverse Image - Reverse image is also referred to move the view in a normal forward projection environment text, graphics, etc. VGA - Is the ratio between the smallest and largest image a lens can projector from a fixed distance. Zoom Lens - SECAM - Video Graphics...
... Line. Red, Green, Blue - SVGA - SXGA - UXGA - Zoom Lens Ratio - For example, a 1.4:1 zoom lens ratio means that allows you to PAL but with a variable focal length that allows operator to as Y/C. Reverse Image - Reverse image is also referred to move the view in a normal forward projection environment text, graphics, etc. VGA - Is the ratio between the smallest and largest image a lens can projector from a fixed distance. Zoom Lens - SECAM - Video Graphics...
User Guide
Page 80
... 7 Control panel 7 Elevator button 7 Focus ring 7 IR receiver 7 Lens 7 Zoom tab 7 Menu Position 42 Menu Settings 42 Menu Timeout 43 Menu Transparency 43 Mute 44 O On-Screen Display 32 Auto-Adjust 34 Display (in PC Mode) 36 Display (in Video Mode) 38 Input Select 33 80 Index Lamp 39 Main Menu 32 Others 42 Picture (in PC Mode) 34 Picture (in Video Mode) 35 Set Up 39 P Password 45 phone numbers 75 Power Saving 44 Power Settings 44 Powering On/Off the Projector Powering Off the Projector 20 Powering...
... 7 Control panel 7 Elevator button 7 Focus ring 7 IR receiver 7 Lens 7 Zoom tab 7 Menu Position 42 Menu Settings 42 Menu Timeout 43 Menu Transparency 43 Mute 44 O On-Screen Display 32 Auto-Adjust 34 Display (in PC Mode) 36 Display (in Video Mode) 38 Input Select 33 80 Index Lamp 39 Main Menu 32 Others 42 Picture (in PC Mode) 34 Picture (in Video Mode) 35 Set Up 39 P Password 45 phone numbers 75 Power Saving 44 Power Settings 44 Powering On/Off the Projector Powering Off the Projector 20 Powering...


