
Brochure
Page 2
...,000 pages per page that allows user to duplex scan and copy up to various devices with genuine Dell options and supplies Toner cartridges The Dell 3333dn and Dell 3335dn black toner cartridge standard capacity: (approximately 8,000 pages3); Solid warranty and exceptional service Should your Dell 3333dn and Dell 3335dn need for recycling at no additional cost. The printer ships with...
...,000 pages per page that allows user to duplex scan and copy up to various devices with genuine Dell options and supplies Toner cartridges The Dell 3333dn and Dell 3335dn black toner cartridge standard capacity: (approximately 8,000 pages3); Solid warranty and exceptional service Should your Dell 3333dn and Dell 3335dn need for recycling at no additional cost. The printer ships with...

Brochure
Page 4
..., write Dell USA LP, Attn: Warranties, One Dell Way, Round Rock, TX 78682 or visit www.dell.com/warranty. 2 Remote Diagnosis is covered by region. Availability varies. Dell 3333dn and Dell 3335dn multifunction...toner cartridge capacity3 Toner cartridge capacity3 Toner recycling Additional consumables Toner level reporting, low toner alerts, auto-generated alert emails The printer ships with 24 x 7 toll-free Support and 1-Year On-site Service after Remote Diagnosis2 1-year Limited Hardware Warranty1 Up to a total of 5 Years On-site Service after Remote Diagnosis 2, 5 1 - 5 Years Dell...
..., write Dell USA LP, Attn: Warranties, One Dell Way, Round Rock, TX 78682 or visit www.dell.com/warranty. 2 Remote Diagnosis is covered by region. Availability varies. Dell 3333dn and Dell 3335dn multifunction...toner cartridge capacity3 Toner cartridge capacity3 Toner recycling Additional consumables Toner level reporting, low toner alerts, auto-generated alert emails The printer ships with 24 x 7 toll-free Support and 1-Year On-site Service after Remote Diagnosis2 1-year Limited Hardware Warranty1 Up to a total of 5 Years On-site Service after Remote Diagnosis 2, 5 1 - 5 Years Dell...
User Manual
Page 9
... computer 230 Ordering supplies...231 Printer attached to a network ...231 Printer attached locally to a computer ...231 Replacing supplies...231 Replacing the toner cartridge ...231 Replacing the photoconductor kit ...233 Recycling Dell products...236 Moving the printer to another location...236 Shipping the printer...237 Administrative support 238 Using the Embedded Web Server...238...
... computer 230 Ordering supplies...231 Printer attached to a network ...231 Printer attached locally to a computer ...231 Replacing supplies...231 Replacing the toner cartridge ...231 Replacing the photoconductor kit ...233 Recycling Dell products...236 Moving the printer to another location...236 Shipping the printer...237 Administrative support 238 Using the Embedded Web Server...238...

User Manual
Page 231
... by printing a menu settings page. or A4-size plain paper. The Order Toner Cartridges window opens. 6 Choose your printer. 8 Click Visit Dell's cartridge ordering website. Replacing supplies Replacing the toner cartridge When 88 Cartridge low appears, or when you experience faded print, remove the toner cartridge. Firmly shake it side-to-side and front-to-back several times to...
... by printing a menu settings page. or A4-size plain paper. The Order Toner Cartridges window opens. 6 Choose your printer. 8 Click Visit Dell's cartridge ordering website. Replacing supplies Replacing the toner cartridge When 88 Cartridge low appears, or when you experience faded print, remove the toner cartridge. Firmly shake it side-to-side and front-to-back several times to...

User Manual
Page 232
Pull the toner cartridge up and out using the handle. 3 Unpack the new toner cartridge. Extended light exposure can cause print quality problems. 4 Rotate the cartridge in all directions to direct light for an extended period of the photoconductor kit. Maintaining the printer 232 To replace the toner cartridge: 1 Open the front door by pressing the button on the left side of the printer and lowering the door. 2 Press the button on the base of time. Warning-Potential Damage: When replacing a toner cartridge, do not leave the photoconductor kit exposed to distribute the toner.
Pull the toner cartridge up and out using the handle. 3 Unpack the new toner cartridge. Extended light exposure can cause print quality problems. 4 Rotate the cartridge in all directions to direct light for an extended period of the photoconductor kit. Maintaining the printer 232 To replace the toner cartridge: 1 Open the front door by pressing the button on the left side of the printer and lowering the door. 2 Press the button on the base of time. Warning-Potential Damage: When replacing a toner cartridge, do not leave the photoconductor kit exposed to distribute the toner.

User Manual
Page 233
... the photoconductor kit has reached its official end-of the photoconductor kit by aligning the rollers on the toner cartridge with the arrows on the display. The cartridge clicks into place when correctly installed. 6 Close the front door. Replacing the photoconductor kit The printer ...automatically notifies you should immediately order a new photoconductor kit. Note: The photoconductor kit is one item only. 5 Install the new toner cartridge by printing a menu settings page. When 84 PC Kit life warning or 84 Replace PC Kit first appears, you before the photoconductor ...
... the photoconductor kit has reached its official end-of the photoconductor kit by aligning the rollers on the toner cartridge with the arrows on the display. The cartridge clicks into place when correctly installed. 6 Close the front door. Replacing the photoconductor kit The printer ...automatically notifies you should immediately order a new photoconductor kit. Note: The photoconductor kit is one item only. 5 Install the new toner cartridge by printing a menu settings page. When 84 PC Kit life warning or 84 Replace PC Kit first appears, you before the photoconductor ...
User Manual
Page 234
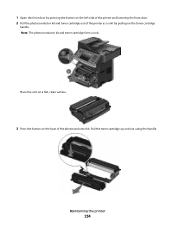
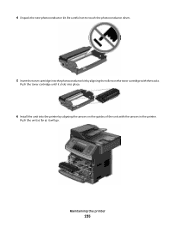
Maintaining the printer 234 Place the unit on a flat, clean surface. 3 Press the button on the toner cartridge handle. Pull the toner cartridge up and out using the handle. Note: The photoconductor kit and toner cartridge form a unit. 1 Open the front door by pressing the button on the left side of the printer and lowering the front door. 2 Pull the photoconductor kit and toner cartridge out of the printer as a unit by pulling on the base of the photoconductor kit.
Maintaining the printer 234 Place the unit on a flat, clean surface. 3 Press the button on the toner cartridge handle. Pull the toner cartridge up and out using the handle. Note: The photoconductor kit and toner cartridge form a unit. 1 Open the front door by pressing the button on the left side of the printer and lowering the front door. 2 Pull the photoconductor kit and toner cartridge out of the printer as a unit by pulling on the base of the photoconductor kit.
User Manual
Page 235
Be careful not to touch the photoconductor drum. 5 Insert the toner cartridge into the printer by aligning the rollers on the guides of the unit with the tracks. Maintaining the printer 235 Push the unit as far as it clicks into place. 6 Install the unit into the photoconductor kit by aligning the arrows on the toner cartridge with the arrows in the printer. 4 Unpack the new photoconductor kit. Push the toner cartridge until it will go.
Be careful not to touch the photoconductor drum. 5 Insert the toner cartridge into the printer by aligning the rollers on the guides of the unit with the tracks. Maintaining the printer 235 Push the unit as far as it clicks into place. 6 Install the unit into the photoconductor kit by aligning the arrows on the toner cartridge with the arrows in the printer. 4 Unpack the new photoconductor kit. Push the toner cartridge until it will go.

User Manual
Page 238
... the printer send you an e-mail when the supplies are getting low or when the paper needs to see tray settings, the level of toner in the toner cartridge, the percentage of your Web browser. Note: If you do not know the IP address of the printer, then print a network setup page and...
... the printer send you an e-mail when the supplies are getting low or when the paper needs to see tray settings, the level of toner in the toner cartridge, the percentage of your Web browser. Note: If you do not know the IP address of the printer, then print a network setup page and...
User Manual
Page 240
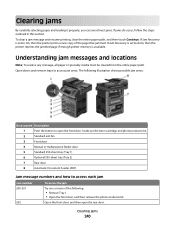
... jam messages and locations Note: To resolve any message, all paper or specialty media must be cleared from the entire paper path. Inside are the toner cartridge and photoconductor kit. 2 Standard exit bin 3 Front door 4 Manual or multipurpose feeder door 5 Standard 250-sheet tray (Tray 1) 6 Optional 550-sheet tray (Tray 2) 7 Rear door...
... jam messages and locations Note: To resolve any message, all paper or specialty media must be cleared from the entire paper path. Inside are the toner cartridge and photoconductor kit. 2 Standard exit bin 3 Front door 4 Manual or multipurpose feeder door 5 Standard 250-sheet tray (Tray 1) 6 Optional 550-sheet tray (Tray 2) 7 Rear door...
User Manual
Page 242
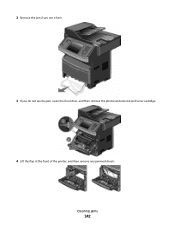
Clearing jams 242 2 Remove the jam if you see it here. 3 If you do not see the jam, open the front door, and then remove the photoconductor kit and toner cartridge. 4 Lift the flap at the front of the printer, and then remove any jammed sheets.
Clearing jams 242 2 Remove the jam if you see it here. 3 If you do not see the jam, open the front door, and then remove the photoconductor kit and toner cartridge. 4 Lift the flap at the front of the printer, and then remove any jammed sheets.

User Manual
Page 243
Clearing jams 243 5 If you do not see any jammed sheets, open the rear door. 6 Remove the jam. 7 Close the rear door. 8 Insert the photoconductor kit and toner cartridge. 9 Close the front door. 10 Touch Continue. 202 paper jam Touch Status/Supplies to identify the location of the jam. If the paper is exiting the printer, then pull the paper out, and then touch Continue.
Clearing jams 243 5 If you do not see any jammed sheets, open the rear door. 6 Remove the jam. 7 Close the rear door. 8 Insert the photoconductor kit and toner cartridge. 9 Close the front door. 10 Touch Continue. 202 paper jam Touch Status/Supplies to identify the location of the jam. If the paper is exiting the printer, then pull the paper out, and then touch Continue.
User Manual
Page 249
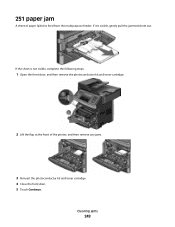
Clearing jams 249 251 paper jam A sheet of the printer, and then remove any jams. 3 Reinsert the photoconductor kit and toner cartridge. 4 Close the front door. 5 Touch Continue. If it is not visible, complete the following steps: 1 Open the front door, and then remove the photoconductor kit and toner cartridge. 2 Lift the flap at the front of paper failed to feed from the multipurpose feeder. If the sheet is visible, gently pull the jammed sheet out.
Clearing jams 249 251 paper jam A sheet of the printer, and then remove any jams. 3 Reinsert the photoconductor kit and toner cartridge. 4 Close the front door. 5 Touch Continue. If it is not visible, complete the following steps: 1 Open the front door, and then remove the photoconductor kit and toner cartridge. 2 Lift the flap at the front of paper failed to feed from the multipurpose feeder. If the sheet is visible, gently pull the jammed sheet out.
User Manual
Page 259
... message and continue printing. Restore Held Jobs? Remove the unsupported device, and then install a supported one . Remove the toner cartridge, and then install a new one . 30.yy Invalid refill, change cartridge An unsupported, refilled toner cartridge is installed. If the printer cannot find a tray with the correct paper type and size, then it prints from...
... message and continue printing. Restore Held Jobs? Remove the unsupported device, and then install a supported one . Remove the toner cartridge, and then install a new one . 30.yy Invalid refill, change cartridge An unsupported, refilled toner cartridge is installed. If the printer cannot find a tray with the correct paper type and size, then it prints from...
User Manual
Page 260
... 260 Try one or more of the following: • Remove the toner cartridge, and then reinstall it. • Remove the toner cartridge, and then install a new one. 32.yy Cartridge part number unsupported by device Remove the toner cartridge, and then install a supported one. 34 Short paper Try one or... are set . For example, if the MP Feeder Size is set to process current jobs. 31.yy Replace defective or missing cartridge The toner cartridge is either missing or not functioning properly. When Ready appears, enable Resource Save. • Install additional memory. 37 Insufficient memory ...
... 260 Try one or more of the following: • Remove the toner cartridge, and then reinstall it. • Remove the toner cartridge, and then install a new one. 32.yy Cartridge part number unsupported by device Remove the toner cartridge, and then install a supported one. 34 Short paper Try one or... are set . For example, if the MP Feeder Size is set to process current jobs. 31.yy Replace defective or missing cartridge The toner cartridge is either missing or not functioning properly. When Ready appears, enable Resource Save. • Install additional memory. 37 Insufficient memory ...

User Manual
Page 264
Order a maintenance kit, which contains all the items necessary to have routine maintenance done. Troubleshooting 264 Replace the toner cartridge, and then touch Continue to clear the message and continue printing. 1565 Emulation error, load emulation option The printer automatically...Continue to clear the message and continue printing. 84 Replace PC Kit The photoconductor kit is low. Install a new photoconductor kit. 88 Cartridge low The toner is exhausted. 61 Remove defective disk Try one or more of the following: • Touch Continue to clear the message and continue printing...
Order a maintenance kit, which contains all the items necessary to have routine maintenance done. Troubleshooting 264 Replace the toner cartridge, and then touch Continue to clear the message and continue printing. 1565 Emulation error, load emulation option The printer automatically...Continue to clear the message and continue printing. 84 Replace PC Kit The photoconductor kit is low. Install a new photoconductor kit. 88 Cartridge low The toner is exhausted. 61 Remove defective disk Try one or more of the following: • Touch Continue to clear the message and continue printing...
User Manual
Page 271
... appears or when the print becomes faded, replace the toner cartridge. CHECK THE QUALITY OF THE ORIGINAL DOCUMENT Make sure the quality of the original document is loaded facedown on the scanner glass in the upper ... more information, see: "Cleaning the scanner glass" on the scanner glass. THE COPY IS TOO LIGHT OR TOO DARK Adjust the copy darkness setting. UNWANTED TONER IS IN THE BACKGROUND • Adjust the darkness to clean the ADF scanner glass as well.
... appears or when the print becomes faded, replace the toner cartridge. CHECK THE QUALITY OF THE ORIGINAL DOCUMENT Make sure the quality of the original document is loaded facedown on the scanner glass in the upper ... more information, see: "Cleaning the scanner glass" on the scanner glass. THE COPY IS TOO LIGHT OR TOO DARK Adjust the copy darkness setting. UNWANTED TONER IS IN THE BACKGROUND • Adjust the darkness to clean the ADF scanner glass as well.
User Manual
Page 282
... the buttons when the screen with the progress bar appears. Reinstall the toner cartridge. THE TONER MAY BE LOW When 88 Cartridge Low appears, order a new toner cartridge. or A4-size paper in the following : PACKING MATERIAL MAY BE ON THE TONER CARTRIDGE Remove the toner cartridge and make sure the packing material is properly removed. Blank pages These are...
... the buttons when the screen with the progress bar appears. Reinstall the toner cartridge. THE TONER MAY BE LOW When 88 Cartridge Low appears, order a new toner cartridge. or A4-size paper in the following : PACKING MATERIAL MAY BE ON THE TONER CARTRIDGE Remove the toner cartridge and make sure the packing material is properly removed. Blank pages These are...
User Manual
Page 286
Skewed print These are possible solutions. Troubleshooting 286 THE TONER MAY BE LOW When 88 Cartridge Low appears or when the print becomes faded, replace the toner cartridge. Solid black or white streaks appear on transparencies or paper These are possible solutions. Try one or more of the following : CHECK THE PAPER GUIDES ...
Skewed print These are possible solutions. Troubleshooting 286 THE TONER MAY BE LOW When 88 Cartridge Low appears or when the print becomes faded, replace the toner cartridge. Solid black or white streaks appear on transparencies or paper These are possible solutions. Try one or more of the following : CHECK THE PAPER GUIDES ...
User Manual
Page 287
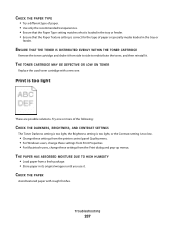
... DUE TO HIGH HUMIDITY • Load paper from side to side to redistribute the toner, and then reinstall it . Troubleshooting 287 ENSURE THAT THE TONER IS DISTRIBUTED EVENLY WITHIN THE TONER CARTRIDGE Remove the toner cartridge and shake it from a fresh package. • Store paper in its original wrapper...it . Print is correct for the type of paper or specialty media loaded in the tray or feeder. THE TONER CARTRIDGE MAY BE DEFECTIVE OR LOW ON TONER Replace the used toner cartridge with rough finishes. CHECK THE PAPER TYPE • Try a different type of paper. • Use only the...
... DUE TO HIGH HUMIDITY • Load paper from side to side to redistribute the toner, and then reinstall it . Troubleshooting 287 ENSURE THAT THE TONER IS DISTRIBUTED EVENLY WITHIN THE TONER CARTRIDGE Remove the toner cartridge and shake it from a fresh package. • Store paper in its original wrapper...it . Print is correct for the type of paper or specialty media loaded in the tray or feeder. THE TONER CARTRIDGE MAY BE DEFECTIVE OR LOW ON TONER Replace the used toner cartridge with rough finishes. CHECK THE PAPER TYPE • Try a different type of paper. • Use only the...


