User Guide
Page 5
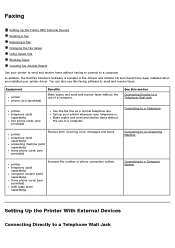
... (provided) Benefits Make copies and send and receive faxes without the use of phone connection outlets. You can also use of a computer. Connecting to send and receive faxes. Make copies and send and receive faxes without having to connect to a Telephone printer telephone (sold separately) answering machine (sold separately) three phone cords (one provided) USB cable (sold separately) three...
... (provided) Benefits Make copies and send and receive faxes without the use of phone connection outlets. You can also use of a computer. Connecting to send and receive faxes. Make copies and send and receive faxes without having to connect to a Telephone printer telephone (sold separately) answering machine (sold separately) three phone cords (one provided) USB cable (sold separately) three...
User Guide
Page 23
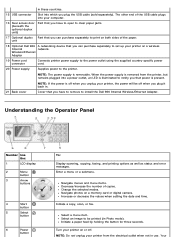
...Dell 966 A networking device that you can purchase separately to set up your printer, the power will be printed (in Photo mode). Understanding the Operator Panel Number Use the: 1 LCD display 2 Menu button 3 Arrow buttons 4 Start button 5 Select button 6 Power button To: Display scanning, copying, faxing, and printing...not unplug your printer on both sides of copies. in these countries. 15 USB connector Slot into which you plug it back in. The other end of the USB cable plugs into a power outlet, an LED is off when you plug the USB cable (sold...
...Dell 966 A networking device that you can purchase separately to set up your printer, the power will be printed (in Photo mode). Understanding the Operator Panel Number Use the: 1 LCD display 2 Menu button 3 Arrow buttons 4 Start button 5 Select button 6 Power button To: Display scanning, copying, faxing, and printing...not unplug your printer on both sides of copies. in these countries. 15 USB connector Slot into which you plug it back in. The other end of the USB cable plugs into a power outlet, an LED is off when you plug the USB cable (sold...
User Guide
Page 58
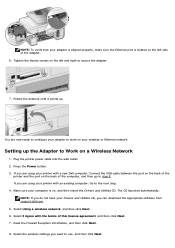
You are now ready to configure your adapter to step 8. If you are using your printer with an existing computer: Go to use, and then click Next. If you are using your printer with the terms of this license agreement, and then click Next. 7. Select Using a wireless network, and...download the appropriate software from support.dell.com . 5. Setting up . Select I Agree with a new Dell computer: Connect the USB cable between the port on the back of the printer and the port on the back of the adapter. 6. Plug the printer power cable into the wall outlet. 2. Rotate the antenna until...
You are now ready to configure your adapter to step 8. If you are using your printer with an existing computer: Go to use, and then click Next. If you are using your printer with the terms of this license agreement, and then click Next. 7. Select Using a wireless network, and...download the appropriate software from support.dell.com . 5. Setting up . Select I Agree with a new Dell computer: Connect the USB cable between the port on the back of the printer and the port on the back of the adapter. 6. Plug the printer power cable into the wall outlet. 2. Rotate the antenna until...
User Guide
Page 86
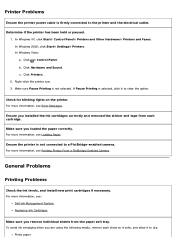
...outlet and computer, if using a computer. If the software installation screen does not appear automatically, install the software manually. 1. Follow the instructions on your computer. Determine if the printer software is compatible with your computer. Troubleshooting Setup Problems General Problems Error Messages Improving Print...Windows 2000, double-click My Computer from your computer. Check the USB cable. For Windows Vista: Click Start® Programs or All Programs® Dell Printers. The printer supports Windows XP Professional x64, Windows XP, Windows 2000, and...
...outlet and computer, if using a computer. If the software installation screen does not appear automatically, install the software manually. 1. Follow the instructions on your computer. Determine if the printer software is compatible with your computer. Troubleshooting Setup Problems General Problems Error Messages Improving Print...Windows 2000, double-click My Computer from your computer. Check the USB cable. For Windows Vista: Click Start® Programs or All Programs® Dell Printers. The printer supports Windows XP Professional x64, Windows XP, Windows 2000, and...

User Guide
Page 87
...® Printers and Faxes. Click ® Control Panel. c. Print a job to each of the print object by right-clicking the printer icon and selecting Set as the default printer by right-clicking the printer name and selecting Delete. Click Dell Printers. Reconnect the USB cable to see Removing and Reinstalling Software. In Windows Vista: a. b. Delete the other copies of these print objects...
...® Printers and Faxes. Click ® Control Panel. c. Print a job to each of the print object by right-clicking the printer icon and selecting Set as the default printer by right-clicking the printer name and selecting Delete. Click Dell Printers. Reconnect the USB cable to see Removing and Reinstalling Software. In Windows Vista: a. b. Delete the other copies of these print objects...
User Guide
Page 88
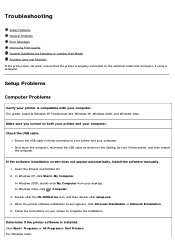
... levels, and install new print cartridges if necessary. Click ® Control Panel. For more information, see Error Messages. Replacing Ink Cartridges. If Pause Printing is firmly connected to the printer and the electrical outlet. Printer Problems Ensure the printer power cable is selected, click it to dry: Photo paper For more information, see Printing Photos From a PictBridge-Enabled Camera...
... levels, and install new print cartridges if necessary. Click ® Control Panel. For more information, see Error Messages. Replacing Ink Cartridges. If Pause Printing is firmly connected to the printer and the electrical outlet. Printer Problems Ensure the printer power cable is selected, click it to dry: Photo paper For more information, see Printing Photos From a PictBridge-Enabled Camera...
User Guide
Page 90
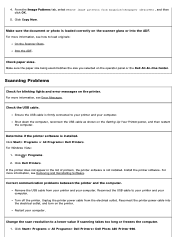
... ADF. Ensure the USB cable is installed. Click Dell Printers. Turn off the printer. Change the scan resolution to your printer and your computer. 4. Make sure the document or photo is not installed. Click Start® Programs or All Programs® Dell Printers. Install the printer software. Click Start® Programs or All Programs® Dell Printers® Dell Photo AIO Printer 966. Check paper sizes...
... ADF. Ensure the USB cable is installed. Click Dell Printers. Turn off the printer. Change the scan resolution to your printer and your computer. 4. Make sure the document or photo is not installed. Click Start® Programs or All Programs® Dell Printers. Install the printer software. Click Start® Programs or All Programs® Dell Printers® Dell Photo AIO Printer 966. Check paper sizes...