
User Guide
Page 2
... Windows are trademarks of Dell of Dell Inc. Dell Inc. Model 2400MP May 2008 Rev. Information in trademarks and trade names other countries. All rights reserved. ITnrca.d;eDmLaPrkasnudseDdLiPn®thliosgtoexatr:eDtrealdl eamndartkhse DELL logo are either registered trademarks or trademarks of your projector. disclaims any manner whatsoever without notice. © 2007-2008 Dell Inc. Reproduction in any...
... Windows are trademarks of Dell of Dell Inc. Dell Inc. Model 2400MP May 2008 Rev. Information in trademarks and trade names other countries. All rights reserved. ITnrca.d;eDmLaPrkasnudseDdLiPn®thliosgtoexatr:eDtrealdl eamndartkhse DELL logo are either registered trademarks or trademarks of your projector. disclaims any manner whatsoever without notice. © 2007-2008 Dell Inc. Reproduction in any...
User Guide
Page 3
Contents 1 Your Dell Projector 5 About Your Projector 7 2 Connecting Your Projector 8 Connecting to a Computer 9 Connecting to a DVD Player 10 Connecting a DVD Player with an S-video Cable . . 10 Connecting a DVD Player with a Composite Cable . 11 Connecting a DVD Player with a Component Cable 12 Professional Installation Options 13 3 Using Your Projector . . . . 14 Turning Your Projector On 14 Turning Your Projector Off 14...
Contents 1 Your Dell Projector 5 About Your Projector 7 2 Connecting Your Projector 8 Connecting to a Computer 9 Connecting to a DVD Player 10 Connecting a DVD Player with an S-video Cable . . 10 Connecting a DVD Player with a Composite Cable . 11 Connecting a DVD Player with a Component Cable 12 Professional Installation Options 13 3 Using Your Projector . . . . 14 Turning Your Projector On 14 Turning Your Projector Off 14...
User Guide
Page 4
Using the Remote Control 20 Using the On-Screen Display 21 Main Menu 22 Input Select 22 Auto-Adjust 22 Set Up 22 PICTURE (in PC Mode 24 PICTURE (in Video Mode 24 DISPLAY (in PC Mode 25 DISPLAY (in Video Mode 26 LAMP 26 LANGUAGE 27 Preferences 28 4 Troubleshooting Your Projector 31 Changing the Lamp 35 5 Specifications 37 Contacting Dell 42 6 Appendix: Glossary 43 4 Contents
Using the Remote Control 20 Using the On-Screen Display 21 Main Menu 22 Input Select 22 Auto-Adjust 22 Set Up 22 PICTURE (in PC Mode 24 PICTURE (in Video Mode 24 DISPLAY (in PC Mode 25 DISPLAY (in Video Mode 26 LAMP 26 LANGUAGE 27 Preferences 28 4 Troubleshooting Your Projector 31 Changing the Lamp 35 5 Specifications 37 Contacting Dell 42 6 Appendix: Glossary 43 4 Contents
User Guide
Page 5
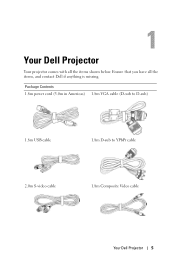
Ensure that you have all the items shown below. 1 Your Dell Projector Your projector comes with all the items, and contact Dell if anything is missing. Package Contents 1.8m power cord (3.0m in Americas) 1.8m VGA cable (D-sub to D-sub) 1.8m USB cable 1.8m D-sub to YPbPr cable 2.0m S-video cable 1.8m Composite Video cable Your Dell Projector 5
Ensure that you have all the items shown below. 1 Your Dell Projector Your projector comes with all the items, and contact Dell if anything is missing. Package Contents 1.8m power cord (3.0m in Americas) 1.8m VGA cable (D-sub to D-sub) 1.8m USB cable 1.8m D-sub to YPbPr cable 2.0m S-video cable 1.8m Composite Video cable Your Dell Projector 5
User Guide
Page 7
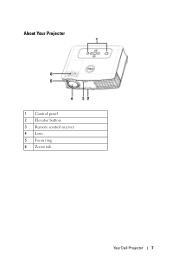
About Your Projector 1 Control panel 2 Elevator button 3 Remote control receiver 4 Lens 5 Focus ring 6 Zoom tab Your Dell Projector 7
About Your Projector 1 Control panel 2 Elevator button 3 Remote control receiver 4 Lens 5 Focus ring 6 Zoom tab Your Dell Projector 7

User Guide
Page 8
2 Connecting Your Projector 1 IR receiver 2 VGA in (D-sub) connector 3 VGA out (monitor loop-through) 4 USB remote connector 5 Audio output connector 6 RS232 connector 7 Power cord connector 8 Audio input connector 9 Composite video connector 10 S-video connector 11 Kensington lock hole 8 Connecting Your Projector
2 Connecting Your Projector 1 IR receiver 2 VGA in (D-sub) connector 3 VGA out (monitor loop-through) 4 USB remote connector 5 Audio output connector 6 RS232 connector 7 Power cord connector 8 Audio input connector 9 Composite video connector 10 S-video connector 11 Kensington lock hole 8 Connecting Your Projector
User Guide
Page 9
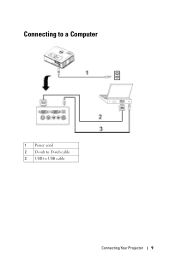
Connecting to a Computer 1 Power cord 2 D-sub to D-sub cable 3 USB to USB cable Connecting Your Projector 9
Connecting to a Computer 1 Power cord 2 D-sub to D-sub cable 3 USB to USB cable Connecting Your Projector 9
User Guide
Page 10
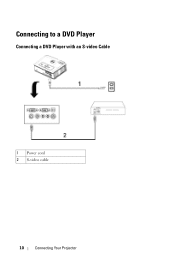
Connecting to a DVD Player Connecting a DVD Player with an S-video Cable 1 Power cord 2 S-video cable 10 Connecting Your Projector
Connecting to a DVD Player Connecting a DVD Player with an S-video Cable 1 Power cord 2 S-video cable 10 Connecting Your Projector
User Guide
Page 11
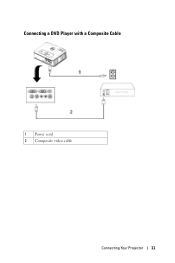
Connecting a DVD Player with a Composite Cable 1 Power cord 2 Composite video cable Connecting Your Projector 11
Connecting a DVD Player with a Composite Cable 1 Power cord 2 Composite video cable Connecting Your Projector 11
User Guide
Page 12
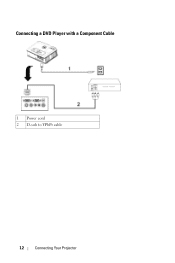
Connecting a DVD Player with a Component Cable 1 Power cord 2 D-sub to YPbPr cable 12 Connecting Your Projector
Connecting a DVD Player with a Component Cable 1 Power cord 2 D-sub to YPbPr cable 12 Connecting Your Projector

User Guide
Page 13
Professional Installation Options: Connecting a Computer with a RS232 cable 1 Power cord 2 RS232 cable Connecting Your Projector 13
Professional Installation Options: Connecting a Computer with a RS232 cable 1 Power cord 2 RS232 cable Connecting Your Projector 13
User Guide
Page 14
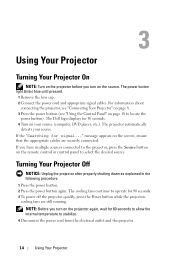
... NOTICE: Unplug the projector after properly shutting down as explained in the following procedure. 1 Press the power button. 2 Press the power button again. The Dell logo displays for signal..." If the "Searching for 30 seconds. 4 Turn on the source. If you turn on your source. The power button light blinks ...
... NOTICE: Unplug the projector after properly shutting down as explained in the following procedure. 1 Press the power button. 2 Press the power button again. The Dell logo displays for signal..." If the "Searching for 30 seconds. 4 Turn on the source. If you turn on your source. The power button light blinks ...
User Guide
Page 15
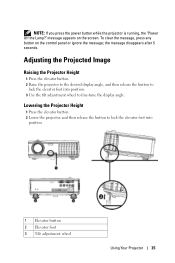
...the tilt adjustment wheel to lock the elevator foot into position. 1 Elevator button 2 Elevator foot 3 Tilt adjustment wheel Using Your Projector 15 message appears on the control panel or ignore the message; the message disappears after 5 seconds. Adjusting the Projected Image Raising the... Projector Height 1 Press the elevator button. 2 Raise the projector to the desired display angle, and then release the button to fine-tune the display angle. NOTE: If ...
...the tilt adjustment wheel to lock the elevator foot into position. 1 Elevator button 2 Elevator foot 3 Tilt adjustment wheel Using Your Projector 15 message appears on the control panel or ignore the message; the message disappears after 5 seconds. Adjusting the Projected Image Raising the... Projector Height 1 Press the elevator button. 2 Raise the projector to the desired display angle, and then release the button to fine-tune the display angle. NOTE: If ...

User Guide
Page 16
Adjusting the Projector Zoom and Focus CAUTION: To avoid damaging the projector, ensure that the zoom lens and elevator foot are fully retracted before moving the projector or placing the projector in its carrying case. 1 Rotate the zoom tab to 12 m). 1 Zoom tab 2 Focus ring 16 Using Your Projector The projector focuses at distances from 3.9 ft to 39.4 ft (1.2 m to zoom in and out. 2 Rotate the focus ring until the image is clear.
Adjusting the Projector Zoom and Focus CAUTION: To avoid damaging the projector, ensure that the zoom lens and elevator foot are fully retracted before moving the projector or placing the projector in its carrying case. 1 Rotate the zoom tab to 12 m). 1 Zoom tab 2 Focus ring 16 Using Your Projector The projector focuses at distances from 3.9 ft to 39.4 ft (1.2 m to zoom in and out. 2 Rotate the focus ring until the image is clear.

User Guide
Page 17
Adjusting Projection Image Size Using Your Projector 17
Adjusting Projection Image Size Using Your Projector 17

User Guide
Page 18
For more information, see "Turning Your Projector On" on page 14 and "Turning Your Projector Off" on and off. Min. 29.5" (75.0 cm) 24.6" (62.5 cm) Max. (WxH) 23.6" x 17.7" Screen Size Min. (WxH) 60.0 cm x 45.5 cm 19.7" x 14.8" ...) 246.1" (625.0 cm) 236.2" x 177.2" 600.0 cm x 450.0 cm 196.9" x 147.6" 500.0 cm x 375.0 cm 39.4' (12.0 m) Using the Control Panel 1 Power 2 Source Turn the projector on page 14. Screen (Diagonal) Max. Press to toggle through Analog RGB, Composite, Component-i, S-video, and Analog YPbPr sources when multiple sources are connected to...
For more information, see "Turning Your Projector On" on page 14 and "Turning Your Projector Off" on and off. Min. 29.5" (75.0 cm) 24.6" (62.5 cm) Max. (WxH) 23.6" x 17.7" Screen Size Min. (WxH) 60.0 cm x 45.5 cm 19.7" x 14.8" ...) 246.1" (625.0 cm) 236.2" x 177.2" 600.0 cm x 450.0 cm 196.9" x 147.6" 500.0 cm x 375.0 cm 39.4' (12.0 m) Using the Control Panel 1 Power 2 Source Turn the projector on page 14. Screen (Diagonal) Max. Press to toggle through Analog RGB, Composite, Component-i, S-video, and Analog YPbPr sources when multiple sources are connected to...
User Guide
Page 19
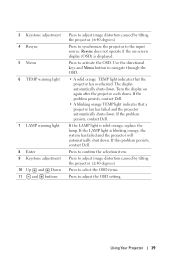
... the input source. Resync does not operate if the on again after the projector cools down . If the problem persists, contact Dell. • A blinking orange TEMP light indicates that the projector has overheated. If the LAMP light is blinking orange, the system has failed... and the projector will automatically shut down . Using Your Projector 19 3 Keystone adjustment 4 Resync 5 Menu 6 TEMP ...
... the input source. Resync does not operate if the on again after the projector cools down . If the problem persists, contact Dell. • A blinking orange TEMP light indicates that the projector has overheated. If the LAMP light is blinking orange, the system has failed... and the projector will automatically shut down . Using Your Projector 19 3 Keystone adjustment 4 Resync 5 Menu 6 TEMP ...

User Guide
Page 20
Press to mute or un-mute the projector speaker. Using the Remote Control 1 Power 2 3 Down button 4 Mute 5 Volume 6 Page 7 Page Turn the projector on page 14. Press to select OSD items. Press to increase the volume. For more information, see "Turning Your Projector On" on page 14 and "Turning Your Projector Off" on and off. Press to move to next page. 20 Using Your Projector Press to previous page. Press to move to adjust the OSD setting.
Press to mute or un-mute the projector speaker. Using the Remote Control 1 Power 2 3 Down button 4 Mute 5 Volume 6 Page 7 Page Turn the projector on page 14. Press to select OSD items. Press to increase the volume. For more information, see "Turning Your Projector On" on page 14 and "Turning Your Projector Off" on and off. Press to move to next page. 20 Using Your Projector Press to previous page. Press to move to adjust the OSD setting.

User Guide
Page 21
...15 Volume Press to decrease the volume. 16 Keystone adjustment Press to adjust image distortion caused by tilting the projector. (±40 degrees) Using the On-Screen Display The projector has a multi-language On-Screen Display (OSD) that are optimized for user to dark gray. Auto adjust ...Movie mode, Game Mode, sRGB, or CUSTOM mode (for displaying data (PC Graphics) or video (movies, games, etc.). 8 Video mode The Dell 2400MP Micro-projector has preset configurations that can be displayed with or without an input source present. In the Main Menu, press or to make a selection. Press...
...15 Volume Press to decrease the volume. 16 Keystone adjustment Press to adjust image distortion caused by tilting the projector. (±40 degrees) Using the On-Screen Display The projector has a multi-language On-Screen Display (OSD) that are optimized for user to dark gray. Auto adjust ...Movie mode, Game Mode, sRGB, or CUSTOM mode (for displaying data (PC Graphics) or video (movies, games, etc.). 8 Video mode The Dell 2400MP Micro-projector has preset configurations that can be displayed with or without an input source present. In the Main Menu, press or to make a selection. Press...

User Guide
Page 22
When the projector is selected and you press SOURCE, you select which input signal you press SOURCE, it automatically finds the next available input signal. Select OFF to ... to Exit tab and press Enter button on the control panel or the remote control. KEYSTONE-Adjust image distortion caused by horizontal shifting of the projector orientation. 22 Using Your...
When the projector is selected and you press SOURCE, you select which input signal you press SOURCE, it automatically finds the next available input signal. Select OFF to ... to Exit tab and press Enter button on the control panel or the remote control. KEYSTONE-Adjust image distortion caused by horizontal shifting of the projector orientation. 22 Using Your...


