User Guide
Page 3
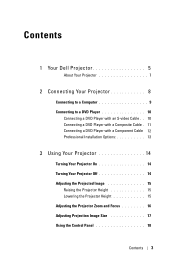
... Projector 7 2 Connecting Your Projector 8 Connecting to a Computer 9 Connecting to a DVD Player 10 Connecting a DVD Player with an S-video Cable . . 10 Connecting a DVD Player with a Composite Cable . 11 Connecting a DVD Player with a Component Cable 12 Professional Installation Options 13 3 Using Your Projector . . . . 14 Turning Your Projector On 14 Turning Your Projector Off 14 Adjusting the Projected Image 15 Raising the Projector Height 15 Lowering the Projector Height 15 Adjusting the Projector Zoom and Focus 16 Adjusting Projection Image Size 17 Using the Control Panel...
... Projector 7 2 Connecting Your Projector 8 Connecting to a Computer 9 Connecting to a DVD Player 10 Connecting a DVD Player with an S-video Cable . . 10 Connecting a DVD Player with a Composite Cable . 11 Connecting a DVD Player with a Component Cable 12 Professional Installation Options 13 3 Using Your Projector . . . . 14 Turning Your Projector On 14 Turning Your Projector Off 14 Adjusting the Projected Image 15 Raising the Projector Height 15 Lowering the Projector Height 15 Adjusting the Projector Zoom and Focus 16 Adjusting Projection Image Size 17 Using the Control Panel...
User Guide
Page 14
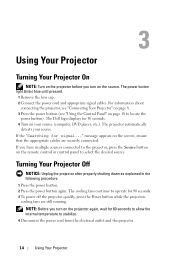
... have multiple sources connected to the projector, press the Source button on your source. 3 Using Your Projector Turning Your Projector On NOTE: Turn on the projector before you turn on the projector again, wait for 30 seconds. 4 Turn on the remote control or control panel to operate for signal..." message appears on the source. The Dell logo displays for 60 seconds to allow the internal temperature to locate the power button). The power button light blinks blue until pressed. 1 Remove the lens cap. 2 Connect the power cord and appropriate signal cables.
... have multiple sources connected to the projector, press the Source button on your source. 3 Using Your Projector Turning Your Projector On NOTE: Turn on the projector before you turn on the projector again, wait for 30 seconds. 4 Turn on the remote control or control panel to operate for signal..." message appears on the source. The Dell logo displays for 60 seconds to allow the internal temperature to locate the power button). The power button light blinks blue until pressed. 1 Remove the lens cap. 2 Connect the power cord and appropriate signal cables.
User Guide
Page 19
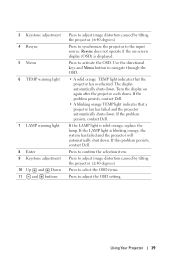
... problem persists, contact Dell. Using Your Projector 19 The display automatically shuts down . Press to adjust the OSD setting. Resync does not operate if the on again after the projector cools down . Turn the display on -screen display (OSD) is solid orange, replace the lamp. Press to the input source. If this problem persists, contact Dell. 3 Keystone adjustment 4 Resync 5 Menu 6 TEMP warning light 7 LAMP warning light 8 Enter 9 Keystone adjustment 10 Up and Down 11 and buttons Press to adjust image distortion caused by tilting the projector...
... problem persists, contact Dell. Using Your Projector 19 The display automatically shuts down . Press to adjust the OSD setting. Resync does not operate if the on again after the projector cools down . Turn the display on -screen display (OSD) is solid orange, replace the lamp. Press to the input source. If this problem persists, contact Dell. 3 Keystone adjustment 4 Resync 5 Menu 6 TEMP warning light 7 LAMP warning light 8 Enter 9 Keystone adjustment 10 Up and Down 11 and buttons Press to adjust image distortion caused by tilting the projector...

User Guide
Page 21
... or to the input source. Auto adjust does not operate if the OSD (On-Screen Display) is selected, the color changes to dark gray. Use or on the control panel or the remote control to adjust image distortion caused by tilting the projector. (±40 degrees) 17 Source Press to switch between modes. 9 Blank screen Press to hide the image, press again to resume display of the image. 10 LED light LED indicator. 11 Up button Press to select...
... or to the input source. Auto adjust does not operate if the OSD (On-Screen Display) is selected, the color changes to dark gray. Use or on the control panel or the remote control to adjust image distortion caused by tilting the projector. (±40 degrees) 17 Source Press to switch between modes. 9 Blank screen Press to hide the image, press again to resume display of the image. 10 LED light LED indicator. 11 Up button Press to select...
User Guide
Page 23
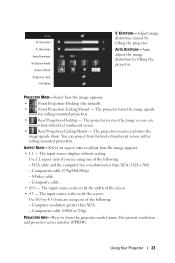
... projector turns the image upside down . The projector reverses the image so you can project from behind a translucent screen with a ceiling-mounted projection. ASPECT RATIO-Select an aspect ratio to fit the screen. VGA cable and the computer has a resolution less than XGA - The input source scales to adjust how the image appears. • 1:1 - The input source scales to show the projector model name, the present resolution and projector series number (PPID#). Use 16:9 or 4:3 if you are using...
... projector turns the image upside down . The projector reverses the image so you can project from behind a translucent screen with a ceiling-mounted projection. ASPECT RATIO-Select an aspect ratio to fit the screen. VGA cable and the computer has a resolution less than XGA - The input source scales to adjust how the image appears. • 1:1 - The input source scales to show the projector model name, the present resolution and projector series number (PPID#). Use 16:9 or 4:3 if you are using...

User Guide
Page 24
... control the degree of difference between the brightest and darkest parts of the picture. The higher the temperature, the screen appears bluer; Adjusting the contrast changes the amount of black and white in the image. User mode activates the values in the "color setting" menu. User mode activates the values in the "color setting" menu. COLOR ADJUST-Manually adjust red, green, and blue color. 24 Using Your Projector COLOR TEMP-Adjust the color temperature. the lower the temperature, the screen appears redder. COLOR ADJUST-Manually adjust red, green, and blue color. COLOR TEMP...
... control the degree of difference between the brightest and darkest parts of the picture. The higher the temperature, the screen appears bluer; Adjusting the contrast changes the amount of black and white in the image. User mode activates the values in the "color setting" menu. User mode activates the values in the "color setting" menu. COLOR ADJUST-Manually adjust red, green, and blue color. 24 Using Your Projector COLOR TEMP-Adjust the color temperature. the lower the temperature, the screen appears redder. COLOR ADJUST-Manually adjust red, green, and blue color. COLOR TEMP...

User Guide
Page 25
...-Change the display data clock frequency to CUSTOM. This is being used: PC, MOVIE, sRGB (provides more accurate color representation), GAME , and CUSTOM (set your computer graphics card. SHARPNESS-Press to decrease the sharpness and to reduce the zoomed image. SIGNAL TYPE-Manually select signal type RGB, YCbCr, YPbPr. ZOOM-Press to digitally magnify an image to 10 times on how the projector is a coarse adjustment. WHITE INTENSITY-Setting...
...-Change the display data clock frequency to CUSTOM. This is being used: PC, MOVIE, sRGB (provides more accurate color representation), GAME , and CUSTOM (set your computer graphics card. SHARPNESS-Press to decrease the sharpness and to reduce the zoomed image. SIGNAL TYPE-Manually select signal type RGB, YCbCr, YPbPr. ZOOM-Press to digitally magnify an image to 10 times on how the projector is a coarse adjustment. WHITE INTENSITY-Setting...
User Guide
Page 26
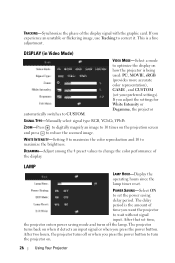
... signal input. The delay period is being used: PC, MOVIE, sRGB (provides more accurate color representation), GAME , and CUSTOM (set your preferred settings). This is a fine adjustment. TRACKING-Synchronize the phase of the display. LAMP LAMP HOUR-Display the operating hours since the lamp timer reset. ZOOM-Press to digitally magnify an image to 10 times on . 26 Using Your Projector POWER SAVING-Select ON to turn the projector on the projection screen and press to CUSTOM. DISPLAY (in Video Mode...
... signal input. The delay period is being used: PC, MOVIE, sRGB (provides more accurate color representation), GAME , and CUSTOM (set your preferred settings). This is a fine adjustment. TRACKING-Synchronize the phase of the display. LAMP LAMP HOUR-Display the operating hours since the lamp timer reset. ZOOM-Press to digitally magnify an image to 10 times on . 26 Using Your Projector POWER SAVING-Select ON to turn the projector on the projection screen and press to CUSTOM. DISPLAY (in Video Mode...

User Guide
Page 27
Select OFF to operate at a lower power level (230 Watts), which may provide longer lamp life, quieter operation, and dimmer luminance output on the screen. LANGUAGE Using Your Projector 27 LAMP RESET-After you install a new lamp, select Yes to reset the lamp timer. ECO MODE-Select ON to use the projector at normal power level (260 Watts).
Select OFF to operate at a lower power level (230 Watts), which may provide longer lamp life, quieter operation, and dimmer luminance output on the screen. LANGUAGE Using Your Projector 27 LAMP RESET-After you install a new lamp, select Yes to reset the lamp timer. ECO MODE-Select ON to use the projector at normal power level (260 Watts).
User Guide
Page 28
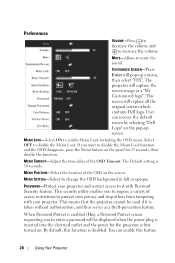
... location of the OSD Timeout. PASSWORD-Protect your projector. The projector will be used if it with Password Security feature. User can enable this function is 30 seconds. MENU TIMEOUT-Adjust the time delay of the OSD on the pop-up a menu, then select "YES". MENU SETTING-Select to mute the sound. You can recover the default screen by selecting "Dell Logo" on the screen. MUTE-Allows to change...
... location of the OSD Timeout. PASSWORD-Protect your projector. The projector will be used if it with Password Security feature. User can enable this function is 30 seconds. MENU TIMEOUT-Adjust the time delay of the OSD on the pop-up a menu, then select "YES". MENU SETTING-Select to mute the sound. You can recover the default screen by selecting "Dell Logo" on the screen. MUTE-Allows to change...
User Guide
Page 31
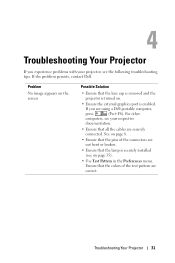
.... See on page 35). • Use Test Pattern in the Preferences menu. 4 Troubleshooting Your Projector If you are using a Dell portable computer, press (Fn+F8). Problem No image appears on . • Ensure the external graphics port is securely installed (see the following troubleshooting tips. Troubleshooting Your Projector 31 Ensure that the lens cap is removed and the projector is turned on the screen Possible Solution • Ensure that...
.... See on page 35). • Use Test Pattern in the Preferences menu. 4 Troubleshooting Your Projector If you are using a Dell portable computer, press (Fn+F8). Problem No image appears on . • Ensure the external graphics port is securely installed (see the following troubleshooting tips. Troubleshooting Your Projector 31 Ensure that the lens cap is removed and the projector is turned on the screen Possible Solution • Ensure that...
User Guide
Page 32
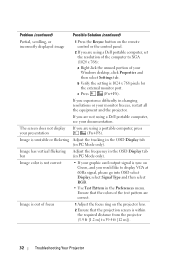
... [12 m]). 32 Troubleshooting Your Projector Image is sync on the projector lens. 2 Ensure that the colors of your Windows desktop, click Properties and then select Settings tab. Image color is not correct • If your graphic card output signal is unstable or flickering Adjust the tracking in the OSD Display tab (in changing resolutions or your documentation. The screen does not display your presentation If you are using a Dell portable computer...
... [12 m]). 32 Troubleshooting Your Projector Image is sync on the projector lens. 2 Ensure that the colors of your Windows desktop, click Properties and then select Settings tab. Image color is not correct • If your graphic card output signal is unstable or flickering Adjust the tracking in the OSD Display tab (in changing resolutions or your documentation. The screen does not display your presentation If you are using a Dell portable computer...
User Guide
Page 33
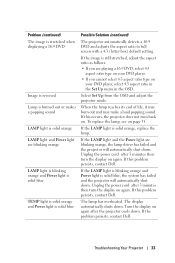
... full screen with a 4:3 (letter-box) default setting. If this problem persists, contact Dell. If the LAMP light is blinking orange and Power light is solid blue, the system has failed and the projector will automatically shut down . The lamp has overheated. The display automatically shuts down . Unplug the power cord after 3 minutes then turn the display on again. If this problem persists, contact Dell. If the problem persists, contact Dell. If the LAMP light and the Power light are blinking orange, the lamp driver...
... full screen with a 4:3 (letter-box) default setting. If this problem persists, contact Dell. If the LAMP light is blinking orange and Power light is solid blue, the system has failed and the projector will automatically shut down . The lamp has overheated. The display automatically shuts down . Unplug the power cord after 3 minutes then turn the display on again. If this problem persists, contact Dell. If the problem persists, contact Dell. If the LAMP light and the Power light are blinking orange, the lamp driver...
User Guide
Page 34
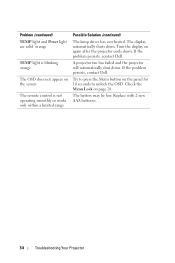
... (continued) The lamp driver has overheated. Try to press the Menu button on the screen The remote control is blinking orange The OSD does not appear on the panel for 10 seconds to unlock the OSD. The display automatically shuts down . Check the Menu Lock on again after the projector cools down. A projector fan has failed and the projector will automatically shut down . Replace with 2 new AAA batteries. 34 Troubleshooting Your Projector Turn the display on page...
... (continued) The lamp driver has overheated. Try to press the Menu button on the screen The remote control is blinking orange The OSD does not appear on the panel for 10 seconds to unlock the OSD. The display automatically shuts down . Check the Menu Lock on again after the projector cools down. A projector fan has failed and the projector will automatically shut down . Replace with 2 new AAA batteries. 34 Troubleshooting Your Projector Turn the display on page...
User Guide
Page 35
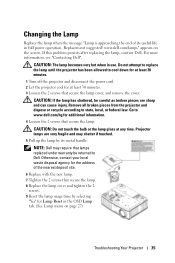
Changing the Lamp Replace the lamp when the message "Lamp is approaching the end of the nearest deposit site. 6 Replace with the new lamp. 7 Tighten the 2 screws that secure the lamp. 8 Replace the lamp cover and tighten the 2 screws. 9 Reset the lamp usage time by its useful life in full power operation. If this problem persists after replacing the lamp, contact Dell. Do not attempt to replace the lamp until the projector has been allowed to Dell. CAUTION: If the lamp has...
Changing the Lamp Replace the lamp when the message "Lamp is approaching the end of the nearest deposit site. 6 Replace with the new lamp. 7 Tighten the 2 screws that secure the lamp. 8 Replace the lamp cover and tighten the 2 screws. 9 Reset the lamp usage time by its useful life in full power operation. If this problem persists after replacing the lamp, contact Dell. Do not attempt to replace the lamp until the projector has been allowed to Dell. CAUTION: If the lamp has...
User Guide
Page 38
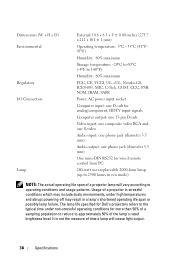
... analog/component, HDTV input signals Computer output: one 15-pin D-sub Video input: one composite video RCA and one S-video Audio input: one phone jack (diameter 3.5 mm) Audio output: one phone jack (diameter 3.5 mm) One mini-DIN RS232 for wired remote control from PC 260-watt user-replaceable 2000-hour lamp (up to 2500 hours in eco mode) NOTE: The actual operating life span of a projector lamp will cease light output. 38 Specifications
... analog/component, HDTV input signals Computer output: one 15-pin D-sub Video input: one composite video RCA and one S-video Audio input: one phone jack (diameter 3.5 mm) Audio output: one phone jack (diameter 3.5 mm) One mini-DIN RS232 for wired remote control from PC 260-watt user-replaceable 2000-hour lamp (up to 2500 hours in eco mode) NOTE: The actual operating life span of a projector lamp will cease light output. 38 Specifications
User Guide
Page 44
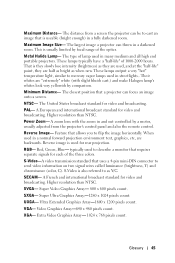
... 16 alternating black and white rectangles. DLP- Light passes through a color filter is immediately very visible on ) and the light output of a projected image caused by the projection industry to determine the ANSI contrast ratio. digital Micro- DVI- For devices that support DVI, a digital to digital connection can project a small, red (typically), high intensity beam of a lens to screen angle. Keystone Correction- decibel-A unit used by improper projector to its focal point...
... 16 alternating black and white rectangles. DLP- Light passes through a color filter is immediately very visible on ) and the light output of a projected image caused by the projection industry to determine the ANSI contrast ratio. digital Micro- DVI- For devices that support DVI, a digital to digital connection can project a small, red (typically), high intensity beam of a lens to screen angle. Keystone Correction- decibel-A unit used by improper projector to its focal point...
User Guide
Page 45
... to flip the image horizontally. Feature that is useable (bright enough) in many medium and all high end portable projectors. RGB- Ultra Extended Graphics Array-1600 x 1200 pixels count. Red, Green, Blue- Glossary 45 Their whites are backwards. S-Video is used in a fully darkened room. Higher resolution than NTSC. XGA- Metal Halide Lamp- Maximum Distance- The type of 1000-2000 hours. The distance from the projector's control panel and...
... to flip the image horizontally. Feature that is useable (bright enough) in many medium and all high end portable projectors. RGB- Ultra Extended Graphics Array-1600 x 1200 pixels count. Red, Green, Blue- Glossary 45 Their whites are backwards. S-Video is used in a fully darkened room. Higher resolution than NTSC. XGA- Metal Halide Lamp- Maximum Distance- The type of 1000-2000 hours. The distance from the projector's control panel and...
User Guide
Page 48
... Power Supply 37 Projection Distance 37 Projection Lens 37 Projection Screen Size 37 Regulatory 38 RS232 Protocol 39 Uniformity 37 V. Control panel 7 Elevator button 7 Focus ring 7 Lens 7 Remote control receiver 7 Zoom tab 7 O On-Screen Display 21 Auto-Adjust 22 DISPLAY (in PC Mode) 25 DISPLAY (in Video Mode) 26 Input Select 22 LAMP 26 LANGUAGE 27 Main Menu 22 PICTURE (in PC Mode) 24 PICTURE (in Video Mode) 24 Preferences 28 Set Up 22 P Phone numbers 42 Powering On/Off the Projector Powering Off the Projector 14 Powering On the Projector 14 S Specifications Audio...
... Power Supply 37 Projection Distance 37 Projection Lens 37 Projection Screen Size 37 Regulatory 38 RS232 Protocol 39 Uniformity 37 V. Control panel 7 Elevator button 7 Focus ring 7 Lens 7 Remote control receiver 7 Zoom tab 7 O On-Screen Display 21 Auto-Adjust 22 DISPLAY (in PC Mode) 25 DISPLAY (in Video Mode) 26 Input Select 22 LAMP 26 LANGUAGE 27 Main Menu 22 PICTURE (in PC Mode) 24 PICTURE (in Video Mode) 24 Preferences 28 Set Up 22 P Phone numbers 42 Powering On/Off the Projector Powering Off the Projector 14 Powering On the Projector 14 S Specifications Audio...
Protocol Document
Page 3
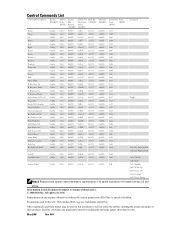
... 0x0005 0xbfd9 0x1111 0x0001 0x2a ECO Mode Off 0xefbe 0x10 0x0005 0x7e19 0x1111 0x0001 0x2b Auto Source On 0xefbe 0x10 0x0005 0x3fdb 0x1111 0x0001 0x2c Auto Source Off 0xefbe 0x10 0x0005 0xfe1b 0x1111 0x0001 0x2d Factory Reset 0xefbe 0x10 0x0005 0xbe1a 0x1111 0x0001 0x2e Lamp Hour 0xefbe 0x10 0x0005 0x7fda 0x1111 0x0001 0x2f Firmware Version 0xefbe 0x10 0x0005 0x3e12 0x1111...
... 0x0005 0xbfd9 0x1111 0x0001 0x2a ECO Mode Off 0xefbe 0x10 0x0005 0x7e19 0x1111 0x0001 0x2b Auto Source On 0xefbe 0x10 0x0005 0x3fdb 0x1111 0x0001 0x2c Auto Source Off 0xefbe 0x10 0x0005 0xfe1b 0x1111 0x0001 0x2d Factory Reset 0xefbe 0x10 0x0005 0xbe1a 0x1111 0x0001 0x2e Lamp Hour 0xefbe 0x10 0x0005 0x7fda 0x1111 0x0001 0x2f Firmware Version 0xefbe 0x10 0x0005 0x3e12 0x1111...


