

User Guide
Page 6
... support. 15 Supplies reorder label NOTE: The Express Service Code is loaded into the multipurpose feeder. Information on where you use support.dell.com or contact technical support. Slide the tab to adjust the width guides. Enter the Express Service Code to direct your printer when... you can order toner cartridges or paper: visit www.dell.com/supplies. 9 Multipurpose feeder Tray to manually load various paper types such as envelopes. 10 Multipurpose feeder tray 11 Extension ...
... support. 15 Supplies reorder label NOTE: The Express Service Code is loaded into the multipurpose feeder. Information on where you use support.dell.com or contact technical support. Slide the tab to adjust the width guides. Enter the Express Service Code to direct your printer when... you can order toner cartridges or paper: visit www.dell.com/supplies. 9 Multipurpose feeder Tray to manually load various paper types such as envelopes. 10 Multipurpose feeder tray 11 Extension ...
User Guide
Page 24
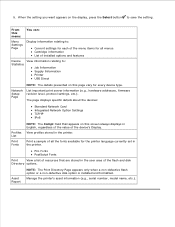
... USB Direct NOTE: The details presented on the display, press the Select button to : Current settings for each of the menu items for all menus Cartridge information List of all the fonts available for every device type.
... USB Direct NOTE: The details presented on the display, press the Select button to : Current settings for each of the menu items for all menus Cartridge information List of all the fonts available for every device type.
User Guide
Page 32
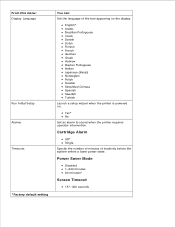
... Turkish Launch a setup wizard when the printer is powered on the display. Yes* No Set an alarm to sound when the printer requires operator intervention. Cartridge Alarm Off* Single Specify the number of minutes of the text appearing on . Power Saver Mode Disabled 1-240 minutes 60 minutes* Screen Timeout 15*-300...
... Turkish Launch a setup wizard when the printer is powered on the display. Yes* No Set an alarm to sound when the printer requires operator intervention. Cartridge Alarm Off* Single Specify the number of minutes of the text appearing on . Power Saver Mode Disabled 1-240 minutes 60 minutes* Screen Timeout 15*-300...
User Guide
Page 83
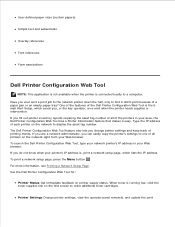
...or the key operator, an e-mail when the printer needs supplies or intervention. The Dell Printer Configuration Web Tool feature also lets you can easily copy the printer's settings to order additional toner cartridges. If you are a network administrator, you change printer settings and keep track of ...printing trends. To launch the Dell Printer Configuration Web Tool, type your network printer's IP address in your ...
...or the key operator, an e-mail when the printer needs supplies or intervention. The Dell Printer Configuration Web Tool feature also lets you can easily copy the printer's settings to order additional toner cartridges. If you are a network administrator, you change printer settings and keep track of ...printing trends. To launch the Dell Printer Configuration Web Tool, type your network printer's IP address in your ...

User Guide
Page 87
...dialog box can order toner by Phone heading. In Windows Vista® or later (default Start menu): a. Click Programs. b. Click your Dell Laser printer model. 2. The Order Supplies dialog box opens. 3. If Multiple Printers Found launches, select the printer you are ordering the supplies...window, the Programs window, or the desktop icon. Click Order Supplies to order replacement toner cartridges. In Windows® XP and 2000: Click Start Programs or All Programs Dell Printers your Dell Laser Printer model. Follow the instructions on the screen. If ordering by phone, call ...
...dialog box can order toner by Phone heading. In Windows Vista® or later (default Start menu): a. Click Programs. b. Click your Dell Laser printer model. 2. The Order Supplies dialog box opens. 3. If Multiple Printers Found launches, select the printer you are ordering the supplies...window, the Programs window, or the desktop icon. Click Order Supplies to order replacement toner cartridges. In Windows® XP and 2000: Click Start Programs or All Programs Dell Printers your Dell Laser Printer model. Follow the instructions on the screen. If ordering by phone, call ...
User Guide
Page 98
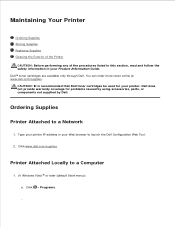
... in your Web browser to a Network 1. You can order more toner online at www.dell.com/supplies. CAUTION: It is recommended that Dell toner cartridges be used for problems caused by using accessories, parts, or components not supplied by Dell. In Windows Vista ® or later (default Start menu): a. Click Programs. b. Printer Attached Locally...
... in your Web browser to a Network 1. You can order more toner online at www.dell.com/supplies. CAUTION: It is recommended that Dell toner cartridges be used for problems caused by using accessories, parts, or components not supplied by Dell. In Windows Vista ® or later (default Start menu): a. Click Programs. b. Printer Attached Locally...

User Guide
Page 99
... printer model. 2. In Windows® XP and 2000: Click Start Programs or All Programs Dell Printers your Dell Laser Printer model. Click Dell Printer Supplies Reorder Application. Storing Supplies Storing Print Media Use the following guidelines for proper print media storage. Do not place anything ... of the original carton, ensure that they rest on a flat surface so the edges do not buckle or curl. Storing the Toner Cartridge Store the toner cartridge in an environment where the temperature is approximately 21°C (70°F) and the relative humidity is 40%. a. Do not store ...
... printer model. 2. In Windows® XP and 2000: Click Start Programs or All Programs Dell Printers your Dell Laser Printer model. Click Dell Printer Supplies Reorder Application. Storing Supplies Storing Print Media Use the following guidelines for proper print media storage. Do not place anything ... of the original carton, ensure that they rest on a flat surface so the edges do not buckle or curl. Storing the Toner Cartridge Store the toner cartridge in an environment where the temperature is approximately 21°C (70°F) and the relative humidity is 40%. a. Do not store ...
User Guide
Page 101
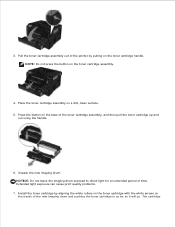
... for an extended period of the new imaging drum and pushing the toner cartridge in as far as it will go. NOTE: Do not press the button on the base of the toner cartridge assembly, and then pull the toner cartridge up and out using the handle. 6. 2. 3. Extended light exposure can cause... print quality problems. 7. Pull the toner cartridge assembly out of the printer by aligning the white rollers on the toner...
... for an extended period of the new imaging drum and pushing the toner cartridge in as far as it will go. NOTE: Do not press the button on the base of the toner cartridge assembly, and then pull the toner cartridge up and out using the handle. 6. 2. 3. Extended light exposure can cause... print quality problems. 7. Pull the toner cartridge assembly out of the printer by aligning the white rollers on the toner...
User Guide
Page 102
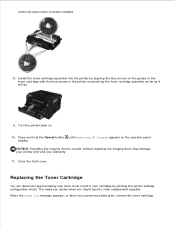
...front cover. This helps you decide when you experience faded print, remove the toner cartridge. Replacing the Toner Cartridge You can determine approximately how much toner is left in the printer and pushing the toner cartridge assembly as far as it will go. 9. NOTICE: Resetting the imaging drum's... counter without replacing the imaging drum may damage your printer and void your cartridge by aligning the blue arrows on the operator panel display. When the Toner low message appears, or when you might need to order ...
...front cover. This helps you decide when you experience faded print, remove the toner cartridge. Replacing the Toner Cartridge You can determine approximately how much toner is left in the printer and pushing the toner cartridge assembly as far as it will go. 9. NOTICE: Resetting the imaging drum's... counter without replacing the imaging drum may damage your printer and void your cartridge by aligning the blue arrows on the operator panel display. When the Toner low message appears, or when you might need to order ...

User Guide
Page 103
... still print for an extended period of the printer and lowering the cover. 3. When the print remains faded, replace the toner cartridge. NOTICE: When replacing a toner cartridge, do not leave the new cartridge exposed to redistribute the toner, and then reinsert it and continue printing. Turn the printer off. 2. NOTE: You can cause.... Open the front cover by pressing the button on the base of the imaging drum and pull the toner cartridge assembly up and out using the handle. 4. Firmly shake it side-to-side and front-to-back several times to direct light for a short time ...
... still print for an extended period of the printer and lowering the cover. 3. When the print remains faded, replace the toner cartridge. NOTICE: When replacing a toner cartridge, do not leave the new cartridge exposed to redistribute the toner, and then reinsert it and continue printing. Turn the printer off. 2. NOTE: You can cause.... Open the front cover by pressing the button on the base of the imaging drum and pull the toner cartridge assembly up and out using the handle. 4. Firmly shake it side-to-side and front-to-back several times to direct light for a short time ...

User Guide
Page 104
...paper exit tray. 3. Remove paper from the wall outlet and disconnect all directions to distribute the toner. 6. The cartridge clicks into place when correctly installed. 7. Rotate the cartridge in as far as it will go. CAUTION: To avoid the risk of the imaging drum kit and pushing ...the toner cartridge in all cables to the printer before proceeding. 2. NOTICE: When replacing a toner cartridge assembly, do not leave the new cartridge exposed to direct light for an extended period of the Printer 1. Close the front...
...paper exit tray. 3. Remove paper from the wall outlet and disconnect all directions to distribute the toner. 6. The cartridge clicks into place when correctly installed. 7. Rotate the cartridge in as far as it will go. CAUTION: To avoid the risk of the imaging drum kit and pushing ...the toner cartridge in all cables to the printer before proceeding. 2. NOTICE: When replacing a toner cartridge assembly, do not leave the new cartridge exposed to direct light for an extended period of the Printer 1. Close the front...
User Guide
Page 115
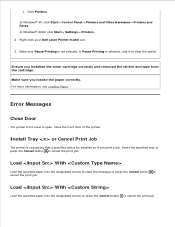
... paper into the designated source or press the Cancel button to cancel the print job. Make sure you installed the toner cartridge correctly and removed the sticker and tape from the cartridge. For more information, see Loading Paper. Error Messages Close Door The printer front cover is requesting that a specified device be... Load the specified paper into the designated source to clear the message or press the Cancel button to cancel the print job. Right-click your Dell Laser Printer model icon. 3.
... paper into the designated source or press the Cancel button to cancel the print job. Make sure you installed the toner cartridge correctly and removed the sticker and tape from the cartridge. For more information, see Loading Paper. Error Messages Close Door The printer front cover is requesting that a specified device be... Load the specified paper into the designated source to clear the message or press the Cancel button to cancel the print job. Right-click your Dell Laser Printer model icon. 3.

User Guide
Page 118
... install a new one. 31 Missing or Defective Cartridge If the toner cartridge is not installed, install it and install a new toner cartridge. 31 Defective Toner Cartridge Remove and install a new toner cartridge. 32 Unsupported Toner Cartridge Remove the specified toner cartridge, and then install a supported one. 34 Short Paper Ensure that the paper you loaded is installed...Support Resource Save Feature To ignore Resource Save and continue printing, press the Back button . The current job may not print correctly. If the toner cartridge is large enough. 30 Invalid Refill, Change Toner...
... install a new one. 31 Missing or Defective Cartridge If the toner cartridge is not installed, install it and install a new toner cartridge. 31 Defective Toner Cartridge Remove and install a new toner cartridge. 32 Unsupported Toner Cartridge Remove the specified toner cartridge, and then install a supported one. 34 Short Paper Ensure that the paper you loaded is installed...Support Resource Save Feature To ignore Resource Save and continue printing, press the Back button . The current job may not print correctly. If the toner cartridge is large enough. 30 Invalid Refill, Change Toner...
User Guide
Page 123
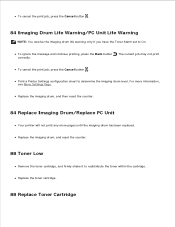
... may not print correctly. Print a Printer Settings configuration sheet to redistribute the toner within the cartridge. Replace the toner cartridge. 88 Replace Toner Cartridge Replace the imaging drum, and reset the counter. 88 Toner Low Remove the toner cartridge, and firmly shake it to determine the imaging drum level. For more pages until the...
... may not print correctly. Print a Printer Settings configuration sheet to redistribute the toner within the cartridge. Replace the toner cartridge. 88 Replace Toner Cartridge Replace the imaging drum, and reset the counter. 88 Toner Low Remove the toner cartridge, and firmly shake it to determine the imaging drum level. For more pages until the...
User Guide
Page 124
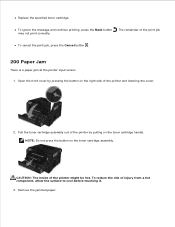
... the surface to cool before touching it. 3. Remove the jammed paper. Replace the specified toner cartridge. CAUTION: The inside of the print job may not print correctly. NOTE: Do not press the button on the toner cartridge assembly. The remainder of the printer might be hot. To reduce the risk of the... printer by pressing the button on the toner cartridge handle. To ignore the message and continue printing, press the Back button . To cancel the print job, press the Cancel button . 200 Paper Jam There ...
... the surface to cool before touching it. 3. Remove the jammed paper. Replace the specified toner cartridge. CAUTION: The inside of the print job may not print correctly. NOTE: Do not press the button on the toner cartridge assembly. The remainder of the printer might be hot. To reduce the risk of the... printer by pressing the button on the toner cartridge handle. To ignore the message and continue printing, press the Back button . To cancel the print job, press the Cancel button . 200 Paper Jam There ...

User Guide
Page 125
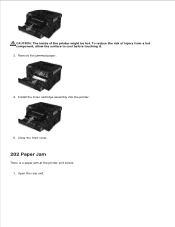
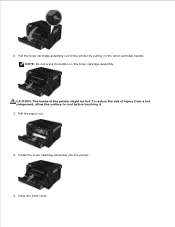
Open the front cover by pressing the button on the right side of the printer by pulling on the toner cartridge assembly. Pull the toner cartridge assembly out of the printer and lowering the cover. 2. NOTE: Do not press the button on the toner cartridge handle. 3. 4. Install the toner cartridge assembly into the printer. 5. Close the front cover. 201 Paper Jam There is a paper jam between the printer input and paper exit sensors. 1.
Open the front cover by pressing the button on the right side of the printer by pulling on the toner cartridge assembly. Pull the toner cartridge assembly out of the printer and lowering the cover. 2. NOTE: Do not press the button on the toner cartridge handle. 3. 4. Install the toner cartridge assembly into the printer. 5. Close the front cover. 201 Paper Jam There is a paper jam between the printer input and paper exit sensors. 1.
User Guide
Page 126
Install the toner cartridge assembly into the printer. 5. Close the front cover. 202 Paper Jam There is a paper jam at the printer exit sensor. 1. To reduce the risk of the printer might be hot. Remove the jammed paper. 4. Open the rear exit. CAUTION: The inside of injury from a hot component, allow the surface to cool before touching it. 3.
Install the toner cartridge assembly into the printer. 5. Close the front cover. 202 Paper Jam There is a paper jam at the printer exit sensor. 1. To reduce the risk of the printer might be hot. Remove the jammed paper. 4. Open the rear exit. CAUTION: The inside of injury from a hot component, allow the surface to cool before touching it. 3.
User Guide
Page 136
NOTE: Do not press the button on the toner cartridge handle. Close the front cover. 2. Pull the toner cartridge assembly out of the printer by pulling on the toner cartridge assembly. Pull the paper out. 4. To reduce the risk of the printer might be hot. Install the toner cartridge assembly into the printer. 5. CAUTION: The inside of injury from a hot component, allow the surface to cool before touching it. 3.
NOTE: Do not press the button on the toner cartridge handle. Close the front cover. 2. Pull the toner cartridge assembly out of the printer by pulling on the toner cartridge assembly. Pull the paper out. 4. To reduce the risk of the printer might be hot. Install the toner cartridge assembly into the printer. 5. CAUTION: The inside of injury from a hot component, allow the surface to cool before touching it. 3.
User Guide
Page 140
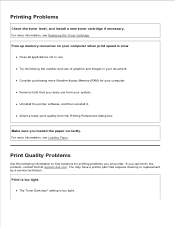
...Close all applications not in your system. The Toner Darkness1 setting is too light. Consider purchasing more information, see Replacing the Toner Cartridge. If you loaded the paper correctly. Uninstall the printer software, and then reinstall it. Printing Problems Check the toner level, and ...install a new toner cartridge if necessary. For more Random Access Memory (RAM) for printing problems you rarely use . Make sure you cannot fix the problem, contact Dell at support.dell.com. Try minimizing the number and size of graphics and images...
...Close all applications not in your system. The Toner Darkness1 setting is too light. Consider purchasing more information, see Replacing the Toner Cartridge. If you loaded the paper correctly. Uninstall the printer software, and then reinstall it. Printing Problems Check the toner level, and ...install a new toner cartridge if necessary. For more Random Access Memory (RAM) for printing problems you rarely use . Make sure you cannot fix the problem, contact Dell at support.dell.com. Try minimizing the number and size of graphics and images...
User Guide
Page 141
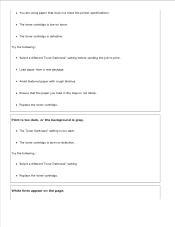
.... Try the following : Select a different Toner Darkness1 setting. Avoid textured paper with rough finishes. The toner cartridge is gray. Try the following : Select a different Toner Darkness1 setting before sending the job to print. The toner cartridge is too dark. Ensure that does not meet the printer specifications. You are using paper that...
.... Try the following : Select a different Toner Darkness1 setting. Avoid textured paper with rough finishes. The toner cartridge is gray. Try the following : Select a different Toner Darkness1 setting before sending the job to print. The toner cartridge is too dark. Ensure that does not meet the printer specifications. You are using paper that...


