

User Guide
Page 5
...to the multipurpose feeder. Button to access the printer memory. Door to gain access to control print jobs. Standard paper tray that your printer can hold . About Your Printer Understanding Printer Parts Understanding the Operator Panel Choosing the Right Cable Understanding... Printer Parts Part 1 Front exit 2 Output bin extender 3 Multipurpose feeder cover 4 Standard tray (Tray 1) 5 Optional 550-sheet drawer (Tray 2) 6 Memory access door 7 Door release button 8 Operator panel Description Slot from where the paper exits the printer....
...to the multipurpose feeder. Button to access the printer memory. Door to gain access to control print jobs. Standard paper tray that your printer can hold . About Your Printer Understanding Printer Parts Understanding the Operator Panel Choosing the Right Cable Understanding... Printer Parts Part 1 Front exit 2 Output bin extender 3 Multipurpose feeder cover 4 Standard tray (Tray 1) 5 Optional 550-sheet drawer (Tray 2) 6 Memory access door 7 Door release button 8 Operator panel Description Slot from where the paper exits the printer....

User Guide
Page 6
Information on where you use support.dell.com or contact technical support. Part 14 Express service code Description A series of numbers that identify your call when contacting technical support. 15 Supplies reorder label NOTE: The Express Service Code is loaded into the multipurpose feeder. 9 Multipurpose feeder Tray to manually load various paper types...
Information on where you use support.dell.com or contact technical support. Part 14 Express service code Description A series of numbers that identify your call when contacting technical support. 15 Supplies reorder label NOTE: The Express Service Code is loaded into the multipurpose feeder. 9 Multipurpose feeder Tray to manually load various paper types...
User Guide
Page 11
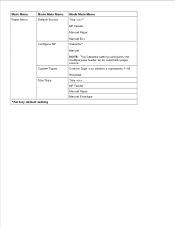
Custom Type (where x represents 1-6) Recycled Tray MP Feeder Manual Paper Manual Envelope Main Menu Paper Menu Mode Main Menu Default Source Configure MP Custom Types Size/Type *Factory default setting Mode Main Menu Tray * MP Feeder Manual Paper Manual Env Cassette* Manual NOTE: The Cassette setting configures the multipurpose feeder as an automatic paper source.
Custom Type (where x represents 1-6) Recycled Tray MP Feeder Manual Paper Manual Envelope Main Menu Paper Menu Mode Main Menu Default Source Configure MP Custom Types Size/Type *Factory default setting Mode Main Menu Tray * MP Feeder Manual Paper Manual Env Cassette* Manual NOTE: The Cassette setting configures the multipurpose feeder as an automatic paper source.

User Guide
Page 15
... feeder for the job. Cassette*-Treats the multipurpose feeder like a manual feed tray. Manual-Treats the multipurpose feeder like any other tray. Load Manual appears when a single sheet of the listed Default Source options under Tray Configuration. If a print job requests a size or type that is loaded ...from the multipurpose feeder and the mode of operation of the multipurpose feeder. Size and Type settings are configured for all print jobs. Tray * MP Feeder Manual Paper Manual Env NOTE: The items on the default source vary depending on the device type and the attachments ...
... feeder for the job. Cassette*-Treats the multipurpose feeder like a manual feed tray. Manual-Treats the multipurpose feeder like any other tray. Load Manual appears when a single sheet of the listed Default Source options under Tray Configuration. If a print job requests a size or type that is loaded ...from the multipurpose feeder and the mode of operation of the multipurpose feeder. Size and Type settings are configured for all print jobs. Tray * MP Feeder Manual Paper Manual Env NOTE: The items on the default source vary depending on the device type and the attachments ...

User Guide
Page 16
.... Specify the type of print media loaded in the Paper Type menu. From this menu: Custom Types *Factory default setting Size/Type From this menu: Tray Size Tray Type *Factory default setting You ctahne: multipurpose feeder. Plain* Paper Transparency Labels Bond Letterhead Preprinted Colored Paper Light Paper
.... Specify the type of print media loaded in the Paper Type menu. From this menu: Custom Types *Factory default setting Size/Type From this menu: Tray Size Tray Type *Factory default setting You ctahne: multipurpose feeder. Plain* Paper Transparency Labels Bond Letterhead Preprinted Colored Paper Light Paper

User Guide
Page 20
Card Stock Transparency Recycled Normal* Rough Smooth Labels Bond Envelope Rough Envelope Letterhead Preprinted Colored Light Heavy Rough/Cotton Custom (where x represents 1-6) *Factory default setting Paper Weight From this menu: Plain You can: Specify the relative texture of the print media loaded in a specific tray.
Card Stock Transparency Recycled Normal* Rough Smooth Labels Bond Envelope Rough Envelope Letterhead Preprinted Colored Light Heavy Rough/Cotton Custom (where x represents 1-6) *Factory default setting Paper Weight From this menu: Plain You can: Specify the relative texture of the print media loaded in a specific tray.

User Guide
Page 21
From this menu: You can: Plain* Card Stock Transparency Recycled Identify the relative weight of the print media loaded in a specific tray and ensure that the toner adheres properly to the printed page. Light Heavy Normal* Labels Bond Envelope Rough Envelope Letterhead Preprinted Colored Light Heavy Rough/Cotton Custom (where x represents 1-6) *Factory default setting Paper Loading
From this menu: You can: Plain* Card Stock Transparency Recycled Identify the relative weight of the print media loaded in a specific tray and ensure that the toner adheres properly to the printed page. Light Heavy Normal* Labels Bond Envelope Rough Envelope Letterhead Preprinted Colored Light Heavy Rough/Cotton Custom (where x represents 1-6) *Factory default setting Paper Loading

User Guide
Page 36
... Mode Main Menu From this You can: menu: Sides (Duplex) Enable duplex (2-sided) printing. 1 sided* 2 sided Duplex Binding Define the way duplexed pages are inserted. Tray * MP Feeder NOTE: From the Paper menu, Configure MP must be printed on the display, press the Select button to Cassette in a print job. Off...
... Mode Main Menu From this You can: menu: Sides (Duplex) Enable duplex (2-sided) printing. 1 sided* 2 sided Duplex Binding Define the way duplexed pages are inserted. Tray * MP Feeder NOTE: From the Paper menu, Configure MP must be printed on the display, press the Select button to Cassette in a print job. Off...

User Guide
Page 41
... in the device. * Factory default setting PCL Emul Mode Mode Menu PCL Emul Mode Main Menu Font Source Font Name Symbol Set PCL Emulation Settings Tray Renumber 1. From the menu list, use the Arrow buttons to scroll to save the setting. Use the Arrow buttons to scroll through the available menu...
... in the device. * Factory default setting PCL Emul Mode Mode Menu PCL Emul Mode Main Menu Font Source Font Name Symbol Set PCL Emulation Settings Tray Renumber 1. From the menu list, use the Arrow buttons to scroll to save the setting. Use the Arrow buttons to scroll through the available menu...

User Guide
Page 42
... On Off* Auto LF Specify whether the printer automatically performs a line feed (LF) after after a line feed (LF) control command. On Off* Tray Renumber Assign MP Feeder Assign *Factory default setting Configure the printer to print on the page. Portrait* Landscape Lines per Page Assign the number of... lines that use different source assignments for trays, drawers, and feeders. 200 = Off* Range: 0.08 - 100.00 in increments of text and graphics on A4-size paper. 198 mm*...
... On Off* Auto LF Specify whether the printer automatically performs a line feed (LF) after after a line feed (LF) control command. On Off* Tray Renumber Assign MP Feeder Assign *Factory default setting Configure the printer to print on the page. Portrait* Landscape Lines per Page Assign the number of... lines that use different source assignments for trays, drawers, and feeders. 200 = Off* Range: 0.08 - 100.00 in increments of text and graphics on A4-size paper. 198 mm*...

User Guide
Page 43
From this You can: menuA:ssign Tray 0-199 Assign Manual Paper Assign Man Env View Factory Def Display the factory default setting assigned to the factory default Defaults settings. *Factory default setting Restore Return all tray, drawer, and feeder assignments to each tray, drawer, or feeder.
From this You can: menuA:ssign Tray 0-199 Assign Manual Paper Assign Man Env View Factory Def Display the factory default setting assigned to the factory default Defaults settings. *Factory default setting Restore Return all tray, drawer, and feeder assignments to each tray, drawer, or feeder.
User Guide
Page 44
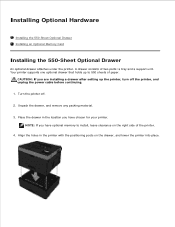
... drawer that holds up the printer, turn off . 2. Place the drawer in the printer with the positioning posts on the right side of two parts: a tray and a support unit. Align the holes in the location you have optional memory to 550 sheets of paper. Installing Optional Hardware Installing the 550-Sheet...
... drawer that holds up the printer, turn off . 2. Place the drawer in the printer with the positioning posts on the right side of two parts: a tray and a support unit. Align the holes in the location you have optional memory to 550 sheets of paper. Installing Optional Hardware Installing the 550-Sheet...

User Guide
Page 49
Dell™ 2330d/2350d Laser Printer - NOTE: If the size of the paper being loaded now is ... Setting the Paper Size and Paper Type Loading the 250-Sheet Paper Tray Loading the 550-Sheet Paper Tray Using the Rear Exit Using the Multipurpose Feeder Linking and Unlinking Trays Setting the Paper Size and Paper Type NOTE: You must install the... software for the size and type used in the trays, then any trays containing the same size and type are automatically linked...
Dell™ 2330d/2350d Laser Printer - NOTE: If the size of the paper being loaded now is ... Setting the Paper Size and Paper Type Loading the 250-Sheet Paper Tray Loading the 550-Sheet Paper Tray Using the Rear Exit Using the Multipurpose Feeder Linking and Unlinking Trays Setting the Paper Size and Paper Type NOTE: You must install the... software for the size and type used in the trays, then any trays containing the same size and type are automatically linked...

User Guide
Page 50
... Configuration Web Tool is available only on the Dell 2330dn/2350dn Laser Printer. 1. Select the paper size you do not know your Web browser. 5. Size appears under the source name. 6. Select Printer Settings in each tray. 6. Press the Arrow buttons until the correct size ...appears, and then press the Select button . Press the Select button . 7. Dell 2330dn/2350dn Laser Printer - Type your network printer's IP address in the left column...
... Configuration Web Tool is available only on the Dell 2330dn/2350dn Laser Printer. 1. Select the paper size you do not know your Web browser. 5. Size appears under the source name. 6. Select Printer Settings in each tray. 6. Press the Arrow buttons until the correct size ...appears, and then press the Select button . Press the Select button . 7. Dell 2330dn/2350dn Laser Printer - Type your network printer's IP address in the left column...

User Guide
Page 51
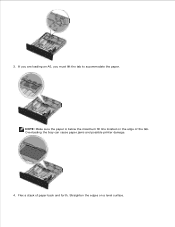
Select the paper type you must adjust the paper tray to load paper in each tray. 11. a. 7. 8. Loading the 250-Sheet Paper Tray Follow these instructions to accommodate the larger paper. Click Submit. b. Remove the tray. 2. If you are loading legal or folio-size paper, you have in the 250-sheet paper tray. 1. Select Paper Type. 10. Press down on the latch at the back of the tray. From the Printer Settings page, select Paper Menu. 9. Expand the tray until the extender locks into place.
Select the paper type you must adjust the paper tray to load paper in each tray. 11. a. 7. 8. Loading the 250-Sheet Paper Tray Follow these instructions to accommodate the larger paper. Click Submit. b. Remove the tray. 2. If you are loading legal or folio-size paper, you have in the 250-sheet paper tray. 1. Select Paper Type. 10. Press down on the latch at the back of the tray. From the Printer Settings page, select Paper Menu. 9. Expand the tray until the extender locks into place.
User Guide
Page 52
Straighten the edges on the edge of paper back and forth. Flex a stack of the tab. If you are loading an A6, you must lift the tab to accommodate the paper. NOTE: Make sure the paper is below the maximum fill line located on a level surface. Overloading the tray can cause paper jams and possible printer damage. 4. b. 3.
Straighten the edges on the edge of paper back and forth. Flex a stack of the tab. If you are loading an A6, you must lift the tab to accommodate the paper. NOTE: Make sure the paper is below the maximum fill line located on a level surface. Overloading the tray can cause paper jams and possible printer damage. 4. b. 3.
User Guide
Page 53
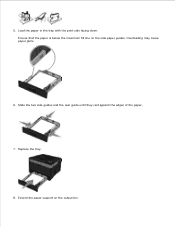
Load the paper in the tray with the print side facing down. Slide the two side guides and the rear guide until they rest against the edges of the paper. 7. Ensure that the paper is below the maximum fill line on the output bin. 4. 5. Extend the paper support on the side paper guides. Replace the tray. 8. Overloading may cause paper jams. 6.
Load the paper in the tray with the print side facing down. Slide the two side guides and the rear guide until they rest against the edges of the paper. 7. Ensure that the paper is below the maximum fill line on the output bin. 4. 5. Extend the paper support on the side paper guides. Replace the tray. 8. Overloading may cause paper jams. 6.

User Guide
Page 54
a. Expand the tray until the extender locks into place. Loading the 550-Sheet Paper Tray Follow these instructions to accommodate the larger paper. If you are loading legal or folio-size paper, you must adjust the paper tray to load paper in the 550-sheet paper tray. 1. Press down on the latch at the back of the tray. b. 8. Remove the tray. 2.
a. Expand the tray until the extender locks into place. Loading the 550-Sheet Paper Tray Follow these instructions to accommodate the larger paper. If you are loading legal or folio-size paper, you must adjust the paper tray to load paper in the 550-sheet paper tray. 1. Press down on the latch at the back of the tray. b. 8. Remove the tray. 2.

User Guide
Page 55
Slide the two side guides and the rear guide until they rest against the edges of paper back and forth. Ensure that the paper is below the maximum fill line on a level surface. 4. Overloading may cause paper jams. 5. b. 3. Straighten the edges on the side paper guides. Load the paper in the tray with the print side facing down. Flex a stack of the paper.
Slide the two side guides and the rear guide until they rest against the edges of paper back and forth. Ensure that the paper is below the maximum fill line on a level surface. 4. Overloading may cause paper jams. 5. b. 3. Straighten the edges on the side paper guides. Load the paper in the tray with the print side facing down. Flex a stack of the paper.

User Guide
Page 56
Replace the tray. 7. To use the rear exit, open , all print jobs are sent to help reduce curling and potential jams. This is open the rear exit door. When the rear exit door is especially useful for specialty media, such as transparencies, envelopes, labels, card stock, or index cards. When closed, all print jobs come out the rear exit. Using the Rear Exit The single-sheet rear exit provides a straight-through paper path to the output bin on the output bin. 5. 6. Extend the paper support on top of the printer.
Replace the tray. 7. To use the rear exit, open , all print jobs are sent to help reduce curling and potential jams. This is open the rear exit door. When the rear exit door is especially useful for specialty media, such as transparencies, envelopes, labels, card stock, or index cards. When closed, all print jobs come out the rear exit. Using the Rear Exit The single-sheet rear exit provides a straight-through paper path to the output bin on the output bin. 5. 6. Extend the paper support on top of the printer.


