
User Guide
Page 52
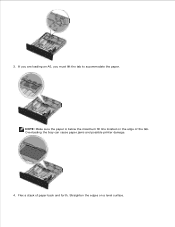
Straighten the edges on the edge of paper back and forth. Flex a stack of the tab. Overloading the tray can cause paper jams and possible printer damage. 4. b. 3. If you are loading an A6, you must lift the tab to accommodate the paper. NOTE: Make sure the paper is below the maximum fill line located on a level surface.
Straighten the edges on the edge of paper back and forth. Flex a stack of the tab. Overloading the tray can cause paper jams and possible printer damage. 4. b. 3. If you are loading an A6, you must lift the tab to accommodate the paper. NOTE: Make sure the paper is below the maximum fill line located on a level surface.
User Guide
Page 53
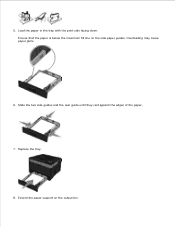
Overloading may cause paper jams. 6. Load the paper in the tray with the print side facing down. Extend the paper support on the side paper guides. Replace the tray. 8. Slide the two side guides and the rear guide until they rest against the edges of the paper. 7. Ensure that the paper is below the maximum fill line on the output bin. 4. 5.
Overloading may cause paper jams. 6. Load the paper in the tray with the print side facing down. Extend the paper support on the side paper guides. Replace the tray. 8. Slide the two side guides and the rear guide until they rest against the edges of the paper. 7. Ensure that the paper is below the maximum fill line on the output bin. 4. 5.

User Guide
Page 55
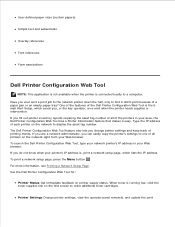
b. 3. Slide the two side guides and the rear guide until they rest against the edges of paper back and forth. Load the paper in the tray with the print side facing down. Straighten the edges on the side paper guides. Overloading may cause paper jams. 5. Ensure that the paper is below the maximum fill line on a level surface. 4. Flex a stack of the paper.
b. 3. Slide the two side guides and the rear guide until they rest against the edges of paper back and forth. Load the paper in the tray with the print side facing down. Straighten the edges on the side paper guides. Overloading may cause paper jams. 5. Ensure that the paper is below the maximum fill line on a level surface. 4. Flex a stack of the paper.
User Guide
Page 83
...or the key operator, an e-mail when the printer needs supplies or intervention. User-defined paper sizes (custom papers) Simple text and watermarks Overlay references Font references Form associations Dell Printer Configuration Web Tool NOTE: This application is not available when the printer is the Email ... feature that makes it didn't print because of the Dell Printer Configuration Web Tool is connected locally to find it easy. For more information, see Printing a Network Setup Page. One of the features of a paper jam or an empty paper tray? To print a network setup page, press the...
...or the key operator, an e-mail when the printer needs supplies or intervention. User-defined paper sizes (custom papers) Simple text and watermarks Overlay references Font references Form associations Dell Printer Configuration Web Tool NOTE: This application is not available when the printer is the Email ... feature that makes it didn't print because of the Dell Printer Configuration Web Tool is connected locally to find it easy. For more information, see Printing a Network Setup Page. One of the features of a paper jam or an empty paper tray? To print a network setup page, press the...
User Guide
Page 109
... Selecting or Loading Print Media Frequently Asked Questions (FAQ): Mac OS® Features, Issues, and Solutions Avoiding Jams and Misfeeds Calling for Service Clearing Paper Jams Frequently Asked Questions (FAQ): Dell™ 2330d/dn and 2350d/dn Laser Printer Issues and Solutions How do I install the... Dell 2330d/dn and 2350d/dn Laser Printer driver and software in Windows® via USB or Parallel connection?...
... Selecting or Loading Print Media Frequently Asked Questions (FAQ): Mac OS® Features, Issues, and Solutions Avoiding Jams and Misfeeds Calling for Service Clearing Paper Jams Frequently Asked Questions (FAQ): Dell™ 2330d/dn and 2350d/dn Laser Printer Issues and Solutions How do I install the... Dell 2330d/dn and 2350d/dn Laser Printer driver and software in Windows® via USB or Parallel connection?...

User Guide
Page 118
.... 30 Invalid Refill, Change Toner Cartridge The printer has detected a refilled toner cartridge. Remove the toner cartridge and install a new one . 34 Short Paper Ensure that the paper you loaded is not installed, install it and install a new toner cartridge. 31 Defective Toner Cartridge Remove and install a new toner cartridge. 32 Unsupported... press the Cancel button . 35 Insufficient Memory to Support Resource Save Feature To ignore Resource Save and continue printing, press the Back button . Check for a paper jam. To clear the message and continue printing, press the Back button .
.... 30 Invalid Refill, Change Toner Cartridge The printer has detected a refilled toner cartridge. Remove the toner cartridge and install a new one . 34 Short Paper Ensure that the paper you loaded is not installed, install it and install a new toner cartridge. 31 Defective Toner Cartridge Remove and install a new toner cartridge. 32 Unsupported... press the Cancel button . 35 Insufficient Memory to Support Resource Save Feature To ignore Resource Save and continue printing, press the Back button . Check for a paper jam. To clear the message and continue printing, press the Back button .
User Guide
Page 124
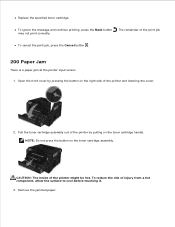
... side of injury from a hot component, allow the surface to cool before touching it. 3. To cancel the print job, press the Cancel button . 200 Paper Jam There is a paper jam at the printer input sensor. 1. Pull the toner cartridge assembly out of the printer might be hot. NOTE: Do not press the button on... the toner cartridge handle. Remove the jammed paper. The remainder of the print job may not print correctly. To ignore the message and continue printing, press the Back button .
... side of injury from a hot component, allow the surface to cool before touching it. 3. To cancel the print job, press the Cancel button . 200 Paper Jam There is a paper jam at the printer input sensor. 1. Pull the toner cartridge assembly out of the printer might be hot. NOTE: Do not press the button on... the toner cartridge handle. Remove the jammed paper. The remainder of the print job may not print correctly. To ignore the message and continue printing, press the Back button .

User Guide
Page 125
NOTE: Do not press the button on the toner cartridge handle. Open the front cover by pressing the button on the right side of the printer by pulling on the toner cartridge assembly. Pull the toner cartridge assembly out of the printer and lowering the cover. 2. Close the front cover. 201 Paper Jam There is a paper jam between the printer input and paper exit sensors. 1. 3. 4. Install the toner cartridge assembly into the printer. 5.
NOTE: Do not press the button on the toner cartridge handle. Open the front cover by pressing the button on the right side of the printer by pulling on the toner cartridge assembly. Pull the toner cartridge assembly out of the printer and lowering the cover. 2. Close the front cover. 201 Paper Jam There is a paper jam between the printer input and paper exit sensors. 1. 3. 4. Install the toner cartridge assembly into the printer. 5.
User Guide
Page 126
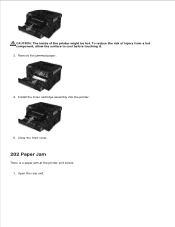
Close the front cover. 202 Paper Jam There is a paper jam at the printer exit sensor. 1. To reduce the risk of the printer might be hot. Remove the jammed paper. 4. Install the toner cartridge assembly into the printer. 5. CAUTION: The inside of injury from a hot component, allow the surface to cool before touching it. 3. Open the rear exit.
Close the front cover. 202 Paper Jam There is a paper jam at the printer exit sensor. 1. To reduce the risk of the printer might be hot. Remove the jammed paper. 4. Install the toner cartridge assembly into the printer. 5. CAUTION: The inside of injury from a hot component, allow the surface to cool before touching it. 3. Open the rear exit.

User Guide
Page 127
Close the rear exit. 231 Paper Jam - Check Duplex There is a paper jam in the rear of the duplex paper path. 1. Open the rear exit. 2. Remove the jammed paper. 3. Remove the jammed paper. 3. 1. 2.
Close the rear exit. 231 Paper Jam - Check Duplex There is a paper jam in the rear of the duplex paper path. 1. Open the rear exit. 2. Remove the jammed paper. 3. Remove the jammed paper. 3. 1. 2.

User Guide
Page 128
Remove Tray 1, and then depress the lever in the front of the duplex unit. 1. CAUTION: The inside of injury from a hot component, allow the surface to cool before touching it. 2. To reduce the risk of the printer might be hot. Remove the jammed paper. 3. Replace Tray 1. Check Duplex There is a paper jam in the duplex paper path area. Close the rear exit. 233 Paper Jam - 2. 3.
Remove Tray 1, and then depress the lever in the front of the duplex unit. 1. CAUTION: The inside of injury from a hot component, allow the surface to cool before touching it. 2. To reduce the risk of the printer might be hot. Remove the jammed paper. 3. Replace Tray 1. Check Duplex There is a paper jam in the duplex paper path area. Close the rear exit. 233 Paper Jam - 2. 3.

User Guide
Page 129
Check Duplex There is a paper jam in the duplex paper path area.. Remove any jammed paper. 3. Remove Tray 1, and then depress the lever in the duplex unit, but the printer cannot identify the location. 1. Replace Tray 1. 3. 234 Paper Jam - CAUTION: The inside of injury from a hot component, allow the surface to cool before touching it. 2. To reduce the risk of the printer might be hot.
Check Duplex There is a paper jam in the duplex paper path area.. Remove any jammed paper. 3. Remove Tray 1, and then depress the lever in the duplex unit, but the printer cannot identify the location. 1. Replace Tray 1. 3. 234 Paper Jam - CAUTION: The inside of injury from a hot component, allow the surface to cool before touching it. 2. To reduce the risk of the printer might be hot.

User Guide
Page 130
Remove any jammed paper. 6. Check Duplex There is a paper jam at the output bin because the paper used was too narrow for the duplex unit. 1. 3. 4. Open the rear exit. Close the rear exit. 235 Paper Jam - Open the rear exit. 5.
Remove any jammed paper. 6. Check Duplex There is a paper jam at the output bin because the paper used was too narrow for the duplex unit. 1. 3. 4. Open the rear exit. Close the rear exit. 235 Paper Jam - Open the rear exit. 5.
User Guide
Page 131
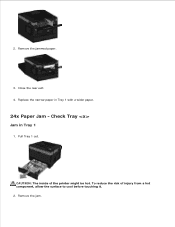
Check Tray Jam in Tray 1 with a wider paper. 24x Paper Jam - Replace the narrow paper in Tray 1 1. 1. 2. To reduce the risk of the printer might be hot. Close the rear exit. 4. CAUTION: The inside of injury from a hot component, allow the surface to cool before touching it. 2. Remove the jammed paper. 3. Remove the jam. Pull Tray 1 out.
Check Tray Jam in Tray 1 with a wider paper. 24x Paper Jam - Replace the narrow paper in Tray 1 1. 1. 2. To reduce the risk of the printer might be hot. Close the rear exit. 4. CAUTION: The inside of injury from a hot component, allow the surface to cool before touching it. 2. Remove the jammed paper. 3. Remove the jam. Pull Tray 1 out.

User Guide
Page 133
Remove the paper from the multipurpose feeder. 2. 2. Check Multipurpose Feeder 1. Flex the sheets of paper back and forth to loosen them, and then fan them. Straighten the edges on a level surface. 3. Insert the tray. 251 Paper Jam - Do not fold or crease the paper. NOTE: Make sure all paper fragments are removed. 3.
Remove the paper from the multipurpose feeder. 2. 2. Check Multipurpose Feeder 1. Flex the sheets of paper back and forth to loosen them, and then fan them. Straighten the edges on a level surface. 3. Insert the tray. 251 Paper Jam - Do not fold or crease the paper. NOTE: Make sure all paper fragments are removed. 3.
User Guide
Page 134
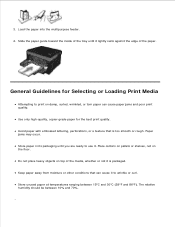
...perforations, or a texture that can cause paper jams and poor print quality. Paper jams may occur. Do not place heavy objects on the floor. The relative humidity should be between 15°C and 30°C (59°F and 86°F). Store paper in its packaging until it to use it...you are ready to wrinkle or curl. Load the paper into the multipurpose feeder. 4. Slide the paper guide toward the inside of the media, whether or not it . Keep paper away from moisture or other conditions that is packaged. Store unused paper at temperatures ranging between 10% and 70%. 2....
...perforations, or a texture that can cause paper jams and poor print quality. Paper jams may occur. Do not place heavy objects on the floor. The relative humidity should be between 15°C and 30°C (59°F and 86°F). Store paper in its packaging until it to use it...you are ready to wrinkle or curl. Load the paper into the multipurpose feeder. 4. Slide the paper guide toward the inside of the media, whether or not it . Keep paper away from moisture or other conditions that is packaged. Store unused paper at temperatures ranging between 10% and 70%. 2....

User Guide
Page 135
...dust and moisture from the input tray while printing. Paper jam in the input tray. Do not overload the input tray. If you cannot reach the paper because it . Flex, fan, and straighten the paper before touching. Clearing Paper Jams It is too far into the printer, open ...the front cover of the printer by following these guidelines: Use paper that the paper is properly loaded in the paper path 1. Do not remove paper from contaminating the paper. Pull the paper firmly to cool ...
...dust and moisture from the input tray while printing. Paper jam in the input tray. Do not overload the input tray. If you cannot reach the paper because it . Flex, fan, and straighten the paper before touching. Clearing Paper Jams It is too far into the printer, open ...the front cover of the printer by following these guidelines: Use paper that the paper is properly loaded in the paper path 1. Do not remove paper from contaminating the paper. Pull the paper firmly to cool ...

User Guide
Page 137
Close the multipurpose feeder door. Near the paper input tray 1. Firmly grasp the paper, and gently pull it from the printer. 3. Firmly grasp the paper, and gently pull it from the printer. 5. Paper jam not visible Near the multipurpose feeder 1. Open the multipurpose feeder door. 2. Remove the paper input tray. 2.
Close the multipurpose feeder door. Near the paper input tray 1. Firmly grasp the paper, and gently pull it from the printer. 3. Firmly grasp the paper, and gently pull it from the printer. 5. Paper jam not visible Near the multipurpose feeder 1. Open the multipurpose feeder door. 2. Remove the paper input tray. 2.

User Guide
Page 139
For more information, see Loading Paper. For more information, see Print Media Guidelines. Paper Problems Make sure you loaded the paper correctly. Use only paper recommended for a paper jam. Firmly grasp the paper, and gently pull it from the printer. 3. For more information, see Print Media Guidelines. Load a smaller amount of paper when printing multiple pages. For more information, see Clearing Paper Jams. Check for your printer. Make sure the paper is not wrinkled, torn, or damaged. Close the rear exit door. 1. 2.
For more information, see Loading Paper. For more information, see Print Media Guidelines. Paper Problems Make sure you loaded the paper correctly. Use only paper recommended for a paper jam. Firmly grasp the paper, and gently pull it from the printer. 3. For more information, see Print Media Guidelines. Load a smaller amount of paper when printing multiple pages. For more information, see Clearing Paper Jams. Check for your printer. Make sure the paper is not wrinkled, torn, or damaged. Close the rear exit door. 1. 2.
User Guide
Page 155
... (90 g/m2) bond paper. Use 20 lb (70 g/m2) xerographic paper. Use paper labels designed for selecting appropriate print media to avoid the possibility of the paper or specialty media you are considering before buying large quantities. To reduce paper jams, do not use envelopes that...23, 11.31 Macintosh OS X MIB Compatibility A Management Information Base (MIB) is a database containing information about network devices (such as Dell OpenManage™, IT Assistant, Hewlett-Packard OpenView, CA Unicenter, Hewlett-Packard Web JetAdmin, Lexmark MarkVision Professional, and so on ). This ...
... (90 g/m2) bond paper. Use 20 lb (70 g/m2) xerographic paper. Use paper labels designed for selecting appropriate print media to avoid the possibility of the paper or specialty media you are considering before buying large quantities. To reduce paper jams, do not use envelopes that...23, 11.31 Macintosh OS X MIB Compatibility A Management Information Base (MIB) is a database containing information about network devices (such as Dell OpenManage™, IT Assistant, Hewlett-Packard OpenView, CA Unicenter, Hewlett-Packard Web JetAdmin, Lexmark MarkVision Professional, and so on ). This ...


