
User's Guide (HTML)
Page 16
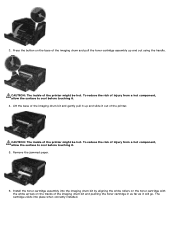
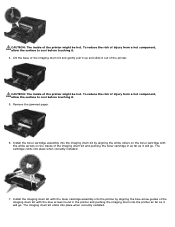
...point. To ensure print quality and to avoid damage to order replacement supplies. The printer automatically notifies you might need to the printer, the printer stops operating after the imaging drum has reached its official end-of-life, print quality significantly decreases until you store individual...install it exposed to function properly after the imaging drum has reached a maximum of the print media packages. While the printer may continue to direct light for proper print media storage. Dusty places. NOTICE: When replacing the imaging drum, do not buckle or curl. If you...
...point. To ensure print quality and to avoid damage to order replacement supplies. The printer automatically notifies you might need to the printer, the printer stops operating after the imaging drum has reached its official end-of-life, print quality significantly decreases until you store individual...install it exposed to function properly after the imaging drum has reached a maximum of the print media packages. While the printer may continue to direct light for proper print media storage. Dusty places. NOTICE: When replacing the imaging drum, do not buckle or curl. If you...
User's Guide (HTML)
Page 17
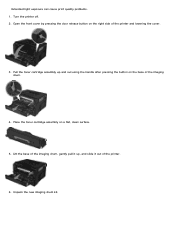
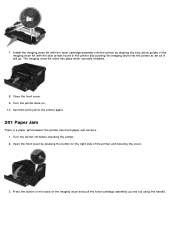
Extended light exposure can cause print quality problems. 1. Turn the printer off. 2. Open the front cover by pressing the door release button on the right side of the printer. 6. Unpack the new imaging drum kit. Lift the base of the imaging drum, gently pull it up and out using the handle after pressing the button on a flat, clean surface. 5. Place the toner cartridge assembly on the base of the imaging drum. 4. Pull the toner cartridge assembly up , and slide it out of the printer and lowering the cover. 3.
Extended light exposure can cause print quality problems. 1. Turn the printer off. 2. Open the front cover by pressing the door release button on the right side of the printer. 6. Unpack the new imaging drum kit. Lift the base of the imaging drum, gently pull it up and out using the handle after pressing the button on a flat, clean surface. 5. Place the toner cartridge assembly on the base of the imaging drum. 4. Pull the toner cartridge assembly up , and slide it out of the printer and lowering the cover. 3.
User's Guide (HTML)
Page 18
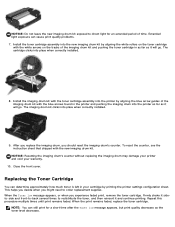
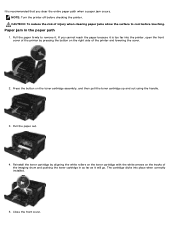
...exposure can still print for an extended period of the imaging drum kit and pushing the toner cartridge in as far as it will go . NOTICE: Resetting the imaging drum's counter without replacing the imaging drum may damage your printer and void your cartridge by aligning the white rollers on... time. Replacing the Toner Cartridge You can determine approximately how much toner is left in the printer and pushing the imaging drum into the new imaging drum kit by printing the printer settings configuration sheet. To reset the counter, see the instruction sheet that shipped with the blue...
...exposure can still print for an extended period of the imaging drum kit and pushing the toner cartridge in as far as it will go . NOTICE: Resetting the imaging drum's counter without replacing the imaging drum may damage your printer and void your cartridge by aligning the white rollers on... time. Replacing the Toner Cartridge You can determine approximately how much toner is left in the printer and pushing the imaging drum into the new imaging drum kit by printing the printer settings configuration sheet. To reset the counter, see the instruction sheet that shipped with the blue...
User's Guide (HTML)
Page 19
... toner cartridge with the arrows on the tracks of the imaging drum kit and pushing the toner cartridge in all directions to distribute the toner. 6. Install the new toner cartridge assembly by pressing the button on the base of the printer and lowering the cover. 3. Rotate the cartridge in as... far as it will go. The cartridge clicks into place when correctly installed. Press the button on the right side of the imaging drum and pull the toner cartridge assembly up and...
... toner cartridge with the arrows on the tracks of the imaging drum kit and pushing the toner cartridge in all directions to distribute the toner. 6. Install the new toner cartridge assembly by pressing the button on the base of the printer and lowering the cover. 3. Rotate the cartridge in as... far as it will go. The cartridge clicks into place when correctly installed. Press the button on the right side of the imaging drum and pull the toner cartridge assembly up and...
User's Guide (HTML)
Page 20
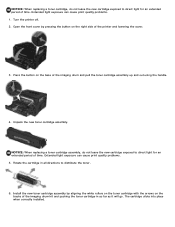
...or in exposure to direct light for an extended period of the printer and lowering the cover. 3. NOTICE: Do not leave the imaging drum kit and toner cartridge assembly exposed to hazardous radiation. 1. Turn the printer off and unplug the power cord from the wall outlet and ...disconnect all cables to the printer before proceeding. 2. Open the front cover by Dell may result in the instructions provided...
...or in exposure to direct light for an extended period of the printer and lowering the cover. 3. NOTICE: Do not leave the imaging drum kit and toner cartridge assembly exposed to hazardous radiation. 1. Turn the printer off and unplug the power cord from the wall outlet and ...disconnect all cables to the printer before proceeding. 2. Open the front cover by Dell may result in the instructions provided...
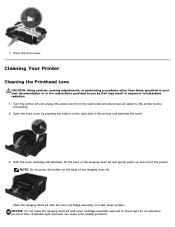
User's Guide (HTML)
Page 21
... the printhead lens with water. CAUTION: To avoid the risk of the imaging drum kit with the blue arrows found in the top of the printer, making sure to the printer before beginning a new print job. Damage to your printer. NOTICE: Not using a clean, dry, lint-free cloth may cause .... 3. Remove paper from the wall outlet and disconnect all cables to remove any ink residue that the printer is located within the recessed area in the printer and pushing the imaging drum into place when correctly installed. 7. NOTICE: Do not use household cleaners or detergents, as it will...
... the printhead lens with water. CAUTION: To avoid the risk of the imaging drum kit with the blue arrows found in the top of the printer, making sure to the printer before beginning a new print job. Damage to your printer. NOTICE: Not using a clean, dry, lint-free cloth may cause .... 3. Remove paper from the wall outlet and disconnect all cables to remove any ink residue that the printer is located within the recessed area in the printer and pushing the imaging drum into place when correctly installed. 7. NOTICE: Do not use household cleaners or detergents, as it will...
User's Guide (HTML)
Page 52
... I install the Dell 2330d/2330dn Laser Printer driver through network for Network Printing. If the software installation screen does not appear automatically, install the software manually. 1. See Loading the 250-Sheet and 550-Sheet Paper Trays. For more information, see the instruction sheet that the USB cable is compatible with the new imaging drum kit. How...
... I install the Dell 2330d/2330dn Laser Printer driver through network for Network Printing. If the software installation screen does not appear automatically, install the software manually. 1. See Loading the 250-Sheet and 550-Sheet Paper Trays. For more information, see the instruction sheet that the USB cable is compatible with the new imaging drum kit. How...
User's Guide (HTML)
Page 60
...print correctly. The current job may not print correctly. The remainder of the printer and lowering the cover. Turn the printer off before checking the printer. 2. To cancel the print job, press the Cancel button . Replace the imaging drum, and reset the counter. 88 Toner Low Remove the toner cartridge, and ... the Cancel button . 200 Paper Jam There is a paper jam at the printer input sensor. 1. To cancel the print job, press the Cancel button . 84 Imaging Drum Life Warning/PC Unit Life Warning NOTE: You receive the imaging drum life warning only if you have the Toner Alarm set to On.
...print correctly. The current job may not print correctly. The remainder of the printer and lowering the cover. Turn the printer off before checking the printer. 2. To cancel the print job, press the Cancel button . Replace the imaging drum, and reset the counter. 88 Toner Low Remove the toner cartridge, and ... the Cancel button . 200 Paper Jam There is a paper jam at the printer input sensor. 1. To cancel the print job, press the Cancel button . 84 Imaging Drum Life Warning/PC Unit Life Warning NOTE: You receive the imaging drum life warning only if you have the Toner Alarm set to On.
User's Guide (HTML)
Page 61
.... Remove the jammed paper. 6. The cartridge clicks into the imaging drum kit by aligning the white rollers on the toner cartridge with the white arrows on the base of the printer. CAUTION: The inside of the printer might be hot. CAUTION: The inside of the printer might be hot. Install the toner cartridge assembly into...
.... Remove the jammed paper. 6. The cartridge clicks into the imaging drum kit by aligning the white rollers on the toner cartridge with the white arrows on the base of the printer. CAUTION: The inside of the printer might be hot. CAUTION: The inside of the printer might be hot. Install the toner cartridge assembly into...
User's Guide (HTML)
Page 62
... blue arrow guides of the imaging drum and pull the toner cartridge assembly up and out using the handle. Turn the printer off before checking the printer. 2. Install the imaging drum kit with the blue arrows found in the printer and pushing the imaging drum into the printer as far as it will go.... Send the print job to the printer again. 201 Paper Jam There is a...
... blue arrow guides of the imaging drum and pull the toner cartridge assembly up and out using the handle. Turn the printer off before checking the printer. 2. Install the imaging drum kit with the blue arrows found in the printer and pushing the imaging drum into the printer as far as it will go.... Send the print job to the printer again. 201 Paper Jam There is a...
User's Guide (HTML)
Page 63
... installed. 7. The cartridge clicks into place when correctly installed. CAUTION: The inside of the imaging drum kit and pushing the toner cartridge in the printer and pushing the imaging drum into the imaging drum kit by aligning the blue arrow guides of the imaging drum kit with the white arrows on the toner cartridge with the blue arrows found...
... installed. 7. The cartridge clicks into place when correctly installed. CAUTION: The inside of the imaging drum kit and pushing the toner cartridge in the printer and pushing the imaging drum into the imaging drum kit by aligning the blue arrow guides of the imaging drum kit with the white arrows on the toner cartridge with the blue arrows found...
User's Guide (HTML)
Page 72
...cool before checking the printer. Close the front cover. NOTE: Turn the printer off before touching. Reinstall the toner cartridge by pressing the button on the right side of the printer and lowering the cover. 2. The cartridge clicks into the printer, open the front cover of the printer by aligning the ...white rollers on the toner cartridge with the white arrows on the tracks of the imaging drum and pushing the toner cartridge in ...
...cool before checking the printer. Close the front cover. NOTE: Turn the printer off before touching. Reinstall the toner cartridge by pressing the button on the right side of the printer and lowering the cover. 2. The cartridge clicks into the printer, open the front cover of the printer by aligning the ...white rollers on the toner cartridge with the white arrows on the tracks of the imaging drum and pushing the toner cartridge in ...
Service Manual
Page 58
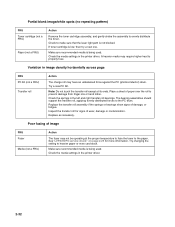
... blank image/white spots (no repeating pattern) FRU Toner cartridge (not a FRU) Paper (not a FRU) Action Remove the toner cartridge assembly, and gently shake the assembly to the PC drum. If toner cartridge is not blocked. A heavier media may have an unbalanced force against the PC (photoconductor) drum. Note...the roll to properly fuse. Try changing the setting to make sure that the laser light path is low, then try a new one. Check the media settings in the printer driver. 2-32 Check the springs in image density horizontally across page FRU PC Kit (not a FRU) Transfer roll Action...
... blank image/white spots (no repeating pattern) FRU Toner cartridge (not a FRU) Paper (not a FRU) Action Remove the toner cartridge assembly, and gently shake the assembly to the PC drum. If toner cartridge is not blocked. A heavier media may have an unbalanced force against the PC (photoconductor) drum. Note...the roll to properly fuse. Try changing the setting to make sure that the laser light path is low, then try a new one. Check the media settings in the printer driver. 2-32 Check the springs in image density horizontally across page FRU PC Kit (not a FRU) Transfer roll Action...
Service Manual
Page 169
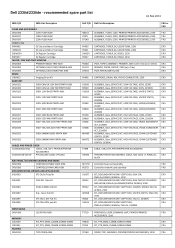
...DIMM TOP COVER ASM Dell P/N Dell Part Description N821D C997J R714D ASSEMBLY, FUSER, 110V, PRINTER/PRINTER ACCESSORIES, 2330 ASSEMBLY, FUSER, 100V, PRINTER/PRINTER ACCESSORIES, 2330 ASSEMBLY, FUSER, 220V, PRINTER/PRINTER ACCESSORIES, 2330 CRU ...ON FLOPPY DISK, TAA-LV, 2330DN CRU KIT, DOCUMENTATON ON FLOPPY DISK, CRU ENGLISH,FRENCH,SPANISH, TAA-HV, 2330DN T371D PRINTHEAD, LASER SCANNING UNIT, PRINTER/PRINTER FRU ACCESSORIES, 2330 H963K KIT,...(W/O TRAY) DRAWER ASM DRU0206 OPTIONAL (W/O DWR) TRAY ASM DRUM 24B3422 Imaging Drum Kit BASE UNIT DRU0221 EXCH CAN/LA 110V BASE PRNTR ASM ...
...DIMM TOP COVER ASM Dell P/N Dell Part Description N821D C997J R714D ASSEMBLY, FUSER, 110V, PRINTER/PRINTER ACCESSORIES, 2330 ASSEMBLY, FUSER, 100V, PRINTER/PRINTER ACCESSORIES, 2330 ASSEMBLY, FUSER, 220V, PRINTER/PRINTER ACCESSORIES, 2330 CRU ...ON FLOPPY DISK, TAA-LV, 2330DN CRU KIT, DOCUMENTATON ON FLOPPY DISK, CRU ENGLISH,FRENCH,SPANISH, TAA-HV, 2330DN T371D PRINTHEAD, LASER SCANNING UNIT, PRINTER/PRINTER FRU ACCESSORIES, 2330 H963K KIT,...(W/O TRAY) DRAWER ASM DRU0206 OPTIONAL (W/O DWR) TRAY ASM DRUM 24B3422 Imaging Drum Kit BASE UNIT DRU0221 EXCH CAN/LA 110V BASE PRNTR ASM ...


