

User's Guide (HTML)
Page 1
...may be used in this text: Dell, the DELL logo, Dell Toner Management System, and OpenManage are trademarks of Dell Inc. Visit the Dell website, or order Dell printer supplies by the Debian project. Finding Information About Your Printer Operator Panel Menus Installing Optional Hardware ...a trademark of Microsoft Corporation in any proprietary interest in the United States and other countries. Dell™ 2330d/2330dn Laser Printer User's Guide To order ink or supplies from Dell: 1. in trademarks and trade names other countries. and managed by phone. is a registered...
...may be used in this text: Dell, the DELL logo, Dell Toner Management System, and OpenManage are trademarks of Dell Inc. Visit the Dell website, or order Dell printer supplies by the Debian project. Finding Information About Your Printer Operator Panel Menus Installing Optional Hardware ...a trademark of Microsoft Corporation in any proprietary interest in the United States and other countries. Dell™ 2330d/2330dn Laser Printer User's Guide To order ink or supplies from Dell: 1. in trademarks and trade names other countries. and managed by phone. is a registered...

User's Guide (HTML)
Page 4
... Number These labels are already installed on your printer. Supplies for my printer Accessories for my printer Replacement toner and parts for components such as memory, network cards, and optional equipment Customer Care-Contact information, service call and order status, warranty, and repair information Dell Support Website-support.dell.com NOTE: Select your region or business...
... Number These labels are already installed on your printer. Supplies for my printer Accessories for my printer Replacement toner and parts for components such as memory, network cards, and optional equipment Customer Care-Contact information, service call and order status, warranty, and repair information Dell Support Website-support.dell.com NOTE: Select your region or business...
User's Guide (HTML)
Page 12
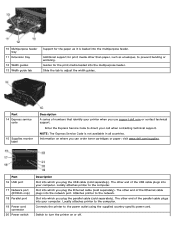
Part 14 Express service code 15 Supplies reorder label Description A series of the USB cable plugs into your printer when you can order toner cartridges or paper: visit www.dell.com/supplies. Information on or off. The other than paper, such as it is not available in all ...loaded into which you plug the parallel cable (sold separately). Locally attaches printer to turn the printer on where you use support.dell.com or contact technical support. Part 16 USB port 17 Network port (2330dn only) 18 Parallel port 19 Power cord connector 20 Power switch Description Slot...
Part 14 Express service code 15 Supplies reorder label Description A series of the USB cable plugs into your printer when you can order toner cartridges or paper: visit www.dell.com/supplies. Information on or off. The other than paper, such as it is not available in all ...loaded into which you plug the parallel cable (sold separately). Locally attaches printer to turn the printer on where you use support.dell.com or contact technical support. Part 16 USB port 17 Network port (2330dn only) 18 Parallel port 19 Power cord connector 20 Power switch Description Slot...
User's Guide (HTML)
Page 15
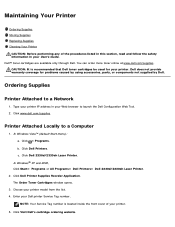
... Dell Printers. Click Dell Printer Supplies Reorder Application. Dell™ toner cartridges are available only through Dell. Printer Attached Locally to a Network 1. Click Dell 2330d/2330dn Laser Printer. Choose your Dell printer Service Tag number. Enter your printer model from the list. 4. Ordering Supplies Printer Attached to a Computer 1. In Windows® XP and 2000, Click Start® Programs or All Programs® Dell Printers® Dell 2330d/2330dn Laser Printer. 2. The Order Toner...
... Dell Printers. Click Dell Printer Supplies Reorder Application. Dell™ toner cartridges are available only through Dell. Printer Attached Locally to a Network 1. Click Dell 2330d/2330dn Laser Printer. Choose your Dell printer Service Tag number. Enter your printer model from the list. 4. Ordering Supplies Printer Attached to a Computer 1. In Windows® XP and 2000, Click Start® Programs or All Programs® Dell Printers® Dell 2330d/2330dn Laser Printer. 2. The Order Toner...
User's Guide (HTML)
Page 16
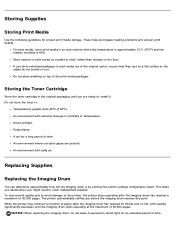
...damage to function properly after the imaging drum has reached a maximum of 30,000 pages. The printer automatically notifies you are present. Storing the Toner Cartridge Store the toner cartridge in humidity or temperature. An environment with salty air. An environment with extreme changes in ...°F). A car for proper print media storage. Do not store the toner in an environment where the temperature is approximately 21°C (70°F) and the relative humidity is by printing the printer settings configuration sheet. For best results, store print media in : Temperatures ...
...damage to function properly after the imaging drum has reached a maximum of 30,000 pages. The printer automatically notifies you are present. Storing the Toner Cartridge Store the toner cartridge in humidity or temperature. An environment with salty air. An environment with extreme changes in ...°F). A car for proper print media storage. Do not store the toner in an environment where the temperature is approximately 21°C (70°F) and the relative humidity is by printing the printer settings configuration sheet. For best results, store print media in : Temperatures ...
User's Guide (HTML)
Page 17
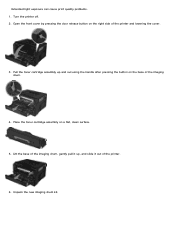
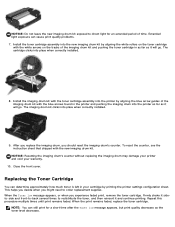
Extended light exposure can cause print quality problems. 1. Place the toner cartridge assembly on the base of the imaging drum. 4. Turn the printer off. 2. Open the front cover by pressing the door release button on the right side of the printer. 6. Lift the base of the imaging drum, gently pull it out of the printer and lowering the cover. 3. Pull the toner cartridge assembly up , and slide it up and out using the handle after pressing the button on a flat, clean surface. 5. Unpack the new imaging drum kit.
Extended light exposure can cause print quality problems. 1. Place the toner cartridge assembly on the base of the imaging drum. 4. Turn the printer off. 2. Open the front cover by pressing the door release button on the right side of the printer. 6. Lift the base of the imaging drum, gently pull it out of the printer and lowering the cover. 3. Pull the toner cartridge assembly up , and slide it up and out using the handle after pressing the button on a flat, clean surface. 5. Unpack the new imaging drum kit.
User's Guide (HTML)
Page 18
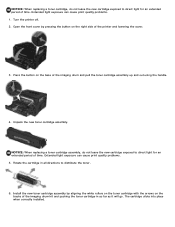
... decreases. NOTICE: Resetting the imaging drum's counter without replacing the imaging drum may damage your printer and void your cartridge by aligning the white rollers on the toner cartridge with the white arrows on the tracks of time. Firmly shake it sideto-side and front-to-back several...print for an extended period of the imaging drum kit and pushing the toner cartridge in your warranty. 10. The imaging drum kit clicks into place when correctly installed. 8. Install the toner cartridge assembly into the printer by aligning the blue arrow guides of the imaging drum kit with ...
... decreases. NOTICE: Resetting the imaging drum's counter without replacing the imaging drum may damage your printer and void your cartridge by aligning the white rollers on the toner cartridge with the white arrows on the tracks of time. Firmly shake it sideto-side and front-to-back several...print for an extended period of the imaging drum kit and pushing the toner cartridge in your warranty. 10. The imaging drum kit clicks into place when correctly installed. 8. Install the toner cartridge assembly into the printer by aligning the blue arrow guides of the imaging drum kit with ...
User's Guide (HTML)
Page 19
... light for an extended period of the imaging drum kit and pushing the toner cartridge in as far as it will go. Turn the printer off. 2. Open the front cover by aligning the white rollers on the toner cartridge with the arrows on the base of time. Unpack the new... toner cartridge assembly. NOTICE: When replacing a toner cartridge, do not leave the new cartridge exposed to distribute the toner. 6. Extended light exposure...
... light for an extended period of the imaging drum kit and pushing the toner cartridge in as far as it will go. Turn the printer off. 2. Open the front cover by aligning the white rollers on the toner cartridge with the arrows on the base of time. Unpack the new... toner cartridge assembly. NOTICE: When replacing a toner cartridge, do not leave the new cartridge exposed to distribute the toner. 6. Extended light exposure...
User's Guide (HTML)
Page 20
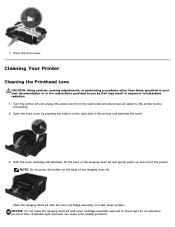
Open the front cover by Dell may result in exposure to the printer before proceeding. 2. NOTE: Do not press the button on a flat, clean surface. With the toner cartridge still attached, lift the base of the imaging drum kit and gently pull it up and out of time. Extended ... to hazardous radiation. 1. NOTICE: Do not leave the imaging drum kit and toner cartridge assembly exposed to direct light for an extended period of the printer. 7. Place the imaging drum kit with the toner cartridge assembly on the base of the printer and lowering the cover. 3. Close the front cover.
Open the front cover by Dell may result in exposure to the printer before proceeding. 2. NOTE: Do not press the button on a flat, clean surface. With the toner cartridge still attached, lift the base of the imaging drum kit and gently pull it up and out of time. Extended ... to hazardous radiation. 1. NOTICE: Do not leave the imaging drum kit and toner cartridge assembly exposed to direct light for an extended period of the printer. 7. Place the imaging drum kit with the toner cartridge assembly on the base of the printer and lowering the cover. 3. Close the front cover.
User's Guide (HTML)
Page 21
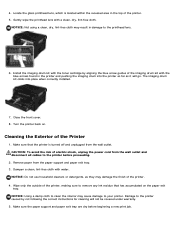
...the paper support and paper exit tray are dry before proceeding. 2. CAUTION: To avoid the risk of the printer. 5. Wipe only the outside of the imaging drum kit with the toner cartridge by not following the correct instructions for cleaning will go. 4. Gently wipe the printhead lens with water.... NOTICE: Not using a clean, dry, lint-free cloth may cause damage to the printer caused by aligning the blue arrow guides ...
...the paper support and paper exit tray are dry before proceeding. 2. CAUTION: To avoid the risk of the printer. 5. Wipe only the outside of the imaging drum kit with the toner cartridge by not following the correct instructions for cleaning will go. 4. Gently wipe the printhead lens with water.... NOTICE: Not using a clean, dry, lint-free cloth may cause damage to the printer caused by aligning the blue arrow guides ...
User's Guide (HTML)
Page 28
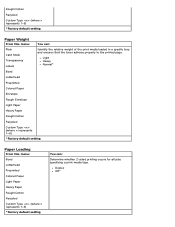
... default setting You can : Plain Card Stock Transparency Labels Identify the relative weight of the print media loaded in a specific tray and ensures that the toner adheres properly to the printed page. Duplex Off* Light Heavy Normal* Bond Letterhead Preprinted Colored Paper Envelope Rough Envelope Light Paper Heavy Paper Rough/Cotton...
... default setting You can : Plain Card Stock Transparency Labels Identify the relative weight of the print media loaded in a specific tray and ensures that the toner adheres properly to the printed page. Duplex Off* Light Heavy Normal* Bond Letterhead Preprinted Colored Paper Envelope Rough Envelope Light Paper Heavy Paper Rough/Cotton...

User's Guide (HTML)
Page 37
...* Wait Timeout Disabled 15-65535 seconds 40 seconds* Network Job Timeout Disabled 10-255 seconds 90 seconds* Print Specify whether the printer continues from certain offline situations, Recovery reprints jammed pages, or waits until the entire page is processed and ready to their factory default... values. Toner Alarm Off* Single Continuous Timeouts Specify the number of minutes of inactivity before the system enters a lower power state. Do Not Restore...
...* Wait Timeout Disabled 15-65535 seconds 40 seconds* Network Job Timeout Disabled 10-255 seconds 90 seconds* Print Specify whether the printer continues from certain offline situations, Recovery reprints jammed pages, or waits until the entire page is processed and ready to their factory default... values. Toner Alarm Off* Single Continuous Timeouts Specify the number of minutes of inactivity before the system enters a lower power state. Do Not Restore...
User's Guide (HTML)
Page 41
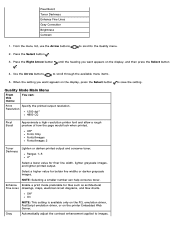
...: Selecting a smaller number can : Print Resolution Specify the printed output resolution. 1200 dpi* 4800 CQ Pixel Boost Approximate a high-resolution printer font and allow a rough preview of how the page would look when printed. Enhance Enable a print mode preferable for files such as architectural...on the display, press the Select button to the Quality menu. 2. Quality Mode Main Menu From this menu: You can help conserve toner. Gray Automatically adjust the contrast enhancement applied to scroll through the available menu items. 5. Use the Arrow buttons to images. Off*...
...: Selecting a smaller number can : Print Resolution Specify the printed output resolution. 1200 dpi* 4800 CQ Pixel Boost Approximate a high-resolution printer font and allow a rough preview of how the page would look when printed. Enhance Enable a print mode preferable for files such as architectural...on the display, press the Select button to the Quality menu. 2. Quality Mode Main Menu From this menu: You can help conserve toner. Gray Automatically adjust the contrast enhancement applied to scroll through the available menu items. 5. Use the Arrow buttons to images. Off*...
User's Guide (HTML)
Page 54
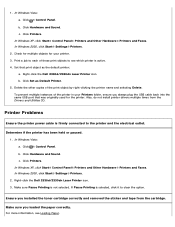
c. Right-click the Dell 2330d/2330dn Laser Printer icon. In Windows Vista: a. c. Right-click the Dell 2330d/2330dn Laser Printer icon. 3. Ensure you installed the toner cartridge correctly and removed the sticker and tape from the Drivers and Utilities CD. In Windows Vista: a. Click Printers. Delete the other copies of these print objects to clear the option. In Windows 2000, click...
c. Right-click the Dell 2330d/2330dn Laser Printer icon. In Windows Vista: a. c. Right-click the Dell 2330d/2330dn Laser Printer icon. 3. Ensure you installed the toner cartridge correctly and removed the sticker and tape from the Drivers and Utilities CD. In Windows Vista: a. Click Printers. Delete the other copies of these print objects to clear the option. In Windows 2000, click...

User's Guide (HTML)
Page 56
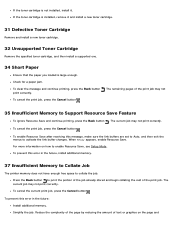
...any paper from that is already being used in the default input source. Remove the toner cartridge and install a new one of the correct type, it feeds paper from that tray. If the printer cannot find a tray with the correct paper type and size, it prints on paper... paper size. To cancel the print job, press the Cancel button . 30 Invalid Refill, Change Toner Cartridge The printer has detected a refilled toner cartridge. The current job may not print correctly. If the printer finds a tray of the correct type and size, it prints on paper already installed in one ...
...any paper from that is already being used in the default input source. Remove the toner cartridge and install a new one of the correct type, it feeds paper from that tray. If the printer cannot find a tray with the correct paper type and size, it prints on paper... paper size. To cancel the print job, press the Cancel button . 30 Invalid Refill, Change Toner Cartridge The printer has detected a refilled toner cartridge. The current job may not print correctly. If the printer finds a tray of the correct type and size, it prints on paper already installed in one ...
User's Guide (HTML)
Page 57
... of the print job. To enable Resource Save after receiving this error in the future: Install additional memory. Simplify the job. If the toner cartridge is large enough. To clear the message and continue printing, press the Back button . The current job may not print correctly. To ...prevent this error in the future, install additional memory. 37 Insufficient Memory to Collate Job The printer memory does not have enough free space to collate the job. For more information on the page and Check for a paper jam. The current...
... of the print job. To enable Resource Save after receiving this error in the future: Install additional memory. Simplify the job. If the toner cartridge is large enough. To clear the message and continue printing, press the Back button . The current job may not print correctly. To ...prevent this error in the future, install additional memory. 37 Insufficient Memory to Collate Job The printer memory does not have enough free space to collate the job. For more information on the page and Check for a paper jam. The current...
User's Guide (HTML)
Page 60
...receive the imaging drum life warning only if you have the Toner Alarm set to determine the imaging drum level. Print a Printer Settings configuration sheet to On. Replace the toner cartridge. 88 Replace Toner Cartridge Replace the specified toner cartridge. Replace the imaging drum, and then reset the ...button . 200 Paper Jam There is a paper jam at the printer input sensor. 1. Replace the imaging drum, and reset the counter. 88 Toner Low Remove the toner cartridge, and firmly shake it to redistribute the toner within the cartridge. The current job may not print correctly. To...
...receive the imaging drum life warning only if you have the Toner Alarm set to determine the imaging drum level. Print a Printer Settings configuration sheet to On. Replace the toner cartridge. 88 Replace Toner Cartridge Replace the specified toner cartridge. Replace the imaging drum, and then reset the ...button . 200 Paper Jam There is a paper jam at the printer input sensor. 1. Replace the imaging drum, and reset the counter. 88 Toner Low Remove the toner cartridge, and firmly shake it to redistribute the toner within the cartridge. The current job may not print correctly. To...
User's Guide (HTML)
Page 61
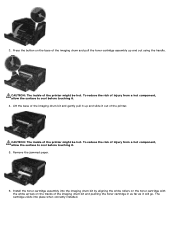
... handle. Remove the jammed paper. 6. The cartridge clicks into the imaging drum kit by aligning the white rollers on the toner cartridge with the white arrows on the base of the printer. Press the button on the tracks of injury from a hot component, allow the surface to cool before touching it will... go. To reduce the risk of the imaging drum kit and pushing the toner cartridge in as far as it . 5. CAUTION: ...
... handle. Remove the jammed paper. 6. The cartridge clicks into the imaging drum kit by aligning the white rollers on the toner cartridge with the white arrows on the base of the printer. Press the button on the tracks of injury from a hot component, allow the surface to cool before touching it will... go. To reduce the risk of the imaging drum kit and pushing the toner cartridge in as far as it . 5. CAUTION: ...
User's Guide (HTML)
Page 62
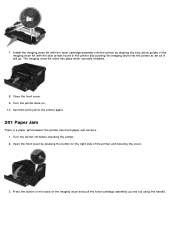
... Jam There is a paper jam between the printer input and paper exit sensors. 1. Open the front cover by aligning the blue arrow guides of the imaging drum kit with the toner cartridge assembly into the printer by pressing the button on . 10. Turn the printer back on the right side of the imaging... drum and pull the toner cartridge assembly up and out using the handle. Install the imaging drum ...
... Jam There is a paper jam between the printer input and paper exit sensors. 1. Open the front cover by aligning the blue arrow guides of the imaging drum kit with the toner cartridge assembly into the printer by pressing the button on . 10. Turn the printer back on the right side of the imaging... drum and pull the toner cartridge assembly up and out using the handle. Install the imaging drum ...
User's Guide (HTML)
Page 63
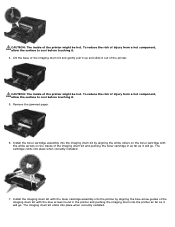
... in as far as it will go . The cartridge clicks into place when correctly installed. CAUTION: The inside of the printer might be hot. Install the toner cartridge assembly into the imaging drum kit by aligning the blue arrow guides of injury from a hot component, allow the surface... out of the imaging drum kit and pushing the toner cartridge in the printer and pushing the imaging drum into the printer by aligning the white rollers on the tracks of the printer. Install the imaging drum kit with the toner cartridge assembly into the printer as far as it will go .
... in as far as it will go . The cartridge clicks into place when correctly installed. CAUTION: The inside of the printer might be hot. Install the toner cartridge assembly into the imaging drum kit by aligning the blue arrow guides of injury from a hot component, allow the surface... out of the imaging drum kit and pushing the toner cartridge in the printer and pushing the imaging drum into the printer by aligning the white rollers on the tracks of the printer. Install the imaging drum kit with the toner cartridge assembly into the printer as far as it will go .


