
Service Manual
Page 35
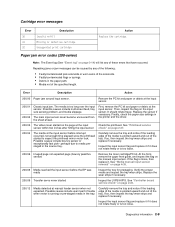
... the manual input sensor. Carefully remove the tray and notice if the leading edge of the media is running or pre-staged media in the printer and the driver. 200.03 The video never started Inspect the LVPS/HVPS. At the front, remove the upper front guide, and inspect the... strips and replace if necessary. The media is too loose. 200.06 Imaged page not expected page (bouncy passthru sensor) Remove the toner cartridge/PC kit. The main input sensor never became uncovered from the sheet ahead. Possible causes include bouncy sensor or exceptionally fast pick- Remove the...
... the manual input sensor. Carefully remove the tray and notice if the leading edge of the media is running or pre-staged media in the printer and the driver. 200.03 The video never started Inspect the LVPS/HVPS. At the front, remove the upper front guide, and inspect the... strips and replace if necessary. The media is too loose. 200.06 Imaged page not expected page (bouncy passthru sensor) Remove the toner cartridge/PC kit. The main input sensor never became uncovered from the sheet ahead. Possible causes include bouncy sensor or exceptionally fast pick- Remove the...
Service Manual
Page 36
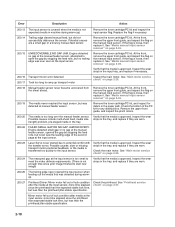
...the input tray, and replace if necessary. 200.16 Transport motor error detected 200.17 Took too long to ramp up ) Remove the toner cartridge/PC kit and inspect the input sensor flag. See "Main motor service check" on page 2-26. 200.24 The measured gap at manual feeder sensor. ... page 4-39. 200.15 UNRECOVERABLE NO GAP JAM. Remove the toner cartridge/PC kit. Remove the toner cartridge/PC kit, and inspect for any obstructions. Check the bottom of lock condition after media at the input sensor. 200.23 Laser Servo never started due to start new image) Verify that the media is ...
...the input tray, and replace if necessary. 200.16 Transport motor error detected 200.17 Took too long to ramp up ) Remove the toner cartridge/PC kit and inspect the input sensor flag. See "Main motor service check" on page 2-26. 200.24 The measured gap at manual feeder sensor. ... page 4-39. 200.15 UNRECOVERABLE NO GAP JAM. Remove the toner cartridge/PC kit. Remove the toner cartridge/PC kit, and inspect for any obstructions. Check the bottom of lock condition after media at the input sensor. 200.23 Laser Servo never started due to start new image) Verify that the media is ...
Service Manual
Page 37
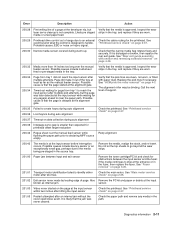
Inspect the wear laser servo cleanup is at the developer nip, but the page was never cleared. See event beyond the wear strips. 201.00 Paper jam between input and exit sensor Remove the toner cartridge/PC kit and check for obstructions between the input sensor and the fuser. Probable causes: ESD or ... solenoid removal" on page 2-37. 201.05 Restart attempted after two tries. Remove the media, realign the stock, and re-insert. Also Remove the PC kit and paper or debris at the input sensor while waiting for page from tray 1 did make it is likely that the pick tires are worn...
Inspect the wear laser servo cleanup is at the developer nip, but the page was never cleared. See event beyond the wear strips. 201.00 Paper jam between input and exit sensor Remove the toner cartridge/PC kit and check for obstructions between the input sensor and the fuser. Probable causes: ESD or ... solenoid removal" on page 2-37. 201.05 Restart attempted after two tries. Remove the media, realign the stock, and re-insert. Also Remove the PC kit and paper or debris at the input sensor while waiting for page from tray 1 did make it is likely that the pick tires are worn...
Service Manual
Page 38
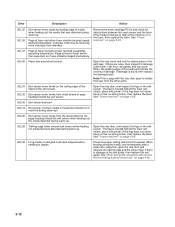
...25 Exit sensor never broke from sheet ahead of page heading toward desired temperature. The flag is located behind the fuser exit rollers, about mid printer. If there is found, then replace the damaged part. See "Rear exit guide assembly with the rear door open the reat door and ...after it was probably staged prematurely. 202.00 Paper jam around exit sensor. Page arrived at fuser earlier than intended Remove the toner cartridge/PC kit and check for damage at the entrance or in the path way. Error Description Action 201.25 Exit sensor never made by leading edge of...
...25 Exit sensor never broke from sheet ahead of page heading toward desired temperature. The flag is located behind the fuser exit rollers, about mid printer. If there is found, then replace the damaged part. See "Rear exit guide assembly with the rear door open the reat door and ...after it was probably staged prematurely. 202.00 Paper jam around exit sensor. Page arrived at fuser earlier than intended Remove the toner cartridge/PC kit and check for damage at the entrance or in the path way. Error Description Action 201.25 Exit sensor never made by leading edge of...
Service Manual
Page 56
... guide at CN202) and the corresponding wire form (spring) found about 14 mm above and to these problems. 3. Try a different PC kit. • With the cartridge out, check the spring loaded contacts on the lens. Enter Configuration Menu. The first page has various ...printer, and check the cable continuity between the LVPS/HVPS connector marked OPC (at the end of the beam or dust on the right side for solutions to the right of service. Extreme environmental conditions, temperatures, and humidity will affect the print quality. Try a different toner cartridge and PC kit...
... guide at CN202) and the corresponding wire form (spring) found about 14 mm above and to these problems. 3. Try a different PC kit. • With the cartridge out, check the spring loaded contacts on the lens. Enter Configuration Menu. The first page has various ...printer, and check the cable continuity between the LVPS/HVPS connector marked OPC (at the end of the beam or dust on the right side for solutions to the right of service. Extreme environmental conditions, temperatures, and humidity will affect the print quality. Try a different toner cartridge and PC kit...
Service Manual
Page 57
... FRUs one at CN203. Black page Note: Incorrect laser exposure or incorrect charging of service. If the cable is bad, then call the next level of the photoconductor causes an all black page. FRU Toner cartridge (not a FRU) PC Kit (not a FRU) LVPS/HVPS Controller board Action ...on pins 17 and 19 of -life. Make sure the toner cartridge and PC Kit are correctly installed and the high voltage contacts are installed correctly, then try a new PC Kit first and then toner cartridge. With the printer off, disconnect the LVPS/HVPS cable from a different print cartridge assembly and...
... FRUs one at CN203. Black page Note: Incorrect laser exposure or incorrect charging of service. If the cable is bad, then call the next level of the photoconductor causes an all black page. FRU Toner cartridge (not a FRU) PC Kit (not a FRU) LVPS/HVPS Controller board Action ...on pins 17 and 19 of -life. Make sure the toner cartridge and PC Kit are correctly installed and the high voltage contacts are installed correctly, then try a new PC Kit first and then toner cartridge. With the printer off, disconnect the LVPS/HVPS cable from a different print cartridge assembly and...
Service Manual
Page 58
...the toner to the paper. Check the media settings in the printer driver. 2-32 Replace the transfer roll assembly if the springs or... in the printer driver. Variation in the left and right transfer roll bearings. Check the springs in image density horizontally across page FRU PC Kit (not a... FRU) Transfer roll Action The charge roll may have an unbalanced force against the PC (photoconductor) drum. ... media may not be operating at its ends. Try a new PC Kit. If toner cartridge is being used . The bearing assemblies should support the ...
...the toner to the paper. Check the media settings in the printer driver. 2-32 Replace the transfer roll assembly if the springs or... in the printer driver. Variation in the left and right transfer roll bearings. Check the springs in image density horizontally across page FRU PC Kit (not a... FRU) Transfer roll Action The charge roll may have an unbalanced force against the PC (photoconductor) drum. ... media may not be operating at its ends. Try a new PC Kit. If toner cartridge is being used . The bearing assemblies should support the ...

Service Manual
Page 59
..., check to make sure that the toner cartridge is primarily due to a variation in the speed of the media as it feeds through the printer, especially in the order shown: • Transfer roll • LVPS/HVPS card White or black lines or bands FRU Print cartridge assembly (not a ... soft cloth. Light print FRU Toner cartridge (not a FRU) Transfer roll LVPS/HVPS card Action Make sure the toner cartridge and PC Kit are installed correctly and that the laser beam is plugged into the LVPS/HVPS. Replace the LVPS/ HVPS or controller board as necessary. Inspect the fuser for media type...
..., check to make sure that the toner cartridge is primarily due to a variation in the speed of the media as it feeds through the printer, especially in the order shown: • Transfer roll • LVPS/HVPS card White or black lines or bands FRU Print cartridge assembly (not a ... soft cloth. Light print FRU Toner cartridge (not a FRU) Transfer roll LVPS/HVPS card Action Make sure the toner cartridge and PC Kit are installed correctly and that the laser beam is plugged into the LVPS/HVPS. Replace the LVPS/ HVPS or controller board as necessary. Inspect the fuser for media type...
Service Manual
Page 60
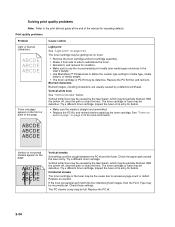
...by the laser beam, which may be incorrectly set. Solving print quality problems Note: Refer to the print defects guide at its entry for debris. • Make sure the media is straight and unwrinkled. • Replace the PC Kit, and recheck before replacing the toner cartridge. With the printer off ..., clear the path or clean the lens. With the printer off , clear the path or clean the lens. Toner smudges appear on the page...
...by the laser beam, which may be incorrectly set. Solving print quality problems Note: Refer to the print defects guide at its entry for debris. • Make sure the media is straight and unwrinkled. • Replace the PC Kit, and recheck before replacing the toner cartridge. With the printer off ..., clear the path or clean the lens. With the printer off , clear the path or clean the lens. Toner smudges appear on the page...
Service Manual
Page 67
.... 2. To print the event log: 1. When PPDS emulation is activated, the following settings are turned off. • The printer language is turned on the print menu page. Users can be printed on the operator panel and through the PJL data stream.... are duplexed. Press Event Log to return to the Configuration menu. Reset photoconductor maintenance counter (Reset PC Cnt) The reset photoconductor maintenance counter resets the photoconductor kit page counter and clears any warnings or photoconductor exhausted messages. Page one contains device information, cartridge information...
.... 2. To print the event log: 1. When PPDS emulation is activated, the following settings are turned off. • The printer language is turned on the print menu page. Users can be printed on the operator panel and through the PJL data stream.... are duplexed. Press Event Log to return to the Configuration menu. Reset photoconductor maintenance counter (Reset PC Cnt) The reset photoconductor maintenance counter resets the photoconductor kit page counter and clears any warnings or photoconductor exhausted messages. Page one contains device information, cartridge information...
Service Manual
Page 78
..., then the oldest error is Medium. Identical errors in consecutive positions in the log are stored in the event log as well as the PC kit and maintenance counter resets and NVRAM resets initiated by one error per minute), but can be used when printing with a specific operating point....see the second service error, press . The default setting is discarded. The error log is 0 (default) to adjust toner darkness. When deactivated, the printer disables. The range is displayed one results in position 10 (if 10 errors have occurred). Each time this test is running. Press Back once to...
..., then the oldest error is Medium. Identical errors in consecutive positions in the log are stored in the event log as well as the PC kit and maintenance counter resets and NVRAM resets initiated by one error per minute), but can be used when printing with a specific operating point....see the second service error, press . The default setting is discarded. The error log is 0 (default) to adjust toner darkness. When deactivated, the printer disables. The range is displayed one results in position 10 (if 10 errors have occurred). Each time this test is running. Press Back once to...


