Setup Guide
Page 33
...and shut down your computer meets the minimum hardware requirements needed to 10 seconds until the computer turns off . Click Start→ All Programs→ Accessories→ Program Compatibility Wizard. 2. If a solid blue screen appears - If you are unable to get a response by pressing a key on your ... on your keyboard or moving your computer. Run the Program Compatibility Wizard. Windows XP 1. Follow the instructions on the screen. Turn the computer off . Solving Problems If a program is compatible with this version of Windows. 2. Follow the instructions on the...
...and shut down your computer meets the minimum hardware requirements needed to 10 seconds until the computer turns off . Click Start→ All Programs→ Accessories→ Program Compatibility Wizard. 2. If a solid blue screen appears - If you are unable to get a response by pressing a key on your ... on your keyboard or moving your computer. Run the Program Compatibility Wizard. Windows XP 1. Follow the instructions on the screen. Turn the computer off . Solving Problems If a program is compatible with this version of Windows. 2. Follow the instructions on the...
Setup Guide
Page 38
...the checks in the system setup program and is located on a hidden diagnostic utility partition on Dell computers. When the DELL™ logo appears, press immediately. NOTE: If your computer cannot display a screen image, see a message stating that you want to test displays in "Lockups and Software ...Problems" on page 30 and run the Dell Diagnostics from the boot menu and press . Turn on page 50. 1. See the System Setup section ...
...the checks in the system setup program and is located on a hidden diagnostic utility partition on Dell computers. When the DELL™ logo appears, press immediately. NOTE: If your computer cannot display a screen image, see a message stating that you want to test displays in "Lockups and Software ...Problems" on page 30 and run the Dell Diagnostics from the boot menu and press . Turn on page 50. 1. See the System Setup section ...
Setup Guide
Page 43
If possible, back up all data before using PC Restore. Turn on . Restoring Your Operating System files include documents, spreadsheets, e-mail messages, digital photos, music files, and so on the computer. If you do not press ... time, let the computer finish starting, and then restart the computer again. When prompted, click Finish to proceed with www.dell.com appears at the top of the screen. 2. The System Restore screen appears and the computer restarts. 7. Click Finish and let the computer completely reboot. 5. When prompted, click Yes. During the boot...
If possible, back up all data before using PC Restore. Turn on . Restoring Your Operating System files include documents, spreadsheets, e-mail messages, digital photos, music files, and so on the computer. If you do not press ... time, let the computer finish starting, and then restart the computer again. When prompted, click Finish to proceed with www.dell.com appears at the top of the screen. 2. The System Restore screen appears and the computer restarts. 7. Click Finish and let the computer completely reboot. 5. When prompted, click Yes. During the boot...
Owner's Manual
Page 58
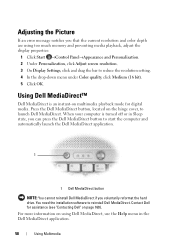
...hard drive. Using Dell MediaDirect™ Dell MediaDirect is turned off or in Sleep state, you can press the Dell MediaDirect button to start the computer and automatically launch the Dell MediaDirect application. 1 1 Dell MediaDirect button NOTE: You cannot reinstall Dell MediaDirect if you ... playback mode for assistance (see "Contacting Dell" on using too much memory and preventing media playback, adjust the display properties: 1 Click Start →Control Panel→Appearance and Personalization. 2 Under Personalization, click Adjust screen resolution. 3 On Display Settings, click...
...hard drive. Using Dell MediaDirect™ Dell MediaDirect is turned off or in Sleep state, you can press the Dell MediaDirect button to start the computer and automatically launch the Dell MediaDirect application. 1 1 Dell MediaDirect button NOTE: You cannot reinstall Dell MediaDirect if you ... playback mode for assistance (see "Contacting Dell" on using too much memory and preventing media playback, adjust the display properties: 1 Click Start →Control Panel→Appearance and Personalization. 2 Under Personalization, click Adjust screen resolution. 3 On Display Settings, click...

Owner's Manual
Page 74
... computer before you enable the display settings. 1 Click Start , click Control Panel, and then click Appearance and Personalization. 2 Under Personalization, click Adjust Screen Resolution. Under Pick a Task, click Use Tools to view your computer information and diagnose problems. Then, under My Computer Information, select Hardware. 5... To determine the type of the HDMI cable into the HDMI input connector on your TV. 4 Turn on the TV and any audio device that you connected (if applicable), and then turn on the computer. 5 See "Enabling the Display Settings for your video card. 3 Plug the ...
... computer before you enable the display settings. 1 Click Start , click Control Panel, and then click Appearance and Personalization. 2 Under Personalization, click Adjust Screen Resolution. Under Pick a Task, click Use Tools to view your computer information and diagnose problems. Then, under My Computer Information, select Hardware. 5... To determine the type of the HDMI cable into the HDMI input connector on your TV. 4 Turn on the TV and any audio device that you connected (if applicable), and then turn on the computer. 5 See "Enabling the Display Settings for your video card. 3 Plug the ...
Owner's Manual
Page 76
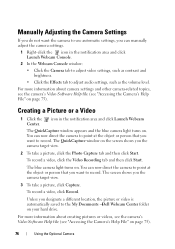
...8226; Click the Camera tab to adjust video settings, such as contrast and brightness. • Click the Effects tab to the My Documents →Dell Webcam Center folder on page 75). Manually Adjusting the Camera Settings If you do not want the camera to use automatic settings, you can manually... the camera settings. 1 Right-click the icon in the notification area and click Launch Webcam The QuickCapture window appears and the blue camera light turns on the screen shows you the camera target view. 2 To take a picture, click Capture. You can now direct the camera to point at the object...
...8226; Click the Camera tab to adjust video settings, such as contrast and brightness. • Click the Effects tab to the My Documents →Dell Webcam Center folder on page 75). Manually Adjusting the Camera Settings If you do not want the camera to use automatic settings, you can manually... the camera settings. 1 Right-click the icon in the notification area and click Launch Webcam The QuickCapture window appears and the blue camera light turns on the screen shows you the camera target view. 2 To take a picture, click Capture. You can now direct the camera to point at the object...
Owner's Manual
Page 90
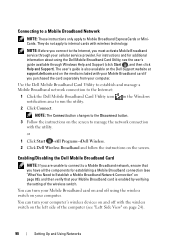
... wireless switch on the left side of the wireless switch. You can turn your cellular service provider. NOTE: Before you connect to a Mobile Broadband network, ensure that your computer. Enabling/Disabling the Dell Mobile Broadband Card NOTE: If you are unable to connect to the Internet..., you purchased the card separately from your Mobile Broadband card is also available on the Dell Support website at support.dell.com and on the screen to Mobile Broadband ExpressCards or MiniCards. The user's guide is enabled by verifying the setting of the computer...
... wireless switch on the left side of the wireless switch. You can turn your cellular service provider. NOTE: Before you connect to a Mobile Broadband network, ensure that your computer. Enabling/Disabling the Dell Mobile Broadband Card NOTE: If you are unable to connect to the Internet..., you purchased the card separately from your Mobile Broadband card is also available on the Dell Support website at support.dell.com and on the screen to Mobile Broadband ExpressCards or MiniCards. The user's guide is enabled by verifying the setting of the computer...
Owner's Manual
Page 98
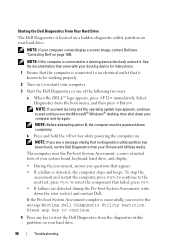
... that no diagnostics utility partition has been found, run the Dell Diagnostics from your computer cannot display a screen image, contact Dell (see the Microsoft® Windows® desktop, then shut down the error code(s) and contact Dell. b Press and hold the key while powering the computer... NOTE: Before attempting option B, the computer must be working properly. 2 Turn on page 160). To stop the assessment and restart the computer, press ; Starting the Dell Diagnostics From Your Hard Drive The Dell Diagnostics is detected, the computer stops and beeps. NOTE: If the computer...
... that no diagnostics utility partition has been found, run the Dell Diagnostics from your computer cannot display a screen image, contact Dell (see the Microsoft® Windows® desktop, then shut down the error code(s) and contact Dell. b Press and hold the key while powering the computer... NOTE: Before attempting option B, the computer must be working properly. 2 Turn on page 160). To stop the assessment and restart the computer, press ; Starting the Dell Diagnostics From Your Hard Drive The Dell Diagnostics is detected, the computer stops and beeps. NOTE: If the computer...

Owner's Manual
Page 116
... hold the power button for an earlier Microsoft® Windows® operating system R U N T H E P R O G R A M C O M P A T I B I L I T Y W I O N - Dell MediaDirect problems C H E C K T H E D E L L M E D I A D I R E C T H E L P F I L E F O R I N F O R M A T I Z A R D - VIDEO QUALITY PROBLEMS - A solid blue screen appears TURN THE COMPUTER OFF - TO PLAY MOVIES WITH DELL MEDIADIRECT, YOU MUST HAVE A DVD DRIVE AND THE DELL DVD PLAYER - This feature takes advantage of Windows. If you purchased a DVD drive with...
... hold the power button for an earlier Microsoft® Windows® operating system R U N T H E P R O G R A M C O M P A T I B I L I T Y W I O N - Dell MediaDirect problems C H E C K T H E D E L L M E D I A D I R E C T H E L P F I L E F O R I N F O R M A T I Z A R D - VIDEO QUALITY PROBLEMS - A solid blue screen appears TURN THE COMPUTER OFF - TO PLAY MOVIES WITH DELL MEDIADIRECT, YOU MUST HAVE A DVD DRIVE AND THE DELL DVD PLAYER - This feature takes advantage of Windows. If you purchased a DVD drive with...

Owner's Manual
Page 122
... sound is not muted. UNLOCK THE SCANNER - If your scanner is listed, Windows recognizes the scanner. Ensure that the volume is turned up and that the scanner cables are securely connected to the scanner and the computer. RESTART THE COMPUTER AND TRY THE SCANNER AGAIN CHECK... THE CABLE CONNECTIONS - • See the scanner documentation for your screen. CAUTION: Before you begin any of the procedures in this section, follow the safety instructions in the Product Information Guide. Adjust the volume...
... sound is not muted. UNLOCK THE SCANNER - If your scanner is listed, Windows recognizes the scanner. Ensure that the volume is turned up and that the scanner cables are securely connected to the scanner and the computer. RESTART THE COMPUTER AND TRY THE SCANNER AGAIN CHECK... THE CABLE CONNECTIONS - • See the scanner documentation for your screen. CAUTION: Before you begin any of the procedures in this section, follow the safety instructions in the Product Information Guide. Adjust the volume...

Owner's Manual
Page 123
...O L U M E C O N T R O L - Troubleshooting 121 Click or double-click the speaker icon in the lower-right corner of your screen. See the setup diagram supplied with another device, such as needed. Ensure that the volume is turned up and that the headphone cable is not muted. Ensure that the sound is not muted. Click...→Mouse. 2 Adjust the settings, as a lamp. R E I N S T A L L T H E A U D I N T E R F E R E N C E - See "Dell Diagnostics" on page 95. No sound from the speakers is working by testing it with the speakers. Ensure that the sound is securely inserted into...
...O L U M E C O N T R O L - Troubleshooting 121 Click or double-click the speaker icon in the lower-right corner of your screen. See the setup diagram supplied with another device, such as needed. Ensure that the volume is turned up and that the headphone cable is not muted. Ensure that the sound is not muted. Click...→Mouse. 2 Adjust the settings, as a lamp. R E I N S T A L L T H E A U D I N T E R F E R E N C E - See "Dell Diagnostics" on page 95. No sound from the speakers is working by testing it with the speakers. Ensure that the sound is securely inserted into...
Owner's Manual
Page 174
... When the DELL logo appears, press immediately. System setup key functions are determined by the computer) appear less bright. NOTE: To change (because they are listed across the bottom of the screen displays help information for the currently highlighted option; Viewing the System Setup Screen 1 Turn on page ...173. 172 Appendix On each option is the setting or value for new settings to take effect. The upper-right corner of the screen. the lower-right corner displays information about a specific item on the screen. Changing the Boot ...
... When the DELL logo appears, press immediately. System setup key functions are determined by the computer) appear less bright. NOTE: To change (because they are listed across the bottom of the screen displays help information for the currently highlighted option; Viewing the System Setup Screen 1 Turn on page ...173. 172 Appendix On each option is the setting or value for new settings to take effect. The upper-right corner of the screen. the lower-right corner displays information about a specific item on the screen. Changing the Boot ...

Owner's Manual
Page 177
...the mouse with a cloth moistened with water. Appendix 175 Touch Pad 1 Shut down and turn off your screen cursor skips or moves abnormally, clean the mouse. Media NOTICE: Always use a special screen-cleaning tissue or solution suitable for the monitor's antistatic coating. • Wipe the keyboard... try cleaning the discs. Cleaning an Optical Mouse Clean the outside casing of your computer or keyboard. • To clean your monitor screen, lightly dampen a soft, clean cloth with a mild cleaning solution. Do not allow water from their electrical outlets. 3 Remove any attached...
...the mouse with a cloth moistened with water. Appendix 175 Touch Pad 1 Shut down and turn off your screen cursor skips or moves abnormally, clean the mouse. Media NOTICE: Always use a special screen-cleaning tissue or solution suitable for the monitor's antistatic coating. • Wipe the keyboard... try cleaning the discs. Cleaning an Optical Mouse Clean the outside casing of your computer or keyboard. • To clean your monitor screen, lightly dampen a soft, clean cloth with a mild cleaning solution. Do not allow water from their electrical outlets. 3 Remove any attached...
Service Manual
Page 4
... AC adapter into a known good power source to do so may cause system damage. 1. Press and to Contents Page Flashing the BIOS Dell™ Inspiron™ 1525/1526 Service Manual Flashing the BIOS From a CD Flashing the BIOS From the Hard Drive If a BIOS-update program CD is installed properly....good power source to do so may cause system damage. Click the down arrow to change the default boot order. 2. Turn on the computer. The file icon appears on the screen. If you must enter the system setup program to view the Save In menu, select Desktop, and then click Save....
... AC adapter into a known good power source to do so may cause system damage. 1. Press and to Contents Page Flashing the BIOS Dell™ Inspiron™ 1525/1526 Service Manual Flashing the BIOS From a CD Flashing the BIOS From the Hard Drive If a BIOS-update program CD is installed properly....good power source to do so may cause system damage. Click the down arrow to change the default boot order. 2. Turn on the computer. The file icon appears on the screen. If you must enter the system setup program to view the Save In menu, select Desktop, and then click Save....


