
Owner's Manual
Page 143
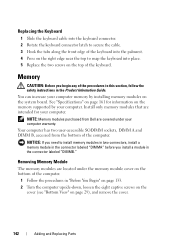
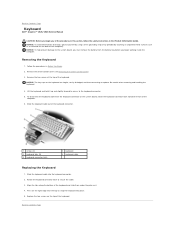
..., rotate the keyboard connector latch toward the front of the computer. 6 Slide the keyboard cable out of the keyboard. NOTICE: The key caps on the keyboard are fragile, easily dislodged, and timeconsuming to the keyboard connector. 5 To disconnect the keyboard cable from the keyboard connector on page 139). 3 Remove the two screws at the top of the keyboard connector. 1 2 3 4 5 1 screws (2) 3 keyboard tabs (5) 5 keyboard connector latch 2 keyboard 4 keyboard cable Adding...
..., rotate the keyboard connector latch toward the front of the computer. 6 Slide the keyboard cable out of the keyboard. NOTICE: The key caps on the keyboard are fragile, easily dislodged, and timeconsuming to the keyboard connector. 5 To disconnect the keyboard cable from the keyboard connector on page 139). 3 Remove the two screws at the top of the keyboard connector. 1 2 3 4 5 1 screws (2) 3 keyboard tabs (5) 5 keyboard connector latch 2 keyboard 4 keyboard cable Adding...
Owner's Manual
Page 144
... from Dell are covered under the memory module cover on the memory supported by installing memory modules on page 161 for your computer. Memory CAUTION: Before you begin any of the computer. Replacing the Keyboard 1 Slide the keyboard cable into the keyboard connector. 2 Rotate the keyboard connector latch to... secure the cable. 3 Hook the tabs along the front edge of the keyboard into the palmrest. 4 Press on the right edge ...
... from Dell are covered under the memory module cover on the memory supported by installing memory modules on page 161 for your computer. Memory CAUTION: Before you begin any of the computer. Replacing the Keyboard 1 Slide the keyboard cable into the keyboard connector. 2 Rotate the keyboard connector latch to... secure the cable. 3 Hook the tabs along the front edge of the keyboard into the palmrest. 4 Press on the right edge ...
Service Manual
Page 1
...Connectors Notes, Notices, and Cautions NOTE: A NOTE indicates important information that helps you how to change without the written permission of Dell Inc.; Information in this text: Dell, the DELL logo, and Inspiron... proprietary interest in this document is strictly forbidden. Dell™ Inspiron™ 1525/1526 Service Manual Before You Begin Subscriber Identity Module (...Keyboard Button Board Memory Display Speaker Assembly Palm Rest ExpressCard Cage Processor Thermal-Cooling Assembly Processor Module Wireless Mini-Cards System Board Assembly Coin-Cell Battery Battery Latch...
...Connectors Notes, Notices, and Cautions NOTE: A NOTE indicates important information that helps you how to change without the written permission of Dell Inc.; Information in this text: Dell, the DELL logo, and Inspiron... proprietary interest in this document is strictly forbidden. Dell™ Inspiron™ 1525/1526 Service Manual Before You Begin Subscriber Identity Module (...Keyboard Button Board Memory Display Speaker Assembly Palm Rest ExpressCard Cage Processor Thermal-Cooling Assembly Processor Module Wireless Mini-Cards System Board Assembly Coin-Cell Battery Battery Latch...
Service Manual
Page 10
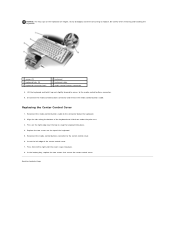
... of the center control cover. 7. Be careful when removing and handling the keyboard. 1 screws (2) 3 keyboard tabs (5) 5 keyboard connector latch 2 keyboard 4 keyboard cable 6 media control buttons connector 8. Replace the two screws on the keyboard are fragile, easily dislodged, and time-consuming to replace. Insert the left to snap the keyboard into place. 8. In the battery bay, replace the two screws that...
... of the center control cover. 7. Be careful when removing and handling the keyboard. 1 screws (2) 3 keyboard tabs (5) 5 keyboard connector latch 2 keyboard 4 keyboard cable 6 media control buttons connector 8. Replace the two screws on the keyboard are fragile, easily dislodged, and time-consuming to replace. Insert the left to snap the keyboard into place. 8. In the battery bay, replace the two screws that...
Service Manual
Page 27
...: The key caps on the system board, rotate the keyboard connector latch toward the front of the keyboard. Slide the keyboard cable into place. 5. Lift the keyboard and hold it up and slightly forward to access to replace. Removing the Keyboard 1. Back to Contents Page Keyboard Dell™ Inspiron™ 1525/1526 Service Manual CAUTION: Before you begin working inside the...
...: The key caps on the system board, rotate the keyboard connector latch toward the front of the keyboard. Slide the keyboard cable into place. 5. Lift the keyboard and hold it up and slightly forward to access to replace. Removing the Keyboard 1. Back to Contents Page Keyboard Dell™ Inspiron™ 1525/1526 Service Manual CAUTION: Before you begin working inside the...


