
Setup Guide
Page 5
... 6 Connect the Network Cable (optional 7 Press the Power Button 7 Microsoft® Windows® Setup 8 Connect to the Internet (Optional 8 Using Your Inspiron Laptop 12 Device Status Lights 12 Right Side Features 14 Left Side Features 16 Front Side Features 18 Computer Base and Keyboard Features 19 Media... Controls 20 Display Features 21 Removing and Replacing the Battery 22 Software Features 23 Solving Problems 26 Network Problems 26 Power Problems 28 Memory Problems 29 Lockups and Software Problems 30...
... 6 Connect the Network Cable (optional 7 Press the Power Button 7 Microsoft® Windows® Setup 8 Connect to the Internet (Optional 8 Using Your Inspiron Laptop 12 Device Status Lights 12 Right Side Features 14 Left Side Features 16 Front Side Features 18 Computer Base and Keyboard Features 19 Media... Controls 20 Display Features 21 Removing and Replacing the Battery 22 Software Features 23 Solving Problems 26 Network Problems 26 Power Problems 28 Memory Problems 29 Lockups and Software Problems 30...
Setup Guide
Page 14
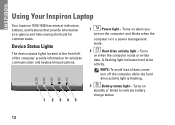
... the computer provide information for common tasks. Turns on steadily or blinks to indicate battery charge status. 12 Turns on when the computer reads or writes data. A flashing light indicates hard drive activity. INSPIRON Using Your Inspiron Laptop Your Inspiron 1525/1526 has several indicators, buttons, and features that provide information at the front left...
... the computer provide information for common tasks. Turns on steadily or blinks to indicate battery charge status. 12 Turns on when the computer reads or writes data. A flashing light indicates hard drive activity. INSPIRON Using Your Inspiron Laptop Your Inspiron 1525/1526 has several indicators, buttons, and features that provide information at the front left...
Setup Guide
Page 18
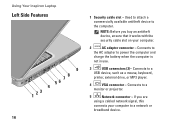
...a USB device, such as a mouse, keyboard, printer, external drive, or MP3 player. 4 VGA connector - Connects to power the computer and charge the battery when the computer is not in use. 3 USB connectors (2)- If you buy an antitheft device, ensure that it works with the security cable slot on... your computer to a network or broadband device. Using Your Inspiron Laptop Left Side Features 9 78 56 4 1 23 16 1 Security cable slot - Connects to the AC adapter to a monitor or projector. 5 Network ...
...a USB device, such as a mouse, keyboard, printer, external drive, or MP3 player. 4 VGA connector - Connects to power the computer and charge the battery when the computer is not in use. 3 USB connectors (2)- If you buy an antitheft device, ensure that it works with the security cable slot on... your computer to a network or broadband device. Using Your Inspiron Laptop Left Side Features 9 78 56 4 1 23 16 1 Security cable slot - Connects to the AC adapter to a monitor or projector. 5 Network ...

Setup Guide
Page 24
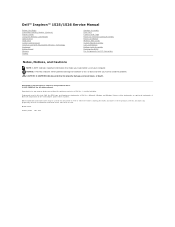
.... 22 This computer should only use batteries from Dell. To remove the battery: 1. To replace the battery, slide it into place. 3. Shut down the computer, and remove external cables (including the AC adapter). Slide the battery out. Using Your Inspiron Laptop Removing and Replacing the Battery CAUTION: Using an incompatible battery may increase the risk of fire or...
.... 22 This computer should only use batteries from Dell. To remove the battery: 1. To replace the battery, slide it into place. 3. Shut down the computer, and remove external cables (including the AC adapter). Slide the battery out. Using Your Inspiron Laptop Removing and Replacing the Battery CAUTION: Using an incompatible battery may increase the risk of fire or...
Service Manual
Page 1
... used in any proprietary interest in this document to refer to either potential damage to avoid the problem. A00 Dell™ Inspiron™ 1525/1526 Service Manual Before You Begin Subscriber Identity Module (Optional) ExpressCards Using the Memory Card Reader Optical Drive Hard... Display Speaker Assembly Palm Rest ExpressCard Cage Processor Thermal-Cooling Assembly Processor Module Wireless Mini-Cards System Board Assembly Coin-Cell Battery Battery Latch Assembly Flashing the BIOS Pin Assignments for property damage, personal injury, or death. NOTICE: A NOTICE indicates either ...
... used in any proprietary interest in this document to refer to either potential damage to avoid the problem. A00 Dell™ Inspiron™ 1525/1526 Service Manual Before You Begin Subscriber Identity Module (Optional) ExpressCards Using the Memory Card Reader Optical Drive Hard... Display Speaker Assembly Palm Rest ExpressCard Cage Processor Thermal-Cooling Assembly Processor Module Wireless Mini-Cards System Board Assembly Coin-Cell Battery Battery Latch Assembly Flashing the BIOS Pin Assignments for property damage, personal injury, or death. NOTICE: A NOTICE indicates either ...
Service Manual
Page 2
... locking tabs, press inward on a card. NOTE: To avoid damage to the computer, use batteries designed for other Dell computers. 6. Do not use only the battery designed for this document. Back to Contents Page Before You Begin Dell™ Inspiron™ 1525/1526 Service Manual Recommended Tools Before Working Inside Your Computer This document provides procedures...
... locking tabs, press inward on a card. NOTE: To avoid damage to the computer, use batteries designed for other Dell computers. 6. Do not use only the battery designed for this document. Back to Contents Page Before You Begin Dell™ Inspiron™ 1525/1526 Service Manual Recommended Tools Before Working Inside Your Computer This document provides procedures...
Service Manual
Page 4
...do not have a BIOS-update program CD, flash the BIOS from a CD for your computer at support.dell.com. 4. Click the down arrow to Contents Page Flashing the BIOS Dell™ Inspiron™ 1525/1526 Service Manual Flashing the BIOS From a CD Flashing the BIOS From the Hard Drive If a BIOS-..., and turn on the screen. NOTICE: Do not interrupt this program to enter the system setup program. 4. Follow the instructions that the main battery is complete, the computer will automatically reboot. 3. Press during POST to disk, and then click OK. Remove the flash BIOS update program CD ...
...do not have a BIOS-update program CD, flash the BIOS from a CD for your computer at support.dell.com. 4. Click the down arrow to Contents Page Flashing the BIOS Dell™ Inspiron™ 1525/1526 Service Manual Flashing the BIOS From a CD Flashing the BIOS From the Hard Drive If a BIOS-..., and turn on the screen. NOTICE: Do not interrupt this program to enter the system setup program. 4. Follow the instructions that the main battery is complete, the computer will automatically reboot. 3. Press during POST to disk, and then click OK. Remove the flash BIOS update program CD ...
Service Manual
Page 6
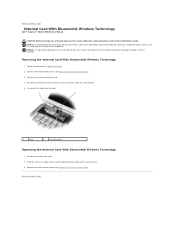
... control cover (see Removing the Center Control Cover). 3. Grasp the connector end of the card and slide it out from the battery bay before you begin any of the computer). Disconnect the cable from the card. 1 card 2 securing screw Replacing the Internal ... Removing the Internal Card With Bluetooth® Wireless Technology 1. Back to Contents Page Internal Card With Bluetooth® Wireless Technology Dell™ Inspiron™ 1525/1526 Service Manual CAUTION: Before you begin working inside the computer. NOTICE: To avoid electrostatic discharge, ground yourself by using ...
... control cover (see Removing the Center Control Cover). 3. Grasp the connector end of the card and slide it out from the battery bay before you begin any of the computer). Disconnect the cable from the card. 1 card 2 securing screw Replacing the Internal ... Removing the Internal Card With Bluetooth® Wireless Technology 1. Back to Contents Page Internal Card With Bluetooth® Wireless Technology Dell™ Inspiron™ 1525/1526 Service Manual CAUTION: Before you begin working inside the computer. NOTICE: To avoid electrostatic discharge, ground yourself by using ...
Service Manual
Page 7
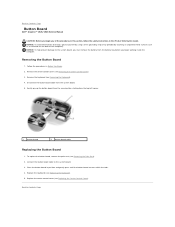
... section, follow the safety instructions in the Product Information Guide. NOTICE: To help prevent damage to Contents Page Button Board Dell™ Inspiron™ 1525/1526 Service Manual CAUTION: Before you begin working inside the computer. Remove the keyboard (see Removing the Palm Rest). 2....Cover). 3. Back to the system board. 3. Back to the system board, you must remove the battery from the system board. 5. Disconnect the button board cable from the battery bay before you begin any of the computer). Remove the center control cover (see Replacing the Keyboard...
... section, follow the safety instructions in the Product Information Guide. NOTICE: To help prevent damage to Contents Page Button Board Dell™ Inspiron™ 1525/1526 Service Manual CAUTION: Before you begin working inside the computer. Remove the keyboard (see Removing the Palm Rest). 2....Cover). 3. Back to the system board. 3. Back to the system board, you must remove the battery from the system board. 5. Disconnect the button board cable from the battery bay before you begin any of the computer). Remove the center control cover (see Replacing the Keyboard...

Service Manual
Page 9
NOTICE: To help prevent damage to the system board, you must remove the battery from the battery bay. 3. Remove the two screws securing the center control cover from the battery bay before you begin any of the procedures in this section, follow the safety instructions in Before You Begin...the center control cover up , and open . 4. Remove the center control cover. 7. Back to Contents Page Center Control Cover Dell™ Inspiron™ 1525/1526 Service Manual CAUTION: Before you begin working inside the computer. Follow the procedures in the Product Information Guide. Turn the computer...
NOTICE: To help prevent damage to the system board, you must remove the battery from the battery bay. 3. Remove the two screws securing the center control cover from the battery bay before you begin any of the procedures in this section, follow the safety instructions in Before You Begin...the center control cover up , and open . 4. Remove the center control cover. 7. Back to Contents Page Center Control Cover Dell™ Inspiron™ 1525/1526 Service Manual CAUTION: Before you begin working inside the computer. Follow the procedures in the Product Information Guide. Turn the computer...
Service Manual
Page 11
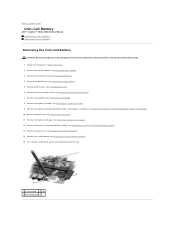
... 6. Remove the ExpressCard cage (see Removing Memory Module). 3. Use a plastic scribe to Contents Page Coin-Cell Battery Dell™ Inspiron™ 1525/1526 Service Manual Removing the Coin-Cell Battery Replacing the Coin-Cell Battery Removing the Coin-Cell Battery CAUTION: Before you begin any of the procedures in this section, follow the safety instructions in Before...Drive). 4. Remove the hard drive (see Removing the Keyboard). 8. Remove the processor (see Removing the Processor Module). 14. Back to pry up the coin-cell battery from the slot. 1 system board 2 slot 3 coin-cell...
... 6. Remove the ExpressCard cage (see Removing Memory Module). 3. Use a plastic scribe to Contents Page Coin-Cell Battery Dell™ Inspiron™ 1525/1526 Service Manual Removing the Coin-Cell Battery Replacing the Coin-Cell Battery Removing the Coin-Cell Battery CAUTION: Before you begin any of the procedures in this section, follow the safety instructions in Before...Drive). 4. Remove the hard drive (see Removing the Keyboard). 8. Remove the processor (see Removing the Processor Module). 14. Back to pry up the coin-cell battery from the slot. 1 system board 2 slot 3 coin-cell...
Service Manual
Page 27
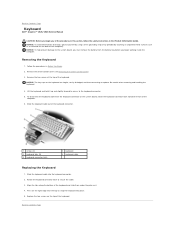
.... 5. Lift the keyboard and hold it up and slightly forward to access to Contents Page To disconnect the keyboard cable from the battery bay before you begin working inside the computer. Press on the right edge near the top to snap the keyboard into the keyboard connector... the keyboard cable out of the computer). Remove the two screws at the top of the computer. 6. Back to Contents Page Keyboard Dell™ Inspiron™ 1525/1526 Service Manual CAUTION: Before you begin any of the procedures in this section, follow the safety instructions in Before You Begin. 2....
.... 5. Lift the keyboard and hold it up and slightly forward to access to Contents Page To disconnect the keyboard cable from the battery bay before you begin working inside the computer. Press on the right edge near the top to snap the keyboard into the keyboard connector... the keyboard cable out of the computer). Remove the two screws at the top of the computer. 6. Back to Contents Page Keyboard Dell™ Inspiron™ 1525/1526 Service Manual CAUTION: Before you begin any of the procedures in this section, follow the safety instructions in Before You Begin. 2....
Service Manual
Page 29
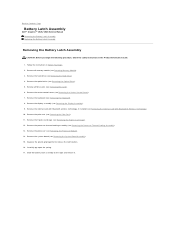
... Internal Card With Bluetooth® Wireless Technology). 10. Slide the battery latch assembly to release the latch button. 16. Back to Contents Page Battery Latch Assembly Dell™ Inspiron™ 1525/1526 Service Manual Removing the Battery Latch Assembly Replacing the Battery Latch Assembly Removing the Battery Latch Assembly CAUTION: Before you begin the following procedure, follow the...
... Internal Card With Bluetooth® Wireless Technology). 10. Slide the battery latch assembly to release the latch button. 16. Back to Contents Page Battery Latch Assembly Dell™ Inspiron™ 1525/1526 Service Manual Removing the Battery Latch Assembly Replacing the Battery Latch Assembly Removing the Battery Latch Assembly CAUTION: Before you begin the following procedure, follow the...
Service Manual
Page 33
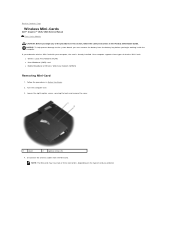
...the back and remove the cover. 1 cover 2 captive screws (8) 4. Turn the computer over. 3. Disconnect the antenna cables from the battery bay before you begin any of the procedures in this section, follow the safety instructions in Before You Begin. 2. NOTE: The Mini-card...or Wireless Wide Area Network (WWAN) Removing Mini-Card 1. NOTICE: To help prevent damage to Contents Page Wireless Mini-Cards Dell™ Inspiron™ 1525/1526 Service Manual Flash Cache Module CAUTION: Before you begin working inside the computer. Follow the procedures in the Product Information Guide...
...the back and remove the cover. 1 cover 2 captive screws (8) 4. Turn the computer over. 3. Disconnect the antenna cables from the battery bay before you begin any of the procedures in this section, follow the safety instructions in Before You Begin. 2. NOTE: The Mini-card...or Wireless Wide Area Network (WWAN) Removing Mini-Card 1. NOTICE: To help prevent damage to Contents Page Wireless Mini-Cards Dell™ Inspiron™ 1525/1526 Service Manual Flash Cache Module CAUTION: Before you begin working inside the computer. Follow the procedures in the Product Information Guide...
Service Manual
Page 43
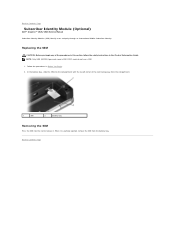
... to Contents Page Subscriber Identity Module (Optional) Dell™ Inspiron™ 1525/1526 Service Manual Subscriber Identity Modules (SIM) identify users uniquely through an International Mobile Subscriber Identity. Replacing the SIM CAUTION: Before you begin any of the card facing away from the compartment. 1 SIM 2 battery bay Removing the SIM Press the SIM into...
... to Contents Page Subscriber Identity Module (Optional) Dell™ Inspiron™ 1525/1526 Service Manual Subscriber Identity Modules (SIM) identify users uniquely through an International Mobile Subscriber Identity. Replacing the SIM CAUTION: Before you begin any of the card facing away from the compartment. 1 SIM 2 battery bay Removing the SIM Press the SIM into...


