User Guide
Page 4
Adjusting Projection Image Size 18 Using the Control Panel 20 Using the Remote Control 22 Installing the Remote Control Batteries 25 Operating Range With Remote Control 26 Using the On-Screen Display 27 Main Menu 27 AUTO-ADJUST 27 INPUT SELECT 28 PICTURE (in PC Mode 29 PICTURE (in Video Mode 29 DISPLAY (in PC Mode 31 DISPLAY (in Video Mode 33 LAMP 34 SET UP 34 INFORMATION 36 OTHERS 36 4 Troubleshooting Your Projector 42 Guiding Signals 46 Changing the Lamp 47 4 Contents
Adjusting Projection Image Size 18 Using the Control Panel 20 Using the Remote Control 22 Installing the Remote Control Batteries 25 Operating Range With Remote Control 26 Using the On-Screen Display 27 Main Menu 27 AUTO-ADJUST 27 INPUT SELECT 28 PICTURE (in PC Mode 29 PICTURE (in Video Mode 29 DISPLAY (in PC Mode 31 DISPLAY (in Video Mode 33 LAMP 34 SET UP 34 INFORMATION 36 OTHERS 36 4 Troubleshooting Your Projector 42 Guiding Signals 46 Changing the Lamp 47 4 Contents
User Guide
Page 7
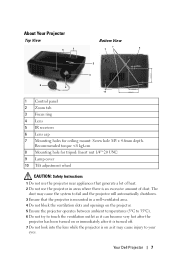
Recommended torque About Your Projector Top View 5 1 Bottom View 7 9 8 2 14.00±0.10 82.30±0.15 3 6 4 10 55.00±0.10 110.00±0.15 1 Control panel 2 Zoom tab 3 Focus ring 4 Lens 5 IR receivers 6 Lens cap 7 Mounting holes for ceiling mount: Screw hole M3 x 4.6mm depth.
Recommended torque About Your Projector Top View 5 1 Bottom View 7 9 8 2 14.00±0.10 82.30±0.15 3 6 4 10 55.00±0.10 110.00±0.15 1 Control panel 2 Zoom tab 3 Focus ring 4 Lens 5 IR receivers 6 Lens cap 7 Mounting holes for ceiling mount: Screw hole M3 x 4.6mm depth.

User Guide
Page 8
8 Do not place any objects near or in front of the projector or cover its lens while the projector is on as the heat may cause the object to ceiling mount the projector yourself. NOTE: • Do not attempt to melt or burn. For more information, see the Dell Support website at support.dell.com. • For more information, see the Safety Information that shipped with your projector. 8 Your Dell Projector It should be installed by a qualified technician. • Recommended Projector Ceiling Mount Kit (P/N: C3505).
8 Do not place any objects near or in front of the projector or cover its lens while the projector is on as the heat may cause the object to ceiling mount the projector yourself. NOTE: • Do not attempt to melt or burn. For more information, see the Dell Support website at support.dell.com. • For more information, see the Safety Information that shipped with your projector. 8 Your Dell Projector It should be installed by a qualified technician. • Recommended Projector Ceiling Mount Kit (P/N: C3505).
User Guide
Page 15
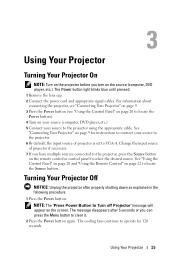
... source to the projector. 6 By default, the input source of projector if necessary. 7 If you can press the Menu button to locate the Source button. Turning Your Projector Off NOTICE: Unplug the projector after 5 seconds or you have multiple sources connected to the projector, press the Source button on the remote control or control panel to Turn off Projector" message will appear on the source (computer, DVD player, etc.). The Power button light blinks blue until pressed. 1 Remove the lens cap. 2 Connect the power cord and appropriate signal cables...
... source to the projector. 6 By default, the input source of projector if necessary. 7 If you can press the Menu button to locate the Source button. Turning Your Projector Off NOTICE: Unplug the projector after 5 seconds or you have multiple sources connected to the projector, press the Source button on the remote control or control panel to Turn off Projector" message will appear on the source (computer, DVD player, etc.). The Power button light blinks blue until pressed. 1 Remove the lens cap. 2 Connect the power cord and appropriate signal cables...
User Guide
Page 20
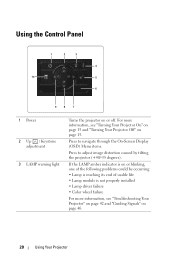
... following problems could be occurring: • Lamp is reaching its end of usable life • Lamp module is not properly installed • Lamp driver failure • Color wheel failure For more information, see "Troubleshooting Your Projector" on page 42 and "Guiding Signals" on page 46. 20 Using Your Projector Using the Control Panel 1 2 3 4 10 5 6 9 8 7 1 Power 2 Up / Keystone adjustment 3 LAMP warning light Turns the projector on page 15. Press to navigate through the On-Screen Display (OSD) Menu items. Press to adjust image distortion...
... following problems could be occurring: • Lamp is reaching its end of usable life • Lamp module is not properly installed • Lamp driver failure • Color wheel failure For more information, see "Troubleshooting Your Projector" on page 42 and "Guiding Signals" on page 46. 20 Using Your Projector Using the Control Panel 1 2 3 4 10 5 6 9 8 7 1 Power 2 Up / Keystone adjustment 3 LAMP warning light Turns the projector on page 15. Press to navigate through the On-Screen Display (OSD) Menu items. Press to adjust image distortion...

User Guide
Page 21
... input source. 4 TEMP warning light If the TEMP amber indicator is on page 46. 5 Enter Press to confirm the selection item. 6 IR Receiver Point the remote control towards the IR receiver and press a button. 7 Right / Auto Adjust Press to navigate through the On-Screen Display (OSD) Menu items. Press to synchronize the projector to navigate through Analog RGB, Composite, Component (YPbPr via VGA), and S-video sources when multiple sources are connected...
... input source. 4 TEMP warning light If the TEMP amber indicator is on page 46. 5 Enter Press to confirm the selection item. 6 IR Receiver Point the remote control towards the IR receiver and press a button. 7 Right / Auto Adjust Press to navigate through the On-Screen Display (OSD) Menu items. Press to synchronize the projector to navigate through Analog RGB, Composite, Component (YPbPr via VGA), and S-video sources when multiple sources are connected...

User Guide
Page 28
... your projector's input source. COMPOSITE VIDEO-Press to detect S-Video signal. S-VIDEO-Press to detect Composite Video signal. VGA-A-Use and VGA-B-Use and S-VIDEO-Use and COMPOSITE VIDEO-Use to auto detect the available input signals. Select On to enable or disable VGA-A input. and to lock the current input signal. AUTO SOURCE-Select Off (the default) to enable or disable Composite Video input. 28 Using Your Projector VGA-A-Press to detect VGA-B signal. INPUT SELECT The Input Select menu allows you press the Source button when the projector is set...
... your projector's input source. COMPOSITE VIDEO-Press to detect S-Video signal. S-VIDEO-Press to detect Composite Video signal. VGA-A-Use and VGA-B-Use and S-VIDEO-Use and COMPOSITE VIDEO-Use to auto detect the available input signals. Select On to enable or disable VGA-A input. and to lock the current input signal. AUTO SOURCE-Select Off (the default) to enable or disable Composite Video input. 28 Using Your Projector VGA-A-Press to detect VGA-B signal. INPUT SELECT The Input Select menu allows you press the Source button when the projector is set...

User Guide
Page 30
... the sharpness and to adjust the display white intensity. See "PICTURE ADVANCED" below. The Picture Advanced menu provides the following options: WHITE INTENSITY-Use and to increase the sharpness. SATURATION-Allows you adjust the values in the Custom mode. 30 Using Your Projector The screen appears cooler at higher color temperatures and warmer at lower color temperatures. The values are only available when input source is activated. NOTE: Saturation...
... the sharpness and to adjust the display white intensity. See "PICTURE ADVANCED" below. The Picture Advanced menu provides the following options: WHITE INTENSITY-Use and to increase the sharpness. SATURATION-Allows you adjust the values in the Custom mode. 30 Using Your Projector The screen appears cooler at higher color temperatures and warmer at lower color temperatures. The values are only available when input source is activated. NOTE: Saturation...

User Guide
Page 37
.... Using Your Projector 37 You can be set to enter power saving mode after 20 seconds of the OSD background. A warning message appears on the control panel or remote control for 15 seconds, then disable the function. MENU LOCK-Select On to stop power saving mode. MENU TRANSPARENCY-Select to change audio settings. MENU TIMEOUT-Allows you want to disable the Menu Lock function and have the OSD disappear, press the Menu button on screen...
.... Using Your Projector 37 You can be set to enter power saving mode after 20 seconds of the OSD background. A warning message appears on the control panel or remote control for 15 seconds, then disable the function. MENU LOCK-Select On to stop power saving mode. MENU TRANSPARENCY-Select to change audio settings. MENU TIMEOUT-Allows you want to disable the Menu Lock function and have the OSD disappear, press the Menu button on screen...
User Guide
Page 42
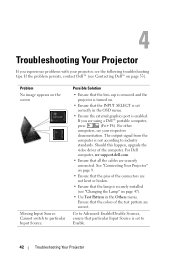
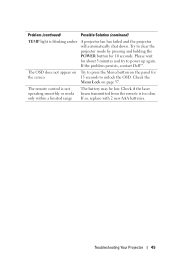
... cables are securely connected. Problem No image appears on page 47). • Use Test Pattern in the OSD menu. • Ensure the external graphics port is set to particular Input Source. The output signal from the computer is set correctly in the Others menu. 4 Troubleshooting Your Projector If you are correct. Possible Solution • Ensure that the colors of the computer. Ensure that the lens cap is removed...
... cables are securely connected. Problem No image appears on page 47). • Use Test Pattern in the OSD menu. • Ensure the external graphics port is set to particular Input Source. The output signal from the computer is set correctly in the Others menu. 4 Troubleshooting Your Projector If you are correct. Possible Solution • Ensure that the colors of the computer. Ensure that the lens cap is removed...
User Guide
Page 43
... computer. Image has vertical flickering Adjust the frequency in PC Mode only). bar menu (in the Others menu. Problem (continued) Possible Solution (continued) Partial, scrolling, or incorrectly displayed image 1 Press the Auto Adjust button on the projector lens. 2 Ensure that the setting is 1024 x 768 pixels for the external monitor port. b Verify that the projection screen is within the required distance from the graphics card, please set the resolution of the...
... computer. Image has vertical flickering Adjust the frequency in PC Mode only). bar menu (in the Others menu. Problem (continued) Possible Solution (continued) Partial, scrolling, or incorrectly displayed image 1 Press the Auto Adjust button on the projector lens. 2 Ensure that the setting is 1024 x 768 pixels for the external monitor port. b Verify that the projection screen is within the required distance from the graphics card, please set the resolution of the...
User Guide
Page 44
... lamp driver has failed and the projector will automatically shut down . Turn the display on . The projector has overheated. If the problem persists, contact Dell™. 44 Troubleshooting Your Projector Please check the lamp module and ensure that it may burn out and may be disrupted. When the lamp reaches its end of the projected image according to input signal format with an Original setting. If the LAMP light is solid blue, the color wheel...
... lamp driver has failed and the projector will automatically shut down . Turn the display on . The projector has overheated. If the problem persists, contact Dell™. 44 Troubleshooting Your Projector Please check the lamp module and ensure that it may burn out and may be disrupted. When the lamp reaches its end of the projected image according to input signal format with an Original setting. If the LAMP light is solid blue, the color wheel...
User Guide
Page 45
... POWER button for the screen 15 seconds to press the Menu button on page 37. If so, replace with 2 new AAA batteries. Check if the laser beam transmitted from the remote is blinking amber A projector fan has failed and the projector will automatically shut down. Problem (continued) Possible Solution (continued) TEMP light is too dim. Check the Menu Lock on the panel for 10 seconds. If the problem persists, contact Dell™. The remote control...
... POWER button for the screen 15 seconds to press the Menu button on page 37. If so, replace with 2 new AAA batteries. Check if the laser beam transmitted from the remote is blinking amber A projector fan has failed and the projector will automatically shut down. Problem (continued) Possible Solution (continued) TEMP light is too dim. Check the Menu Lock on the panel for 10 seconds. If the problem persists, contact Dell™. The remote control...

User Guide
Page 46
... Dell. Guiding Signals Projector Status Description Control Buttons Power Standby mode Warming up and power on . Projector is cooling to display an image. The projector will automatically enter standby mode, if an input signal is within operational range. If the problem persists, contact Dell. The lamp driver has failed. Power Saving mode has been activated. If the problem persists, contact Dell. The projector automatically shuts down . BLUE Flashing BLUE BLUE BLUE AMBER Flashing AMBER OFF AMBER ÒFF AMBER Flashing BLUE AMBER Flashing Indicator TEMP (Amber) LAMP...
... Dell. Guiding Signals Projector Status Description Control Buttons Power Standby mode Warming up and power on . Projector is cooling to display an image. The projector will automatically enter standby mode, if an input signal is within operational range. If the problem persists, contact Dell. The lamp driver has failed. Power Saving mode has been activated. If the problem persists, contact Dell. The projector automatically shuts down . BLUE Flashing BLUE BLUE BLUE AMBER Flashing AMBER OFF AMBER ÒFF AMBER Flashing BLUE AMBER Flashing Indicator TEMP (Amber) LAMP...
User Guide
Page 47
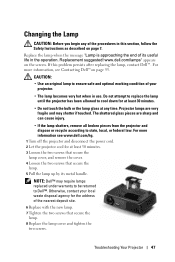
... lamp. 8 Replace the lamp cover and tighten the two screws. NOTE: Dell™ may shatter if touched. CAUTION: • Use an original lamp to Dell™. Otherwise, contact your projector. • The lamp becomes very hot when in this problem persists after replacing the lamp, contact Dell™. For more information, see www.dell.com/hg. 1 Turn off the projector and disconnect the power cord. 2 Let the projector cool for the address...
... lamp. 8 Replace the lamp cover and tighten the two screws. NOTE: Dell™ may shatter if touched. CAUTION: • Use an original lamp to Dell™. Otherwise, contact your projector. • The lamp becomes very hot when in this problem persists after replacing the lamp, contact Dell™. For more information, see www.dell.com/hg. 1 Turn off the projector and disconnect the power cord. 2 Let the projector cool for the address...

User Guide
Page 48
CAUTION: Lamp Disposal (for Lamp Reset in the OSD Lamp tab (see Lamp menu on page 34). 9 Reset the lamp usage time by selecting "Yes" for the US only) LAMP(S) INSIDE THIS PRODUCT CONTAIN MERCURY AND MUST BE RECYCLED OR DISPOSED OF ACCORDING TO LOCAL, STATE OR FEDERAL LAWS. FOR LAMP SPECIFIC DISPOSAL INFORMATION CHECK WWW.LAMPRECYCLE.ORG. 48 Troubleshooting Your Projector FOR MORE INFORMATION, GO TO WWW.DELL.COM/HG OR CONTACT THE ELECTRONIC INDUSTRIES ALLIANCE AT WWW.EIAE.ORG. When a new lamp module has been changed, the projector will automatically detect and reset the lamp hours.
CAUTION: Lamp Disposal (for Lamp Reset in the OSD Lamp tab (see Lamp menu on page 34). 9 Reset the lamp usage time by selecting "Yes" for the US only) LAMP(S) INSIDE THIS PRODUCT CONTAIN MERCURY AND MUST BE RECYCLED OR DISPOSED OF ACCORDING TO LOCAL, STATE OR FEDERAL LAWS. FOR LAMP SPECIFIC DISPOSAL INFORMATION CHECK WWW.LAMPRECYCLE.ORG. 48 Troubleshooting Your Projector FOR MORE INFORMATION, GO TO WWW.DELL.COM/HG OR CONTACT THE ELECTRONIC INDUSTRIES ALLIANCE AT WWW.EIAE.ORG. When a new lamp module has been changed, the projector will automatically detect and reset the lamp hours.
User Guide
Page 55
... requires separate signals for each of 525 lines at 25 frames per seconds of a computer image as DMD. DLP® - Reflective display technology developed by improper projector to the DLP mirrors which arrange the RGB colors into a picture projected onto screen, also known as per second. Light passes through a color filter is used to express relative difference in a normal forward projection environment text, graphics, etc. DMD - Digital Micro...
... requires separate signals for each of 525 lines at 25 frames per seconds of a computer image as DMD. DLP® - Reflective display technology developed by improper projector to the DLP mirrors which arrange the RGB colors into a picture projected onto screen, also known as per second. Light passes through a color filter is used to express relative difference in a normal forward projection environment text, graphics, etc. DMD - Digital Micro...
User Guide
Page 56
..., a 1.4:1 zoom lens ratio means that a 10 foot image without zoom would be a 14 foot image with a variable focal length that allows operator to move the view in or out making the image smaller or larger. A name used to identify the particular wireless LAN to which a user wants to as Y/C. SVGA - VGA - Zoom Lens - SSID - Service Set Identifiers - Is the ratio between the smallest and largest image a lens can projector from a fixed distance...
..., a 1.4:1 zoom lens ratio means that a 10 foot image without zoom would be a 14 foot image with a variable focal length that allows operator to move the view in or out making the image smaller or larger. A name used to identify the particular wireless LAN to which a user wants to as Y/C. SVGA - VGA - Zoom Lens - SSID - Service Set Identifiers - Is the ratio between the smallest and largest image a lens can projector from a fixed distance...

User Guide
Page 57
... A Adjusting the Projected Image 16 Adjusting the Projector Height 16 lower the projector Elevator button 16 Elevator foot 16 Adjusting the Projector Zoom and Focus 17 Focus ring 17 Zoom tab 17 Audio Input 37 Audio Settings 37 C Changing the Lamp 47 Closed Caption 40 Connecting the Projector Composite video cable 13 Connecting with a Component Cable 14 Connecting with a Composite Cable 13 Connecting with an S-video Cable 12 Power cord 10, 11, 12, 13, 14 S-video cable 12 To Computer 10 USB to USB cable 10 VGA to VGA cable...
... A Adjusting the Projected Image 16 Adjusting the Projector Height 16 lower the projector Elevator button 16 Elevator foot 16 Adjusting the Projector Zoom and Focus 17 Focus ring 17 Zoom tab 17 Audio Input 37 Audio Settings 37 C Changing the Lamp 47 Closed Caption 40 Connecting the Projector Composite video cable 13 Connecting with a Component Cable 14 Connecting with a Composite Cable 13 Connecting with an S-video Cable 12 Power cord 10, 11, 12, 13, 14 S-video cable 12 To Computer 10 USB to USB cable 10 VGA to VGA cable...

User Guide
Page 58
...-Screen Display 27 Auto-Adjust 29 Display (in PC Mode) 31 Display (in Video Mode) 33 Input Select 28 Lamp 34 Main Menu 27 Others 36 Picture (in PC Mode) 29 Picture (in Video Mode) 29 Set Up 34 P Password 38 phone numbers 53 Power Saving 37 Power Settings 37 Powering On/Off the Projector Powering Off the Projector 15 Powering On the Projector 15 Q Quick Shutdown 38 R Remote Control 22 IR receiver 21 Reset, Factory 41 S Screen Settings 37 Security Settings 38 Speaker 37 Specifications Audio 49...
...-Screen Display 27 Auto-Adjust 29 Display (in PC Mode) 31 Display (in Video Mode) 33 Input Select 28 Lamp 34 Main Menu 27 Others 36 Picture (in PC Mode) 29 Picture (in Video Mode) 29 Set Up 34 P Password 38 phone numbers 53 Power Saving 37 Power Settings 37 Powering On/Off the Projector Powering Off the Projector 15 Powering On the Projector 15 Q Quick Shutdown 38 R Remote Control 22 IR receiver 21 Reset, Factory 41 S Screen Settings 37 Security Settings 38 Speaker 37 Specifications Audio 49...


