Service Manual
Page 135
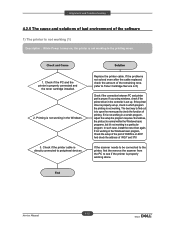
... installed. 2. If you using windows, check if the printer driver in which program the printing is not working in a certain program, adjust the setup the program requires. If not working (1) Description : While Power turned on ECP. Check if the printer cable is directly connected to see if the... If it 's not working . Service Manual 4-62 And check the address of IRQ 7 and 378 If the scanner needs to be connected to the printer, first the remove the scanner from the PC to peripheral devices Replace the printer cable. Sometimes, the printout is normal within the Windows basic programs...
... installed. 2. If you using windows, check if the printer driver in which program the printing is not working in a certain program, adjust the setup the program requires. If not working (1) Description : While Power turned on ECP. Check if the printer cable is directly connected to see if the... If it 's not working . Service Manual 4-62 And check the address of IRQ 7 and 378 If the scanner needs to be connected to the printer, first the remove the scanner from the PC to peripheral devices Replace the printer cable. Sometimes, the printout is normal within the Windows basic programs...
User Guide
Page 19
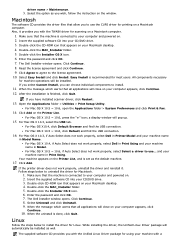
...you wish, follow the instruction on a Macintosh computer. 1. Open the Applications folder > Utilities > Print Setup Utility. For Mac OS X 10.5 ~ 10.6, press the "+" icon; Follow steps below to your... Linux Driver package will close on . 2. Double-click the Installer OS X icon. 6. The Dell Installer window opens. Select Easy Install and click Install. Click Add on a Macintosh computer. a ...the Printer List. If you with a The supplied software CD provides you have installed scanner driver, click Restart. 13. Linux Follow the steps below to use the CUPS driver...
...you wish, follow the instruction on a Macintosh computer. 1. Open the Applications folder > Utilities > Print Setup Utility. For Mac OS X 10.5 ~ 10.6, press the "+" icon; Follow steps below to your... Linux Driver package will close on . 2. Double-click the Installer OS X icon. 6. The Dell Installer window opens. Select Easy Install and click Install. Click Add on a Macintosh computer. a ...the Printer List. If you with a The supplied software CD provides you have installed scanner driver, click Restart. 13. Linux Follow the steps below to use the CUPS driver...
User Guide
Page 43
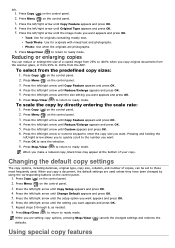
... document, the default settings are used . Press Menu ( ) on the control panel. 3. Press the left/right arrow until the setup option you copy original documents from the scanner glass, or from 25% to 400% when you want . Using special copy features Photo: Use when the originals are setting copy...lines may appear at the bottom of a copied image from 25% to 100% from the predefined copy sizes: 1. Press the left /right arrow until Copy Setup appears and press OK. 4. Press Copy ( ) on the control panel. 2. Press the left /right arrow until Copy Feature appears and press OK. ...
... document, the default settings are used . Press Menu ( ) on the control panel. 3. Press the left/right arrow until the setup option you copy original documents from the scanner glass, or from 25% to 400% when you want . Using special copy features Photo: Use when the originals are setting copy...lines may appear at the bottom of a copied image from 25% to 100% from the predefined copy sizes: 1. Press the left /right arrow until Copy Setup appears and press OK. 4. Press Copy ( ) on the control panel. 2. Press the left /right arrow until Copy Feature appears and press OK. ...
User Guide
Page 46
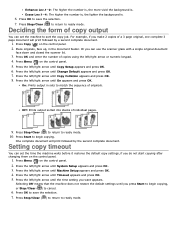
... to save the selection. 7. Press the left /right arrow until Change Default appears and press OK. 7. Press the left /right arrow until Machine Setup appears and press OK. 4. Enhance Lev.1~2: The higher the number is, the more vivid the background is . 6. Place originals, face up, in ...default copy settings, if you can set the machine to save the selection. 7. Setting copy timeout You can use the scanner glass with a single original document face down and closed the scanner lid. 3. Press Menu ( ) on the control panel. 1. Press Stop/Clear ( ) to return to ready mode...
... to save the selection. 7. Press the left /right arrow until Change Default appears and press OK. 7. Press the left /right arrow until Machine Setup appears and press OK. 4. Enhance Lev.1~2: The higher the number is, the more vivid the background is . 6. Place originals, face up, in ...default copy settings, if you can set the machine to save the selection. 7. Setting copy timeout You can use the scanner glass with a single original document face down and closed the scanner lid. 3. Press Menu ( ) on the control panel. 1. Press Stop/Clear ( ) to return to ready mode...

User Guide
Page 56
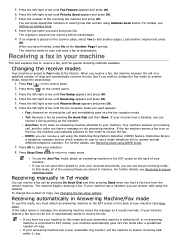
... fax manually This method is connected to suit your fax needs (See Adjusting the document settings). 4. Open Dell Scan and Fax Manager. From the Start menu, click Control Panel > Dell Scan and Fax Manager. 3. Save Location: Selects location to the Set Fax Receiving tab and activate Enable Fax... Set Fax Receiving tab: Enable Fax Receiving: You can use either the document feeder or the scanner glass (See Loading originals). When setting is done, press OK. Press the left /right arrow until System Setup appears and press OK. 3. Press OK to ready mode. Sending a fax 1. Press Menu ...
... fax manually This method is connected to suit your fax needs (See Adjusting the document settings). 4. Open Dell Scan and Fax Manager. From the Start menu, click Control Panel > Dell Scan and Fax Manager. 3. Save Location: Selects location to the Set Fax Receiving tab and activate Enable Fax... Set Fax Receiving tab: Enable Fax Receiving: You can use either the document feeder or the scanner glass (See Loading originals). When setting is done, press OK. Press the left /right arrow until System Setup appears and press OK. 3. Press OK to ready mode. Sending a fax 1. Press Menu ...

User Guide
Page 57
...down on the control panel. 6. When you want to send the document. 9. Confirming a transmission When the last page of redial attempts (See Changing the fax setup options). Press Redial/Pause ( ) on the control panel. 2. Load another fax number to cancel a fax job, press Stop/Clear ( ) at a ... further details, see Setting up into memory. When an original is completed. prompt. You cannot send a color fax using the number keypad on the scanner glass. 3. Press Menu ( ) on the control panel. The display asks you have finished, select No at the Another No.? To cancel the ...
...down on the control panel. 6. When you want to send the document. 9. Confirming a transmission When the last page of redial attempts (See Changing the fax setup options). Press Redial/Pause ( ) on the control panel. 2. Load another fax number to cancel a fax job, press Stop/Clear ( ) at a ... further details, see Setting up into memory. When an original is completed. prompt. You cannot send a color fax using the number keypad on the scanner glass. 3. Press Menu ( ) on the control panel. The display asks you have finished, select No at the Another No.? To cancel the ...
User Guide
Page 59
...address book. 8. If your answering machine has a user-selectable ring counter, set your machine to receive the fax. For details, see Changing the fax setup options. Press the left /right arrow until Receive Mode appears and press OK. 6. In this mode and your answering machine is switched off, or no...original is a telephone company service which enables an user to use the Ans/Fax mode, attach an answering machine to the EXT socket on the scanner glass, select Yes to change the number of the receiving fax machine and press OK. But if you want to add another pages. Receiving ...
...address book. 8. If your answering machine has a user-selectable ring counter, set your machine to receive the fax. For details, see Changing the fax setup options. Press the left /right arrow until Receive Mode appears and press OK. 6. In this mode and your answering machine is switched off, or no...original is a telephone company service which enables an user to use the Ans/Fax mode, attach an answering machine to the EXT socket on the scanner glass, select Yes to change the number of the receiving fax machine and press OK. But if you want to add another pages. Receiving ...

User Guide
Page 72
... Web Service opens, click Information > Print information. Press Menu ( ) on the control panel. 2. Press the left /right arrow until System Setup appears and press OK. 3. Platen Scan: Displays the number of pages scanned using the ADF. Using toner low alert If the amount of pages... press OK. 4. Monitoring the supplies life If you experience frequent paper jams or printing problems, check the number of pages scanned using the scanner glass. 6. Press the left /right arrow until TonerLow Alert appears and press OK. This chapter includes: Printing a machine report Monitoring the...
... Web Service opens, click Information > Print information. Press Menu ( ) on the control panel. 2. Press the left /right arrow until System Setup appears and press OK. 3. Platen Scan: Displays the number of pages scanned using the ADF. Using toner low alert If the amount of pages... press OK. 4. Monitoring the supplies life If you experience frequent paper jams or printing problems, check the number of pages scanned using the scanner glass. 6. Press the left /right arrow until TonerLow Alert appears and press OK. This chapter includes: Printing a machine report Monitoring the...
User Guide
Page 110
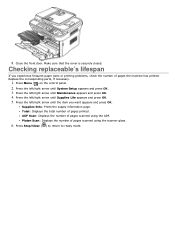
... appears and press OK. 4. ADF Scan: Displays the number of pages scanned using the ADF. Platen Scan: Displays the number of pages scanned using the scanner glass. 6. Checking replaceable's lifespan If you want appears and press OK. Press the left /right arrow until Supplies Life appears and press OK. 5. Supplies Info... has printed. Close the front door. Replace the corresponding parts, if necessary. 1. Press Menu ( ) on the control panel. 2. Press the left /right arrow until System Setup appears and press OK. 3. Press Stop/Clear ( ) to return to ready mode.
... appears and press OK. 4. ADF Scan: Displays the number of pages scanned using the ADF. Platen Scan: Displays the number of pages scanned using the scanner glass. 6. Checking replaceable's lifespan If you want appears and press OK. Press the left /right arrow until Supplies Life appears and press OK. 5. Supplies Info... has printed. Close the front door. Replace the corresponding parts, if necessary. 1. Press Menu ( ) on the control panel. 2. Press the left /right arrow until System Setup appears and press OK. 3. Press Stop/Clear ( ) to return to ready mode.
User Guide
Page 127
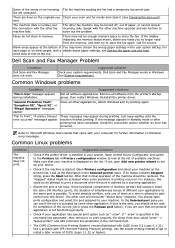
...the port is occupied by a scanning application. Since functional components of machine (printer and scanner) share the same I/O interface (port), the situation of simultaneous access of different user applications... the printer's startup group, then restart Windows. suggested solution Check your machine. Dell Scan and Fax Manager works in the command line parameter, then remove it (See...System requirements). If "-oraw" is not busy. For Gimp front-end, select "print" -> "Setup printer" and edit command line parameter in the Selected printer pane. The CUPS (Common Unix Printing ...
...the port is occupied by a scanning application. Since functional components of machine (printer and scanner) share the same I/O interface (port), the situation of simultaneous access of different user applications... the printer's startup group, then restart Windows. suggested solution Check your machine. Dell Scan and Fax Manager works in the command line parameter, then remove it (See...System requirements). If "-oraw" is not busy. For Gimp front-end, select "print" -> "Setup printer" and edit command line parameter in the Selected printer pane. The CUPS (Common Unix Printing ...


