Brochure
Page 3
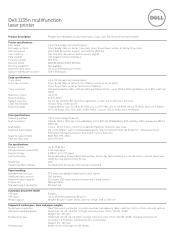
... 250 sheet via standard drawer and 1 sheet feeder Not available 251 sheets (250 sheet standard drawer and 1 sheet feeder) Manual duplex 80 sheet bin Automatic document feeder ADF type ADF input Media support Simplex Up to 40 sheets (based on 80 g/m2...dpi (ADF and Platen) Photo - enhanced: 4800 x 4800 dpi Colour: 16 bit; Dell 1135n multifunction laser printer Product description Reliable and affordable multifunction (print, copy, scan, fax) monochrome laser printer Printer specifications Print speed1 First page out time Print resolutions User interface Data streams Processor speed Memory ...
... 250 sheet via standard drawer and 1 sheet feeder Not available 251 sheets (250 sheet standard drawer and 1 sheet feeder) Manual duplex 80 sheet bin Automatic document feeder ADF type ADF input Media support Simplex Up to 40 sheets (based on 80 g/m2...dpi (ADF and Platen) Photo - enhanced: 4800 x 4800 dpi Colour: 16 bit; Dell 1135n multifunction laser printer Product description Reliable and affordable multifunction (print, copy, scan, fax) monochrome laser printer Printer specifications Print speed1 First page out time Print resolutions User interface Data streams Processor speed Memory ...
Service Manual
Page 3
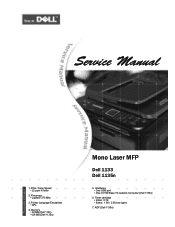
Processor • Jupiter5 375 Mhz 3. Toner cartridge • Initial : 0.7K • Sales : 1.5K / 2.5K two types 7. Memory • 64 MB (Dell 1133) •128 MB (Dell 1135n) Mono Laser MFP Dell 1133 Dell 1135n 5. ADF (Dell 1135n) The keynote of Product Interfaces • One USB port • One 10/100 Base TX network connector (Dell 1135n) 6. Print / Copy Speed • 22 ppm in letter 2. Service Manual 1. Printer Language Emulations • SPL 4.
Processor • Jupiter5 375 Mhz 3. Toner cartridge • Initial : 0.7K • Sales : 1.5K / 2.5K two types 7. Memory • 64 MB (Dell 1133) •128 MB (Dell 1135n) Mono Laser MFP Dell 1133 Dell 1135n 5. ADF (Dell 1135n) The keynote of Product Interfaces • One USB port • One 10/100 Base TX network connector (Dell 1135n) 6. Print / Copy Speed • 22 ppm in letter 2. Service Manual 1. Printer Language Emulations • SPL 4.

Service Manual
Page 8
...user maintenance, or prescribed service condition. Service Manual 1-1 High voltages and lasers inside the printer. Class I laser product con-forming to be serviced by appropriately qualified service technician. Warning >> Never operate or service the printer with the protective cover removed from Laser/ ...re hazards. (3) Laser Safety Statement The Printer is never any unauthorized changes or additions to the printer, these basic safety pre-cautions should only be serviced by a qualified service technician. (2) Use only Dell replacement parts There are designed so there...
...user maintenance, or prescribed service condition. Service Manual 1-1 High voltages and lasers inside the printer. Class I laser product con-forming to be serviced by appropriately qualified service technician. Warning >> Never operate or service the printer with the protective cover removed from Laser/ ...re hazards. (3) Laser Safety Statement The Printer is never any unauthorized changes or additions to the printer, these basic safety pre-cautions should only be serviced by a qualified service technician. (2) Use only Dell replacement parts There are designed so there...

Service Manual
Page 9
... wall socket. (6) Use caution when inserting or removing the power connector. Service Manual 1-2 When removing the power connector grip, ensure the power switch is toxic. Replace a damaged power cable immediately, do so could damage the printer and potentially cause a fire or electric shock. (2) Use only the... care not to cut or damage the power cable or plugs when moving the machine. (9) Use caution during thunder or lightening storms. Dell recommend that the power sockets and plugs are expected. Do not position the machine near a humidifier, or in the Drum cartridge...
... wall socket. (6) Use caution when inserting or removing the power connector. Service Manual 1-2 When removing the power connector grip, ensure the power switch is toxic. Replace a damaged power cable immediately, do so could damage the printer and potentially cause a fire or electric shock. (2) Use only the... care not to cut or damage the power cable or plugs when moving the machine. (9) Use caution during thunder or lightening storms. Dell recommend that the power sockets and plugs are expected. Do not position the machine near a humidifier, or in the Drum cartridge...

Service Manual
Page 10
... printer interface cables and power cables. (4) Only use approved spare parts. These will be caused to the printer ... of supporting its weight. Take extra care when servicing the printer. Damage could cause a fire. 1.2.4 Assembly / ...not to damage the printer (1) Ensure the printer is installed on the printer, These could be erased...the printer which if spilled could cause the printer to tip or fall. (2) The printer contains...replaced correctly. Service Manual 1-3 Precautions 1.2.3 Handling Precautions The following procedures before dismantling the printer or replacing any ...
... printer interface cables and power cables. (4) Only use approved spare parts. These will be caused to the printer ... of supporting its weight. Take extra care when servicing the printer. Damage could cause a fire. 1.2.4 Assembly / ...not to damage the printer (1) Ensure the printer is installed on the printer, These could be erased...the printer which if spilled could cause the printer to tip or fall. (2) The printer contains...replaced correctly. Service Manual 1-3 Precautions 1.2.3 Handling Precautions The following procedures before dismantling the printer or replacing any ...

Service Manual
Page 11
... installed on each side of supporting its weight. This printer weighs 23.34 lbs (Dell 1133) / 25.44 lbs (Dell 1133n) including toner cartridge and cassette. Use the lifting handles located on a level surface, capable of the machine. Service Manual 1-4 The fuser unit works at a high temperature. Wait for the fuser to tip or...
... installed on each side of supporting its weight. This printer weighs 23.34 lbs (Dell 1133) / 25.44 lbs (Dell 1133n) including toner cartridge and cassette. Use the lifting handles located on a level surface, capable of the machine. Service Manual 1-4 The fuser unit works at a high temperature. Wait for the fuser to tip or...
Service Manual
Page 13
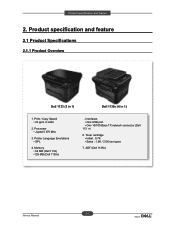
... / 2.5K two types 7. Printer Language Emulations • SPL 4. Memory • 64 MB (Dell 1133) •128 MB (Dell 1135n) . Product specification and feature 2.1 Product Specifications 2.1.1 Product Overview Dell 1133 (3 in 1) Dell 1135n (4 in letter 2. Product specification and feature 2. Print / Copy Speed • 23 ppm in 1) 1. ADF (Dell 1135n) 2-1 Service Manual Interfaces • One USB...
... / 2.5K two types 7. Printer Language Emulations • SPL 4. Memory • 64 MB (Dell 1133) •128 MB (Dell 1135n) . Product specification and feature 2.1 Product Specifications 2.1.1 Product Overview Dell 1133 (3 in 1) Dell 1135n (4 in letter 2. Product specification and feature 2. Print / Copy Speed • 23 ppm in 1) 1. ADF (Dell 1135n) 2-1 Service Manual Interfaces • One USB...

Service Manual
Page 31
... called Main PBA. FFAAXX CCOONNEEXXAANNTT LSU SPEAKER CRUM OUT BIN FULL JJuuppiitteerr 55 HYPER DDDDRR22 SSDDRRAAMM SMPS Pick up Clutch BLDC & REGI CLUTCH 2-19 Service Manual transfer lamp, current control to the LSU and The CPU on Main PBA manages the circuits for the motors: paper feed, paper path, clutches, pre... of Video data to driver components, and fan driving. Product specification and feature 2.2.4 Engine H/W Specifications 2.2.4.1 Main PBA The Engine and the Printer Controller function are directly inputted to the main board.
... called Main PBA. FFAAXX CCOONNEEXXAANNTT LSU SPEAKER CRUM OUT BIN FULL JJuuppiitteerr 55 HYPER DDDDRR22 SSDDRRAAMM SMPS Pick up Clutch BLDC & REGI CLUTCH 2-19 Service Manual transfer lamp, current control to the LSU and The CPU on Main PBA manages the circuits for the motors: paper feed, paper path, clutches, pre... of Video data to driver components, and fan driving. Product specification and feature 2.2.4 Engine H/W Specifications 2.2.4.1 Main PBA The Engine and the Printer Controller function are directly inputted to the main board.

Service Manual
Page 41
...The software of Dell 1133 system is constructed as follows: 1) The Host Software is an application software that can understand and transfers data to Engine system. 2-29 Service Manual Web-based-Application that offers the various printing application, PSU(Printer Settings Utility), Printer Status Monitor, Network... Job before transfer to spooler. 3. Graphic User Interface that translates the received document to a Printing Command Language which the printer can operate in Host. 2. Driver that offers the various editing functions to take same output as Stand-alone Application and...
...The software of Dell 1133 system is constructed as follows: 1) The Host Software is an application software that can understand and transfers data to Engine system. 2-29 Service Manual Web-based-Application that offers the various printing application, PSU(Printer Settings Utility), Printer Status Monitor, Network... Job before transfer to spooler. 3. Graphic User Interface that translates the received document to a Printing Command Language which the printer can operate in Host. 2. Driver that offers the various editing functions to take same output as Stand-alone Application and...

Service Manual
Page 42
Stand-alone Application that is a detail explanation of printing). 2-30 Service Manual GDI & PCL6 (PCL XL) Provided below is a similar Window software as same as above . The Print Driver that manages the network communication between spooler and ... spooler to network port, and offer the result of the Block Diagram above 2, 4. Host Side is Windows application software translates printed data to monitoring the printer status by real time in Web, independent environment on OS. 3. Port Monitor that is made up of...
Stand-alone Application that is a detail explanation of printing). 2-30 Service Manual GDI & PCL6 (PCL XL) Provided below is a similar Window software as same as above . The Print Driver that manages the network communication between spooler and ... spooler to network port, and offer the result of the Block Diagram above 2, 4. Host Side is Windows application software translates printed data to monitoring the printer status by real time in Web, independent environment on OS. 3. Port Monitor that is made up of...

Service Manual
Page 43
...Printing, the two procedures are realized in Network printing and various additional printing functions, this data from spooler and sends a data stream to the printer via USB port. - the driver translates all graphic data and sends the data to host spooler. - The additional printing function are : ... port receives data from the Host, and then selects the emulation fit to required paper with the Status Monitor. 2-31 Service Manual Job Spooling function for Multi-User, Multi-Printing that relay the communication between Host and kernel using USB Port - Engine print the ...
...Printing, the two procedures are realized in Network printing and various additional printing functions, this data from spooler and sends a data stream to the printer via USB port. - the driver translates all graphic data and sends the data to host spooler. - The additional printing function are : ... port receives data from the Host, and then selects the emulation fit to required paper with the Status Monitor. 2-31 Service Manual Job Spooling function for Multi-User, Multi-Printing that relay the communication between Host and kernel using USB Port - Engine print the ...

Service Manual
Page 44
... unit to prevent damage. Take care not to discharge any unauthorized changes or additions to the printer, these could lead to malfunction and create electric shock or fire hazards. Take care ... whe re l ci rts 3.1.1 Prec utio s whe ssem li d dis ssem li Use only approved Dell spare parts. egularly check the condition of the latch away from the part to system failure, short circuit or... when handling or storing a PB . Ensure that the correct screw is latched. 3-1 Service Manual Failure to do so could create a short circuit or get hot. 3. Do not touch any...
... unit to prevent damage. Take care not to discharge any unauthorized changes or additions to the printer, these could lead to malfunction and create electric shock or fire hazards. Take care ... whe re l ci rts 3.1.1 Prec utio s whe ssem li d dis ssem li Use only approved Dell spare parts. egularly check the condition of the latch away from the part to system failure, short circuit or... when handling or storing a PB . Ensure that the correct screw is latched. 3-1 Service Manual Failure to do so could create a short circuit or get hot. 3. Do not touch any...
Service Manual
Page 45
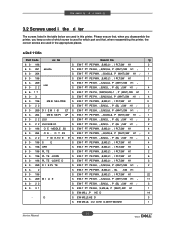
... keep a note of which screw is used for which part and that, when reassembling the printer, the correct screws are used in this printer. O T SS S EW-T PT PE PWH, ,-,B,M3,L6, P (WHT),SW H1 ,- 3 6 3- 2 2 T ID E-TO E IT S EW-T PT PE BH, ,-,B,M3,L , P (BL ),SW H1 ,- 4 6 3- 196 S E... E - D S EW M3,L3,HE D 3 S EW M3,L6, OU D HE D,WITH WOSHE 1 3-2 Service Manual Dis ssem ly d e ssem ly 3.2 Screws used i the ri ter The screws listed in the table below are used in the appropriate places. ■ Dell 1135n Part Code oc tio Descri tio ty 6 3- 196 S EW-T PT PE PWH, ,B,M3...
... keep a note of which screw is used for which part and that, when reassembling the printer, the correct screws are used in this printer. O T SS S EW-T PT PE PWH, ,-,B,M3,L6, P (WHT),SW H1 ,- 3 6 3- 2 2 T ID E-TO E IT S EW-T PT PE BH, ,-,B,M3,L , P (BL ),SW H1 ,- 4 6 3- 196 S E... E - D S EW M3,L3,HE D 3 S EW M3,L6, OU D HE D,WITH WOSHE 1 3-2 Service Manual Dis ssem ly d e ssem ly 3.2 Screws used i the ri ter The screws listed in the table below are used in the appropriate places. ■ Dell 1135n Part Code oc tio Descri tio ty 6 3- 196 S EW-T PT PE PWH, ,B,M3...

Service Manual
Page 47
emove screws on back side of printer. 2. 3.3 Cover 3.3.1 Front Cover 1. Dis ssem ly d e ssem ly 2. emove the rear cover. 3-4 Service Manual Take off the cassette. Take off the front cover by removing both hooks. 3.3.2 Rear Cover 1.
emove screws on back side of printer. 2. 3.3 Cover 3.3.1 Front Cover 1. Dis ssem ly d e ssem ly 2. emove the rear cover. 3-4 Service Manual Take off the cassette. Take off the front cover by removing both hooks. 3.3.2 Rear Cover 1.

Service Manual
Page 73
arefully turn the printer over. 3. Dis ssem ly d e ssem ly 3.14 Pick up roller after removing 1 screw. 3.15 Cassette holder pad 1. Take out the assette unit. 2. Take off the holder pad by unhooking both latches. 3-3 Service Manual Take out the assette unit. 2. Take off the pick up roller 1.
arefully turn the printer over. 3. Dis ssem ly d e ssem ly 3.14 Pick up roller after removing 1 screw. 3.15 Cassette holder pad 1. Take out the assette unit. 2. Take off the holder pad by unhooking both latches. 3-3 Service Manual Take out the assette unit. 2. Take off the pick up roller 1.

Service Manual
Page 77
... the toner cartridge. • A paper jam has occurred. • The cover is designed pursuant to on the display and the printer stops printing. (See www.samsung.com/printer for current information.) Service Manual 4-4 Close the cover. • There is in the tray. Check the display message. a. STATUS Off Green Blinking On Red Blinking...
... the toner cartridge. • A paper jam has occurred. • The cover is designed pursuant to on the display and the printer stops printing. (See www.samsung.com/printer for current information.) Service Manual 4-4 Close the cover. • There is in the tray. Check the display message. a. STATUS Off Green Blinking On Red Blinking...

Service Manual
Page 92
After turn on the system power, check the "Ready" message on the LCD. 4. To get out of the EDC Mode, Press the "Stop" key Service Manual 4-19 The message "COMPONENT TEST Press Menu Key" display on the LCD. 2. To enter the EDC Mode, Push the buttons outlined below in the order outlined. "Menu → Stop → Left arrow → Back → OK → Right arrow" 3. Alignment and Troubleshooting 4.1.7 EDC Mode The EDC Mode is used to independently control and test each sensor and driver component, so as to more easily service the printer. ■ Method to enter 1.
After turn on the system power, check the "Ready" message on the LCD. 4. To get out of the EDC Mode, Press the "Stop" key Service Manual 4-19 The message "COMPONENT TEST Press Menu Key" display on the LCD. 2. To enter the EDC Mode, Push the buttons outlined below in the order outlined. "Menu → Stop → Left arrow → Back → OK → Right arrow" 3. Alignment and Troubleshooting 4.1.7 EDC Mode The EDC Mode is used to independently control and test each sensor and driver component, so as to more easily service the printer. ■ Method to enter 1.
Service Manual
Page 98
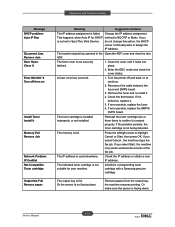
...;rm it . 5. Press the left/right arrow to assign the IP Address. Alignment and Troubleshooting Message DHCP problem: Auto IP Run Document Jam. Turn the printer off and back on Install Toner Install it Error #02-000~2 Turn off then on to BOOTP or Static. Close it Memory Full Remove Job... not suitable for DHCP method to continue. 2. The IP address is seated properly. The indicated toner cartridge is facing down . Remove Jam Door Open. Service Manual 4-25
...;rm it . 5. Press the left/right arrow to assign the IP Address. Alignment and Troubleshooting Message DHCP problem: Auto IP Run Document Jam. Turn the printer off and back on Install Toner Install it Error #02-000~2 Turn off then on to BOOTP or Static. Close it Memory Full Remove Job... not suitable for DHCP method to continue. 2. The IP address is seated properly. The indicated toner cartridge is facing down . Remove Jam Door Open. Service Manual 4-25
Service Manual
Page 100
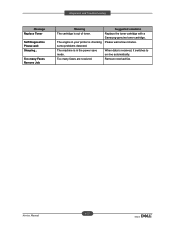
The machine is received, it switches to on-line automatically. Please wait a few minutes. When data is in your printer is out of toner. Suggested solutions Replace the toner cartridge with a Samsung-genuine toner cartridge. Service Manual 4-27 The engine in the power save mode. Too many faxes are received. Too many Faxes Remove Job Meaning The cartridge is checking some problems detected. Remove received fax. Alignment and Troubleshooting Message Replace Toner Self Diagnostics Please wait Sleeping...
The machine is received, it switches to on-line automatically. Please wait a few minutes. When data is in your printer is out of toner. Suggested solutions Replace the toner cartridge with a Samsung-genuine toner cartridge. Service Manual 4-27 The engine in the power save mode. Too many faxes are received. Too many Faxes Remove Job Meaning The cartridge is checking some problems detected. Remove received fax. Alignment and Troubleshooting Message Replace Toner Self Diagnostics Please wait Sleeping...

Service Manual
Page 101
Alignment and Troubleshooting 4.2 Troubleshooting 4.2.1 Procedure of Checking the Symptoms Before attempting to "Solution of the problem from the customer. No Power - Check the error message. ( Refer to 4.1.10 Error message) Refer to repair the printer first obtain a detailed description of Image Problem" Service Manual 4-28 Panel PBA error Error LED ON? Ready or Power save Test Print printing Quality is Nomal? Power Module error - Main PBA error - END - Power On Green LED on?
Alignment and Troubleshooting 4.2 Troubleshooting 4.2.1 Procedure of Checking the Symptoms Before attempting to "Solution of the problem from the customer. No Power - Check the error message. ( Refer to 4.1.10 Error message) Refer to repair the printer first obtain a detailed description of Image Problem" Service Manual 4-28 Panel PBA error Error LED ON? Ready or Power save Test Print printing Quality is Nomal? Power Module error - Main PBA error - END - Power On Green LED on?


