Brochure
Page 3
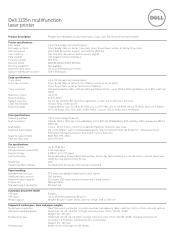
Dell 1135n multifunction laser printer Product description Reliable and affordable multifunction (print, copy, scan, fax) monochrome laser printer Printer specifications Print speed1 First page out time Print resolutions User interface Data streams Processor speed Memory (RAM) Memory expansion Maximum duty cycle Typical monthly print volume... 250 sheet via standard drawer and 1 sheet feeder Not available 251 sheets (250 sheet standard drawer and 1 sheet feeder) Manual duplex 80 sheet bin Automatic document feeder ADF type ADF input Media support Simplex Up to 22 A4 pages per minute (ppm...
Dell 1135n multifunction laser printer Product description Reliable and affordable multifunction (print, copy, scan, fax) monochrome laser printer Printer specifications Print speed1 First page out time Print resolutions User interface Data streams Processor speed Memory (RAM) Memory expansion Maximum duty cycle Typical monthly print volume... 250 sheet via standard drawer and 1 sheet feeder Not available 251 sheets (250 sheet standard drawer and 1 sheet feeder) Manual duplex 80 sheet bin Automatic document feeder ADF type ADF input Media support Simplex Up to 22 A4 pages per minute (ppm...

Service Manual
Page 8
...This printer should always be serviced by a qualified service technician. (2) Use only Dell replacement parts There are not considered to persons. Class I level during normal operation, user maintenance, or prescribed service condition. Warning >> Never operate or service the printer with the... U.S. to conform to the requirements of IEC 825. The reflected beam, although invisible, can damage your eyes. Service Manual 1-1 Precautions 1. High voltages and lasers inside the printer. The laser system and printer are dangerous. When using this product are...
...This printer should always be serviced by a qualified service technician. (2) Use only Dell replacement parts There are not considered to persons. Class I level during normal operation, user maintenance, or prescribed service condition. Warning >> Never operate or service the printer with the... U.S. to conform to the requirements of IEC 825. The reflected beam, although invisible, can damage your eyes. Service Manual 1-1 Precautions 1. High voltages and lasers inside the printer. The laser system and printer are dangerous. When using this product are...

Service Manual
Page 10
...especially the top cover) open window or close to note the exact location of parts and also cable routing before dismantling any user settings. Precautions 1.2.3 Handling Precautions The following procedures before dismantling the printer or replacing any parts. (1) Check the contents of ... any electrical parts. (3) Disconnect printer interface cables and power cables. (4) Only use Dell parts. Damage could cause the printer to scratch the green surface of the OPC Drum - Service Manual 1-3 These will result in such areas. (5) Do not place candles, burning cigarettes,...
...especially the top cover) open window or close to note the exact location of parts and also cable routing before dismantling any user settings. Precautions 1.2.3 Handling Precautions The following procedures before dismantling the printer or replacing any parts. (1) Check the contents of ... any electrical parts. (3) Disconnect printer interface cables and power cables. (4) Only use Dell parts. Damage could cause the printer to scratch the green surface of the OPC Drum - Service Manual 1-3 These will result in such areas. (5) Do not place candles, burning cigarettes,...
Service Manual
Page 17
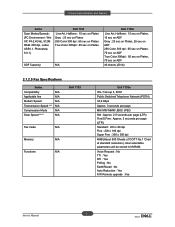
User selectable parameters will be stored in NVRAM. Product specification and feature Items Scan Modes/Speeds: (PC Environment : Win XP, P4-2.4GHz, 512M RAM, 300 dpi, Letter, USB1.1, Photoshop 6.0.1) Dell 1133 Line Art, Halftone : 15 sec on Platen Gray : 23 sec... on Platen 256 Color 300 dpi : 65 sec on Platen True Color 300dpi : 65 sec on Platen ADF Capacity: N/A Dell 1135n Line Art, Halftone : 15 sec on Platen, 15 sec on ADF Gray : 23 sec on Platen, 26 sec on ADF ... TTI : Yes RTI : Yes Polling :No Earth/Recall :No Auto Reduction : Yes F/W Remote upgrade :Yes 2Service Manual
User selectable parameters will be stored in NVRAM. Product specification and feature Items Scan Modes/Speeds: (PC Environment : Win XP, P4-2.4GHz, 512M RAM, 300 dpi, Letter, USB1.1, Photoshop 6.0.1) Dell 1133 Line Art, Halftone : 15 sec on Platen Gray : 23 sec... on Platen 256 Color 300 dpi : 65 sec on Platen True Color 300dpi : 65 sec on Platen ADF Capacity: N/A Dell 1135n Line Art, Halftone : 15 sec on Platen, 15 sec on ADF Gray : 23 sec on Platen, 26 sec on ADF ... TTI : Yes RTI : Yes Polling :No Earth/Recall :No Auto Reduction : Yes F/W Remote upgrade :Yes 2Service Manual

Service Manual
Page 28
A fuser power is cut off main power. Product specification and feature 6) Items for safety Protecting device for user, and attach a caution label at where customer can see easily when customer open a rear cover. 2-16 Service Manual Maintain a temperature of fuser cover's surface under 80ଇ for overheating - 1st protection device: Hardware cuts off when overheated - 2nd protection device: Software cuts off when overheated - 3rd protection device: Thermostat cuts off when a front cover is opened - Safety device -
A fuser power is cut off main power. Product specification and feature 6) Items for safety Protecting device for user, and attach a caution label at where customer can see easily when customer open a rear cover. 2-16 Service Manual Maintain a temperature of fuser cover's surface under 80ଇ for overheating - 1st protection device: Hardware cuts off when overheated - 2nd protection device: Software cuts off when overheated - 3rd protection device: Thermostat cuts off when a front cover is opened - Safety device -

Service Manual
Page 41
... Software is made up of Control flow and Printing Job before transfer to Engine system. 2-29 Service Manual Stand-alone Application that offers the various printing application, PSU(Printer Settings Utility), Printer Status Monitor, Network Management in Host. 2. Graphic... that offers the various editing functions to user in Window system. 4. Kernel that control and management the whole procedure include of : 1. Product specification and feature 2.2.6 S/W Descriptions 2.2.6.1 Overview The software of Dell 1133 system is constructed as follows: 1) The Host Software is an...
... Software is made up of Control flow and Printing Job before transfer to Engine system. 2-29 Service Manual Stand-alone Application that offers the various printing application, PSU(Printer Settings Utility), Printer Status Monitor, Network Management in Host. 2. Graphic... that offers the various editing functions to user in Window system. 4. Kernel that control and management the whole procedure include of : 1. Product specification and feature 2.2.6 S/W Descriptions 2.2.6.1 Overview The software of Dell 1133 system is constructed as follows: 1) The Host Software is an...

Service Manual
Page 43
...Network card and printing with the sequential developing process. After user starts to print their document to PCL string or compressed GDI... emulation job ends, Kernel sends the output bit-map data to end-user making the printing job with the sequential developing process. (2) Network Interface ...status to Engine using Printer Video Controller (by clock type for Multi-User, Multi-Printing that relay the communication between Host and kernel using USB...Kernel use max. 10 Queuing systems in a memory. After the user starts to print their document to Kernel part. - After emulation job...
...Network card and printing with the sequential developing process. After user starts to print their document to PCL string or compressed GDI... emulation job ends, Kernel sends the output bit-map data to end-user making the printing job with the sequential developing process. (2) Network Interface ...status to Engine using Printer Video Controller (by clock type for Multi-User, Multi-Printing that relay the communication between Host and kernel using USB...Kernel use max. 10 Queuing systems in a memory. After the user starts to print their document to Kernel part. - After emulation job...
Service Manual
Page 45
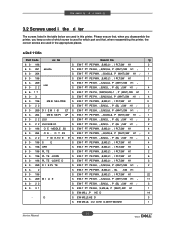
D S EW M3,L3,HE D 3 S EW M3,L6, OU D HE D,WITH WOSHE 1 3-2 Service Manual S EW-T PT PE BH, ,-,B,M3,L , P (BL ),SW H1 ,- 4 6 6- 1 7 S EW-T PT PE PH, ,WSP,B,M3,L1 , P (WHT),...ssem ly d e ssem ly 3.2 Screws used i the ri ter The screws listed in the table below are used in the appropriate places. ■ Dell 1135n Part Code oc tio Descri tio ty 6 3- 196 S EW-T PT PE PWH, ,B,M3,L1 , I PLT,SW H1 2 6 3- 261 assette...,-,B,M3,L6, P (WHT),SW H1 ,- 1 6 3- 196 S EW-T PT PE PWH, ,B,M3,L1 , I PLT,SW H1 1 6 3- 269 user 6 3- 2 2 S EW-T PT PE BH, ,-,S,M3,L6, P (WHT),SW H1 ,-
D S EW M3,L3,HE D 3 S EW M3,L6, OU D HE D,WITH WOSHE 1 3-2 Service Manual S EW-T PT PE BH, ,-,B,M3,L , P (BL ),SW H1 ,- 4 6 6- 1 7 S EW-T PT PE PH, ,WSP,B,M3,L1 , P (WHT),...ssem ly d e ssem ly 3.2 Screws used i the ri ter The screws listed in the table below are used in the appropriate places. ■ Dell 1135n Part Code oc tio Descri tio ty 6 3- 196 S EW-T PT PE PWH, ,B,M3,L1 , I PLT,SW H1 2 6 3- 261 assette...,-,B,M3,L6, P (WHT),SW H1 ,- 1 6 3- 196 S EW-T PT PE PWH, ,B,M3,L1 , I PLT,SW H1 1 6 3- 269 user 6 3- 2 2 S EW-T PT PE BH, ,-,S,M3,L6, P (WHT),SW H1 ,-
Service Manual
Page 46
... 11 6 3- 2 2 S EW-T PT PE BH, ,-,B,M3,L , P (BL ),SW H1 ,- 3 6 3- 3 1 S EW-T PT PE BH, ,S,M4,L6, P (WHT),SW H1 1 3-3 Service Manual Dis ssem ly d e ssem ly ■ Dell 1133 Part Code oc tio Descri tio ty 6 3- 196 S EW-T PT PE PWH, ,B,M3,L1 , I PLT,SW H1 2 6 3- 261 assette S EW-T PT... PE BH, ,-,B,M3,L6, P (WHT),SW H1 ,- 1 6 3- 264 S EW-T PT PE PWH, ,-,B,M3,L6, P (WHT),SW H1 ,- 1 6 3- 196 S EW-T PT PE PWH, ,B,M3,L1 , I PLT,SW H1 1 6 3- 269 user...
... 11 6 3- 2 2 S EW-T PT PE BH, ,-,B,M3,L , P (BL ),SW H1 ,- 3 6 3- 3 1 S EW-T PT PE BH, ,S,M4,L6, P (WHT),SW H1 1 3-3 Service Manual Dis ssem ly d e ssem ly ■ Dell 1133 Part Code oc tio Descri tio ty 6 3- 196 S EW-T PT PE PWH, ,B,M3,L1 , I PLT,SW H1 2 6 3- 261 assette S EW-T PT... PE BH, ,-,B,M3,L6, P (WHT),SW H1 ,- 1 6 3- 264 S EW-T PT PE PWH, ,-,B,M3,L6, P (WHT),SW H1 ,- 1 6 3- 196 S EW-T PT PE PWH, ,B,M3,L1 , I PLT,SW H1 1 6 3- 269 user...

Service Manual
Page 55
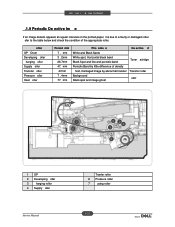
emove the rear and left cover. 2. Take off the user unit. 3-12 Service Manual Dis ssem ly d e ssem ly 3.6 Fuser Unit 3.6.1 Whole Fuser Unit 1. Unplug the 2 connectors from SMPS board and Main board. 4. emove 4 screws. 3.
emove the rear and left cover. 2. Take off the user unit. 3-12 Service Manual Dis ssem ly d e ssem ly 3.6 Fuser Unit 3.6.1 Whole Fuser Unit 1. Unplug the 2 connectors from SMPS board and Main board. 4. emove 4 screws. 3.
Service Manual
Page 61
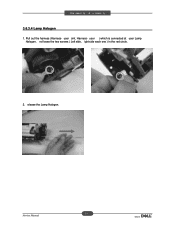
Pull out the harness (Harness- nd loose the two screws ( Left side, ight side each one ) in the red circle. 2. user ) which is connected at user Lamp Halogen. elease the Lamp Halogen. 3-1 Service Manual Dis ssem ly d e ssem ly 3.6.3.4 Lamp HalogenG 1. user oint, Harness-
Pull out the harness (Harness- nd loose the two screws ( Left side, ight side each one ) in the red circle. 2. user ) which is connected at user Lamp Halogen. elease the Lamp Halogen. 3-1 Service Manual Dis ssem ly d e ssem ly 3.6.3.4 Lamp HalogenG 1. user oint, Harness-
Service Manual
Page 62
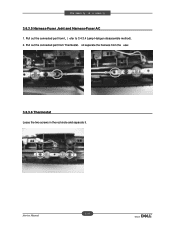
Pull out the connected part from the user. # 3.6.3.6 Thermostat Loose the two screws in the red circle and separate it. 3-19 Service Manual Dis ssem ly d e ssem ly 3.6.3.5 Harness-Fuser Joint and Harness-Fuser AC 1. nd separate the harness from Thermostat. Pull out the connected part from L ( efer to 3.4.3.4 Lamp-Halogen disassemble method). 2.
Pull out the connected part from the user. # 3.6.3.6 Thermostat Loose the two screws in the red circle and separate it. 3-19 Service Manual Dis ssem ly d e ssem ly 3.6.3.5 Harness-Fuser Joint and Harness-Fuser AC 1. nd separate the harness from Thermostat. Pull out the connected part from L ( efer to 3.4.3.4 Lamp-Halogen disassemble method). 2.
Service Manual
Page 64
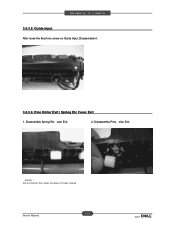
oller Exit. aution : Do not touch the roller surface of fuser inside 3-21 Service Manual Pmo Roller Exit / Spring Etc Fuser ExitG 1. Disassemble Spring-Etc user Exit. 2. Disassemble Pmo- Guide InputG After loose the fixed one screw on Guide Input, Disassemble it. 3.6.3.9. Dis ssem ly d e ssem ly 3.6.3.8.
oller Exit. aution : Do not touch the roller surface of fuser inside 3-21 Service Manual Pmo Roller Exit / Spring Etc Fuser ExitG 1. Disassemble Spring-Etc user Exit. 2. Disassemble Pmo- Guide InputG After loose the fixed one screw on Guide Input, Disassemble it. 3.6.3.9. Dis ssem ly d e ssem ly 3.6.3.8.

Service Manual
Page 75
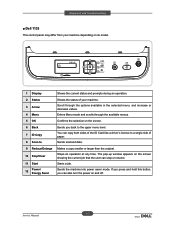
The pop-up window appears on the screen showing the current job that the user can also turn the power on the screen. 11 Back 12 Numeric keypad 13 Address Book 14 Redial/Pause 15 On Hook Dial Sends you ... same as you hold this button, you can stop or resume. In standby mode, redials the last number. Stops an operation at any time. Service Manual 4-2 Dials fax number, and enters the number value for stored fax numbers or email addresses. If you press and hold a handset under the telephone line...
The pop-up window appears on the screen showing the current job that the user can also turn the power on the screen. 11 Back 12 Numeric keypad 13 Address Book 14 Redial/Pause 15 On Hook Dial Sends you ... same as you hold this button, you can stop or resume. In standby mode, redials the last number. Stops an operation at any time. Service Manual 4-2 Dials fax number, and enters the number value for stored fax numbers or email addresses. If you press and hold a handset under the telephone line...
Service Manual
Page 76
... side of paper. Confirms the selection on the screen. The pop-up window appears on the screen showing the current job that the user can also turn the power on and off. Sends the machine into power saver mode. Scroll through the available menus. You can copy both sides... decrease values. Stops an operation at any time. Starts a job. If you press and hold this button, you back to the upper menu level. Service Manual 4-3 Alignment and Troubleshooting ■ Dell 1133 This control panel may differ from your machine.
... side of paper. Confirms the selection on the screen. The pop-up window appears on the screen showing the current job that the user can also turn the power on and off. Sends the machine into power saver mode. Scroll through the available menus. You can copy both sides... decrease values. Stops an operation at any time. Starts a job. If you press and hold this button, you back to the upper menu level. Service Manual 4-3 Alignment and Troubleshooting ■ Dell 1133 This control panel may differ from your machine.
Service Manual
Page 87
... you perform this function, at printing, the setting value for better transmission/reception by the user, will be under -12 dBm. This ensures that the error rate remains below the set 33.6Kbps as default setting. Service Manual 4-14 Toner Low Level The function is a setting value of the transmission signal. Never...
... you perform this function, at printing, the setting value for better transmission/reception by the user, will be under -12 dBm. This ensures that the error rate remains below the set 33.6Kbps as default setting. Service Manual 4-14 Toner Low Level The function is a setting value of the transmission signal. Never...
Service Manual
Page 89
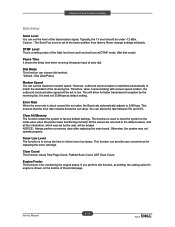
Dell 1135n Service Manual 4-16 You may print this list to confirm your changes after changing settings. - Alignment and Troubleshooting Report ■ Configuration Report This report shows the status of the user-selectable options.
Dell 1135n Service Manual 4-16 You may print this list to confirm your changes after changing settings. - Alignment and Troubleshooting Report ■ Configuration Report This report shows the status of the user-selectable options.
Service Manual
Page 96
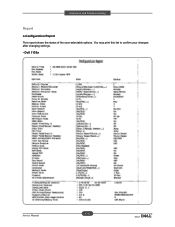
... and Black Spots White spot, Horizontal black band Black Spot and line and periodic band Toner artridge Periodic Band by abnormal transfer Transfer roller Background user Black spot and image ghost 7 32 4 6 1 5 1 OP 2 Developing oller 3 harging roller 4 Supply oller Service Manual Tranfer roller 6 Pressure roller 7 using roller 4-23
... and Black Spots White spot, Horizontal black band Black Spot and line and periodic band Toner artridge Periodic Band by abnormal transfer Transfer roller Background user Black spot and image ghost 7 32 4 6 1 5 1 OP 2 Developing oller 3 harging roller 4 Supply oller Service Manual Tranfer roller 6 Pressure roller 7 using roller 4-23

Service Manual
Page 151
Check if the driver is not so, reinstall it. (Refer to User's Manual.) If copy function works, replace the Main PBA. Service Manual 4-78 After confirming that it is proper by performing a PC printing test related to driver setup, if it . If copy function doesn't work, replace the ...
Check if the driver is not so, reinstall it. (Refer to User's Manual.) If copy function works, replace the Main PBA. Service Manual 4-78 After confirming that it is proper by performing a PC printing test related to driver setup, if it . If copy function doesn't work, replace the ...
Service Manual
Page 152
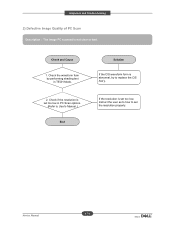
Alignment and Troubleshooting 2) Defective Image Quality of PC Scan Description : The image PC scanned is set too low, Instruct the user as to how to set too low in TECH Mode. 2. If the resolution is not clear or bad. 1. Check if the resolution is set the resolution properly. Service Manual 4-79 Check the waveform form by performing shading test in PC Scan options. (Refer to User's Manual.) If the CIS waveform form is abnormal, try to replace the CIS Ass'y.
Alignment and Troubleshooting 2) Defective Image Quality of PC Scan Description : The image PC scanned is set too low, Instruct the user as to how to set too low in TECH Mode. 2. If the resolution is not clear or bad. 1. Check if the resolution is set the resolution properly. Service Manual 4-79 Check the waveform form by performing shading test in PC Scan options. (Refer to User's Manual.) If the CIS waveform form is abnormal, try to replace the CIS Ass'y.


