Installation Guide
Page 2
D-Link DXS-3250/DXS-3227P/DXS-3227 User Guide Table of Contents Preface...5 DXS-3250/DXS-3227P/DXS-3227 User Guide Overview 6 Intended Audience ...7 Device Description ...9 Viewing the Device...10 Ports Description...12 Cable Specifications...14 LED ...Preparing for Installation ...22 Installing the Device ...24 Connecting the Device ...27 Initial Configuration ...29 General Configuration Information 29 Booting the Switch ...30 Stacking Configuration ...32 Configuration Overview...33 Advanced Configuration...36 Software Download and Reboot 39 Startup Menu Functions ...41 Getting Started...45...
D-Link DXS-3250/DXS-3227P/DXS-3227 User Guide Table of Contents Preface...5 DXS-3250/DXS-3227P/DXS-3227 User Guide Overview 6 Intended Audience ...7 Device Description ...9 Viewing the Device...10 Ports Description...12 Cable Specifications...14 LED ...Preparing for Installation ...22 Installing the Device ...24 Connecting the Device ...27 Initial Configuration ...29 General Configuration Information 29 Booting the Switch ...30 Stacking Configuration ...32 Configuration Overview...33 Advanced Configuration...36 Software Download and Reboot 39 Startup Menu Functions ...41 Getting Started...45...

Installation Guide
Page 4
D-Link DXS-3250/DXS-3227P/DXS-3227 User Guide Defining Multicast Bridging Groups 170 Managing System Files...174 File Management Overview ...175 Downloading System Files...17 Uploading System Files ...177 Activating ...
D-Link DXS-3250/DXS-3227P/DXS-3227 User Guide Defining Multicast Bridging Groups 170 Managing System Files...174 File Management Overview ...175 Downloading System Files...17 Uploading System Files ...177 Activating ...

Installation Guide
Page 6
... Interface User Guide, and includes the following sections: • DXS-3250/DXS-3227P/DXS-3227 User Guide Overview • Intended Audience Page 5 In addition, The D-Link Embedded Web Interface provides real time graphs and RMON statistics to help system administrators monitor network performance. D-Link DXS-3250/DXS-3227P/DXS-3227 User Guide Preface The Embedded Web System (EWS) is a network...
... Interface User Guide, and includes the following sections: • DXS-3250/DXS-3227P/DXS-3227 User Guide Overview • Intended Audience Page 5 In addition, The D-Link Embedded Web Interface provides real time graphs and RMON statistics to help system administrators monitor network performance. D-Link DXS-3250/DXS-3227P/DXS-3227 User Guide Preface The Embedded Web System (EWS) is a network...
Installation Guide
Page 7
...Guide • Using the Embedded Web Interface User Guide Using the Installation Guide This section provides an overview of the D-Link DXS-3250/DXS-3227P/DXS-3227 Installation Guide, which includes the following sections: • Section 4. Provides information for managing stacked devices, includuing ...Provides a system description including the hardware components. • Section 2. Defining the Forwarding Database - Preface DXS-3250/DXS-3227P/DXS-3227 User Guide Overview DXS-3250/DXS-3227P/DXS-3227 User Guide Overview This user guide is divided into the following sections to the...
...Guide • Using the Embedded Web Interface User Guide Using the Installation Guide This section provides an overview of the D-Link DXS-3250/DXS-3227P/DXS-3227 Installation Guide, which includes the following sections: • Section 4. Provides information for managing stacked devices, includuing ...Provides a system description including the hardware components. • Section 2. Defining the Forwarding Database - Preface DXS-3250/DXS-3227P/DXS-3227 User Guide Overview DXS-3250/DXS-3227P/DXS-3227 User Guide Overview This user guide is divided into the following sections to the...

Installation Guide
Page 8
... viewing device statistics, including RMON sta- Configuring System Time - Page 7 Managing Device Diagnostics - Provides basic troubleshooting for network administrators familiar with IT concepts and terminology. D-Link DXS-3250/DXS-3227P/DXS-3227 User Guide • Section 16.
... viewing device statistics, including RMON sta- Configuring System Time - Page 7 Managing Device Diagnostics - Provides basic troubleshooting for network administrators familiar with IT concepts and terminology. D-Link DXS-3250/DXS-3227P/DXS-3227 User Guide • Section 16.

Installation Guide
Page 10
D-Link DXS-3250/DXS-3227P/DXS-3227 User Guide Section 1. Device Description This section contains a description of the D-Link DXS-3250 and D-Link DXS-3227, and contains the following topics: • Viewing the Device • Ports Description • Cable Specifications • LED Defiitions • Cable, Port, and Pinout Information • Physical Dimensions Page 9
D-Link DXS-3250/DXS-3227P/DXS-3227 User Guide Section 1. Device Description This section contains a description of the D-Link DXS-3250 and D-Link DXS-3227, and contains the following topics: • Viewing the Device • Ports Description • Cable Specifications • LED Defiitions • Cable, Port, and Pinout Information • Physical Dimensions Page 9

Installation Guide
Page 11
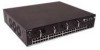
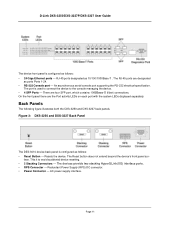
... 4 SFP Ports on the front panel for the following: • DXS-3250 Front Panel • DXS-3227 Front Panel • Back Panels DXS-3250 Front Panel The D-Link DXS-3250 is configured as 10/100/1000Base-T . Figure 1: DXS-3250 Front Panel The device front panel is a 48 port Gigabit Ethernet Managed Switch. RJ-45 ports designated as follows: • 48 Giga...
... 4 SFP Ports on the front panel for the following: • DXS-3250 Front Panel • DXS-3227 Front Panel • Back Panels DXS-3250 Front Panel The D-Link DXS-3250 is configured as 10/100/1000Base-T . Figure 1: DXS-3250 Front Panel The device front panel is a 48 port Gigabit Ethernet Managed Switch. RJ-45 ports designated as follows: • 48 Giga...
Installation Guide
Page 12
... • 24 Giga Ethernet ports - Figure 3: DXS-3250 and DXS-3227 Back Panel The DES-3010 device back panel is used to connect the device to avoid accidental device resetting. • 2 Stacking Connectors - The devices provide two stacking HyperG.Link(XG) interface ports. • RPS Connector - ...managing the device. • 4 SFP Ports - RJ-45 ports designated as ports Ports 1-24. • RS-232 Console port - D-Link DXS-3250/DXS-3227P/DXS-3227 User Guide The device front panel is configured as follows: • Reset Button - There are the Port activity LEDs on each port ...
... • 24 Giga Ethernet ports - Figure 3: DXS-3250 and DXS-3227 Back Panel The DES-3010 device back panel is used to connect the device to avoid accidental device resetting. • 2 Stacking Connectors - The devices provide two stacking HyperG.Link(XG) interface ports. • RPS Connector - ...managing the device. • 4 SFP Ports - RJ-45 ports designated as ports Ports 1-24. • RS-232 Console port - D-Link DXS-3250/DXS-3227P/DXS-3227 User Guide The device front panel is configured as follows: • Reset Button - There are the Port activity LEDs on each port ...

Installation Guide
Page 14
... change the rate from 115200 down to a console managing the device. A 4X to 4X Infidband Cable is used to connect devices in the stacking configuration. D-Link DXS-3250/DXS-3227P/DXS-3227 User Guide Stacking Ports The device provides two stacking HyperG...
... change the rate from 115200 down to a console managing the device. A 4X to 4X Infidband Cable is used to connect devices in the stacking configuration. D-Link DXS-3250/DXS-3227P/DXS-3227 User Guide Stacking Ports The device provides two stacking HyperG...
Installation Guide
Page 16
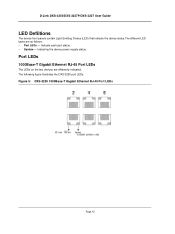
D-Link DXS-3250/DXS-3227P/DXS-3227 User Guide LED Defiitions The device front panels contain Light Emitting Diodes (LED) that indicate the device status.The different LED types are differently indicated. Indicating the device power supply status. The following figure illustrates the DXS-3250 port LEDs. Figure 5: DXS-3250 1000Base-T Gigabit Ethernet RJ-45 Port LEDs Page 15 Port LEDs 1000Base-T Gigabit Ethernet RJ-45 Port LEDs The LEDs on the two devices are as follows: • Port LEDs - Indicate each port status. • System -
D-Link DXS-3250/DXS-3227P/DXS-3227 User Guide LED Defiitions The device front panels contain Light Emitting Diodes (LED) that indicate the device status.The different LED types are differently indicated. Indicating the device power supply status. The following figure illustrates the DXS-3250 port LEDs. Figure 5: DXS-3250 1000Base-T Gigabit Ethernet RJ-45 Port LEDs Page 15 Port LEDs 1000Base-T Gigabit Ethernet RJ-45 Port LEDs The LEDs on the two devices are as follows: • Port LEDs - Indicate each port status. • System -
Installation Guide
Page 18
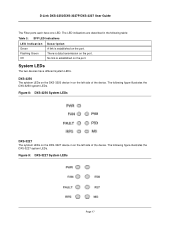
...of the device. Figure 9: DXS-3227 System LEDs Page 17 The LED indications are described in on the port. No link is data transmission on the left side of the device. The following figure illustrates the DXS-3250 system LEDs. D-Link DXS-3250/DXS-3227P/DXS-3227 User Guide The Fiber ...ports each have different system LEDs. DXS-3250 The sytstem LEDs on the port. ...
...of the device. Figure 9: DXS-3227 System LEDs Page 17 The LED indications are described in on the port. No link is data transmission on the left side of the device. The following figure illustrates the DXS-3250 system LEDs. D-Link DXS-3250/DXS-3227P/DXS-3227 User Guide The Fiber ...ports each have different system LEDs. DXS-3250 The sytstem LEDs on the port. ...
Installation Guide
Page 20
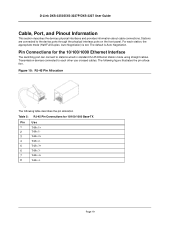
... for the 10/100/1000 Ethernet Interface The switching port can connect to each station, the appropriate mode (Half/Full Duplex, Auto Negotiation) is Auto Negotiation. Stations are connected to the device ports through the physical interface ports on the front panel. D-Link DXS-3250/DXS-3227P/DXS-3227 User Guide Cable, Port, and Pinout Information...
... for the 10/100/1000 Ethernet Interface The switching port can connect to each station, the appropriate mode (Half/Full Duplex, Auto Negotiation) is Auto Negotiation. Stations are connected to the device ports through the physical interface ports on the front panel. D-Link DXS-3250/DXS-3227P/DXS-3227 User Guide Cable, Port, and Pinout Information...

Installation Guide
Page 22
Mounting Device This section contains information for installing the device, and includes the following sections: • Preparing for Installation • Installing the Device • Connecting the Device • Rack Installation Page 21 D-Link DXS-3250/DXS-3227P/DXS-3227 User Guide Section 2.
Mounting Device This section contains information for installing the device, and includes the following sections: • Preparing for Installation • Installing the Device • Connecting the Device • Rack Installation Page 21 D-Link DXS-3250/DXS-3227P/DXS-3227 User Guide Section 2.

Installation Guide
Page 24
...feet with adhesive backing • Rack kit • An AC power cable • Console RS-232 cable with the device. 2. D-Link DXS-3250/DXS-3227P/DXS-3227 User Guide • Ambient Requirements - Open the container. 4. An ESD strap is recommended to put on an ESD wrist strap...surface. 5. Inspect the product for damage. The ambient unit operating temperature range is found missing or damaged, please contact your local D-Link reseller for unpacking the device, and includes the following topics: • Package Contents • Unpacking Essentials Package Contents While unpacking the...
...feet with adhesive backing • Rack kit • An AC power cable • Console RS-232 cable with the device. 2. D-Link DXS-3250/DXS-3227P/DXS-3227 User Guide • Ambient Requirements - Open the container. 4. An ESD strap is recommended to put on an ESD wrist strap...surface. 5. Inspect the product for damage. The ambient unit operating temperature range is found missing or damaged, please contact your local D-Link reseller for unpacking the device, and includes the following topics: • Package Contents • Unpacking Essentials Package Contents While unpacking the...
Installation Guide
Page 26
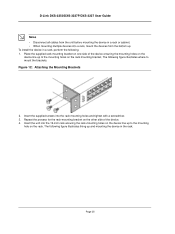
... 2. To install the device in the rack. Insert the unit into the 19-inch rack ensuring the rack-mounting holes on the device line up . D-Link DXS-3250/DXS-3227P/DXS-3227 User Guide Notes • Disconnect all cables from the unit before mounting the device in a rack or cabinet. • When mounting multiple devices...
... 2. To install the device in the rack. Insert the unit into the 19-inch rack ensuring the rack-mounting holes on the device line up . D-Link DXS-3250/DXS-3227P/DXS-3227 User Guide Notes • Disconnect all cables from the unit before mounting the device in a rack or cabinet. • When mounting multiple devices...
Installation Guide
Page 28
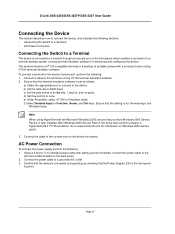
.... 2. f) Select Terminal keys for Emulation mode. Connect the power cable to 9600 baud. D-Link DXS-3250/DXS-3227P/DXS-3227 User Guide Connecting the Device This section describes how to connect the device, and includes the following sections: • Connecting the Switch to a Terminal • AC Power Connection Connecting the Switch to a Terminal The device is green.
.... 2. f) Select Terminal keys for Emulation mode. Connect the power cable to 9600 baud. D-Link DXS-3250/DXS-3227P/DXS-3227 User Guide Connecting the Device This section describes how to connect the device, and includes the following sections: • Connecting the Switch to a Terminal • AC Power Connection Connecting the Switch to a Terminal The device is green.
Installation Guide
Page 31
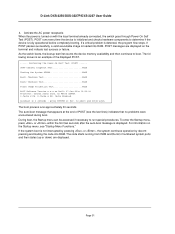
...seconds. During boot, the Startup menu can be accessed if necessary to abort and enter prom. If the system boot is loaded into RAM. D-Link DXS-3250/DXS-3227P/DXS-3227 User Guide 4. The following screen is displayed. To enter the Startup menu, press or within the first two seconds after the auto-boot ... messages are displayed. D-Cache 8 KB. If a critical problem is detected, the program flow stops. For information on with the local terminal already connected, the switch goes through Power On Self Test (POST). Page 31 Activate the AC power receptacle. press RETURN or Esc.
...seconds. During boot, the Startup menu can be accessed if necessary to abort and enter prom. If the system boot is loaded into RAM. D-Link DXS-3250/DXS-3227P/DXS-3227 User Guide 4. The following screen is displayed. To enter the Startup menu, press or within the first two seconds after the auto-boot ... messages are displayed. D-Cache 8 KB. If a critical problem is detected, the program flow stops. For information on with the local terminal already connected, the switch goes through Power On Self Test (POST). Page 31 Activate the AC power receptacle. press RETURN or Esc.
Installation Guide
Page 33
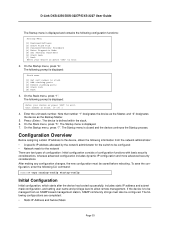
The Startup menu is displayed and contains the following prompt is displayed. 7. D-Link DXS-3250/DXS-3227P/DXS-3227 User Guide The Startup menu is closed and the device continues the Startup process. The following configuration functions: Startup Menu [1]...the following prompt is to be managed from the network administrator: • A specific IP address allocated by the network administrator for the switch to allow remote management. The following CLI command: Console# copy running-config startup-config Initial Configuration Initial configuration, which starts after the device...
The Startup menu is displayed and contains the following prompt is displayed. 7. D-Link DXS-3250/DXS-3227P/DXS-3227 User Guide The Startup menu is closed and the device continues the Startup process. The following configuration functions: Startup Menu [1]...the following prompt is to be managed from the network administrator: • A specific IP address allocated by the network administrator for the switch to allow remote management. The following CLI command: Console# copy running-config startup-config Initial Configuration Initial configuration, which starts after the device...
Installation Guide
Page 35
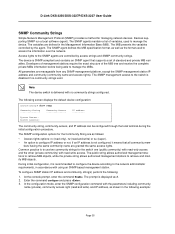
... except the SNMP management station IP address and community (community name and access rights). The SNMP management access to the switch is disabled if no community strings configured. The MIB presents the variables controlled by access strings and SNMP community strings. ...receive the complete private MIBs information before being able to manage the MIBs. At the console prompt, enter the command Enable. D-Link DXS-3250/DXS-3227P/DXS-3227 User Guide SNMP Community Strings Simple Network Management Protocol (SNMP) provides a method for the Community String are as follows:...
... except the SNMP management station IP address and community (community name and access rights). The SNMP management access to the switch is disabled if no community strings configured. The MIB presents the variables controlled by access strings and SNMP community strings. ...receive the complete private MIBs information before being able to manage the MIBs. At the console prompt, enter the command Enable. D-Link DXS-3250/DXS-3227P/DXS-3227 User Guide SNMP Community Strings Simple Network Management Protocol (SNMP) provides a method for the Community String are as follows:...
Installation Guide
Page 37
...Security Management and Password Configuration System security is delivered with an IP address. Page 37 In this instance, the switch retrieves the new configuration file and boots from the Startup menu. The device reboots with an identical configuration. When ... password is lost, a password recovery procedure can be deleted to retrieve the IP address. 2. all passwords are user-defined. D-Link DXS-3250/DXS-3227P/DXS-3227 User Guide -------10.7.1.1 -----Static Active IP address Interface Type Directed Broadcast -------- 10.7.1.192/24 VLAN 1 Static Notes: 1....
...Security Management and Password Configuration System security is delivered with an IP address. Page 37 In this instance, the switch retrieves the new configuration file and boots from the Startup menu. The device reboots with an identical configuration. When ... password is lost, a password recovery procedure can be deleted to retrieve the IP address. 2. all passwords are user-defined. D-Link DXS-3250/DXS-3227P/DXS-3227 User Guide -------10.7.1.1 -----Static Active IP address Interface Type Directed Broadcast -------- 10.7.1.192/24 VLAN 1 Static Notes: 1....


