
Product Manual
Page 7
... managing and configuring - No MAC addresses needed. Fully compatible with the IEEE 802.11b standard and interoperable with the setup wizard. Just click on IEEE Standard 802.11g specifications. Network conditions and environmental factors, including volume of the operating system...Easy setup with all existing 802.11b compliant devices. Actual data throughput will vary. With a maximum wireless signal rate of your wireless network. Features and Benefits Extends the range of up to 54Mbps* with the Site Survey tool. Simple configuration with AirPlus G Products, the DWL-G710 delivers ...
... managing and configuring - No MAC addresses needed. Fully compatible with the IEEE 802.11b standard and interoperable with the setup wizard. Just click on IEEE Standard 802.11g specifications. Network conditions and environmental factors, including volume of the operating system...Easy setup with all existing 802.11b compliant devices. Actual data throughput will vary. With a maximum wireless signal rate of your wireless network. Features and Benefits Extends the range of up to 54Mbps* with the Site Survey tool. Simple configuration with AirPlus G Products, the DWL-G710 delivers ...
Product Manual
Page 13
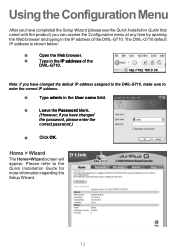
...192.168.0.30 Note: if you have changed the default IP address assigned to the DWL-G710, make sure to the Quick Installation Guide for more information regarding the Setup Wizard. 13 Home > Wizard The Home>Wizard screen will appear. Leave the Password blank. (However, if you can access the Configuration...refer to enter the correct IP address. Type admin in the IP address of the DWL-G710. Type in the User name field. Using the Configuration Menu After you have completed the Setup Wizard (please see the Quick Installation Guide that came with the product) you have changed ...
...192.168.0.30 Note: if you have changed the default IP address assigned to the DWL-G710, make sure to the Quick Installation Guide for more information regarding the Setup Wizard. 13 Home > Wizard The Home>Wizard screen will appear. Leave the Password blank. (However, if you can access the Configuration...refer to enter the correct IP address. Type admin in the IP address of the DWL-G710. Type in the User name field. Using the Configuration Menu After you have completed the Setup Wizard (please see the Quick Installation Guide that came with the product) you have changed ...
Product Manual
Page 19
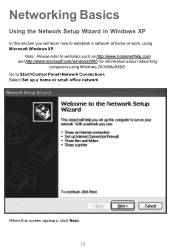
Networking Basics Using the Network Setup Wizard in Windows XP In this screen appears, click Next. 19 Go to Start>Control Panel>Network Connections Select Set up a home or small office network When this section you will learn how to websites such as http://www.homenethelp.com and http://www.microsoft.com/windows2000 for information about networking computers using Microsoft Windows XP. Note: Please refer to establish a network at home or work, using Windows 2000/Me/98SE.
Networking Basics Using the Network Setup Wizard in Windows XP In this screen appears, click Next. 19 Go to Start>Control Panel>Network Connections Select Set up a home or small office network When this section you will learn how to websites such as http://www.homenethelp.com and http://www.microsoft.com/windows2000 for information about networking computers using Microsoft Windows XP. Note: Please refer to establish a network at home or work, using Windows 2000/Me/98SE.
Product Manual
Page 22
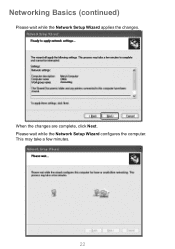
This may take a few minutes. 22 Please wait while the Network Setup Wizard configures the computer. Networking Basics (continued) Please wait while the Network Setup Wizard applies the changes. When the changes are complete, click Next.
This may take a few minutes. 22 Please wait while the Network Setup Wizard configures the computer. Networking Basics (continued) Please wait while the Network Setup Wizard applies the changes. When the changes are complete, click Next.
Product Manual
Page 24
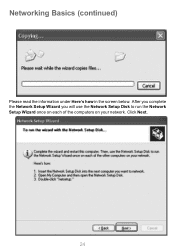
Click Next. 24 After you complete the Network Setup Wizard you will use the Network Setup Disk to run the Network Setup Wizard once on each of the computers on your network. Networking Basics (continued) Please read the information under Here's how in the screen below.
Click Next. 24 After you complete the Network Setup Wizard you will use the Network Setup Disk to run the Network Setup Wizard once on each of the computers on your network. Networking Basics (continued) Please read the information under Here's how in the screen below.

Product Manual
Page 25
Next, you restart the computer. After running the Network Setup Disk on all the other computers on your network. Networking Basics (continued) Please read the information on this computer. The new settings will take effect when you will be ready to run the Network Setup Disk on all your computers, your new wireless network will need to use. 25 Click Yes to complete the Network Setup Wizard. You have completed configuring this screen, then click Finish to restart the computer.
Next, you restart the computer. After running the Network Setup Disk on all the other computers on your network. Networking Basics (continued) Please read the information on this computer. The new settings will take effect when you will be ready to run the Network Setup Disk on all your computers, your new wireless network will need to use. 25 Click Yes to complete the Network Setup Wizard. You have completed configuring this screen, then click Finish to restart the computer.

