
Product Manual
Page 2
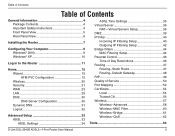
... XP 10 Log in to the Router 11 Home 12 Wizard 12 ATM PVC Configuration 12 Wireless 20 Security 21 WAN 23 LAN 29 DNS 30 DNS Server Configuration 30 Dynamic DNS 31 Logout 32 Advanced Setup 33 ADSL 33 ADSL Settings 34 ADSL...Setup 44 Parental Control 46 Time of Day Restrictions 46 Routing 47 Routing--Static Route 47 Routing--Default Gateway 48 RIP 49 Quality of Service 50 Port Mapping 52 Certificate 54 Local 54 Trusted CA 56 Wireless 57 Wireless--Advanced 58 Wireless--MAC Filter 60 Wireless--Bridge 61 Wireless--QoS 62 Tools 63 D-Link DSL-2640B ADSL2+ 4-Port Router...
... XP 10 Log in to the Router 11 Home 12 Wizard 12 ATM PVC Configuration 12 Wireless 20 Security 21 WAN 23 LAN 29 DNS 30 DNS Server Configuration 30 Dynamic DNS 31 Logout 32 Advanced Setup 33 ADSL 33 ADSL Settings 34 ADSL...Setup 44 Parental Control 46 Time of Day Restrictions 46 Routing 47 Routing--Static Route 47 Routing--Default Gateway 48 RIP 49 Quality of Service 50 Port Mapping 52 Certificate 54 Local 54 Trusted CA 56 Wireless 57 Wireless--Advanced 58 Wireless--MAC Filter 60 Wireless--Bridge 61 Wireless--QoS 62 Tools 63 D-Link DSL-2640B ADSL2+ 4-Port Router...

Product Manual
Page 12
... steps to access the Internet. D-Link DSL-2640B ADSL2+ 4-Port Router User Manual 12 To continue, click on the box labeled DSL Auto-connect, a process that will explain how to quickly configure the router if your only intention is to quickly set up your router for each. The below sections explain the setup for Internet connection. Also included in...
... steps to access the Internet. D-Link DSL-2640B ADSL2+ 4-Port Router User Manual 12 To continue, click on the box labeled DSL Auto-connect, a process that will explain how to quickly configure the router if your only intention is to quickly set up your router for each. The below sections explain the setup for Internet connection. Also included in...

Product Manual
Page 19
Home After all WAN configurations are correct before clicking on Save / Reboot will save your settings and restart your router. Check that the settings are complete, the WAN Setup Summary screen displays all WAN settings that you have made. D-Link DSL-2640B ADSL2+ 4-Port Router User Manual 19 Clicking on the Save / Reboot button. Section 5 -
Home After all WAN configurations are correct before clicking on Save / Reboot will save your settings and restart your router. Check that the settings are complete, the WAN Setup Summary screen displays all WAN settings that you have made. D-Link DSL-2640B ADSL2+ 4-Port Router User Manual 19 Clicking on the Save / Reboot button. Section 5 -
Product Manual
Page 28
Close the DSL Configuration window and wait at least two minutes before reopening your web browser. Select the Finish button to the WAN Setup screen showing the new configuration. When the router restarts the DSL Router Reboot screen will return you to save the changes and reboot the router. Section 5 - D-Link DSL-2640B ADSL2+ 4-Port Router User Manual 28 Home After you apply the configuration, it will appear during the reboot process.
Close the DSL Configuration window and wait at least two minutes before reopening your web browser. Select the Finish button to the WAN Setup screen showing the new configuration. When the router restarts the DSL Router Reboot screen will return you to save the changes and reboot the router. Section 5 - D-Link DSL-2640B ADSL2+ 4-Port Router User Manual 28 Home After you apply the configuration, it will appear during the reboot process.

Product Manual
Page 32
A confirmation screen will appear confirming that you really want to log out. D-Link DSL-2640B ADSL2+ 4-Port Router User Manual 32 Section 5 - Home Logout To log out of the router's user interface at any time during the setup, click on the Logout button.
A confirmation screen will appear confirming that you really want to log out. D-Link DSL-2640B ADSL2+ 4-Port Router User Manual 32 Section 5 - Home Logout To log out of the router's user interface at any time during the setup, click on the Logout button.
Product Manual
Page 33
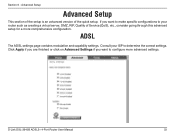
ADSL The ADSL settings page contains modulation and capability settings. D-Link DSL-2640B ADSL2+ 4-Port Router User Manual 33 Section 6 - If you want to make specific configurations to your ISP to configure more comprehensive configuration. Click Apply if... finished or click on Advanced Settings if you want to determine the correct settings. Consult your router such as creating a virtual server, DMZ, RIP, Quality of the quick setup. Advanced Setup Advanced Setup This section of the setup is an advanced version of Service (QoS), etc., consider going through this advanced...
ADSL The ADSL settings page contains modulation and capability settings. D-Link DSL-2640B ADSL2+ 4-Port Router User Manual 33 Section 6 - If you want to make specific configurations to your ISP to configure more comprehensive configuration. Click Apply if... finished or click on Advanced Settings if you want to determine the correct settings. Consult your router such as creating a virtual server, DMZ, RIP, Quality of the quick setup. Advanced Setup Advanced Setup This section of the setup is an advanced version of Service (QoS), etc., consider going through this advanced...

Product Manual
Page 34
After you make your selection, click on Apply to save these settings first before you go to Tone Selection. D-Link DSL-2640B ADSL2+ 4-Port Router User Manual 34 Test modes include normal, reverb, medley, no retrain, and L3. Section 6 - Advanced Setup ADSL Settings The test mode can be selected from the ADSL Advanced Settings page.
After you make your selection, click on Apply to save these settings first before you go to Tone Selection. D-Link DSL-2640B ADSL2+ 4-Port Router User Manual 34 Test modes include normal, reverb, medley, no retrain, and L3. Section 6 - Advanced Setup ADSL Settings The test mode can be selected from the ADSL Advanced Settings page.
Product Manual
Page 35
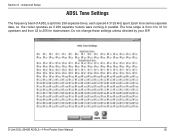
The tone range is split into 256 separate tones, each spaced 4.3125 kHz apart. D-Link DSL-2640B ADSL2+ 4-Port Router User Manual 35 Advanced Setup ADSL Tone Settings The frequency band of ADSL is from 0 to 31 for upstream and from 32 to 255 for downstream. Each tone carries separate data, so the router operates as if 256 separate routers were running in parallel. Do not change these settings unless directed by your ISP. Section 6 -
The tone range is split into 256 separate tones, each spaced 4.3125 kHz apart. D-Link DSL-2640B ADSL2+ 4-Port Router User Manual 35 Advanced Setup ADSL Tone Settings The frequency band of ADSL is from 0 to 31 for upstream and from 32 to 255 for downstream. Each tone carries separate data, so the router operates as if 256 separate routers were running in parallel. Do not change these settings unless directed by your ISP. Section 6 -

Product Manual
Page 36
... software that allows you can configure the Virtual Server, Port Triggering, and DMZ Host. peer-to configure your virtual server(s). D-Link DSL-2640B ADSL2+ 4-Port Router User Manual 36 Click on the LAN side. Section 6 - Advanced Setup Virtual Server If you enable NAT (Network Address Translation), you to -peer, games, etc.). This figure shows the Virtual...
... software that allows you can configure the Virtual Server, Port Triggering, and DMZ Host. peer-to configure your virtual server(s). D-Link DSL-2640B ADSL2+ 4-Port Router User Manual 36 Click on the LAN side. Section 6 - Advanced Setup Virtual Server If you enable NAT (Network Address Translation), you to -peer, games, etc.). This figure shows the Virtual...

Product Manual
Page 37
Advanced Setup Select a virtual server from the drop-down list and then enter the server IP address. The Server IP Address would normally be the IP address of this manual. Once you are satisfied with your network which is using the application or game. D-Link DSL-2640B ADSL2+ 4-Port Router User Manual 37 To determine your IP address see Networking Basics in the Appendix section of the computer on your selection, click Apply once. Section 6 -
Advanced Setup Select a virtual server from the drop-down list and then enter the server IP address. The Server IP Address would normally be the IP address of this manual. Once you are satisfied with your network which is using the application or game. D-Link DSL-2640B ADSL2+ 4-Port Router User Manual 37 To determine your IP address see Networking Basics in the Appendix section of the computer on your selection, click Apply once. Section 6 -

Product Manual
Page 38
Advanced Setup The following screen appears after you need to remove any of the server names, select its check box in the Remove column and click on the Add button. To add additional virtual servers, click on the Remove button. If you save your selection. Section 6 - D-Link DSL-2640B ADSL2+ 4-Port Router User Manual 38
Advanced Setup The following screen appears after you need to remove any of the server names, select its check box in the Remove column and click on the Add button. To add additional virtual servers, click on the Remove button. If you save your selection. Section 6 - D-Link DSL-2640B ADSL2+ 4-Port Router User Manual 38

Product Manual
Page 39
Section 6 - Enter the IP address and click Apply. Advanced Setup DMZ You can define the IP address of the DMZ Host on this screen. D-Link DSL-2640B ADSL2+ 4-Port Router User Manual 39 The DMZ is used to forward all IP packets coming into the router to a specified IP address.
Section 6 - Enter the IP address and click Apply. Advanced Setup DMZ You can define the IP address of the DMZ Host on this screen. D-Link DSL-2640B ADSL2+ 4-Port Router User Manual 39 The DMZ is used to forward all IP packets coming into the router to a specified IP address.

Product Manual
Page 40
Section 6 - Incoming IP Filtering Setup An Incoming IP filter allows you to specify which WAN traffic is useful to pass through the router. Click on the Inbound or Outbound buttons to add incoming filter settings. Advanced Setup IP Filter IP filters can be configured to manage your incoming and outgoing traffic.This is allowed to allow or block certain traffic through the firewall. D-Link DSL-2640B ADSL2+ 4-Port Router User Manual 40 Click on the Add button to configure the inbound and outbound filters.
Section 6 - Incoming IP Filtering Setup An Incoming IP filter allows you to specify which WAN traffic is useful to pass through the router. Click on the Inbound or Outbound buttons to add incoming filter settings. Advanced Setup IP Filter IP filters can be configured to manage your incoming and outgoing traffic.This is allowed to allow or block certain traffic through the firewall. D-Link DSL-2640B ADSL2+ 4-Port Router User Manual 40 Click on the Add button to configure the inbound and outbound filters.

Product Manual
Page 41
Advanced Setup This next screen will appear when you click Add. Make sure at least one or multiple WAN interfaces are selected to save. D-Link DSL-2640B ADSL2+ 4-Port Router User Manual 41 Click Apply to apply the rule. Section 6 - Enter the filter name, select the Protocol, enter source information (from the WAN side), and destination information (to the LAN side).
Advanced Setup This next screen will appear when you click Add. Make sure at least one or multiple WAN interfaces are selected to save. D-Link DSL-2640B ADSL2+ 4-Port Router User Manual 41 Click Apply to apply the rule. Section 6 - Enter the filter name, select the Protocol, enter source information (from the WAN side), and destination information (to the LAN side).

Product Manual
Page 42
Advanced Setup The following screen appears when you to specify which LAN traffic is blocked from the previous screen. D-Link DSL-2640B ADSL2+ 4-Port Router User Manual 42 Outgoing IP Filtering Setup An Outgoing IP filter allows you apply the IP filter. To add another filter click Add. Click on the Add button to the WAN side (Internet). The screen lists the IP filters that were added from passing through to add outgoing filter settings. Section 6 - To remove any previously created filter, place a checkmark next to the filter in the "Remove" column and click Remove.
Advanced Setup The following screen appears when you to specify which LAN traffic is blocked from the previous screen. D-Link DSL-2640B ADSL2+ 4-Port Router User Manual 42 Outgoing IP Filtering Setup An Outgoing IP filter allows you apply the IP filter. To add another filter click Add. Click on the Add button to the WAN side (Internet). The screen lists the IP filters that were added from passing through to add outgoing filter settings. Section 6 - To remove any previously created filter, place a checkmark next to the filter in the "Remove" column and click Remove.

Product Manual
Page 43
... "Remove" column and click Remove. The screen lists the IP filters that were added from the LAN side), and destination information (to save the filter. D-Link DSL-2640B ADSL2+ 4-Port Router User Manual 43 To add another filter click Add. Section 6 - Advanced Setup This next screen will appear when you apply the IP filter.
... "Remove" column and click Remove. The screen lists the IP filters that were added from the LAN side), and destination information (to save the filter. D-Link DSL-2640B ADSL2+ 4-Port Router User Manual 43 To add another filter click Add. Section 6 - Advanced Setup This next screen will appear when you apply the IP filter.
Product Manual
Page 44
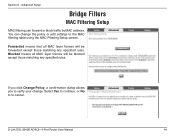
... dialog allows you to cancel. Blocked means all MAC layer frames will be forwarded except those matching any specified rules. D-Link DSL-2640B ADSL2+ 4-Port Router User Manual 44 Advanced Setup Bridge Filters MAC Filtering Setup MAC filtering can change . Forwarded means that all MAC layer frames will be blocked except those matching any specified rules. Section...
... dialog allows you to cancel. Blocked means all MAC layer frames will be forwarded except those matching any specified rules. D-Link DSL-2640B ADSL2+ 4-Port Router User Manual 44 Advanced Setup Bridge Filters MAC Filtering Setup MAC filtering can change . Forwarded means that all MAC layer frames will be blocked except those matching any specified rules. Section...

Product Manual
Page 45
Advanced Setup If you want to add an entry to add, view and delete MAC filtering rules. On this screen you save . Section 6 - The Add MAC Filter screen should then appear. Click Apply to save the settings, a screen showing the settings will be able to the MAC filtering table, Select Add from the MAC Filtering Setup screen. After you will appear. Select a Protocol Type, enter the Destination and Source MAC address, the necessary Frame Direction, and WAN interface (bridge mode only). D-Link DSL-2640B ADSL2+ 4-Port Router User Manual 45
Advanced Setup If you want to add an entry to add, view and delete MAC filtering rules. On this screen you save . Section 6 - The Add MAC Filter screen should then appear. Click Apply to save the settings, a screen showing the settings will be able to the MAC filtering table, Select Add from the MAC Filtering Setup screen. After you will appear. Select a Protocol Type, enter the Destination and Source MAC address, the necessary Frame Direction, and WAN interface (bridge mode only). D-Link DSL-2640B ADSL2+ 4-Port Router User Manual 45

Product Manual
Page 46
D-Link DSL-2640B ADSL2+ 4-Port Router User Manual 46 Advanced Setup Parental Control Time of Day Restrictions. Click Add to the router (and the Internet) by creating special rules called Time of Day Restrictions In a home setting, parents can define the time and days computers on a time ...
D-Link DSL-2640B ADSL2+ 4-Port Router User Manual 46 Advanced Setup Parental Control Time of Day Restrictions. Click Add to the router (and the Internet) by creating special rules called Time of Day Restrictions In a home setting, parents can define the time and days computers on a time ...

V1 Manual
Page 20
D-Link DSL-2640B User Manual 20 WIZARD ADSL SETUP Click on the Next to configure the WAN connection. WELCOME TO D-LINK SETUP WIZARD There are three steps to launch the Setup Wizard. Troubleshooting SETUP This chapter is concerned with using your router. Click on the Setup Wizard button to configuring your computer to continue. The following chapter describes the various windows used to configure and monitor the Router including how to change IP settings and DHCP server setup. Section 4 -
D-Link DSL-2640B User Manual 20 WIZARD ADSL SETUP Click on the Next to configure the WAN connection. WELCOME TO D-LINK SETUP WIZARD There are three steps to launch the Setup Wizard. Troubleshooting SETUP This chapter is concerned with using your router. Click on the Setup Wizard button to configuring your computer to continue. The following chapter describes the various windows used to configure and monitor the Router including how to change IP settings and DHCP server setup. Section 4 -


