Manual
Page 3
... Printer Status 50 TCP/IP Printing for Windows Vista 51 TCP/IP Printing for Windows XP 63 TCP/IP Printing for Windows 2000 76 TCP/IP Printing for Windows 98SE/ME 94 Unix/Linux Printing 107 Printing Text Files form Unix 107 Printing form BSD Unix Versions 108 Printing from SCO Unix System V/386 111 Printing from Solaris 113 Printing from Red Hat Linux...
... Printer Status 50 TCP/IP Printing for Windows Vista 51 TCP/IP Printing for Windows XP 63 TCP/IP Printing for Windows 2000 76 TCP/IP Printing for Windows 98SE/ME 94 Unix/Linux Printing 107 Printing Text Files form Unix 107 Printing form BSD Unix Versions 108 Printing from SCO Unix System V/386 111 Printing from Solaris 113 Printing from Red Hat Linux...
Manual
Page 5
Package Contents Contents of Package: „ D-Link DP-300U Print Server „ Manual and Warranty on CD „ Printed Quick Installation Guide If any of the above ; System Requirements: „ A computer with JavaScript enabled „ Printer must support required operating system iv Netscape Navigator version 6.0 or above, with an installed Ethernet adapter „ Windows Vista/XP/2000/NT4/ME/98SE/95 „ Apple Mac OS 9.x to MAC OS X 10.4.x „ Linux, Solaris, SCO Unix, AIX „ Internet Explorer 6.0 or above items are missing, please contact your reseller.
Package Contents Contents of Package: „ D-Link DP-300U Print Server „ Manual and Warranty on CD „ Printed Quick Installation Guide If any of the above ; System Requirements: „ A computer with JavaScript enabled „ Printer must support required operating system iv Netscape Navigator version 6.0 or above, with an installed Ethernet adapter „ Windows Vista/XP/2000/NT4/ME/98SE/95 „ Apple Mac OS 9.x to MAC OS X 10.4.x „ Linux, Solaris, SCO Unix, AIX „ Internet Explorer 6.0 or above items are missing, please contact your reseller.
Manual
Page 6
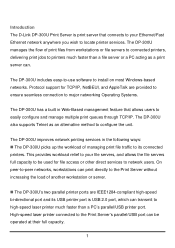
...access or other direct services to install on most Windows-based networks. On peer-to-peer networks, workstations can print directly to the Print Server without increasing the load of another workstation or server. „ The DP-300U's two parallel printer ports are provided to ensure...an alternative method to configure the unit. Introduction The D-Link DP-300U Print Server is USB 2.0 port, which can transmit to high-speed laser printer much faster than a PC's parallel/USB printer port. The DP-300U also supports Telnet as a print server can be used for TCP/IP, NetBEUI, and ...
...access or other direct services to install on most Windows-based networks. On peer-to-peer networks, workstations can print directly to the Print Server without increasing the load of another workstation or server. „ The DP-300U's two parallel printer ports are provided to ensure...an alternative method to configure the unit. Introduction The D-Link DP-300U Print Server is USB 2.0 port, which can transmit to high-speed laser printer much faster than a PC's parallel/USB printer port. The DP-300U also supports Telnet as a print server can be used for TCP/IP, NetBEUI, and ...

Manual
Page 7
... the print server, and assists you to users. The DP-300U offers extraordinary flexibility, operating with all major network operating systems and protocols: „ TCP/IP UNIX lpr/lpd (HP-UX, SunOS, Solaris, SCO, UnixWare, IBM AIX) Windows NT/2000, Windows 95/98SE/ME, Windows XP/Vista, NetWare 5.x NDPS LPR Remote Printing „ NetBEUI Windows NT/2000/XP, Windows 95...
... the print server, and assists you to users. The DP-300U offers extraordinary flexibility, operating with all major network operating systems and protocols: „ TCP/IP UNIX lpr/lpd (HP-UX, SunOS, Solaris, SCO, UnixWare, IBM AIX) Windows NT/2000, Windows 95/98SE/ME, Windows XP/Vista, NetWare 5.x NDPS LPR Remote Printing „ NetBEUI Windows NT/2000/XP, Windows 95...
Manual
Page 15
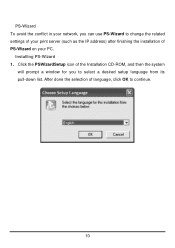
Click the PSWizardSetup icon of the Installation CD-ROM, and then the system will prompt a window for you can use PS-Wizard to change the related settings of your print server (such as the IP address) after finishing the installation of language, click OK to continue. 10 After done the selection of PS-Wizard on your network, you to select a desired setup language from its pull-down list. Installing PS-Wizard 1. PS-Wizard To avoid the conflict in your PC.
Click the PSWizardSetup icon of the Installation CD-ROM, and then the system will prompt a window for you can use PS-Wizard to change the related settings of your print server (such as the IP address) after finishing the installation of language, click OK to continue. 10 After done the selection of PS-Wizard on your network, you to select a desired setup language from its pull-down list. Installing PS-Wizard 1. PS-Wizard To avoid the conflict in your PC.
Manual
Page 16
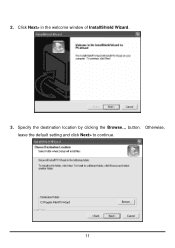
Otherwise, leave the default setting and click Next> to continue. 11 button. Click Next> in the welcome window of InstallShield Wizard. 3. 2. Specify the destination location by clicking the Browse...
Otherwise, leave the default setting and click Next> to continue. 11 button. Click Next> in the welcome window of InstallShield Wizard. 3. 2. Specify the destination location by clicking the Browse...
Manual
Page 18
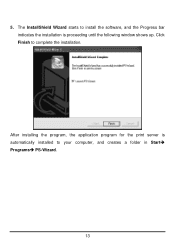
Click Finish to install the software, and the Progress bar indicates the installation is automatically installed to your computer, and creates a folder in StartÎ ProgramsÎ PS-Wizard. 13 The InstallShield Wizard starts to complete the installation. 5. After installing the program, the application program for the print server is proceeding until the following window shows up.
Click Finish to install the software, and the Progress bar indicates the installation is automatically installed to your computer, and creates a folder in StartÎ ProgramsÎ PS-Wizard. 13 The InstallShield Wizard starts to complete the installation. 5. After installing the program, the application program for the print server is proceeding until the following window shows up.
Manual
Page 19
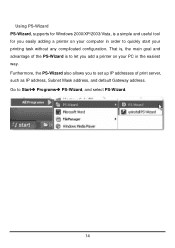
Go to set up IP addresses of the PS-Wizard is a simple and useful tool for Windows 2000/XP/2003/Vista, is to let you to StartÎ ProgramsÎ PS-Wizard, and select PS-Wizard. 14 Furthermore, the PS-Wizard also allows you add a printer on your printing task without any complicated configuration. Using PS-Wizard PS-Wizard, supports for you easily adding a printer on your PC in order to quickly start your computer in the easiest way. That is, the main goal and advantage of print server, such as IP address, Subnet Mask address, and default Gateway address.
Go to set up IP addresses of the PS-Wizard is a simple and useful tool for Windows 2000/XP/2003/Vista, is to let you to StartÎ ProgramsÎ PS-Wizard, and select PS-Wizard. 14 Furthermore, the PS-Wizard also allows you add a printer on your printing task without any complicated configuration. Using PS-Wizard PS-Wizard, supports for you easily adding a printer on your PC in order to quickly start your computer in the easiest way. That is, the main goal and advantage of print server, such as IP address, Subnet Mask address, and default Gateway address.
Manual
Page 21
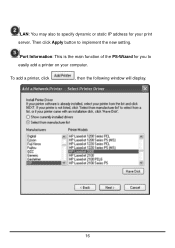
Then click Apply button to easily add a printer on your print server. To add a printer, click , then the following window will display. 16 Port Information: This is the main function of the PS-Wizard for your computer. LAN: You may also to specify dynamic or static IP address for you to implement the new setting.
Then click Apply button to easily add a printer on your print server. To add a printer, click , then the following window will display. 16 Port Information: This is the main function of the PS-Wizard for your computer. LAN: You may also to specify dynamic or static IP address for you to implement the new setting.
Manual
Page 22
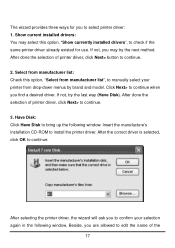
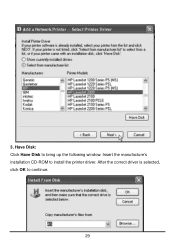
... 17 After selecting the printer driver, the wizard will ask you find a desired driver. Beside, you to manually select your selection again in the following window. Select from drop-down menus by brand and model. The wizard provides three ways for use. After the correct driver is selected, click OK to... select this option, "Select from manufacturer list", to select printer driver: 1. After done the selection of printer driver, click Next> to bring up the following window. Have Disk: Click Have Disk to continue. 3.
... 17 After selecting the printer driver, the wizard will ask you find a desired driver. Beside, you to manually select your selection again in the following window. Select from drop-down menus by brand and model. The wizard provides three ways for use. After the correct driver is selected, click OK to... select this option, "Select from manufacturer list", to select printer driver: 1. After done the selection of printer driver, click Next> to bring up the following window. Have Disk: Click Have Disk to continue. 3.
Manual
Page 23
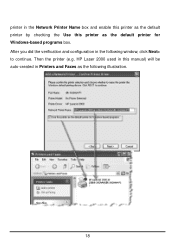
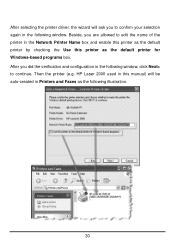
Then the printer (e.g. printer in the Network Printer Name box and enable this printer as the default printer by checking the Use this manual) will be auto-created in the following illustration. 18 After you did the verification and configuration in Printers and Faxes as the default printer for Windows-based programs box. HP Laser 2000 used in this printer as the following window, click Next> to continue.
Then the printer (e.g. printer in the Network Printer Name box and enable this printer as the default printer by checking the Use this manual) will be auto-created in the following illustration. 18 After you did the verification and configuration in Printers and Faxes as the default printer for Windows-based programs box. HP Laser 2000 used in this printer as the following window, click Next> to continue.
Manual
Page 24
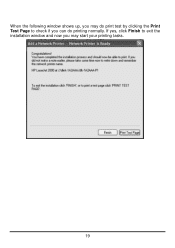
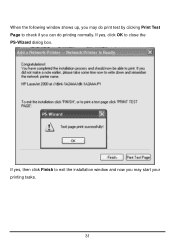
If yes, click Finish to check if you can do print test by clicking the Print Test Page to exit the installation window and now you may do printing normally. When the following window shows up, you may start your printing tasks. 19
If yes, click Finish to check if you can do print test by clicking the Print Test Page to exit the installation window and now you may do printing normally. When the following window shows up, you may start your printing tasks. 19
Manual
Page 30
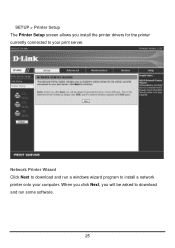
Network Printer Wizard Click Next to download and run some software. 25 SETUP > Printer Setup The Printer Setup screen allows you will be asked to download and run a windows wizard program to install a network printer onto your print server. When you click Next, you install the printer drivers for the printer currently connected to your computer.
Network Printer Wizard Click Next to download and run some software. 25 SETUP > Printer Setup The Printer Setup screen allows you will be asked to download and run a windows wizard program to install a network printer onto your print server. When you click Next, you install the printer drivers for the printer currently connected to your computer.
Manual
Page 31
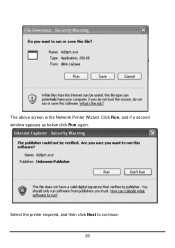
Select the printer required, and then click Next to continue. 26 The above screen is the Network Printer Wizard. Click Run, and if a second window appears as below click Run again.
Select the printer required, and then click Next to continue. 26 The above screen is the Network Printer Wizard. Click Run, and if a second window appears as below click Run again.
Manual
Page 34
After the correct driver is selected, click OK to install the printer driver. 3. Insert the manufacture's installation CD-ROM to continue. 29 Have Disk: Click Have Disk to bring up the following window.
After the correct driver is selected, click OK to install the printer driver. 3. Insert the manufacture's installation CD-ROM to continue. 29 Have Disk: Click Have Disk to bring up the following window.
Manual
Page 35
Beside, you are allowed to continue. After you did the verification and configuration in the following window, click Next> to edit the name of the printer in the Network Printer Name box and enable this printer as the default printer by checking the Use this manual) will ask you to confirm your selection again in Printers and Faxes as the default printer for Windows-based programs box. HP Laser 2000 used in this printer as the following illustration. 30 Then the printer (e.g. After selecting the printer driver, the wizard will be auto-created in the following window.
Beside, you are allowed to continue. After you did the verification and configuration in the following window, click Next> to edit the name of the printer in the Network Printer Name box and enable this printer as the default printer by checking the Use this manual) will ask you to confirm your selection again in Printers and Faxes as the default printer for Windows-based programs box. HP Laser 2000 used in this printer as the following illustration. 30 Then the printer (e.g. After selecting the printer driver, the wizard will be auto-created in the following window.
Manual
Page 36
When the following window shows up, you may start your printing tasks. 31 If yes, then click Finish to exit the installation window and now you can do print test by clicking Print Test Page to close the PS-Wizard dialog box. If yes, click OK to check if you may do printing normally.
When the following window shows up, you may start your printing tasks. 31 If yes, then click Finish to exit the installation window and now you can do print test by clicking Print Test Page to close the PS-Wizard dialog box. If yes, click OK to check if you may do printing normally.

Manual
Page 56
TCP/IP Printing for Windows Vista Go to Start Î Control Panel Î Printers. 51
TCP/IP Printing for Windows Vista Go to Start Î Control Panel Î Printers. 51
Manual
Page 67
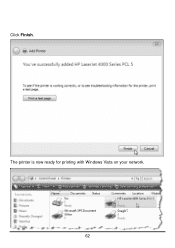
The printer is now ready for printing with Windows Vista on your network. 62 Click Finish.
The printer is now ready for printing with Windows Vista on your network. 62 Click Finish.
Manual
Page 68
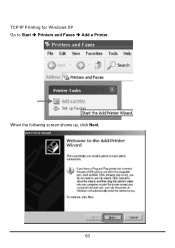
When the following screen shows up, click Next. 63 TCP/IP Printing for Windows XP Go to Start Î Printers and Faxes Î Add a Printer.
When the following screen shows up, click Next. 63 TCP/IP Printing for Windows XP Go to Start Î Printers and Faxes Î Add a Printer.
