
Manual
Page 2
Contents Package Contents iv Contents of Package iv System Requirements iv Introduction 1 External Features 3 Port Connectors 3 Rear Panel...4 Network Cable Connector 4 USB Port Connector 4 Parallel Port Connector 4 DC Power Connector 4 Front Panel ...5 LED Indicators 5 Setting up the DP-300U 6 Installing the Print Server 6 Power ON Self-Test 6 Getting Started 8 Using PS-Wizard 9 Auto-Run Installation 9 PS-Wizard 10 Installing PS-Wizard 10 Using PS-Wizard 14 Using the Web Configuration 20 Home...20 SETUP > Print Server Setup 22 i
Contents Package Contents iv Contents of Package iv System Requirements iv Introduction 1 External Features 3 Port Connectors 3 Rear Panel...4 Network Cable Connector 4 USB Port Connector 4 Parallel Port Connector 4 DC Power Connector 4 Front Panel ...5 LED Indicators 5 Setting up the DP-300U 6 Installing the Print Server 6 Power ON Self-Test 6 Getting Started 8 Using PS-Wizard 9 Auto-Run Installation 9 PS-Wizard 10 Installing PS-Wizard 10 Using PS-Wizard 14 Using the Web Configuration 20 Home...20 SETUP > Print Server Setup 22 i
Manual
Page 5
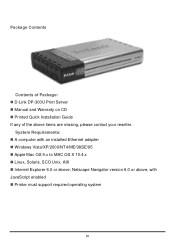
Package Contents Contents of Package: „ D-Link DP-300U Print Server „ Manual and Warranty on CD „ Printed Quick Installation Guide If any of the above , with an installed Ethernet adapter „ Windows Vista/XP/2000/NT4/ME/98SE/95 „ Apple Mac OS 9.x to MAC OS X 10.4.x „ Linux, Solaris, SCO Unix, AIX „ Internet Explorer 6.0 or above; Netscape Navigator version 6.0 or above items are missing, please contact your reseller. System Requirements: „ A computer with JavaScript enabled „ Printer must support required operating system iv
Package Contents Contents of Package: „ D-Link DP-300U Print Server „ Manual and Warranty on CD „ Printed Quick Installation Guide If any of the above , with an installed Ethernet adapter „ Windows Vista/XP/2000/NT4/ME/98SE/95 „ Apple Mac OS 9.x to MAC OS X 10.4.x „ Linux, Solaris, SCO Unix, AIX „ Internet Explorer 6.0 or above; Netscape Navigator version 6.0 or above items are missing, please contact your reseller. System Requirements: „ A computer with JavaScript enabled „ Printer must support required operating system iv
Manual
Page 6
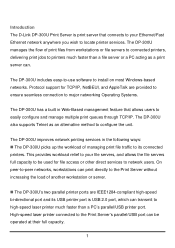
... full capacity. 1 Introduction The D-Link DP-300U Print Server is USB 2.0 port, which can transmit to high-speed laser printer much faster than a PC's parallel/USB printer port. On peer-to-peer networks, workstations can print directly to the Print Server without increasing the load of another workstation or server. „ The DP-300U's two parallel printer ports are provided to...
... full capacity. 1 Introduction The D-Link DP-300U Print Server is USB 2.0 port, which can transmit to high-speed laser printer much faster than a PC's parallel/USB printer port. On peer-to-peer networks, workstations can print directly to the Print Server without increasing the load of another workstation or server. „ The DP-300U's two parallel printer ports are provided to...

Manual
Page 7
...and inexpensive compared to a PC-based print server, and Print Server connects to users. „ Because the DP-300U is a user-friendly program used to complete further settings for the print server, and assists you to easily add a printer on your file servers through the network, printers can be ...deployed to locations of maximum convenience to your computer. The DP-300U offers extraordinary flexibility, operating with all major...
...and inexpensive compared to a PC-based print server, and Print Server connects to users. „ Because the DP-300U is a user-friendly program used to complete further settings for the print server, and assists you to easily add a printer on your file servers through the network, printers can be ...deployed to locations of maximum convenience to your computer. The DP-300U offers extraordinary flexibility, operating with all major...
Manual
Page 8
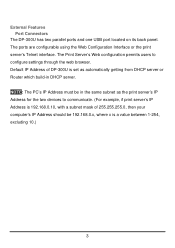
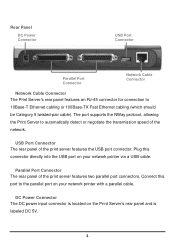
... the two devices to configure settings through the web browser. NOTE: The PC's IP Address must be in DHCP server. The ports are configurable using the Web Configuration Interface or the print server's Telnet interface. External Features Port Connectors The DP-300U has two parallel ports and one USB port located on its back panel.
... the two devices to configure settings through the web browser. NOTE: The PC's IP Address must be in DHCP server. The ports are configurable using the Web Configuration Interface or the print server's Telnet interface. External Features Port Connectors The DP-300U has two parallel ports and one USB port located on its back panel.
Manual
Page 9
... on your network printer with a parallel cable. USB Port Connector The rear panel of the network. The port supports the NWay protocol, allowing the Print Server to automatically detect or negotiate the transmission speed of the print server features the USB port connector. Plug... be Category 5 twisted-pair cable). Parallel Port Connector The rear panel of the print server features two parallel port connectors. Rear Panel DC Power Connector USB Port Connector Parallel Port Connector Network Cable Connector Network Cable Connector The Print Server's rear panel features an RJ-45 ...
... on your network printer with a parallel cable. USB Port Connector The rear panel of the network. The port supports the NWay protocol, allowing the Print Server to automatically detect or negotiate the transmission speed of the print server features the USB port connector. Plug... be Category 5 twisted-pair cable). Parallel Port Connector The rear panel of the print server features two parallel port connectors. Rear Panel DC Power Connector USB Port Connector Parallel Port Connector Network Cable Connector Network Cable Connector The Print Server's rear panel features an RJ-45 ...
Manual
Page 10
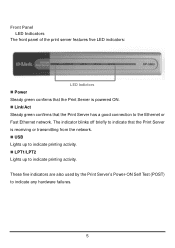
.... Front Panel LED Indicators The front panel of the print server features five LED indicators: LED Indictors „ Power Steady green confirms that the Print Server is powered ON. „ Link/Act Steady green confirms that the Print Server is receiving or transmitting from the network. „... USB Lights up to indicate printing activity. „ LPT1/LPT2 Lights up to indicate printing activity. The indicator blinks off...
.... Front Panel LED Indicators The front panel of the print server features five LED indicators: LED Indictors „ Power Steady green confirms that the Print Server is powered ON. „ Link/Act Steady green confirms that the Print Server is receiving or transmitting from the network. „... USB Lights up to indicate printing activity. „ LPT1/LPT2 Lights up to indicate printing activity. The indicator blinks off...
Manual
Page 11
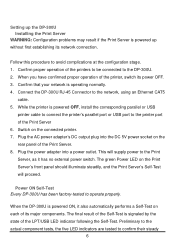
... printer is powered OFF, install the corresponding parallel or USB printer cable to connect the printer's parallel port or USB port to confirm their steady 6 Switch on the Print Server's front panel should illuminate steadily, and the Print Server's Self-Test will supply power to avoid ... When you have confirmed proper operation of the Print Server. 8. When the DP-300U is powered ON, it has no external power switch. Setting up the DP-300U Installing the Print Server WARNING: Configuration problems may result if the Print Server is powered up without first establishing its power ...
... printer is powered OFF, install the corresponding parallel or USB printer cable to connect the printer's parallel port or USB port to confirm their steady 6 Switch on the Print Server's front panel should illuminate steadily, and the Print Server's Self-Test will supply power to avoid ... When you have confirmed proper operation of the Print Server. 8. When the DP-300U is powered ON, it has no external power switch. Setting up the DP-300U Installing the Print Server WARNING: Configuration problems may result if the Print Server is powered up without first establishing its power ...
Manual
Page 14
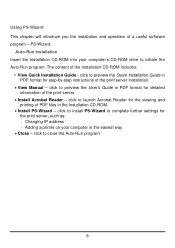
...-ROM includes: y View Quick Installation Guide - click to launch Acrobat Reader for step-by-step instructions of the print server. • Install Acrobat Reader - click to complete further settings for detailed information of the print server Installation. • View Manual - Adding a printer on your computer's CD-ROM drive to close the Auto-Run program.... • Close - click to initiate the Auto-Run program. Auto-Run Installation Insert the Installation CD-ROM into your computer in PDF format for the print server, such as: - Changing IP address - PS-Wizard.
...-ROM includes: y View Quick Installation Guide - click to launch Acrobat Reader for step-by-step instructions of the print server. • Install Acrobat Reader - click to complete further settings for detailed information of the print server Installation. • View Manual - Adding a printer on your computer's CD-ROM drive to close the Auto-Run program.... • Close - click to initiate the Auto-Run program. Auto-Run Installation Insert the Installation CD-ROM into your computer in PDF format for the print server, such as: - Changing IP address - PS-Wizard.
Manual
Page 15
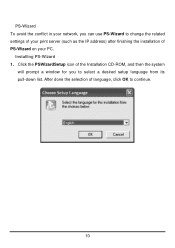
After done the selection of the Installation CD-ROM, and then the system will prompt a window for you can use PS-Wizard to continue. 10 Installing PS-Wizard 1. Click the PSWizardSetup icon of language, click OK to change the related settings of your print server (such as the IP address) after finishing the installation of PS-Wizard on your network, you to select a desired setup language from its pull-down list. PS-Wizard To avoid the conflict in your PC.
After done the selection of the Installation CD-ROM, and then the system will prompt a window for you can use PS-Wizard to continue. 10 Installing PS-Wizard 1. Click the PSWizardSetup icon of language, click OK to change the related settings of your print server (such as the IP address) after finishing the installation of PS-Wizard on your network, you to select a desired setup language from its pull-down list. PS-Wizard To avoid the conflict in your PC.
Manual
Page 18
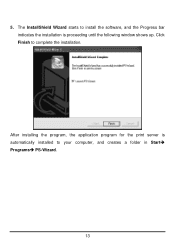
Click Finish to your computer, and creates a folder in StartÎ ProgramsÎ PS-Wizard. 13 The InstallShield Wizard starts to install the software, and the Progress bar indicates the installation is automatically installed to complete the installation. After installing the program, the application program for the print server is proceeding until the following window shows up. 5.
Click Finish to your computer, and creates a folder in StartÎ ProgramsÎ PS-Wizard. 13 The InstallShield Wizard starts to install the software, and the Progress bar indicates the installation is automatically installed to complete the installation. After installing the program, the application program for the print server is proceeding until the following window shows up. 5.
Manual
Page 19
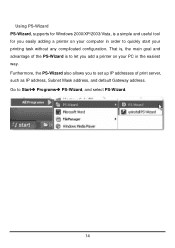
Go to let you add a printer on your printing task without any complicated configuration. Furthermore, the PS-Wizard also allows you easily adding a printer on your PC in order to quickly start your computer in the easiest way. Using PS-Wizard PS-Wizard, supports for you to set up IP addresses of print server, such as IP address, Subnet Mask address, and default Gateway address. That is, the main goal and advantage of the PS-Wizard is a simple and useful tool for Windows 2000/XP/2003/Vista, is to StartÎ ProgramsÎ PS-Wizard, and select PS-Wizard. 14
Go to let you add a printer on your printing task without any complicated configuration. Furthermore, the PS-Wizard also allows you easily adding a printer on your PC in order to quickly start your computer in the easiest way. Using PS-Wizard PS-Wizard, supports for you to set up IP addresses of print server, such as IP address, Subnet Mask address, and default Gateway address. That is, the main goal and advantage of the PS-Wizard is a simple and useful tool for Windows 2000/XP/2003/Vista, is to StartÎ ProgramsÎ PS-Wizard, and select PS-Wizard. 14

Manual
Page 20
Print Server: This field allows you to manually discover the connected print server and to do further configuration of the print server that is selected from the list. 15
Print Server: This field allows you to manually discover the connected print server and to do further configuration of the print server that is selected from the list. 15
Manual
Page 21
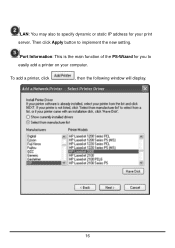
To add a printer, click , then the following window will display. 16 LAN: You may also to specify dynamic or static IP address for you to implement the new setting. Port Information: This is the main function of the PS-Wizard for your computer. Then click Apply button to easily add a printer on your print server.
To add a printer, click , then the following window will display. 16 LAN: You may also to specify dynamic or static IP address for you to implement the new setting. Port Information: This is the main function of the PS-Wizard for your computer. Then click Apply button to easily add a printer on your print server.
Manual
Page 25
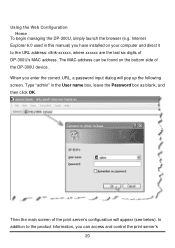
The MAC address can access and control the print server's 20 Then the main screen of the print server's configuration will pop up the following screen. In addition to the URL address: dlink-xxxxxx, where xxxxxx are the last six digits of the DP-300U device. When you enter the correct URL, a password ... used in the User name box, leave the Password box as blank, and then click OK. Using the Web Configuration Home To begin managing the DP-300U, simply launch the browser (e.g. Type "admin" in this manual) you can be found on your computer and direct it to the product information...
The MAC address can access and control the print server's 20 Then the main screen of the print server's configuration will pop up the following screen. In addition to the URL address: dlink-xxxxxx, where xxxxxx are the last six digits of the DP-300U device. When you enter the correct URL, a password ... used in the User name box, leave the Password box as blank, and then click OK. Using the Web Configuration Home To begin managing the DP-300U, simply launch the browser (e.g. Type "admin" in this manual) you can be found on your computer and direct it to the product information...
Manual
Page 27
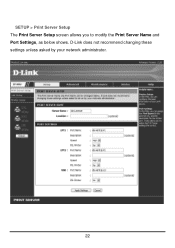
SETUP > Print Server Setup The Print Server Setup screen allows you to modify the Print Server Name and Port Settings, as below shows. D-Link does not recommend changing these settings unless asked by your network administrator. 22
SETUP > Print Server Setup The Print Server Setup screen allows you to modify the Print Server Name and Port Settings, as below shows. D-Link does not recommend changing these settings unless asked by your network administrator. 22

Manual
Page 28
...PJL (Printer Job Language) has certain job requirements that must be met to your printer's manual. The basic information contains a name of print server. For more information, please refer to work correctly. It also allows you have changed the settings in each option, click Apply Settings ...Cancel to select the PJL Printer setting (Yes or No). Once you to abandon. 23 Print Server Name In this field, you can assign the Port Name for the print server, and the description for the print server, assigned in Location (optional) box. Port Settings In this field, you can configure the ...
...PJL (Printer Job Language) has certain job requirements that must be met to your printer's manual. The basic information contains a name of print server. For more information, please refer to work correctly. It also allows you have changed the settings in each option, click Apply Settings ...Cancel to select the PJL Printer setting (Yes or No). Once you to abandon. 23 Print Server Name In this field, you can assign the Port Name for the print server, and the description for the print server, assigned in Location (optional) box. Port Settings In this field, you can configure the ...

Manual
Page 29
... settings in each option, click Apply Settings to store the settings, or Cancel to abandon. 24 Once you should not need to change any of print server. Please note that this section is optional and you configure the local network settings of the settings here to assign IP address in manual or... should enter the related information in the following boxes, including IP Address, Subnet Mask, and Default Gateway. TCP/IP This field allows you to get print server up and running.
... settings in each option, click Apply Settings to store the settings, or Cancel to abandon. 24 Once you should not need to change any of print server. Please note that this section is optional and you configure the local network settings of the settings here to assign IP address in manual or... should enter the related information in the following boxes, including IP Address, Subnet Mask, and Default Gateway. TCP/IP This field allows you to get print server up and running.
Manual
Page 30
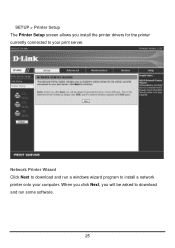
SETUP > Printer Setup The Printer Setup screen allows you will be asked to download and run a windows wizard program to install a network printer onto your print server. When you click Next, you install the printer drivers for the printer currently connected to download and run some software. 25 Network Printer Wizard Click Next to your computer.
SETUP > Printer Setup The Printer Setup screen allows you will be asked to download and run a windows wizard program to install a network printer onto your print server. When you click Next, you install the printer drivers for the printer currently connected to download and run some software. 25 Network Printer Wizard Click Next to your computer.
Manual
Page 38
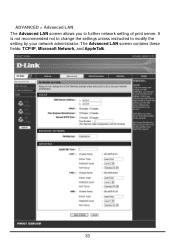
The Advanced LAN screen contains these fields: TCP/IP, Microsoft Network, and AppleTalk. 33 ADVANCED > Advanced LAN The Advanced LAN screen allows you to modify the setting by your network administrator. It is not recommended not to change the settings unless instructed to further network setting of print server.
The Advanced LAN screen contains these fields: TCP/IP, Microsoft Network, and AppleTalk. 33 ADVANCED > Advanced LAN The Advanced LAN screen allows you to modify the setting by your network administrator. It is not recommended not to change the settings unless instructed to further network setting of print server.


