Product Manual
Page 5
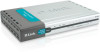
... of the networked computers can retrieve TCP/IP settings automatically from outside intruders are blocked to share one printer. Firewall All unwanted packets from the DI-707P. DHCP server supported All of the networked computers to protect your printer is the connection for the Power Adapter Features & Benefits Broadband modem and IP... with this bi-directional printer port. Most printers will work with a 7-port auto-sensing Ethernet switch. Connections All LAN ports auto-sense cable types to setup a VPN server and VPN clients. Printer Port.
... of the networked computers can retrieve TCP/IP settings automatically from outside intruders are blocked to share one printer. Firewall All unwanted packets from the DI-707P. DHCP server supported All of the networked computers to protect your printer is the connection for the Power Adapter Features & Benefits Broadband modem and IP... with this bi-directional printer port. Most printers will work with a 7-port auto-sensing Ethernet switch. Connections All LAN ports auto-sense cable types to setup a VPN server and VPN clients. Printer Port.
Product Manual
Page 10
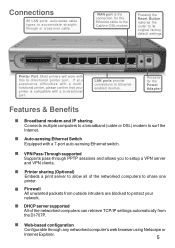
... Menu - learn how to the quick installation guide for proper installation of the modem. Consult with other D-Link Express EtherNetwork products, right out of this manual for the DI-707P, using the webbased interface. 3 6 For a typical network setup at home (as shown above), please do the following sections of the box. 1 Please refer to...
... Menu - learn how to the quick installation guide for proper installation of the modem. Consult with other D-Link Express EtherNetwork products, right out of this manual for the DI-707P, using the webbased interface. 3 6 For a typical network setup at home (as shown above), please do the following sections of the box. 1 Please refer to...
Product Manual
Page 11
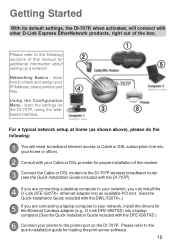
...IP Address assigned to the DI-707P, make sure to enter the correct IP Address. Home > Wizard The Home>Wizard screen will save changes made to the page. Clicking Apply will appear. Apply Clicking Cancel will bring up helpful information regarding the Setup Wizard. Using the Configuration Menu... Whenever you want to configure your network or the DI-707P, you can access the Configuration Menu by opening the web-browser and typing in the IP...
...IP Address assigned to the DI-707P, make sure to enter the correct IP Address. Home > Wizard The Home>Wizard screen will save changes made to the page. Clicking Apply will appear. Apply Clicking Cancel will bring up helpful information regarding the Setup Wizard. Using the Configuration Menu... Whenever you want to configure your network or the DI-707P, you can access the Configuration Menu by opening the web-browser and typing in the IP...

Product Manual
Page 47
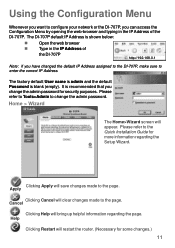
Note: Please refer to establish a network at home or work, using Windows 2000, ME or 98. Networking Basics Using the Network Setup Wizard in Windows XP In this screen appears, Click Next. 47 Go to Start>Control Panel>Network Connections Select Set up a home or small office network When this section you will learn how to websites such as http://www.homenethelp.com and http://www.microsoft.com/windows2000 for information about networking computers using Microsoft Windows XP.
Note: Please refer to establish a network at home or work, using Windows 2000, ME or 98. Networking Basics Using the Network Setup Wizard in Windows XP In this screen appears, Click Next. 47 Go to Start>Control Panel>Network Connections Select Set up a home or small office network When this section you will learn how to websites such as http://www.homenethelp.com and http://www.microsoft.com/windows2000 for information about networking computers using Microsoft Windows XP.

Product Manual
Page 50
When the changes are complete, click Next. Please wait while the Network Setup Wizard configures the computer. Networking Basics Please wait while the Network Setup Wizard applies the changes. This may take a few minutes. 50
When the changes are complete, click Next. Please wait while the Network Setup Wizard configures the computer. Networking Basics Please wait while the Network Setup Wizard applies the changes. This may take a few minutes. 50

Product Manual
Page 51
Insert a disk into the Floppy Disk Drive, in this example, Create a Network Setup Disk has been selected. You will run this disk on each of the computers on your needs. Networking Basics In the window below, select the option that fits your network. Click Next. In this case drive A. 51
Insert a disk into the Floppy Disk Drive, in this example, Create a Network Setup Disk has been selected. You will run this disk on each of the computers on your needs. Networking Basics In the window below, select the option that fits your network. Click Next. In this case drive A. 51

Product Manual
Page 52
Networking Basics Please read the information under Here's how in the screen below. To continue click Next. 52 After you complete the Network Setup Wizard you will use the Network Setup Disk to run the Network Setup Wizard once on each of the computers on your network.
Networking Basics Please read the information under Here's how in the screen below. To continue click Next. 52 After you complete the Network Setup Wizard you will use the Network Setup Disk to run the Network Setup Wizard once on each of the computers on your network.

Product Manual
Page 53
You have completed configuring this screen, then click Finish to use. 53 The new settings will be ready to complete the Network Setup Wizard. Next, you restart the computer. Click Yes to run the Network Setup Disk on all the other computers on all your computers, your network. After running the Network Setup Disk on your new wireless network will take effect when you will need to restart the computer. Networking Basics Please read the information on this computer.
You have completed configuring this screen, then click Finish to use. 53 The new settings will be ready to complete the Network Setup Wizard. Next, you restart the computer. Click Yes to run the Network Setup Disk on all the other computers on all your computers, your network. After running the Network Setup Disk on your new wireless network will take effect when you will need to restart the computer. Networking Basics Please read the information on this computer.
Product Manual
Page 60
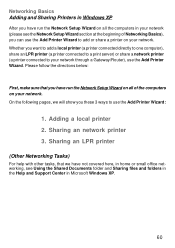
... beginning of the computers on your network. Sharing an LPR printer (Other Networking Tasks) For help with other tasks, that you have run the Network Setup Wizard on all of Networking Basics), you can use the Add Printer Wizard to add or share a printer on your network. Adding a local printer 2.... you these 3 ways to use the Add Printer Wizard: 1. Networking Basics Adding and Sharing Printers in Windows XP After you have run the Network Setup Wizard on all the computers in your network (please see Using the Shared Documents folder and Sharing files and folders in the Help and Support...
... beginning of the computers on your network. Sharing an LPR printer (Other Networking Tasks) For help with other tasks, that you have run the Network Setup Wizard on all of Networking Basics), you can use the Add Printer Wizard to add or share a printer on your network. Adding a local printer 2.... you these 3 ways to use the Add Printer Wizard: 1. Networking Basics Adding and Sharing Printers in Windows XP After you have run the Network Setup Wizard on all the computers in your network (please see Using the Shared Documents folder and Sharing files and folders in the Help and Support...
Product Manual
Page 65
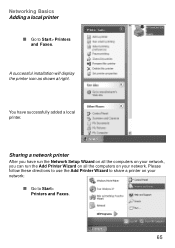
Sharing a network printer After you can run the Add Printer Wizard on all the computers on your network, you have successfully added a local printer. A successful installation will display the printer icon as shown at right. You have run the Network Setup Wizard on all the computers on your network: Go to Start> Printers and Faxes. 65 Please follow these directions to use the Add Printer Wizard to Start> Printers and Faxes. Networking Basics Adding a local printer Go to share a printer on your network.
Sharing a network printer After you can run the Add Printer Wizard on all the computers on your network, you have successfully added a local printer. A successful installation will display the printer icon as shown at right. You have run the Network Setup Wizard on all the computers on your network: Go to Start> Printers and Faxes. 65 Please follow these directions to use the Add Printer Wizard to Start> Printers and Faxes. Networking Basics Adding a local printer Go to share a printer on your network.
Product Manual
Page 68
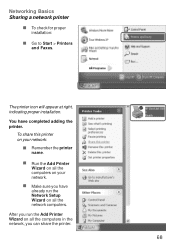
Make sure you have completed adding the printer. Networking Basics Sharing a network printer To check for proper installation: Go to Start > Printers and Faxes. After you can share the printer. 68 The printer icon will appear at right, indicating proper installation. To share this printer on your network: Remember the printer name. Run the Add Printer Wizard on all the network computers. You have already run the Network Setup Wizard on all the computers in the network, you run the Add Printer Wizard on all the computers on your network.
Make sure you have completed adding the printer. Networking Basics Sharing a network printer To check for proper installation: Go to Start > Printers and Faxes. After you can share the printer. 68 The printer icon will appear at right, indicating proper installation. To share this printer on your network: Remember the printer name. Run the Add Printer Wizard on all the network computers. You have already run the Network Setup Wizard on all the computers in the network, you run the Add Printer Wizard on all the computers on your network.
Product Manual
Page 69
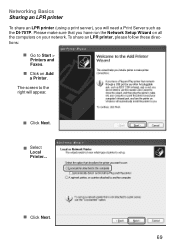
Please make sure that you will appear. The screen to Start > Printers and Faxes. Click Next. 69 Select Local Printer... Click on your network. Networking Basics Sharing an LPR printer To share an LPR printer (using a print server), you have run the Network Setup Wizard on all the computers on Add a Printer. To share an LPR printer, please follow these directions: Go to the right will need a Print Server such as the DI-707P. Click Next.
Please make sure that you will appear. The screen to Start > Printers and Faxes. Click Next. 69 Select Local Printer... Click on your network. Networking Basics Sharing an LPR printer To share an LPR printer (using a print server), you have run the Network Setup Wizard on all the computers on Add a Printer. To share an LPR printer, please follow these directions: Go to the right will need a Print Server such as the DI-707P. Click Next.

Product Manual
Page 74
Please run the Add Printer Wizard. 74 Note: You must run the Network Setup Wizard on all the computers on your network before you run the Add Printer Wizard on all the computers on your printer. Click Finish to share the printer. Networking Basics Sharing an LPR printer This screen will display information about your network in order to complete the addition of the printer.
Please run the Add Printer Wizard. 74 Note: You must run the Network Setup Wizard on all the computers on your network before you run the Add Printer Wizard on all the computers on your printer. Click Finish to share the printer. Networking Basics Sharing an LPR printer This screen will display information about your network in order to complete the addition of the printer.

Product Manual
Page 85
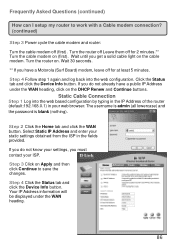
... on Apply and then Continue to work with the computer that was last connected directly to the cable modem. Frequently Asked Questions (continued) How can I setup my router to save the changes. 85 Click Clone Mac Address. Dynamic IP Address is the default value, however, if Dynamic IP Address is blank...
... on Apply and then Continue to work with the computer that was last connected directly to the cable modem. Frequently Asked Questions (continued) How can I setup my router to save the changes. 85 Click Clone Mac Address. Dynamic IP Address is the default value, however, if Dynamic IP Address is blank...
Product Manual
Page 86
Frequently Asked Questions (continued) How can I setup my router to save the changes. Step 2 Click the Home tab and click the WAN button. Step 3 Click on Apply and then click Continue to ...
Frequently Asked Questions (continued) How can I setup my router to save the changes. Step 2 Click the Home tab and click the WAN button. Step 3 Click on Apply and then click Continue to ...
Product Manual
Page 87
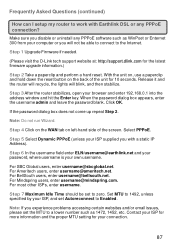
... stabilize. Step 4 Click on the WAN tab on the back of the screen. Frequently Asked Questions (continued) How can I setup my router to Enabled. Step 1 Upgrade Firmware if needed. (Please visit the D-Link tech support website at: http://support.dlink.com for your browser and enter 192.168.0.1 into the address window...
... stabilize. Step 4 Click on the WAN tab on the back of the screen. Frequently Asked Questions (continued) How can I setup my router to Enabled. Step 1 Upgrade Firmware if needed. (Please visit the D-Link tech support website at: http://support.dlink.com for your browser and enter 192.168.0.1 into the address window...

Product Manual
Page 88
...+ may use PPPoE. Step 2 Enter your router: Step 1 Log into the router. Click Continue when prompted. You need to configure the AOL software to the D-Link router. Go to http://www.aol.com for 1 minute and then recycle power to use PPPoE for the user name. Under WAN, click Connect. Can... I setup my router to work with this is the case, then our routers will work with Earthlink DSL or any PPPoE connection? (continued) Step 8 Click Apply. ...
...+ may use PPPoE. Step 2 Enter your router: Step 1 Log into the router. Click Continue when prompted. You need to configure the AOL software to the D-Link router. Go to http://www.aol.com for 1 minute and then recycle power to use PPPoE for the user name. Under WAN, click Connect. Can... I setup my router to work with this is the case, then our routers will work with Earthlink DSL or any PPPoE connection? (continued) Step 8 Click Apply. ...


