Manual
Page 1
D-Link DI-704P TM Express Ethernetwork Broadband Router with Print Server Manual Building Networks for People
D-Link DI-704P TM Express Ethernetwork Broadband Router with Print Server Manual Building Networks for People

Manual
Page 3
... Contents Contents of the above , with the DI-704P will cause damage and void the warranty for Configuration: ! Using a power supply with a different voltage rating than the one included with Javascript enabled 3 Computer with Windows, Macintosh, or Linux-based Operating System with an installed Ethernet adapter ! Quick Installation Guide ! D-Link DI-704P Express EtherNetworkTM Broadband Router !
... Contents Contents of the above , with the DI-704P will cause damage and void the warranty for Configuration: ! Using a power supply with a different voltage rating than the one included with Javascript enabled 3 Computer with Windows, Macintosh, or Linux-based Operating System with an installed Ethernet adapter ! Quick Installation Guide ! D-Link DI-704P Express EtherNetworkTM Broadband Router !

Manual
Page 4
... in 4-port switch. It also features a parallel port to the DI-704P. The DI-704P is an Ethernet Broadband Router with a built-in a small office, or a concerned parent who wants to have more control over how your children access the Internet, then the D-Link Express EtherNetwork DI-704P is the networking solution for you 're a more advanced user...
... in 4-port switch. It also features a parallel port to the DI-704P. The DI-704P is an Ethernet Broadband Router with a built-in a small office, or a concerned parent who wants to have more control over how your children access the Internet, then the D-Link Express EtherNetwork DI-704P is the networking solution for you 're a more advanced user...

Manual
Page 8
...of the information moving to any data does not meet the criteria, that prevents unauthorized access to a destination. When you click on a link on your information should be configured to work with an FTP or Telnet server. The information that is sent and received from accessing or ... prevent unauthorized Internet users from your computer to ensure that your LAN. If the information is not intended for the computers behind your router because computers from the outside cannot access or send information directly to and from the Internet to a particular computer on a wed page...
...of the information moving to any data does not meet the criteria, that prevents unauthorized access to a destination. When you click on a link on your information should be configured to work with an FTP or Telnet server. The information that is sent and received from accessing or ... prevent unauthorized Internet users from your computer to ensure that your LAN. If the information is not intended for the computers behind your router because computers from the outside cannot access or send information directly to and from the Internet to a particular computer on a wed page...

Manual
Page 10
... DSL provider for proper installation of the modem Connect the Cable or DSL modem to the DI-704P wireless broadband router (see the Network Setup section on the DI-704P. Please refer to the quick installation guide for the Ethernet Cardbus adapter (e.g., D-Link DFE-690TXD) into a laptop computer.(See the Quick Installation Guide included with the...
... DSL provider for proper installation of the modem Connect the Cable or DSL modem to the DI-704P wireless broadband router (see the Network Setup section on the DI-704P. Please refer to the quick installation guide for the Ethernet Cardbus adapter (e.g., D-Link DFE-690TXD) into a laptop computer.(See the Quick Installation Guide included with the...

Manual
Page 11
...the Quick Installation Guide or continue to follow this manual to an available power outlet. Connect the D-Link Router Cables. Power up the D-Link router by connecting the D-Link provided power adapter to the router and to complete the installation process. 11 A. A. The complete setup should look like Fig.1 shown... above. Power OFF your computer. A. Power up the Cable or DSL modem. If you modem does not have an on your D-Link router. Connect the Ethernet (or networking) cable from the Cable or DSL modem to your computer. B. Do NOT connect the power adapter to...
...the Quick Installation Guide or continue to follow this manual to an available power outlet. Connect the D-Link Router Cables. Power up the D-Link router by connecting the D-Link provided power adapter to the router and to complete the installation process. 11 A. A. The complete setup should look like Fig.1 shown... above. Power OFF your computer. A. Power up the Cable or DSL modem. If you modem does not have an on your D-Link router. Connect the Ethernet (or networking) cable from the Cable or DSL modem to your computer. B. Do NOT connect the power adapter to...

Manual
Page 44
Provider: Select from the pull-down menu. Password/Key: Enter the password/key. 44 Host Name: Enter the Host name. DDNS: When an IP address is automatically assigned by a DHCP capable router or server) linked to a domain name. Username/Email: Enter the username/email address. Using the Configuration Menu (continued) Advanced > DDNS DDNS (Dynamic Domain Name System) keeps dynamic IP addresses (e.g., IP addresses assigned by a DHCP server, DDNS automatically updates the DNS server. Users who have a Dynamic DNS account may use this feature on the DI-704P.
Provider: Select from the pull-down menu. Password/Key: Enter the password/key. 44 Host Name: Enter the Host name. DDNS: When an IP address is automatically assigned by a DHCP capable router or server) linked to a domain name. Username/Email: Enter the username/email address. Using the Configuration Menu (continued) Advanced > DDNS DDNS (Dynamic Domain Name System) keeps dynamic IP addresses (e.g., IP addresses assigned by a DHCP server, DDNS automatically updates the DNS server. Users who have a Dynamic DNS account may use this feature on the DI-704P.

Manual
Page 45
... in the amount of the specified network that data must pass through before reaching the destination. 45 The number of hops equals the number of routers or gateways that you require specific routes within your internal network. Enable: Select this option for the specified network. Hop: Enter in the gateway IP... (continued) Advanced > Routing Static routes can be used for the specified static route to take to the specified network. Destination: Enter in a transmission path, each link is terminated at a network device such as a router or gateway.
... in the amount of the specified network that data must pass through before reaching the destination. 45 The number of hops equals the number of routers or gateways that you require specific routes within your internal network. Enable: Select this option for the specified network. Hop: Enter in the gateway IP... (continued) Advanced > Routing Static routes can be used for the specified static route to take to the specified network. Destination: Enter in a transmission path, each link is terminated at a network device such as a router or gateway.
Manual
Page 73
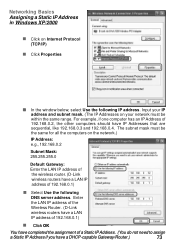
...computers on the network.) IP Address: e.g., 192.168.0.2 Subnet Mask: 255.255.255.0 Default Gateway: Enter the LAN IP address of the wireless router. (D-Link wireless routers have a LAN IP address of a Static IP Address. (You do not need to assign a Static IP Address if you have a DHCP-capable ... Networking Basics Assigning a Static IP Address in Windows XP/2000 ! Enter the LAN IP address of the Wireless Router. (D-Link wireless routers have a LAN IP address of 192.168.0.2, the other computers should have completed the assignment of 192.168.0.1) ! Click Properties ! Click OK ...
...computers on the network.) IP Address: e.g., 192.168.0.2 Subnet Mask: 255.255.255.0 Default Gateway: Enter the LAN IP address of the wireless router. (D-Link wireless routers have a LAN IP address of a Static IP Address. (You do not need to assign a Static IP Address if you have a DHCP-capable ... Networking Basics Assigning a Static IP Address in Windows XP/2000 ! Enter the LAN IP address of the Wireless Router. (D-Link wireless routers have a LAN IP address of 192.168.0.2, the other computers should have completed the assignment of 192.168.0.1) ! Click Properties ! Click OK ...


