
Product Manual
Page 12
...; Type in the IP Address of each screen after you have changed the default IP Address assigned to the DI-524, make sure to the Quick Installation Guide for more information regarding the Setup Wizard. Please refer to enter the correct IP Address. Type admin in the User Name field ...figuration Menu by opening the web-browser and typing in the IP Address of the configuration screens in this section. The DI-524 default IP Address is shown at the bottom of the Router (http://192.168.0.1) Note: if you have made a configuration change. . . . 12
...; Type in the IP Address of each screen after you have changed the default IP Address assigned to the DI-524, make sure to the Quick Installation Guide for more information regarding the Setup Wizard. Please refer to enter the correct IP Address. Type admin in the User Name field ...figuration Menu by opening the web-browser and typing in the IP Address of the configuration screens in this section. The DI-524 default IP Address is shown at the bottom of the Router (http://192.168.0.1) Note: if you have made a configuration change. . . . 12
Product Manual
Page 39
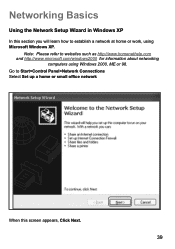
Go to establish a network at home or work, using Windows 2000, ME or 98. Networking Basics Using the Network Setup Wizard in Windows XP In this section you will learn how to Start>Control Panel>Network Connections Select Set up a home or small office network When this screen appears, Click Next. 39 Note: Please refer to websites such as http://www.homenethelp.com and http://www.microsoft.com/windows2000 for information about networking computers using Microsoft Windows XP.
Go to establish a network at home or work, using Windows 2000, ME or 98. Networking Basics Using the Network Setup Wizard in Windows XP In this section you will learn how to Start>Control Panel>Network Connections Select Set up a home or small office network When this screen appears, Click Next. 39 Note: Please refer to websites such as http://www.homenethelp.com and http://www.microsoft.com/windows2000 for information about networking computers using Microsoft Windows XP.
Product Manual
Page 42
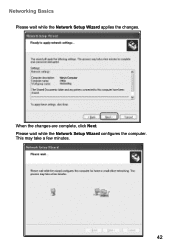
Please wait while the Network Setup Wizard configures the computer. Networking Basics Please wait while the Network Setup Wizard applies the changes. This may take a few minutes. 42 When the changes are complete, click Next.
Please wait while the Network Setup Wizard configures the computer. Networking Basics Please wait while the Network Setup Wizard applies the changes. This may take a few minutes. 42 When the changes are complete, click Next.
Product Manual
Page 44
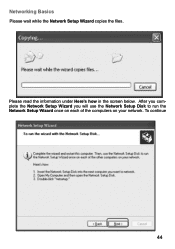
To continue 44 Please read the information under Here's how in the screen below. After you complete the Network Setup Wizard you will use the Network Setup Disk to run the Network Setup Wizard once on each of the computers on your network. Networking Basics Please wait while the Network Setup Wizard copies the files.
To continue 44 Please read the information under Here's how in the screen below. After you complete the Network Setup Wizard you will use the Network Setup Disk to run the Network Setup Wizard once on each of the computers on your network. Networking Basics Please wait while the Network Setup Wizard copies the files.
Product Manual
Page 45
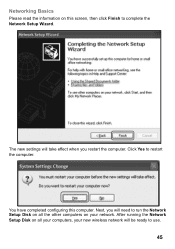
After running the Network Setup Disk on all the other computers on your new wireless network will take effect when you will need to restart the computer. You have completed configuring this screen, then click Finish to use. 45 The new settings will be ready to complete the Network Setup Wizard. Click Yes to run the Network Setup Disk on all your computers, your network. Next, you restart the computer. Networking Basics Please read the information on this computer.
After running the Network Setup Disk on all the other computers on your new wireless network will take effect when you will need to restart the computer. You have completed configuring this screen, then click Finish to use. 45 The new settings will be ready to complete the Network Setup Wizard. Click Yes to run the Network Setup Disk on all your computers, your network. Next, you restart the computer. Networking Basics Please read the information on this computer.
Product Manual
Page 74
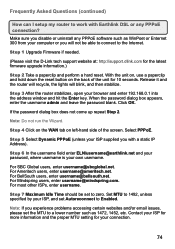
...users, enter [email protected]. For Ameritech users, enter [email protected]. Contact your connection. 74 Note: Do not run the Wizard. Set MTU to 1492, unless specified by your ISP supplied you will blink, and then stabilize. For BellSouth users, enter... the address window and hit the Enter key. Frequently Asked Questions (continued) How can I setup my router to work with a static IP Address). Step 1 Upgrade Firmware if needed. (Please visit the D-Link tech support website at: http://support.dlink.com for the latest firmware upgrade information.) ...
...users, enter [email protected]. For Ameritech users, enter [email protected]. Contact your connection. 74 Note: Do not run the Wizard. Set MTU to 1492, unless specified by your ISP supplied you will blink, and then stabilize. For BellSouth users, enter... the address window and hit the Enter key. Frequently Asked Questions (continued) How can I setup my router to work with a static IP Address). Step 1 Upgrade Firmware if needed. (Please visit the D-Link tech support website at: http://support.dlink.com for the latest firmware upgrade information.) ...
Quick Installation Guide
Page 4
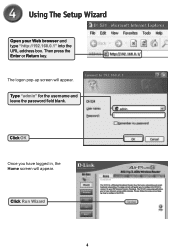
Using The Setup Wizard Open your Web browser and type "http://192.168.0.1" into the URL address box. Type "admin" for the username and leave the password field blank. Click OK Once you have logged in, the Home screen will appear. Then press the Enter or Return key. Click Run Wizard 4 The logon pop-up screen will appear.
Using The Setup Wizard Open your Web browser and type "http://192.168.0.1" into the URL address box. Type "admin" for the username and leave the password field blank. Click OK Once you have logged in, the Home screen will appear. Then press the Enter or Return key. Click Run Wizard 4 The logon pop-up screen will appear.
Quick Installation Guide
Page 5
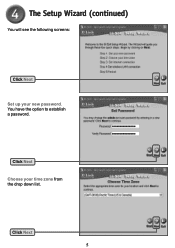
You have the option to establish a password. Click Next 5 The Setup Wizard (continued) You will see the following screens: Click Next Set up your time zone from the drop down list. Click Next Choose your new password.
You have the option to establish a password. Click Next 5 The Setup Wizard (continued) You will see the following screens: Click Next Set up your time zone from the drop down list. Click Next Choose your new password.
Quick Installation Guide
Page 6
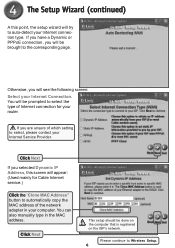
... be prompted to Wireless Setup. 6 Otherwise, you selected Dynamic IP Address, this point, the setup wizard will try to auto-detect your Internet Connection. The Setup Wizard (continued) A this screen will appear: (Used mainly for your Internet Service Provider. Please continue to select the type of which setting to select, please contact your router. If you have...
... be prompted to Wireless Setup. 6 Otherwise, you selected Dynamic IP Address, this point, the setup wizard will try to auto-detect your Internet Connection. The Setup Wizard (continued) A this screen will appear: (Used mainly for your Internet Service Provider. Please continue to select the type of which setting to select, please contact your router. If you have...
Quick Installation Guide
Page 7
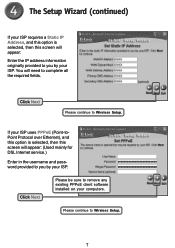
... password provided to you by your ISP. Please continue to Wireless Setup. Click Next Please continue to Wireless Setup. 7 Click Next Please be sure to complete all the required fields. You will need to remove any existing PPPoE client software installed on your computers. The Setup Wizard (continued) If your ISP requires a Static IP Address, and...
... password provided to you by your ISP. Please continue to Wireless Setup. Click Next Please continue to Wireless Setup. 7 Click Next Please be sure to complete all the required fields. You will need to remove any existing PPPoE client software installed on your computers. The Setup Wizard (continued) If your ISP requires a Static IP Address, and...
Quick Installation Guide
Page 8
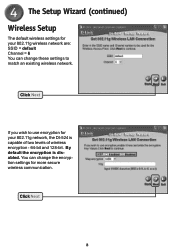
Click Next 8 By default the encryption is capable of two levels of wireless encryption - 64-bit and 128-bit. The Setup Wizard (continued) Wireless Setup The default wireless settings for your 802.11g network, the DI-524 is disabled. Click Next If you wish to match an existing wireless network. You can change the encryption settings for your 802.11g wireless network are: SSID = default Channel = 6 You can change these settings to use encryption for more secure wireless communication.
Click Next 8 By default the encryption is capable of two levels of wireless encryption - 64-bit and 128-bit. The Setup Wizard (continued) Wireless Setup The default wireless settings for your 802.11g network, the DI-524 is disabled. Click Next If you wish to match an existing wireless network. You can change the encryption settings for your 802.11g wireless network are: SSID = default Channel = 6 You can change these settings to use encryption for more secure wireless communication.

