User Guide
Page 1
DES-1004/ DES-1008 10/100 Fast Ethernet Switch User's Guide Rev. 01 (May, 1997) 6DES1008..01 Printed In Taiwan RECYCLABLE
DES-1004/ DES-1008 10/100 Fast Ethernet Switch User's Guide Rev. 01 (May, 1997) 6DES1008..01 Printed In Taiwan RECYCLABLE
User Guide
Page 7
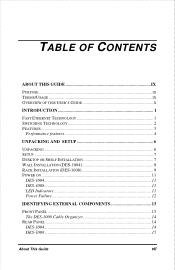
TABLE OF CONTENTS 0 ABOUT THIS GUIDE IX PURPOSE ...IX TERMS/USAGE IX OVERVIEW OF THIS USER'S GUIDE X 1 INTRODUCTION 1 FAST ETHERNET TECHNOLOGY 1 SWITCHING TECHNOLOGY 2 FEATURES ...3 Performance features 4 2 UNPACKING AND SETUP 6 UNPACKING 6 SETUP ...7 DESKTOP OR SHELF INSTALLATION 7 WALL INSTALLATION (DES-1004 8 RACK INSTALLATION (DES-1008 9 POWER ON 11 DES-1004 11 DES-1008 11 LED Indicators 11 Power Failure 12 3 IDENTIFYING EXTERNAL COMPONENTS 13 FRONT PANEL 13 The DES-1008 Cable Organizer 14 REAR PANEL 14 DES-1004 14 DES-1008 15 About This Guide vii
TABLE OF CONTENTS 0 ABOUT THIS GUIDE IX PURPOSE ...IX TERMS/USAGE IX OVERVIEW OF THIS USER'S GUIDE X 1 INTRODUCTION 1 FAST ETHERNET TECHNOLOGY 1 SWITCHING TECHNOLOGY 2 FEATURES ...3 Performance features 4 2 UNPACKING AND SETUP 6 UNPACKING 6 SETUP ...7 DESKTOP OR SHELF INSTALLATION 7 WALL INSTALLATION (DES-1004 8 RACK INSTALLATION (DES-1008 9 POWER ON 11 DES-1004 11 DES-1008 11 LED Indicators 11 Power Failure 12 3 IDENTIFYING EXTERNAL COMPONENTS 13 FRONT PANEL 13 The DES-1008 Cable Organizer 14 REAR PANEL 14 DES-1004 14 DES-1008 15 About This Guide vii
User Guide
Page 9
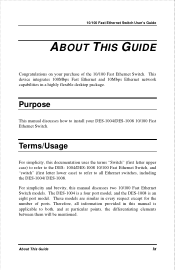
...'s Guide 0 ABOUT THIS GUIDE Congratulations on your DES-1004/DES-1008 10/100 Fast Ethernet Switch. About This Guide ix Terms/Usage For simplicity, this documentation uses the terms "Switch" (first letter upper case) to refer to the DES- 1004/DES-1008 10/100 Fast Ethernet Switch, and "switch" (first letter lower case) to refer to both, and...
...'s Guide 0 ABOUT THIS GUIDE Congratulations on your DES-1004/DES-1008 10/100 Fast Ethernet Switch. About This Guide ix Terms/Usage For simplicity, this documentation uses the terms "Switch" (first letter upper case) to refer to the DES- 1004/DES-1008 10/100 Fast Ethernet Switch, and "switch" (first letter lower case) to refer to both, and...
User Guide
Page 10
...; Chapter 3, Identifying External Components. Helps you can connect the DES-1004/ DES-1008 to your Ethernet network. ♦ Appendix A, Technical Specifications. x About This Guide Describes the Switch and its features. ♦ Chapter 2, Unpacking and Setup. Tells how you get started with the basic installation of this User's Guide ♦ Chapter 1, Introduction. Describes ...
...; Chapter 3, Identifying External Components. Helps you can connect the DES-1004/ DES-1008 to your Ethernet network. ♦ Appendix A, Technical Specifications. x About This Guide Describes the Switch and its features. ♦ Chapter 2, Unpacking and Setup. Tells how you get started with the basic installation of this User's Guide ♦ Chapter 1, Introduction. Describes ...
User Guide
Page 11
Fast Ethernet Technology The growing importance of LANs and the increasing complexity of the DES-1004/ DES-1008, as well as giving some background information about Ethernet/ Fast Ethernet switching technology. It is an extension of high-speed LAN technologies have been proposed to provide greater... solutions in the years to transmit and receive data at 100Mbps, while maintaining the CSMA/CD Ethernet protocol. 10/100 Fast Ethernet Switch User's Guide 1 1 INTRODUCTION This section describes the features of desktop computing applications are fueling the need for high performance networks....
Fast Ethernet Technology The growing importance of LANs and the increasing complexity of the DES-1004/ DES-1008, as well as giving some background information about Ethernet/ Fast Ethernet switching technology. It is an extension of high-speed LAN technologies have been proposed to provide greater... solutions in the years to transmit and receive data at 100Mbps, while maintaining the CSMA/CD Ethernet protocol. 10/100 Fast Ethernet Switch User's Guide 1 1 INTRODUCTION This section describes the features of desktop computing applications are fueling the need for high performance networks....
User Guide
Page 16
...'s Guide ♦ Four rubber feet with adhesive backing ♦ Wall Mount Kit (DES-1004 only) which includes: two tapping screws and two plastic anchors If any item is found missing or damaged, please contact your local D-Link Reseller for the Switches. Unpacking Open the shipping carton of the Switch and carefully unpack its contents.
...'s Guide ♦ Four rubber feet with adhesive backing ♦ Wall Mount Kit (DES-1004 only) which includes: two tapping screws and two plastic anchors If any item is found missing or damaged, please contact your local D-Link Reseller for the Switches. Unpacking Open the shipping carton of the Switch and carefully unpack its contents.
User Guide
Page 17
... is proper heat dissipation from and adequate ventilation around it. Attach these cushioning feet on the Switch. Do not place heavy objects on the bottom at least 1.2 Kg for the DES-1004 and 2.5 KG for the DES-1008. ♦ The power outlet should be first attached. Unpacking and Setup 7 Allow enough ventilation space...
... is proper heat dissipation from and adequate ventilation around it. Attach these cushioning feet on the Switch. Do not place heavy objects on the bottom at least 1.2 Kg for the DES-1004 and 2.5 KG for the DES-1008. ♦ The power outlet should be first attached. Unpacking and Setup 7 Allow enough ventilation space...
User Guide
Page 18
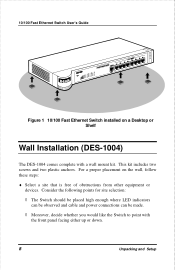
... Desktop or Shelf Wall Installation (DES-1004) The DES-1004 comes complete with the front panel facing either up or down. 8 Unpacking and Setup This kit includes two screws and two plastic anchors. Consider the following points for site selection: ◊ The Switch should be placed high enough where ...cable and power connections can be made. ◊ Moreover, decide whether you would like the Switch to point with a wall mount kit. 10/100 Fast Ethernet Switch User's Guide Figure 1 10/100 Fast Ethernet Switch installed on the wall, follow these steps: ♦ Select a site that is free ...
... Desktop or Shelf Wall Installation (DES-1004) The DES-1004 comes complete with the front panel facing either up or down. 8 Unpacking and Setup This kit includes two screws and two plastic anchors. Consider the following points for site selection: ◊ The Switch should be placed high enough where ...cable and power connections can be made. ◊ Moreover, decide whether you would like the Switch to point with a wall mount kit. 10/100 Fast Ethernet Switch User's Guide Figure 1 10/100 Fast Ethernet Switch installed on the wall, follow these steps: ♦ Select a site that is free ...
User Guide
Page 19
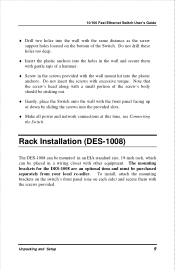
... sliding the screws into the provided slots. ♦ Make all power and network connections at this time, see Connecting the Switch. To install, attach the mounting brackets on the switch's front panel (one on the bottom of a hammer. ♦ Screw in an EIA standard size, 19-inch rack,...support holes located on each side) and secure them with gentle taps of the Switch. Rack Installation (DES-1008) The DES-1008 can be mounted in the screws provided with the screws provided. 10/100 Fast Ethernet Switch User's Guide ♦ Drill two holes into the wall with other equipment. Unpacking...
... sliding the screws into the provided slots. ♦ Make all power and network connections at this time, see Connecting the Switch. To install, attach the mounting brackets on the switch's front panel (one on the bottom of a hammer. ♦ Screw in an EIA standard size, 19-inch rack,...support holes located on each side) and secure them with gentle taps of the Switch. Rack Installation (DES-1008) The DES-1008 can be mounted in the screws provided with the screws provided. 10/100 Fast Ethernet Switch User's Guide ♦ Drill two holes into the wall with other equipment. Unpacking...
User Guide
Page 20
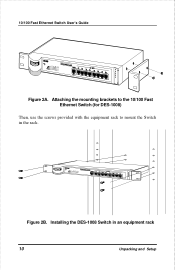
Attaching the mounting brackets to the 10/100 Fast Ethernet Switch (for DES-1008) Then, use the screws provided with the equipment rack to mount the Switch in an equipment rack 10 Unpacking and Setup 10/100 Fast Ethernet Switch User's Guide Figure 2A. Figure 2B. Installing the DES-1008 Switch in the rack.
Attaching the mounting brackets to the 10/100 Fast Ethernet Switch (for DES-1008) Then, use the screws provided with the equipment rack to mount the Switch in an equipment rack 10 Unpacking and Setup 10/100 Fast Ethernet Switch User's Guide Figure 2A. Figure 2B. Installing the DES-1008 Switch in the rack.
User Guide
Page 21
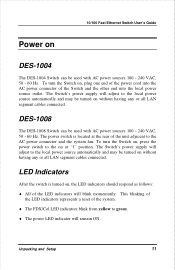
DES-1008 The DES-1008 Switch can be used with AC power sources 100 - 240 VAC, 50 - 60 Hz. Unpacking and Setup 11 The power switch is turned on, the LED indicators should respond as follows: ♦ All of the Switch and the other end into the AC power connector of the LED ...local power source automatically and may be turned on without having any or all LAN segment cables connected. 10/100 Fast Ethernet Switch User's Guide Power on DES-1004 The DES-1004 Switch can be used with AC power sources 100 - 240 VAC, 50 - 60 Hz. This blinking of the LED indicators represents...
DES-1008 The DES-1008 Switch can be used with AC power sources 100 - 240 VAC, 50 - 60 Hz. Unpacking and Setup 11 The power switch is turned on, the LED indicators should respond as follows: ♦ All of the Switch and the other end into the AC power connector of the LED ...local power source automatically and may be turned on without having any or all LAN segment cables connected. 10/100 Fast Ethernet Switch User's Guide Power on DES-1004 The DES-1004 Switch can be used with AC power sources 100 - 240 VAC, 50 - 60 Hz. This blinking of the LED indicators represents...
User Guide
Page 22
For the DES-1004, disconnect the power cord from the local power source, and for the DES-1008, press the power switch to the off or "0" position. 10/100 Fast Ethernet Switch User's Guide Power Failure As a precaution, the Switch should be turned OFF in case of a power failure. 12 Unpacking and Setup At all times, avoid leaving the Switch ON after the occurrence of a power failure. When power is resumed, turn the Switch ON.
For the DES-1004, disconnect the power cord from the local power source, and for the DES-1008, press the power switch to the off or "0" position. 10/100 Fast Ethernet Switch User's Guide Power Failure As a precaution, the Switch should be turned OFF in case of a power failure. 12 Unpacking and Setup At all times, avoid leaving the Switch ON after the occurrence of a power failure. When power is resumed, turn the Switch ON.
User Guide
Page 23
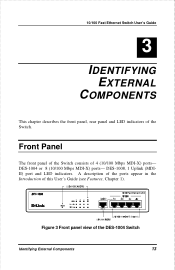
Front Panel The front panel of the Switch consists of the Switch. DES-1008, 1 Uplink (MDIII) port and LED indicators. 10/100 Fast Ethernet Switch User's Guide 3 3 IDENTIFYING EXTERNAL COMPONENTS This chapter describes the front panel, rear panel and LED indicators of 4 (10/100 Mbps MDI-X) ports- A description of the ports appear in the Introduction of this User's Guide (see Features, Chapter 1). 0',0,, Figure 3 Front panel view of the DES-1004 Switch Identifying External Components 13 DES-1004 or 8 (10/100 Mbps MDI-X) ports-
Front Panel The front panel of the Switch consists of the Switch. DES-1008, 1 Uplink (MDIII) port and LED indicators. 10/100 Fast Ethernet Switch User's Guide 3 3 IDENTIFYING EXTERNAL COMPONENTS This chapter describes the front panel, rear panel and LED indicators of 4 (10/100 Mbps MDI-X) ports- A description of the ports appear in the Introduction of this User's Guide (see Features, Chapter 1). 0',0,, Figure 3 Front panel view of the DES-1004 Switch Identifying External Components 13 DES-1004 or 8 (10/100 Mbps MDI-X) ports-
User Guide
Page 24
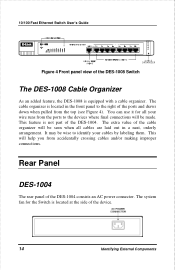
...'s Guide 1 0 /1 0 0 M CABLE ORG ANIZER Figure 4 Front panel view of the DES-1004. This feature is not part of the DES-1008 Switch The DES-1008 Cable Organizer As an added feature, the DES-1008 is equipped with a cable organizer. Rear Panel DES-1004 The rear panel of the ports and draws down when pulled from the... when all your cables by labeling them. The system fan for all cables are laid out in the front panel to the right of the DES-1004 consists an AC power connector. It may be wise to the devices where final connections will help you from the ports to identify your...
...'s Guide 1 0 /1 0 0 M CABLE ORG ANIZER Figure 4 Front panel view of the DES-1004. This feature is not part of the DES-1008 Switch The DES-1008 Cable Organizer As an added feature, the DES-1008 is equipped with a cable organizer. Rear Panel DES-1004 The rear panel of the ports and draws down when pulled from the... when all your cables by labeling them. The system fan for all cables are laid out in the front panel to the right of the DES-1004 consists an AC power connector. It may be wise to the devices where final connections will help you from the ports to identify your...
User Guide
Page 25
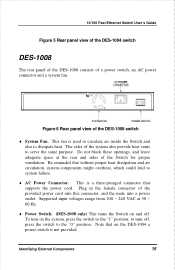
...position. Do not block these openings, and leave adequate space at 50 ~ 60 Hz. ♦ Power Switch. (DES-1008 only) This turns the Switch on the DES-1004 a power switch is a three-pronged connector that without proper heat dissipation and air circulation, system components might overheat, which could...to system failure. ♦ AC Power Connector. 10/100 Fast Ethernet Switch User's Guide Figure 5 Rear panel view of the DES-1004 switch DES-1008 The rear panel of the DES-1008 consists of the Switch for proper ventilation. Identifying External Components 15 Be reminded that supports the ...
...position. Do not block these openings, and leave adequate space at 50 ~ 60 Hz. ♦ Power Switch. (DES-1008 only) This turns the Switch on the DES-1004 a power switch is a three-pronged connector that without proper heat dissipation and air circulation, system components might overheat, which could...to system failure. ♦ AC Power Connector. 10/100 Fast Ethernet Switch User's Guide Figure 5 Rear panel view of the DES-1004 switch DES-1008 The rear panel of the DES-1008 consists of the Switch for proper ventilation. Identifying External Components 15 Be reminded that supports the ...
User Guide
Page 26
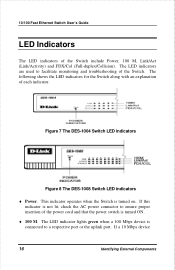
Figure 7 The DES-1004 Switch LED indicators Figure 8 The DES-1008 Switch LED indicators ♦ Power. If a 10 Mbps device 16 Identifying External Components If this indicator is connected to ensure proper insertion of the Switch. The following shows the LED indicators for the Switch along with an explanation of the Switch include Power, 100 M, Link/Act (Link/Activity) and...
Figure 7 The DES-1004 Switch LED indicators Figure 8 The DES-1008 Switch LED indicators ♦ Power. If a 10 Mbps device 16 Identifying External Components If this indicator is connected to ensure proper insertion of the Switch. The following shows the LED indicators for the Switch along with an explanation of the Switch include Power, 100 M, Link/Act (Link/Activity) and...
User Guide
Page 28
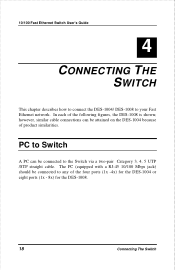
... connected to any of the four ports (1x -4x) for the DES-1004 or eight ports (1x - 8x) for the DES-1008. 18 Connecting The Switch 10/100 Fast Ethernet Switch User's Guide 4 4 CONNECTING THE SWITCH This chapter describes how to connect the DES-1004/ DES-1008 to your Fast Ethernet network. however, similar cable connections can...
... connected to any of the four ports (1x -4x) for the DES-1004 or eight ports (1x - 8x) for the DES-1008. 18 Connecting The Switch 10/100 Fast Ethernet Switch User's Guide 4 4 CONNECTING THE SWITCH This chapter describes how to connect the DES-1004/ DES-1008 to your Fast Ethernet network. however, similar cable connections can...
User Guide
Page 29
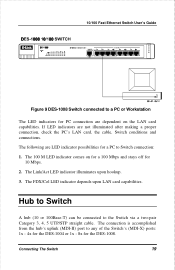
The Link/Act LED indicator illuminates upon LAN card capabilities. The connection is accomplished from the hub's uplink (MDI-II) port to Switch connection: 1. The 100 M LED indicator comes on the LAN card capabilities. 10/100 Fast Ethernet Switch User's Guide 10/100M Figure 9 DES-1008 Switch connected to a PC or ...for a 100 Mbps and stays off for the DES-1008. The following are LED indicator possibilities for a PC to any of the Switch's (MDI-X) ports: 1x - 4x for the DES-1004 or 1x - 8x for 10 Mbps. 2. Connecting The Switch 19 Hub to Switch A hub (10 or 100Base-T) can be ...
The Link/Act LED indicator illuminates upon LAN card capabilities. The connection is accomplished from the hub's uplink (MDI-II) port to Switch connection: 1. The 100 M LED indicator comes on the LAN card capabilities. 10/100 Fast Ethernet Switch User's Guide 10/100M Figure 9 DES-1008 Switch connected to a PC or ...for a 100 Mbps and stays off for the DES-1008. The following are LED indicator possibilities for a PC to any of the Switch's (MDI-X) ports: 1x - 4x for the DES-1004 or 1x - 8x for 10 Mbps. 2. Connecting The Switch 19 Hub to Switch A hub (10 or 100Base-T) can be ...
User Guide
Page 30
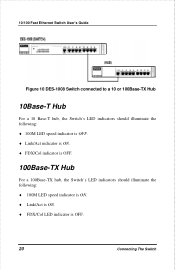
10/100 Fast Ethernet Switch User's Guide Figure 10 DES-1008 Switch connected to a 10 or 100Base-TX Hub 10Base-T Hub For a 10 Base-T hub, the Switch's LED indicators should illuminate the following: ♦ 100M LED speed indicator is OFF. ♦ Link/Act indicator is ON. ♦ FDX/Col indicator is OFF. 100Base-TX Hub For a 100Base-TX hub, the Switch's LED indicators should illuminate the following: ♦ 100M LED speed indicator is ON. ♦ Link/Act is ON. ♦ FDX/Col LED indicator is OFF. 20 Connecting The Switch
10/100 Fast Ethernet Switch User's Guide Figure 10 DES-1008 Switch connected to a 10 or 100Base-TX Hub 10Base-T Hub For a 10 Base-T hub, the Switch's LED indicators should illuminate the following: ♦ 100M LED speed indicator is OFF. ♦ Link/Act indicator is ON. ♦ FDX/Col indicator is OFF. 100Base-TX Hub For a 100Base-TX hub, the Switch's LED indicators should illuminate the following: ♦ 100M LED speed indicator is ON. ♦ Link/Act is ON. ♦ FDX/Col LED indicator is OFF. 20 Connecting The Switch
User Guide
Page 31
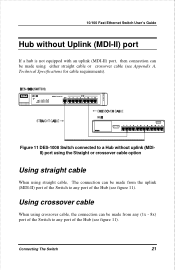
Figure 11 DES-1008 Switch connected to a Hub without Uplink (MDI-II) port If a hub is not equipped with an uplink (MDI-II) port, then connection can be made using either straight cable or crossover cable (see figure 11). 10/100 Fast Ethernet Switch User's Guide Hub without uplink (MDIII) ...using straight cable, The connection can be made from any (1x - 8x) port of the Switch to any port of the Hub (see Appendix A, Technical Specifications for cable requirements). Connecting The Switch 21 Using crossover cable When using crossover cable, the connection can be made from the uplink (MDI...
Figure 11 DES-1008 Switch connected to a Hub without Uplink (MDI-II) port If a hub is not equipped with an uplink (MDI-II) port, then connection can be made using either straight cable or crossover cable (see figure 11). 10/100 Fast Ethernet Switch User's Guide Hub without uplink (MDIII) ...using straight cable, The connection can be made from any (1x - 8x) port of the Switch to any port of the Hub (see Appendix A, Technical Specifications for cable requirements). Connecting The Switch 21 Using crossover cable When using crossover cable, the connection can be made from the uplink (MDI...


