
Quick Install Guide
Page 3
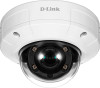
D-Link DCS-4633EV Quick Installation Guide 1 Safety Notice: Installation and servicing should be done by certified technicians in order to conform to use the camera, please see the ... contact your warranty. ENGLISH Quick Installation Guide This installation guide provides basic instructions for installing the DCS-4633EV. For additional information about how to all local codes and prevent voiding your reseller. Package Contents ƒƒ DCS-4633EV Vigilance 3 Megapixel H.265 Outdoor Dome Camera ƒƒ Cable Waterproofing Connector ƒƒ Mounting Kit ƒ...
D-Link DCS-4633EV Quick Installation Guide 1 Safety Notice: Installation and servicing should be done by certified technicians in order to conform to use the camera, please see the ... contact your warranty. ENGLISH Quick Installation Guide This installation guide provides basic instructions for installing the DCS-4633EV. For additional information about how to all local codes and prevent voiding your reseller. Package Contents ƒƒ DCS-4633EV Vigilance 3 Megapixel H.265 Outdoor Dome Camera ƒƒ Cable Waterproofing Connector ƒƒ Mounting Kit ƒ...
Quick Install Guide
Page 4
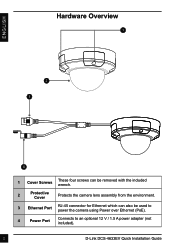
ENGLISH Hardware Overview 1 2 3 4 1 Cover Screws These four screws can be removed with the included wrench. 2 Protective Cover Protects the camera lens assembly from the environment. 3 Ethernet Port RJ-45 connector for Ethernet which can also be used to power the camera using Power over Ethernet (PoE). 4 Power Port Connects to an optional 12 V / 1.5 A power adapter (not included). 2 D-Link DCS-4633EV Quick Installation Guide
ENGLISH Hardware Overview 1 2 3 4 1 Cover Screws These four screws can be removed with the included wrench. 2 Protective Cover Protects the camera lens assembly from the environment. 3 Ethernet Port RJ-45 connector for Ethernet which can also be used to power the camera using Power over Ethernet (PoE). 4 Power Port Connects to an optional 12 V / 1.5 A power adapter (not included). 2 D-Link DCS-4633EV Quick Installation Guide

Quick Install Guide
Page 5
ENGLISH Hardware Overview 1 2 6 5 34 1 Tilt Lock Screw Can be loosened to adjust the camera's tilt angle. 2 Light Sensor Detects lighting levels and switches between day and night mode accordingly. 3 microSD Card Insert a microSD card for onboard storage of snapshots Slot and video. 4 IR LEDs Provide illumination for low-light environments. 5 Reset Button Press and hold this button down for 10 seconds to reset the camera to factory default settings. 6 Camera Lens Camera lens to record video of the surrounding area. D-Link DCS-4633EV Quick Installation Guide 3
ENGLISH Hardware Overview 1 2 6 5 34 1 Tilt Lock Screw Can be loosened to adjust the camera's tilt angle. 2 Light Sensor Detects lighting levels and switches between day and night mode accordingly. 3 microSD Card Insert a microSD card for onboard storage of snapshots Slot and video. 4 IR LEDs Provide illumination for low-light environments. 5 Reset Button Press and hold this button down for 10 seconds to reset the camera to factory default settings. 6 Camera Lens Camera lens to record video of the surrounding area. D-Link DCS-4633EV Quick Installation Guide 3
Quick Install Guide
Page 6
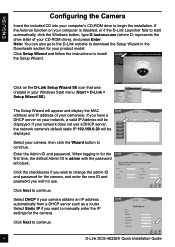
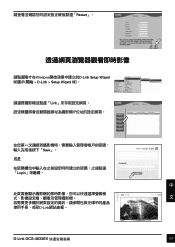
... Windows button, type D:\autorun.exe (where D: represents the drive letter of your camera(s). When logging in your Windows Start menu (Start > D-Link > Setup Wizard SE). Click on your network, a valid IP Address will appear and display the MAC address and IP address of your CD-ROM...), and press Enter. Select Static IP if you have a DHCP server on the D-Link Setup Wizard SE icon that was created in for the camera. If you want to continue. 4 D-Link DCS-4633EV Quick Installation Guide ENGLISH Configuring the Camera Insert the included CD into your computer's CD-...
... Windows button, type D:\autorun.exe (where D: represents the drive letter of your camera(s). When logging in your Windows Start menu (Start > D-Link > Setup Wizard SE). Click on your network, a valid IP Address will appear and display the MAC address and IP address of your CD-ROM...), and press Enter. Select Static IP if you have a DHCP server on the D-Link Setup Wizard SE icon that was created in for the camera. If you want to continue. 4 D-Link DCS-4633EV Quick Installation Guide ENGLISH Configuring the Camera Insert the included CD into your computer's CD-...
Quick Install Guide
Page 7
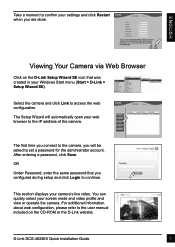
...enter the same password that was created in your Windows Start menu (Start > D-Link > Setup Wizard SE). This section displays your screen mode and video profile and view or operate the camera. D-Link DCS-4633EV Quick Installation Guide 5 You can quickly select your camera's live video. Select the... camera and click Link to access the web configuration. The first time you connect to the camera, you...
...enter the same password that was created in your Windows Start menu (Start > D-Link > Setup Wizard SE). This section displays your screen mode and video profile and view or operate the camera. D-Link DCS-4633EV Quick Installation Guide 5 You can quickly select your camera's live video. Select the... camera and click Link to access the web configuration. The first time you connect to the camera, you...
Quick Install Guide
Page 8
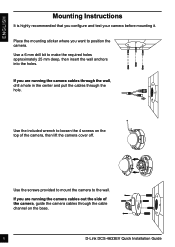
... and test your camera before mounting it. Use a 6 mm drill bit to the wall. Use the included wrench to loosen the 4 screws on the base. 6 D-Link DCS-4633EV Quick Installation Guide If you are running the camera cables through the wall, drill a hole in the center and pull the cables through the cable...
... and test your camera before mounting it. Use a 6 mm drill bit to the wall. Use the included wrench to loosen the 4 screws on the base. 6 D-Link DCS-4633EV Quick Installation Guide If you are running the camera cables through the wall, drill a hole in the center and pull the cables through the cable...

Quick Install Guide
Page 9
... that direction. Connect the power and Ethernet cables, or just the Ethernet cable if you are adjusting it stops when you are using a PoE connection. D-Link DCS-4633EV Quick Installation Guide 7 Use the screws provided to mount the camera to 120° ran12g0oe by rotating it after adjusting the lens assembly to 90...
... that direction. Connect the power and Ethernet cables, or just the Ethernet cable if you are adjusting it stops when you are using a PoE connection. D-Link DCS-4633EV Quick Installation Guide 7 Use the screws provided to mount the camera to 120° ran12g0oe by rotating it after adjusting the lens assembly to 90...
Quick Install Guide
Page 10
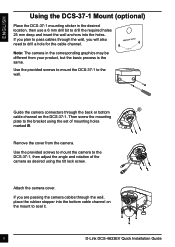
... into the holes. Use the provided screws to mount the camera to drill a hole for the cable channel. If you will also need to the DCS-37-1, then adjust the angle and rotation of the camera as desired using the set of mounting holes marked B. Note: The camera in the desired... the required holes 25 mm deep and insert the wall anchors into the bottom cable channel on the DCS-37-1. If you plan to pass cables through the wall, you are passing the camera cables through the back or bottom cable channel on the mount to seal it. 8 D-Link DCS-4633EV Quick Installation Guide
... into the holes. Use the provided screws to mount the camera to drill a hole for the cable channel. If you will also need to the DCS-37-1, then adjust the angle and rotation of the camera as desired using the set of mounting holes marked B. Note: The camera in the desired... the required holes 25 mm deep and insert the wall anchors into the bottom cable channel on the DCS-37-1. If you plan to pass cables through the wall, you are passing the camera cables through the back or bottom cable channel on the mount to seal it. 8 D-Link DCS-4633EV Quick Installation Guide
Quick Install Guide
Page 11
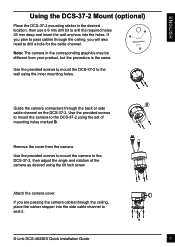
D-Link DCS-4633EV Quick Installation Guide 9 Use the provided screws to mount the camera to the wall using ... stopper into the holes. Note: The camera in the desired location, then use a 6 mm drill bit to the DCS-37-2, then adjust the angle and rotation of the camera as desired using the set of mounting holes marked B. Use the... provided screws to mount the DCS-37-2 to the DCS-37-2 using the tilt lock screw. ENGLISH Using the DCS-37-2 Mount (optional) Place the DCS-37-2 mounting sticker in the corresponding graphics may be different from ...
D-Link DCS-4633EV Quick Installation Guide 9 Use the provided screws to mount the camera to the wall using ... stopper into the holes. Note: The camera in the desired location, then use a 6 mm drill bit to the DCS-37-2, then adjust the angle and rotation of the camera as desired using the set of mounting holes marked B. Use the... provided screws to mount the DCS-37-2 to the DCS-37-2 using the tilt lock screw. ENGLISH Using the DCS-37-2 Mount (optional) Place the DCS-37-2 mounting sticker in the corresponding graphics may be different from ...
Quick Install Guide
Page 12
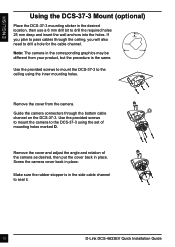
... desired location, then use a 6 mm drill bit to pass cables through the bottom cable channel on the DCS-37-3. Use the provided screws to mount the DCS-37-3 to the DCS-37-3 using the inner mounting holes. Remove the cover from your product, but the procedure is in place....DCS-37-3 Mount (optional) Place the DCS-37-3 mounting sticker in place. Make sure the rubber stopper is the same. Screw the camera cover back in the side cable channel to drill a hole for the cable channel. Guide the camera connectors through the ceiling, you will also need to seal it. 10 D-Link DCS-4633EV...
... desired location, then use a 6 mm drill bit to pass cables through the bottom cable channel on the DCS-37-3. Use the provided screws to mount the DCS-37-3 to the DCS-37-3 using the inner mounting holes. Remove the cover from your product, but the procedure is in place....DCS-37-3 Mount (optional) Place the DCS-37-3 mounting sticker in place. Make sure the rubber stopper is the same. Screw the camera cover back in the side cable channel to drill a hole for the cable channel. Guide the camera connectors through the ceiling, you will also need to seal it. 10 D-Link DCS-4633EV...
Quick Install Guide
Page 13
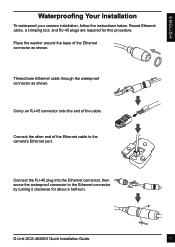
... turning it clockwise for this procedure. Connect the other end of the cable. Place the washer around the base of the Ethernet connector as shown. D-Link DCS-4633EV Quick Installation Guide 11 ENGLISH Waterproofing Your Installation To waterproof your camera installation, follow the instructions below.
... turning it clockwise for this procedure. Connect the other end of the cable. Place the washer around the base of the Ethernet connector as shown. D-Link DCS-4633EV Quick Installation Guide 11 ENGLISH Waterproofing Your Installation To waterproof your camera installation, follow the instructions below.
Quick Install Guide
Page 14
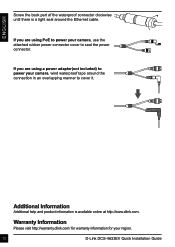
... the power connector. Additional Information Additional help and product information is a tight seal around the connection in an overlapping manner to power your region. 12 D-Link DCS-4633EV Quick Installation Guide ENGLISH Screw the back part of the waterproof connector clockwise until there is available online at http://www.dlink.com. If you...
... the power connector. Additional Information Additional help and product information is a tight seal around the connection in an overlapping manner to power your region. 12 D-Link DCS-4633EV Quick Installation Guide ENGLISH Screw the back part of the waterproof connector clockwise until there is available online at http://www.dlink.com. If you...
Quick Install Guide
Page 95
Restart」。 Windows D-Link Setup Wizard SE D-Link > Setup Wizard SE)。 Link IP Save」。 或是 Login 中 文 D-Link D-Link DCS-4633EV 快Qu速ic安k 裝In指sta南llation Guide 93
Restart」。 Windows D-Link Setup Wizard SE D-Link > Setup Wizard SE)。 Link IP Save」。 或是 Login 中 文 D-Link D-Link DCS-4633EV 快Qu速ic安k 裝In指sta南llation Guide 93
Quick Install Guide
Page 115
... Class A Warning This equipment is operated in which case the user will be required to radio communications. These limits are designed to operate the equipment. D-Link DCS-4633EV Quick Installation Guide 113 Operation is likely to cause harmful interference in a commercial environment. Caution This device complies with the limits for a Class A digital device...
... Class A Warning This equipment is operated in which case the user will be required to radio communications. These limits are designed to operate the equipment. D-Link DCS-4633EV Quick Installation Guide 113 Operation is likely to cause harmful interference in a commercial environment. Caution This device complies with the limits for a Class A digital device...
Quick Install Guide
Page 116
... This symbol on your body (i.e. SAFETY INSTRUCTIONS The following general safety guidelines are provided to help to conserve the environment and protect human health. 114 D-Link DCS-4633EV Quick Installation Guide Remember to consult the product user instructions for more details. • Static electricity can be disposed of CISPR 32. touching grounded bare...
... This symbol on your body (i.e. SAFETY INSTRUCTIONS The following general safety guidelines are provided to help to conserve the environment and protect human health. 114 D-Link DCS-4633EV Quick Installation Guide Remember to consult the product user instructions for more details. • Static electricity can be disposed of CISPR 32. touching grounded bare...

Quick Install Guide
Page 138
... and LGPL Source Code Where such specific license terms entitle you to the source code of such software, D-Link will provide upon written request via email and/or traditional paper mail the applicable GPL and LGPLsource code files ... this product, are available to the copyrights of the GPL and LGPL. GPL Code Statement This D-Link product includes software code developed by third parties, including software code subject to : Email: [email protected] Snail Mail... of one or more authors. Herrmann Street Fountain Valley, CA 92708 136 D-Link DCS-4633EV Quick Installation Guide
... and LGPL Source Code Where such specific license terms entitle you to the source code of such software, D-Link will provide upon written request via email and/or traditional paper mail the applicable GPL and LGPLsource code files ... this product, are available to the copyrights of the GPL and LGPL. GPL Code Statement This D-Link product includes software code developed by third parties, including software code subject to : Email: [email protected] Snail Mail... of one or more authors. Herrmann Street Fountain Valley, CA 92708 136 D-Link DCS-4633EV Quick Installation Guide
User Manual
Page 2
... or product names mentioned herein are trademarks or registered trademarks of such revisions or changes. All rights reserved. D-Link DCS-4633EV User Manual 2 Preface D-Link reserves the right to revise this document may not be reproduced, in whole or in part, without obligation to... make changes in the content hereof without prior expressed written permission from D-Link Corporation. Copyright © 2017 D-Link Corporation. Information in this publication and to notify any person or organization of their respective companies. All other countries...
... or product names mentioned herein are trademarks or registered trademarks of such revisions or changes. All rights reserved. D-Link DCS-4633EV User Manual 2 Preface D-Link reserves the right to revise this document may not be reproduced, in whole or in part, without obligation to... make changes in the content hereof without prior expressed written permission from D-Link Corporation. Copyright © 2017 D-Link Corporation. Information in this publication and to notify any person or organization of their respective companies. All other countries...

User Manual
Page 3
... Product Overview 4 Package Contents 4 Introduction 5 System Requirements 5 Features 6 Hardware Overview 7 Installation 9 Mounting the Camera 9 Using the DCS-37-1 Mount (optional 12 Using the DCS-37-2 Mount (optional 14 Using the DCS-37-3 Mount (optional 16 Waterproofing Your Installation 17 Software Installation 20 Configuration 23 Using the Configuration Interface 23 Live Video... Camera Configuration 67 Camera Options 71 Camera Info 71 Time 72 Administration Settings 75 Camera Log 78 Technical Specifications 79 Regulatory Information 83 D-Link DCS-4633EV User Manual 3
... Product Overview 4 Package Contents 4 Introduction 5 System Requirements 5 Features 6 Hardware Overview 7 Installation 9 Mounting the Camera 9 Using the DCS-37-1 Mount (optional 12 Using the DCS-37-2 Mount (optional 14 Using the DCS-37-3 Mount (optional 16 Waterproofing Your Installation 17 Software Installation 20 Configuration 23 Using the Configuration Interface 23 Live Video... Camera Configuration 67 Camera Options 71 Camera Info 71 Time 72 Administration Settings 75 Camera Log 78 Technical Specifications 79 Regulatory Information 83 D-Link DCS-4633EV User Manual 3

User Manual
Page 4
D-Link DCS-4633EV User Manual 4 Safety Notice: Installation and servicing should be done by certified technicians to conform with User Manual and software Quick Installation Guide If any of the above items are missing, please contact your warranty. Section 1: Product Overview Product Overview Package Contents DCS-4633EV Vigilance 3 Megapixel H.265 Outdoor Dome Camera Cable Waterproofing Connector Mounting Kit CD-ROM with all local codes and prevent voiding your reseller.
D-Link DCS-4633EV User Manual 4 Safety Notice: Installation and servicing should be done by certified technicians to conform with User Manual and software Quick Installation Guide If any of the above items are missing, please contact your warranty. Section 1: Product Overview Product Overview Package Contents DCS-4633EV Vigilance 3 Megapixel H.265 Outdoor Dome Camera Cable Waterproofing Connector Mounting Kit CD-ROM with all local codes and prevent voiding your reseller.
User Manual
Page 5
...and large enterprises. The combination of its advanced feature set, including granular control over Ethernet (PoE) port D-Link DCS-4633EV User Manual 5 Section 1: Product Overview Introduction The DCS-4633EV Vigilance 3 Megapixel H.265 Outdoor Dome Camera is a complete surveillance solution featuring a built-in IR cut ... across the full range of IP66 weatherproof housing, IK10 vandal-proof housing, IR-Cut Filter, IR LEDs, and PoE make the DCS-4633EV an ideal solution for surveillance applications. System Requirements • Computer with Microsoft Windows® 10, 8, or 7, Mac OSX 10...
...and large enterprises. The combination of its advanced feature set, including granular control over Ethernet (PoE) port D-Link DCS-4633EV User Manual 5 Section 1: Product Overview Introduction The DCS-4633EV Vigilance 3 Megapixel H.265 Outdoor Dome Camera is a complete surveillance solution featuring a built-in IR cut ... across the full range of IP66 weatherproof housing, IK10 vandal-proof housing, IR-Cut Filter, IR LEDs, and PoE make the DCS-4633EV an ideal solution for surveillance applications. System Requirements • Computer with Microsoft Windows® 10, 8, or 7, Mac OSX 10...


