
Quick Guide
Page 1
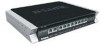
Building Networks for People Network Security Firewall This Quick Guide will guide you through the installation Process. You are only moments away from using your new D-Link Network Security Product DFL-800
Building Networks for People Network Security Firewall This Quick Guide will guide you through the installation Process. You are only moments away from using your new D-Link Network Security Product DFL-800
Quick Guide
Page 2
DFL-800 Quick Installation Guide 1.Before You Begin 1.1 Check Your Package Contents 1 2.Indentifying Components 2.1 Front View 2 2.2 LED Indicators 3 2.3 Default Interface Attribute Definition 3 3.Connecting the DFL-800 3.1 Setting up Firewall to your Network 4 4.Configure DFL-800 4.1 Configure your Computer's IP 5 4.2 Using the Setup Wizard 6 5.Appendix 5.1 How to Configure Static IP Manually on Microsoft Windows XP 14 5.2 How to Configure Static IP Manually on Apple MAC OS X 15 6.WARRANTY
DFL-800 Quick Installation Guide 1.Before You Begin 1.1 Check Your Package Contents 1 2.Indentifying Components 2.1 Front View 2 2.2 LED Indicators 3 2.3 Default Interface Attribute Definition 3 3.Connecting the DFL-800 3.1 Setting up Firewall to your Network 4 4.Configure DFL-800 4.1 Configure your Computer's IP 5 4.2 Using the Setup Wizard 6 5.Appendix 5.1 How to Configure Static IP Manually on Microsoft Windows XP 14 5.2 How to Configure Static IP Manually on Apple MAC OS X 15 6.WARRANTY
Quick Guide
Page 3
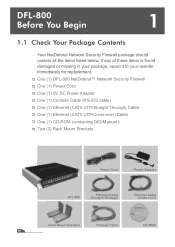
One (1) DFL-800 NetDefend™ Network Security Firewall One (1) Power Cord One (1) 5V DC Power Adapter One (1) Console Cable (RS-232 cable) One (1) Ethernet (CAT5 UTP/Straight Through) Cable One (1) Ethernet (CAT5 UTP/Cross-over) Cable One (1) CD-ROM (containing QIG/Manual ) Two (2) Rack Mount Brackets Power Cord Power Adapter DFL-800 Ethernet Cable (Straight-Through) Ethernet Cable (Cross-over) Rack Mount Brackets Console Cable CD-ROM 01 If any of these items is found damaged or missing in your package...
One (1) DFL-800 NetDefend™ Network Security Firewall One (1) Power Cord One (1) 5V DC Power Adapter One (1) Console Cable (RS-232 cable) One (1) Ethernet (CAT5 UTP/Straight Through) Cable One (1) Ethernet (CAT5 UTP/Cross-over) Cable One (1) CD-ROM (containing QIG/Manual ) Two (2) Rack Mount Brackets Power Cord Power Adapter DFL-800 Ethernet Cable (Straight-Through) Ethernet Cable (Cross-over) Rack Mount Brackets Console Cable CD-ROM 01 If any of these items is found damaged or missing in your package...

Quick Guide
Page 4
... Crossover function. 02 DMZ Port 5. Connects to RS-232 console cable that can be opened by pulling down the lid. Note: None of Ethernet cables to the internal network. Identifying Components 2 The following illustrates the front panel of an Ethernet cable to a Cable or DSL modem. The console port is for the connection of the DFL-800. Power LED 2. These are for the connection of the WAN1 and WAN2 interfaces support Auto MDI/MDI...
... Crossover function. 02 DMZ Port 5. Connects to RS-232 console cable that can be opened by pulling down the lid. Note: None of Ethernet cables to the internal network. Identifying Components 2 The following illustrates the front panel of an Ethernet cable to a Cable or DSL modem. The console port is for the connection of the DFL-800. Power LED 2. These are for the connection of the WAN1 and WAN2 interfaces support Auto MDI/MDI...
Quick Guide
Page 5
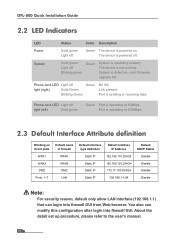
... Port is defective, such firmware upgrade fail. You also can login into firewall GUI. DFL-800 Quick Installation Guide 2.2 LED Indicators LED Status Color Description Power Solid green Light off Green The device is operating properly. System Solid green Light off Blinking green Green System is powered on Front plate WAN1 WAN2 DMZ Ports: 1~7 Default name in firewall WAN1 WAN2 DMZ LAN Default interface type definition Default interface IP Address Static IP 192.168.110.254/24 Static IP Static IP...
... Port is defective, such firmware upgrade fail. You also can login into firewall GUI. DFL-800 Quick Installation Guide 2.2 LED Indicators LED Status Color Description Power Solid green Light off Green The device is operating properly. System Solid green Light off Blinking green Green System is powered on Front plate WAN1 WAN2 DMZ Ports: 1~7 Default name in firewall WAN1 WAN2 DMZ LAN Default interface type definition Default interface IP Address Static IP 192.168.110.254/24 Static IP Static IP...

Quick Guide
Page 6
... DFL-800 and connect it to a port on the DFL-800 will use to configure the DFL-800 to the Ethernet jack located on the front panel of the power cord to indicate proper operation. The LED light above the Enternet port will turn ON to a wall outlet or power strip. Connecting the DFL-800 3 3.1 Connecting Firewall to step B and repeat its instructions. If the LED light is securely connected, powered on the Cable / DSL modem by turning on /off switch...
... DFL-800 and connect it to a port on the DFL-800 will use to configure the DFL-800 to the Ethernet jack located on the front panel of the power cord to indicate proper operation. The LED light above the Enternet port will turn ON to a wall outlet or power strip. Connecting the DFL-800 3 3.1 Connecting Firewall to step B and repeat its instructions. If the LED light is securely connected, powered on the Cable / DSL modem by turning on /off switch...
Quick Guide
Page 7
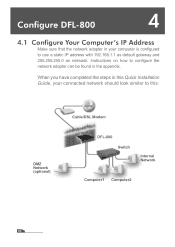
Instructions on how to configure the network adapter can be found in this : DMZ Network (optional) Cable/DSL Modem DFL-800 Switch Internal Network Computer1 Computer2 05 When you have completed the steps in the appendix. Configure DFL-800 4 4.1 Configure Your Computer's IP Address Make sure that the network adapter in your computer is configured to this Quick Installation Guide, your connected network should look similar to use a static IP address with 192.168.1.1 as default gateway and 255.255.255.0 as netmask.
Instructions on how to configure the network adapter can be found in this : DMZ Network (optional) Cable/DSL Modem DFL-800 Switch Internal Network Computer1 Computer2 05 When you have completed the steps in the appendix. Configure DFL-800 4 4.1 Configure Your Computer's IP Address Make sure that the network adapter in your computer is configured to this Quick Installation Guide, your connected network should look similar to use a static IP address with 192.168.1.1 as default gateway and 255.255.255.0 as netmask.

Quick Guide
Page 8
DFL-800 Quick Installation Guide 4.2 Using the Setup Wizard The DFL-800 provides Web based configuration. Open your browser. If you need to the DFL-800 web interface. For example: http://192.168.1.1. To start using the default username and password. Type the default Username/Password Username: admin Pasword: admin and click Login 06 Then press the Enter or Return key. (The IP Address shown in MS Windows, Macintosh or UNIX based platforms. Activate your Web browser and type http://192.168.1.1 / into the Location...
DFL-800 Quick Installation Guide 4.2 Using the Setup Wizard The DFL-800 provides Web based configuration. Open your browser. If you need to the DFL-800 web interface. For example: http://192.168.1.1. To start using the default username and password. Type the default Username/Password Username: admin Pasword: admin and click Login 06 Then press the Enter or Return key. (The IP Address shown in MS Windows, Macintosh or UNIX based platforms. Activate your Web browser and type http://192.168.1.1 / into the Location...
Quick Guide
Page 9
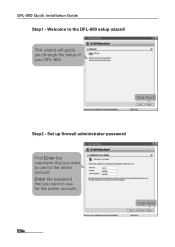
Enter the password that you through the setup of your DFL-800 Click Next Step2 - Click Next 07 This wizard will guide you want to the DFL-800 setup wizard! Welcome to use for the admin account. DFL-800 Quick Installation Guide Step1 - Set up firewall administrator password First Enter the username that you want to use for the admin account.
Enter the password that you through the setup of your DFL-800 Click Next Step2 - Click Next 07 This wizard will guide you want to the DFL-800 setup wizard! Welcome to use for the admin account. DFL-800 Quick Installation Guide Step1 - Set up firewall administrator password First Enter the username that you want to use for the admin account.
Quick Guide
Page 10
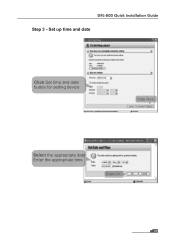
Set up time and date 2 DFL-800 Quick Installation Guide Click Set time and date button for setting device Click Next Select the appropriate date Enter the appropriate time Click OK 08 Step 3 -
Set up time and date 2 DFL-800 Quick Installation Guide Click Set time and date button for setting device Click Next Select the appropriate date Enter the appropriate time Click OK 08 Step 3 -
Quick Guide
Page 11
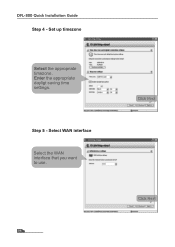
Step 5 - Select WAN interface Select the WAN interface that you want to use. 09 Click Next Click Next DFL-800 Quick Installation Guide Step 4 - Set up timezone Select the appropriate timezone. Enter the appropriate dayligt saving time settings.
Step 5 - Select WAN interface Select the WAN interface that you want to use. 09 Click Next Click Next DFL-800 Quick Installation Guide Step 4 - Set up timezone Select the appropriate timezone. Enter the appropriate dayligt saving time settings.
Quick Guide
Page 12
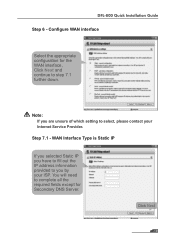
Configure WAN interface Select the appropriate configuration for the WAN interface, Click Next and continue to complete all the required fields except for Secondary DNS Server. You will need to step 7.1 further down. WAN Interface Type is Static IP If you selected Static IP you by your Internet Service Provider. Note: If you are unsure of which setting to you have to fill out the IP address information provided to select, please contact your ISP. Click Next 10 Step 7.1 - DFL-800 Quick Installation Guide Step 6 -
Configure WAN interface Select the appropriate configuration for the WAN interface, Click Next and continue to complete all the required fields except for Secondary DNS Server. You will need to step 7.1 further down. WAN Interface Type is Static IP If you selected Static IP you by your Internet Service Provider. Note: If you are unsure of which setting to you have to fill out the IP address information provided to select, please contact your ISP. Click Next 10 Step 7.1 - DFL-800 Quick Installation Guide Step 6 -
Quick Guide
Page 13
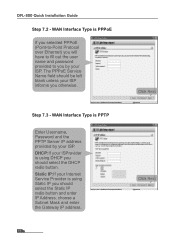
... the PPTP Server IP address provided by your Internet Service Provider is using Static IP you should select the Static IP radio button and enter IP Address, choose a Subnet Mask and enter the Gateway IP address. 11 Click Next Click Next DHCP:If your ISProvider is using DHCP you should select the DHCP radio button. Step 7.3 - DFL-800 Quick Installation Guide Step 7.2 - WAN Interface Type is PPPoE If you selected PPPoE (Point-to-Point Protocol over Ethernet) you will have to fill out the user...
... the PPTP Server IP address provided by your Internet Service Provider is using Static IP you should select the Static IP radio button and enter IP Address, choose a Subnet Mask and enter the Gateway IP address. 11 Click Next Click Next DHCP:If your ISProvider is using DHCP you should select the DHCP radio button. Step 7.3 - DFL-800 Quick Installation Guide Step 7.2 - WAN Interface Type is PPPoE If you selected PPPoE (Point-to-Point Protocol over Ethernet) you will have to fill out the user...
Quick Guide
Page 14
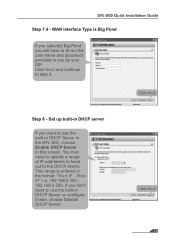
... and password provided to you don't want to use the built-in DHCP Server in the DFL-800, choose Enable DHCP Server in this screen. Click Next Step 8 - You then need to specify a range of IP addresses to hand out to step 8. Click Next and continue to the DHCP clients. WAN Interface Type is entered in DHCP Server or configure it later, choose Disable DHCP Server. Stop IP" i.e. 192.168.0.100 192.168.0.200. DFL-800 Quick Installation Guide Step 7.4 -
... and password provided to you don't want to use the built-in DHCP Server in the DFL-800, choose Enable DHCP Server in this screen. Click Next Step 8 - You then need to specify a range of IP addresses to hand out to step 8. Click Next and continue to the DHCP clients. WAN Interface Type is entered in DHCP Server or configure it later, choose Disable DHCP Server. Stop IP" i.e. 192.168.0.100 192.168.0.200. DFL-800 Quick Installation Guide Step 7.4 -
Quick Guide
Page 15
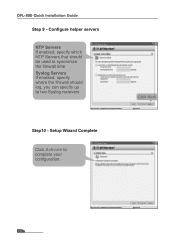
Setup Wizard Complete Click Activate to two Syslog recievers Step10 - Configure helper servers NTP Servers If enabled, specify which NTP Servers that should be used to syncronize the firewall time Syslog Servers If enabled, specify where the firewall should log, you can specify up to complete your configuration. DFL-800 Quick Installation Guide Step 9 - Click Next 13
Setup Wizard Complete Click Activate to two Syslog recievers Step10 - Configure helper servers NTP Servers If enabled, specify which NTP Servers that should be used to syncronize the firewall time Syslog Servers If enabled, specify where the firewall should log, you can specify up to complete your configuration. DFL-800 Quick Installation Guide Step 9 - Click Next 13
Quick Guide
Page 16
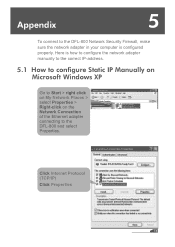
Appendix 5 To connect to the DFL-800 Network Security Firewall, make sure the network adapter in your computer is how to configure the network adapter manually to the correct IP-address. 5.1 How to configure Static IP Manually on Microsoft Windows XP Go to Start > right click on My Network Places > select Properties > Right-click on the Network Connection of the Ethernet adapter connecting to the DFL-800 and select Properties. Here is configured properly. Click Internet Protocol (TCP/IP) Click Properties 14
Appendix 5 To connect to the DFL-800 Network Security Firewall, make sure the network adapter in your computer is how to configure the network adapter manually to the correct IP-address. 5.1 How to configure Static IP Manually on Microsoft Windows XP Go to Start > right click on My Network Places > select Properties > Right-click on the Network Connection of the Ethernet adapter connecting to the DFL-800 and select Properties. Here is configured properly. Click Internet Protocol (TCP/IP) Click Properties 14
Quick Guide
Page 17
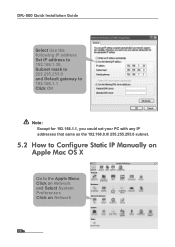
DFL-800 Quick Installation Guide Select Use the following IP address Set IP address to 192.168.1.30, Subnet mask to 255.255.255.0 and Default gateway to 192.168.1.1 Click OK Note: Except for 192.168.1.1, you could set your PC with any IP addresses that same as the 192.168.0.0/ 255.255.255.0 subnet. 5.2 How to Configure Static IP Manually on Apple Mac OS X Go to the Apple Menu Click on Network and Select System Preferences Click on Network 15
DFL-800 Quick Installation Guide Select Use the following IP address Set IP address to 192.168.1.30, Subnet mask to 255.255.255.0 and Default gateway to 192.168.1.1 Click OK Note: Except for 192.168.1.1, you could set your PC with any IP addresses that same as the 192.168.0.0/ 255.255.255.0 subnet. 5.2 How to Configure Static IP Manually on Apple Mac OS X Go to the Apple Menu Click on Network and Select System Preferences Click on Network 15
Quick Guide
Page 18
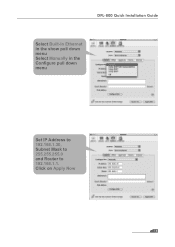
Click on Apply Now 16 DFL-800 Quick Installation Guide Select Built-in Ethernet in the show pull down menu Select Manually in the Configure pull down menu Set IP Address to 192.168.1.30, Subnet Mask to 255.255.255.0 and Router to 192.168.1.1.
Click on Apply Now 16 DFL-800 Quick Installation Guide Select Built-in Ethernet in the show pull down menu Select Manually in the Configure pull down menu Set IP Address to 192.168.1.30, Subnet Mask to 255.255.255.0 and Router to 192.168.1.1.

Quick Guide
Page 19
.... These limits are designed to provide reasonable protection against harmful interference when the equipment is a Class A product. Warnung! Precaución! Ceci est un produit de classe B. Im Wohnbereich kann dieses Produkt Funkstoerungen verursachen.... if not installed and used in accordance with the limits for a Class B digital device, pursuant to Part 15 of this equipment in a residential area is likely to cause harmful interference in which case the user will be ... been tested and found to comply with this user's guide, may cause harmful interference to radio communications.
.... These limits are designed to provide reasonable protection against harmful interference when the equipment is a Class A product. Warnung! Precaución! Ceci est un produit de classe B. Im Wohnbereich kann dieses Produkt Funkstoerungen verursachen.... if not installed and used in accordance with the limits for a Class B digital device, pursuant to Part 15 of this equipment in a residential area is likely to cause harmful interference in which case the user will be ... been tested and found to comply with this user's guide, may cause harmful interference to radio communications.


