
Manual
Page 2
... Introduction...1 External Features ...3 Port Connectors 3 Rear Panel Connectors 4 Network Cable Connector 4 DC Power Connector 4 LED Indicators 5 Front Panel...6 Parallel Port Connector 6 Setting up the DP-301P 7 Installing the Print Server 7 Power ON Self-Test 8 Getting Started...10 Using PS-Wizard...11 Auto-Run Installation 11 PS-Wizard...12 Installing PS-Wizard 12 Using PS...
... Introduction...1 External Features ...3 Port Connectors 3 Rear Panel Connectors 4 Network Cable Connector 4 DC Power Connector 4 LED Indicators 5 Front Panel...6 Parallel Port Connector 6 Setting up the DP-301P 7 Installing the Print Server 7 Power ON Self-Test 8 Getting Started...10 Using PS-Wizard...11 Auto-Run Installation 11 PS-Wizard...12 Installing PS-Wizard 12 Using PS...
Manual
Page 4
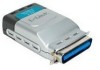
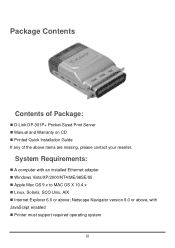
System Requirements: „ A computer with JavaScript enabled „ Printer must support required operating system iii Package Contents Contents of Package: „ D-Link DP-301P+ Pocket-Sized Print Server „ Manual and Warranty on CD „ Printed Quick Installation Guide If any of the above ; Netscape Navigator version 6.0 or above, with an installed Ethernet adapter „ Windows Vista/XP/2000/NT4/ME/98SE/95 „ Apple Mac OS 9.x to MAC OS X 10.4.x „ Linux, Solaris, SCO Unix, AIX „ Internet Explorer 6.0 or above items are missing, please contact your reseller.
System Requirements: „ A computer with JavaScript enabled „ Printer must support required operating system iii Package Contents Contents of Package: „ D-Link DP-301P+ Pocket-Sized Print Server „ Manual and Warranty on CD „ Printed Quick Installation Guide If any of the above ; Netscape Navigator version 6.0 or above, with an installed Ethernet adapter „ Windows Vista/XP/2000/NT4/ME/98SE/95 „ Apple Mac OS 9.x to MAC OS X 10.4.x „ Linux, Solaris, SCO Unix, AIX „ Internet Explorer 6.0 or above items are missing, please contact your reseller.

Manual
Page 5
... you wish to locate printer services. On peer-to-peer networks, workstations can print directly to the Print Server without increasing the load of managing print file traffic to its connected printers. The DP-301P+ also supports Telnet as a print server can. Introduction The D-Link DP-301P+ Print Server is IEEE1284-compliant high-speed bi-directional port, which can transmit to high-speed...
... you wish to locate printer services. On peer-to-peer networks, workstations can print directly to the Print Server without increasing the load of managing print file traffic to its connected printers. The DP-301P+ also supports Telnet as a print server can. Introduction The D-Link DP-301P+ Print Server is IEEE1284-compliant high-speed bi-directional port, which can transmit to high-speed...

Manual
Page 6
... this manual for Workgroups, Microsoft LAN Manager, IBM LAN Server „ AppleTalk MacOS EtherTalk Furthermore, the print server features a useful software: PS-Wizard. The print server also supports configuration and management via the Telnet protocol for the print server, and assist you to users. „ Because the DP-301P+ is an user-friendly program used to complete further settings...
... this manual for Workgroups, Microsoft LAN Manager, IBM LAN Server „ AppleTalk MacOS EtherTalk Furthermore, the print server features a useful software: PS-Wizard. The print server also supports configuration and management via the Telnet protocol for the print server, and assist you to users. „ Because the DP-301P+ is an user-friendly program used to complete further settings...
Manual
Page 7
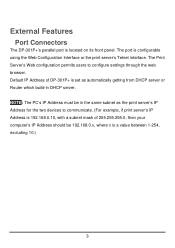
....0.x, where x is set as automatically getting from DHCP server or Router which build-in DHCP server. The port is located on its front panel. The Print Server's Web configuration permits users to communicate. (For example, if print server's IP Address is 192.168.0.10, with a subnet mask of DP-301P+ is a value between 1-254, excluding 10.) 3 External Features...
....0.x, where x is set as automatically getting from DHCP server or Router which build-in DHCP server. The port is located on its front panel. The Print Server's Web configuration permits users to communicate. (For example, if print server's IP Address is 192.168.0.10, with a subnet mask of DP-301P+ is a value between 1-254, excluding 10.) 3 External Features...

Manual
Page 8
DC Power Connector The DC power input connector is located on the Print Server's rear panel and is labeled DC 5V. 4 Rear Panel Connectors Network Cable Connector The Print Server's rear panel feature an RJ-45 connector for connection to automatically detect or negotiate the transmission speed of the network. The port supports the NWay protocol, allowing the Print Server to 10Base-T Ethernet cabling or 100Base-TX Fast Ethernet cabling (which should be Category 5 twisted-pair cable).
DC Power Connector The DC power input connector is located on the Print Server's rear panel and is labeled DC 5V. 4 Rear Panel Connectors Network Cable Connector The Print Server's rear panel feature an RJ-45 connector for connection to automatically detect or negotiate the transmission speed of the network. The port supports the NWay protocol, allowing the Print Server to 10Base-T Ethernet cabling or 100Base-TX Fast Ethernet cabling (which should be Category 5 twisted-pair cable).

Manual
Page 9
The indicator blinks off briefly to indicate that the Print Server has a good connection to the Ethernet or Fast Ethernet network. These three indicators are also used by the Print Server's Power-ON Self Test (POST) to indicate any hardware failures. 5 LED Indicators The rear panel of the print server features three LED indicators: „ Steady green confirms that the Print Server is powered ON. „ LPT Lights up to indicate printing activity. „ ACT Steady green confirms that the Print Server is receiving or transmitting from the network.
The indicator blinks off briefly to indicate that the Print Server has a good connection to the Ethernet or Fast Ethernet network. These three indicators are also used by the Print Server's Power-ON Self Test (POST) to indicate any hardware failures. 5 LED Indicators The rear panel of the print server features three LED indicators: „ Steady green confirms that the Print Server is powered ON. „ LPT Lights up to indicate printing activity. „ ACT Steady green confirms that the Print Server is receiving or transmitting from the network.

Manual
Page 10
There is no need for a parallel port cable between the print server and your network printer. Plug this connector directly into the parallel port on your network printer. 6 Front Panel Parallel Port Connector The front panel of the print server features the parallel port connector.
There is no need for a parallel port cable between the print server and your network printer. Plug this connector directly into the parallel port on your network printer. 6 Front Panel Parallel Port Connector The front panel of the print server features the parallel port connector.

Manual
Page 11
...network printer. 6. Plug the power adapter into the DC 5V power socket on the Print Server's front panel should illuminate steadily, and the Print Server's Self-Test will supply power to the DP-301P+. 2. This will proceed. 7 Confirm proper operation of the printer, switch its ...parallel port on the connected printer. 7. Setting up the DP-301P+ Installing the Print Server WARNING: Configuration problems may result if the Print Server is powered up without first establishing its power OFF. 3. Connect the DP-301P+ RJ-45 Connector to avoid complications at the configuration stage...
...network printer. 6. Plug the power adapter into the DC 5V power socket on the Print Server's front panel should illuminate steadily, and the Print Server's Self-Test will supply power to the DP-301P+. 2. This will proceed. 7 Confirm proper operation of the printer, switch its ...parallel port on the connected printer. 7. Setting up the DP-301P+ Installing the Print Server WARNING: Configuration problems may result if the Print Server is powered up without first establishing its power OFF. 3. Connect the DP-301P+ RJ-45 Connector to avoid complications at the configuration stage...

Manual
Page 15
... into your computer in PDF format for step-by-step instructions of the print server. • Install Acrobat Reader - click to launch Acrobat Reader for the viewing and printing of PDF files in PDF format for detailed information of the print server Installation. • View Manual - click to preview the Quick Installation Guide in the...
... into your computer in PDF format for step-by-step instructions of the print server. • Install Acrobat Reader - click to launch Acrobat Reader for the viewing and printing of PDF files in PDF format for detailed information of the print server Installation. • View Manual - click to preview the Quick Installation Guide in the...
Manual
Page 16
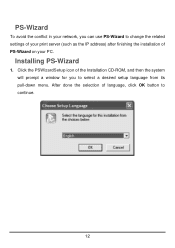
Installing PS-Wizard 1. After done the selection of PS-Wizard on your PC. Click the PSWizardSetup icon of the Installation CD-ROM, and then the system will prompt a window for you can use PS-Wizard to change the related settings of your print server (such as the IP address) after finishing the installation of language, click OK button to select a desired setup language from its pull-down menu. PS-Wizard To avoid the conflict in your network, you to continue. 12
Installing PS-Wizard 1. After done the selection of PS-Wizard on your PC. Click the PSWizardSetup icon of the Installation CD-ROM, and then the system will prompt a window for you can use PS-Wizard to change the related settings of your print server (such as the IP address) after finishing the installation of language, click OK button to select a desired setup language from its pull-down menu. PS-Wizard To avoid the conflict in your network, you to continue. 12

Manual
Page 19
5. Click Finish button to install the software, and the Progress bar indicates the installation is automatically installed to your computer, and creates a folder in StartÎ ProgramsÎ PS-Wizard. 15 The InstallShield Wizard starts to complete the installation. After installing the program, the application program for the print server is proceeding until the following window shows up.
5. Click Finish button to install the software, and the Progress bar indicates the installation is automatically installed to your computer, and creates a folder in StartÎ ProgramsÎ PS-Wizard. 15 The InstallShield Wizard starts to complete the installation. After installing the program, the application program for the print server is proceeding until the following window shows up.
Manual
Page 20
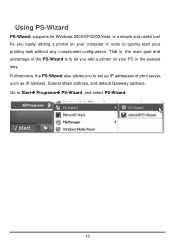
Using PS-Wizard PS-Wizard, supports for Windows 2000/XP/2003/Vista, is to let you add a printer on your computer in order to quickly start your PC in the easiest way. Go to set up IP addresses of print server, such as IP address, Subnet Mask address, and default Gateway address. Furthermore, the PS-Wizard also allows you easily adding a printer on your printing task without any complicated configuration. That is, the main goal and advantage of the PS-Wizard is a simple and useful tool for you to StartÎ ProgramsÎ PS-Wizard, and select PS-Wizard. 16
Using PS-Wizard PS-Wizard, supports for Windows 2000/XP/2003/Vista, is to let you add a printer on your computer in order to quickly start your PC in the easiest way. Go to set up IP addresses of print server, such as IP address, Subnet Mask address, and default Gateway address. Furthermore, the PS-Wizard also allows you easily adding a printer on your printing task without any complicated configuration. That is, the main goal and advantage of the PS-Wizard is a simple and useful tool for you to StartÎ ProgramsÎ PS-Wizard, and select PS-Wizard. 16

Manual
Page 21
Print Server: This field allows you to manually discover the connected print server and to do further configuration of the print server that is selected from the list. 17
Print Server: This field allows you to manually discover the connected print server and to do further configuration of the print server that is selected from the list. 17
Manual
Page 22
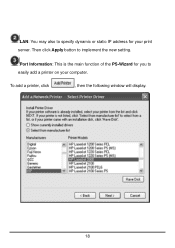
Then click Apply button to implement the new setting. Port Information: This is the main function of the PS-Wizard for your computer. To add a printer, click , then the following window will display. 18 LAN: You may also to specify dynamic or static IP address for you to easily add a printer on your print server.
Then click Apply button to implement the new setting. Port Information: This is the main function of the PS-Wizard for your computer. To add a printer, click , then the following window will display. 18 LAN: You may also to specify dynamic or static IP address for you to easily add a printer on your print server.

Manual
Page 27
You may click a desired link from the bar, to the product information, you can access and control the print server's configuration through five links on the top of the print server's configuration will show up in the left column, and then the corresponding content will appear (see below). In addition to display its submenu and select a desired option listed in the center column. 23 Then the main screen of this main screen: Setup, Advanced, Maintenance, Status, and Help.
You may click a desired link from the bar, to the product information, you can access and control the print server's configuration through five links on the top of the print server's configuration will show up in the left column, and then the corresponding content will appear (see below). In addition to display its submenu and select a desired option listed in the center column. 23 Then the main screen of this main screen: Setup, Advanced, Maintenance, Status, and Help.

Manual
Page 28
SETUP > Print Server Setup The Print Server Setup screen allows you can configure the basic information of the print server, assigned in Server Name field, and a location for the print server, assigned in Location (optional) field. 24 D-Link does not recommend changing these settings unless asked to modify the Print Server Name and Port Name, as below shows. The basic information contains a name of print server. Print Server Name In this field, you to do so by your network administrator.
SETUP > Print Server Setup The Print Server Setup screen allows you can configure the basic information of the print server, assigned in Server Name field, and a location for the print server, assigned in Location (optional) field. 24 D-Link does not recommend changing these settings unless asked to modify the Print Server Name and Port Name, as below shows. The basic information contains a name of print server. Print Server Name In this field, you to do so by your network administrator.

Manual
Page 29
For more information, please refer to abandon. 25 Port Settings In this field, you to work correctly. Once you have changed the settings in each option, click Apply Settings to store the settings, or Cancel to your printer's manual. It also allows you can assign the Port Name for the print server, and the description for the Printer port. NOTE: PJL (Printer Job Language) has certain job requirements that must be met to select the PJL Printer setting (Yes or No).
For more information, please refer to abandon. 25 Port Settings In this field, you to work correctly. Once you have changed the settings in each option, click Apply Settings to store the settings, or Cancel to your printer's manual. It also allows you can assign the Port Name for the print server, and the description for the Printer port. NOTE: PJL (Printer Job Language) has certain job requirements that must be met to select the PJL Printer setting (Yes or No).

Manual
Page 30
Please note that this section is optional and you configure the local network settings of the settings here to get print server up and running. Once you have changed the settings in the following boxes, including IP Address, Subnet Mask, and Default Gateway. SETUP > LAN Setup The ... or automatic method. When you choose Manually Assign, you to abandon. 26 TCP/IP This field allows you should not need to change any of print server.
Please note that this section is optional and you configure the local network settings of the settings here to get print server up and running. Once you have changed the settings in the following boxes, including IP Address, Subnet Mask, and Default Gateway. SETUP > LAN Setup The ... or automatic method. When you choose Manually Assign, you to abandon. 26 TCP/IP This field allows you should not need to change any of print server.

Manual
Page 31
SETUP > Printer Setup The Printer Setup screen allows you will install a network printer onto your print server. When you click Next you install the printer drivers for the printer currently connected to download and run a windows wizard program which will be asked to your computer. Network Printer Wizard Clicking Next to download and run some software. 27
SETUP > Printer Setup The Printer Setup screen allows you will install a network printer onto your print server. When you click Next you install the printer drivers for the printer currently connected to download and run a windows wizard program which will be asked to your computer. Network Printer Wizard Clicking Next to download and run some software. 27


