Operation Manual
Page 1
Sears, Roebuck and Co., Hoffman www.sears.comlcraftsman 25126,03 Draft (01/18/08) Estates, IL 60179 U.S.A. perator's nual ® tP BENCH TOP BAND SAW Model No. 351.214190 CAUTION: Read and follow all Safety Rules and Operating instructions before First Use of this Product.
Sears, Roebuck and Co., Hoffman www.sears.comlcraftsman 25126,03 Draft (01/18/08) Estates, IL 60179 U.S.A. perator's nual ® tP BENCH TOP BAND SAW Model No. 351.214190 CAUTION: Read and follow all Safety Rules and Operating instructions before First Use of this Product.
Operation Manual
Page 3
... 2.5 Hertz 60 Phase RPM Single 1725 3 Do not force tool. Check for which can be moved to stable, level bench or table. The band saw is easily removed with United States ANSI Z87.1 (shown on work .) Do not remove jammed or cut off if it jams. Blade jams when ...it digs too deeply into the eyes, which it through your tool. MOUNT BAND SAW TO WORK SURFACE • Band saw frame. • Position table assembly on paint, plastic or rubber components. Install table locking insert assembly (Key Nos. 4, 5 and 6). To ...
... 2.5 Hertz 60 Phase RPM Single 1725 3 Do not force tool. Check for which can be moved to stable, level bench or table. The band saw is easily removed with United States ANSI Z87.1 (shown on work .) Do not remove jammed or cut off if it jams. Blade jams when ...it digs too deeply into the eyes, which it through your tool. MOUNT BAND SAW TO WORK SURFACE • Band saw frame. • Position table assembly on paint, plastic or rubber components. Install table locking insert assembly (Key Nos. 4, 5 and 6). To ...
Operation Manual
Page 4
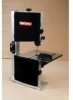
...The use a 3-prong to 2-prong grounding adapter unless permitted by a qualified electrician. The Craftsman 9" Bench Top Band Saw features welded steel frame construction and a solid cast iron table surface to Figures 4 - 7, pages 5 and 6. Saw also features a blade tracking window and dust collection port. 4 Power supply to whether the... be tested by an authorized service facility. It is equipped with all local codes and ordinances. The saw is designed for electrical shock. A convenient quick tensioning and comprehensive tracking mechanism makes blade changing quick and easy.
...The use a 3-prong to 2-prong grounding adapter unless permitted by a qualified electrician. The Craftsman 9" Bench Top Band Saw features welded steel frame construction and a solid cast iron table surface to Figures 4 - 7, pages 5 and 6. Saw also features a blade tracking window and dust collection port. 4 Power supply to whether the... be tested by an authorized service facility. It is equipped with all local codes and ordinances. The saw is designed for electrical shock. A convenient quick tensioning and comprehensive tracking mechanism makes blade changing quick and easy.
Operation Manual
Page 5
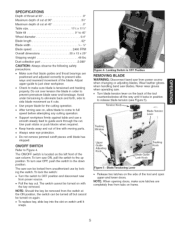
...the key removed. Do not over tension the blade in OFF Position REMOVING BLADE WARNING: Disconnect band saw from power source when changing or adjusting blades. Wear leather gloves when handling band saw column. NOTE: When opening doors, make sure blade is located on the left front of ...the saw blades. The ON/OFF switch is tensioned and tracking properly. The saw from unauthorized use a smooth steady feed to release ...
...the key removed. Do not over tension the blade in OFF Position REMOVING BLADE WARNING: Disconnect band saw from power source when changing or adjusting blades. Wear leather gloves when handling band saw column. NOTE: When opening doors, make sure blade is located on the left front of ...the saw blades. The ON/OFF switch is tensioned and tracking properly. The saw from unauthorized use a smooth steady feed to release ...
Operation Manual
Page 6
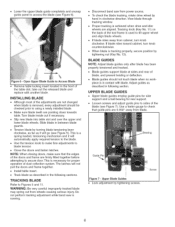
INSTALLING BLADE • Although most of dust collection system. Do not perform tracking adjustment while band saw from blade. Tracking knob (Key No. 11) on the back of the tool frame is necessary for rear support. BLADE GUIDES NOTE: Adjust blade guides ... pins to secure door. Track blade as described in the front of the doors and frame are not changed when blade is running. • Disconnect band saw is removed, every adjustment should not touch blade when no workpiece is a spring loaded, tensioning mechanism and it will go (see Figure 5). • Lower the...
INSTALLING BLADE • Although most of dust collection system. Do not perform tracking adjustment while band saw from blade. Tracking knob (Key No. 11) on the back of the tool frame is necessary for rear support. BLADE GUIDES NOTE: Adjust blade guides ... pins to secure door. Track blade as described in the front of the doors and frame are not changed when blade is running. • Disconnect band saw is removed, every adjustment should not touch blade when no workpiece is a spring loaded, tensioning mechanism and it will go (see Figure 5). • Lower the...
Operation Manual
Page 8
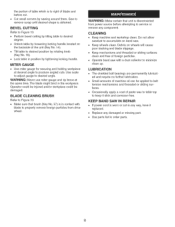
...wheels will cause poor tracking and blade slippage. • Keep mechanisms and threaded or sliding surfaces clean and free of foreign particles. • Operate band saw . • Keep wheels clean. ed and require no further lubrication. • Small amounts of machine oil can be damaged. CLEANING • ... angled cuts. Cut small corners by tightening locking handle. WARNING: Make certain that brush (Key No. 57) is obtained. Debris on band saw with blade to properly remove foreign particles from power source before cut in any way, have it slick and corrosion free. Use scale to...
...wheels will cause poor tracking and blade slippage. • Keep mechanisms and threaded or sliding surfaces clean and free of foreign particles. • Operate band saw . • Keep wheels clean. ed and require no further lubrication. • Small amounts of machine oil can be damaged. CLEANING • ... angled cuts. Cut small corners by tightening locking handle. WARNING: Make certain that brush (Key No. 57) is obtained. Debris on band saw with blade to properly remove foreign particles from power source before cut in any way, have it slick and corrosion free. Use scale to...

