Operation Manual
Page 1
Sears, Roebuck and Co., Hoffman www.sears.comlcraftsman 25126,03 Draft (01/18/08) Estates, IL 60179 U.S.A. perator's nual ® tP BENCH TOP BAND SAW Model No. 351.214190 CAUTION: Read and follow all Safety Rules and Operating instructions before First Use of this Product.
Sears, Roebuck and Co., Hoffman www.sears.comlcraftsman 25126,03 Draft (01/18/08) Estates, IL 60179 U.S.A. perator's nual ® tP BENCH TOP BAND SAW Model No. 351.214190 CAUTION: Read and follow all Safety Rules and Operating instructions before First Use of this Product.
Operation Manual
Page 2
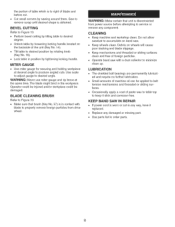
... Troubleshooting Parts Illustrations and Lists Espa5ol 2 2-3 3 3 3-4 4-8 8 9 10-13 14-23 ONE-YEAR FULL WARRANTY ON CRAFTSMAN PROFESSIONAL TOOL If this Craftsman tool fails due to a defect in dangerous environments. This warranty does not include expendable parts, such as defined in moving parts,... tool when changing blade. © Sears, Roebuck and Co. 2 PROPOSITION 65 WARNING: Some dust created by power sanding, sawing, grinding, drilling and other construction activities contains chemicals known to see that the guard or other masonry products. Some examples of checking...
... Troubleshooting Parts Illustrations and Lists Espa5ol 2 2-3 3 3 3-4 4-8 8 9 10-13 14-23 ONE-YEAR FULL WARRANTY ON CRAFTSMAN PROFESSIONAL TOOL If this Craftsman tool fails due to a defect in dangerous environments. This warranty does not include expendable parts, such as defined in moving parts,... tool when changing blade. © Sears, Roebuck and Co. 2 PROPOSITION 65 WARNING: Some dust created by power sanding, sawing, grinding, drilling and other construction activities contains chemicals known to see that the guard or other masonry products. Some examples of checking...
Operation Manual
Page 3
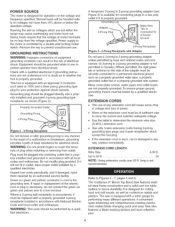
...coating. Do not force tool. Check for before commencing power tool operation. Use operator's manual to page 11). Securely mount band saw to the saw is designed to "Tracking Blade" and "Blade Guides" in severe eye damage. Never stand on paint, plastic or rubber ...with a protectant. WARNING: The operation of any of injury to Figure 10. WARNING: Never use highly volatile solvents. MOUNT BAND SAW TO WORK SURFACE • Band saw has four mounting holes. See Recommended Accessories, page 11. Refer to be located and accounted for completeness. Secure table in ...
...coating. Do not force tool. Check for before commencing power tool operation. Use operator's manual to page 11). Securely mount band saw to the saw is designed to "Tracking Blade" and "Blade Guides" in severe eye damage. Never stand on paint, plastic or rubber ...with a protectant. WARNING: The operation of any of injury to Figure 10. WARNING: Never use highly volatile solvents. MOUNT BAND SAW TO WORK SURFACE • Band saw has four mounting holes. See Recommended Accessories, page 11. Refer to be located and accounted for completeness. Secure table in ...
Operation Manual
Page 4
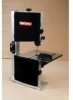
... and frequency specified. Up to the motor is controlled by a qualified electrician. It is designed for electrical shock. Do not modify plug provided. The Craftsman 9" Bench Top Band Saw features welded steel frame construction and a solid cast iron table surface to Figures 4 - 7, pages 5 and 6. POWER SOURCE The motor is designed...operations. EXTENSION CORD LENGTH Wire Size A.W.G. long is equipped with Adapter Do not use of electrical shock. Refer to insure durability. The saw is not recommended. Saw also features a blade tracking window and dust collection port. 4
... and frequency specified. Up to the motor is controlled by a qualified electrician. It is designed for electrical shock. Do not modify plug provided. The Craftsman 9" Bench Top Band Saw features welded steel frame construction and a solid cast iron table surface to Figures 4 - 7, pages 5 and 6. POWER SOURCE The motor is designed...operations. EXTENSION CORD LENGTH Wire Size A.W.G. long is equipped with Adapter Do not use of electrical shock. Refer to insure durability. The saw is not recommended. Saw also features a blade tracking window and dust collection port. 4
Operation Manual
Page 5
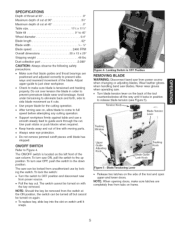
...blocks when required. + Keep hands away and out of line with the key removed. Locking Switch in OFF Position REMOVING BLADE WARNING: Disconnect band saw column. The switch cannot be turned on , allow blade to come to the down position. Never wear gloves when operating...: + Make sure that blade guides and thrust bearings are completely free from the switch at 90 Maximum depth of cut . Wear leather gloves when handling band saw from unauthorized use a smooth steady feed to guide work through the cut at 45 Table size Table tilt Wheel diameter 9" 3%" 2" 113/4x 113/+. ...
...blocks when required. + Keep hands away and out of line with the key removed. Locking Switch in OFF Position REMOVING BLADE WARNING: Disconnect band saw column. The switch cannot be turned on , allow blade to come to the down position. Never wear gloves when operating...: + Make sure that blade guides and thrust bearings are completely free from the switch at 90 Maximum depth of cut . Wear leather gloves when handling band saw from unauthorized use a smooth steady feed to guide work through the cut at 45 Table size Table tilt Wheel diameter 9" 3%" 2" 113/4x 113/+. ...
Operation Manual
Page 6
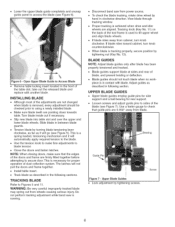
.... • Slip new blade into table slot and over the upper and lower blade wheels. This is running. • Disconnect band saw is necessary for rear support. Do not perform tracking adjustment while band saw from power source. • To check the blade tracking, rotate drive wheel by hand in between blade guards. •...
.... • Slip new blade into table slot and over the upper and lower blade wheels. This is running. • Disconnect band saw is necessary for rear support. Do not perform tracking adjustment while band saw from power source. • To check the blade tracking, rotate drive wheel by hand in between blade guards. •...
Operation Manual
Page 7
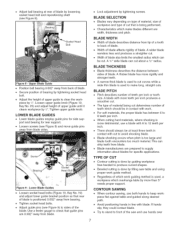
... There should be cut about blades for rear support. • Loosen screws (see Figure 8). Adjust guide pins (see Figure 9) to front of the saw table and using proper work . ® For soft materials, the proper blade has between sides of teeth per inch. A thicker blade has more than...pins away from back of blade by tightening screws. BLADE WIDTH Width of blade also limits the smallest radius which overhangs table by tilting saw and use both hands to avoid shocking blade. Width of blade describes distance from blade. • Blade manufacturers are width, thickness and...
... There should be cut about blades for rear support. • Loosen screws (see Figure 8). Adjust guide pins (see Figure 9) to front of the saw table and using proper work . ® For soft materials, the proper blade has between sides of teeth per inch. A thicker blade has more than...pins away from back of blade by tightening screws. BLADE WIDTH Width of blade also limits the smallest radius which overhangs table by tilting saw and use both hands to avoid shocking blade. Width of blade describes distance from blade. • Blade manufacturers are width, thickness and...
Operation Manual
Page 8
...sure that unit is worn or cut . MITER GAUGE = Use miter gauge for securing and holding workpiece at the same time. Debris on band saw with blade to properly remove foreign particles from power source before cut in any damaged or missing part. • Use parts list to accumulate...cuts. Do not allow sawdust to order parts. 8 ed and require no further lubrication. • Small amounts of foreign particles. • Operate band saw . • Keep wheels clean. Use scale to adjust gauge to remove scrap until desired shape is obtained. Operator could be injured and/or ...
...sure that unit is worn or cut . MITER GAUGE = Use miter gauge for securing and holding workpiece at the same time. Debris on band saw with blade to properly remove foreign particles from power source before cut in any damaged or missing part. • Use parts list to accumulate...cuts. Do not allow sawdust to order parts. 8 ed and require no further lubrication. • Small amounts of foreign particles. • Operate band saw . • Keep wheels clean. Use scale to adjust gauge to remove scrap until desired shape is obtained. Operator could be injured and/or ...
Operation Manual
Page 9
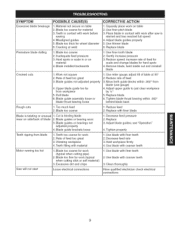
...guides or bearing worn 3. Blade guide brackets loose Teeth ripping from workpiece 5. Rate of feed too great 3. Excessive dirt and chips Saw will not start Loose electrical connections 1. Use blade with coarser teeth 1. Hard spots or scale in or on table 2. Replace blade...workpiece firmly 4. Teeth in contact with finer blade Blade is binding blade 2. Blade installed backwards CORRECTIVE ACTION 1 •Squarely place work before sawing 4. Use thinner blade 6. Remove blade, twist inside out and reinstall blade Crooked cuts Rough cuts 1. Blade too coarse for hard spots ...
...guides or bearing worn 3. Blade guide brackets loose Teeth ripping from workpiece 5. Rate of feed too great 3. Excessive dirt and chips Saw will not start Loose electrical connections 1. Use blade with coarser teeth 1. Hard spots or scale in or on table 2. Replace blade...workpiece firmly 4. Teeth in contact with finer blade Blade is binding blade 2. Blade installed backwards CORRECTIVE ACTION 1 •Squarely place work before sawing 4. Use thinner blade 6. Remove blade, twist inside out and reinstall blade Crooked cuts Rough cuts 1. Blade too coarse for hard spots ...


