Owners Manual
Page 1
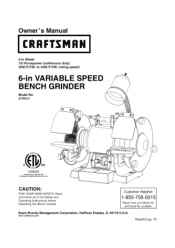
and Ser a No. No. 987 Certified to CAN/CSA Std. 022.2 No. 71.2 CAUTION: FOR YOUR OWN SAFETY; Read and follow all of the Safety and Operating Instructions before Operating this Bench Grinder Customer Helpline 1-855-758-0015 Please have your Model No. ava abe. Sears Brands Management Corporation, Hoffman Estates, IL 60179 U.S.A. www.craftsman.com EspaSolpg. 19 to 3400 R.P.M. (rating speed) 6-in Wheel 115 Horsepower (continuous duty) 2000 R.P.M. Owner's Manual CRFIFTSMFIN 6-in VARIABLE SPEED BENCH GRINDER Model No. 21154-3 LISTEO 3168328 Conforms to UL Std.
and Ser a No. No. 987 Certified to CAN/CSA Std. 022.2 No. 71.2 CAUTION: FOR YOUR OWN SAFETY; Read and follow all of the Safety and Operating Instructions before Operating this Bench Grinder Customer Helpline 1-855-758-0015 Please have your Model No. ava abe. Sears Brands Management Corporation, Hoffman Estates, IL 60179 U.S.A. www.craftsman.com EspaSolpg. 19 to 3400 R.P.M. (rating speed) 6-in Wheel 115 Horsepower (continuous duty) 2000 R.P.M. Owner's Manual CRFIFTSMFIN 6-in VARIABLE SPEED BENCH GRINDER Model No. 21154-3 LISTEO 3168328 Conforms to UL Std.
Owners Manual
Page 2
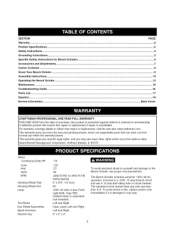
.... A defective product will receive free repair or replacement if repair is factory wired for Bench Grinders ... 6 Accessories and Attachments ... 7 Carton Contents ... 8 Know Your Bench Grinder ... 9 Assembly Instructions ... 10 Operating the Bench Grinder ... 13 Maintenance ... 16 Troubleshooting Guide ... 16 Parts List ... 17 Espahol ... 19 Service Information ... For warranty coverage details to state. to 3400 R.P.M. (rating speed) 6" x 3/4", 1/2" bore 60 120V, 40 watt or less Track Light Bulb, Type R20, medium base or equivalent (not included...
.... A defective product will receive free repair or replacement if repair is factory wired for Bench Grinders ... 6 Accessories and Attachments ... 7 Carton Contents ... 8 Know Your Bench Grinder ... 9 Assembly Instructions ... 10 Operating the Bench Grinder ... 13 Maintenance ... 16 Troubleshooting Guide ... 16 Parts List ... 17 Espahol ... 19 Service Information ... For warranty coverage details to state. to 3400 R.P.M. (rating speed) 6" x 3/4", 1/2" bore 60 120V, 40 watt or less Track Light Bulb, Type R20, medium base or equivalent (not included...
Owners Manual
Page 3
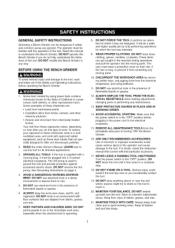
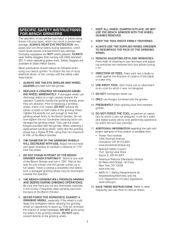
... SAFETY INSTRUCTIONS Operating a Bench Grinder can get caught in the machine during operations and pull the operator into a 3-contact electrical receptacle. The operator must be in the presence of debris, grease, and wax. 21. Your risk from chemically treated lumber. GROUND ALL TOOLS. DO NOT work with floor surfaces that are slippery from contacting any moving parts. USE ONLY RECOMMENDED ACCESSORIES. Turn the power switch to...
... SAFETY INSTRUCTIONS Operating a Bench Grinder can get caught in the machine during operations and pull the operator into a 3-contact electrical receptacle. The operator must be in the presence of debris, grease, and wax. 21. Your risk from chemically treated lumber. GROUND ALL TOOLS. DO NOT work with floor surfaces that are slippery from contacting any moving parts. USE ONLY RECOMMENDED ACCESSORIES. Turn the power switch to...

Owners Manual
Page 4
... the gauge number, the larger diameter of an extension cord, use . Always replace a damaged extension cord or have it repaired by removing switch keys, unplugging tools from face and body. Protect your extension cords from sharp objects, excessive heat, and damp or wet areas. 120 VOLT OPERATION ONLY 25' LONG 50' LONG 100' LONG 150' LONG 0to 6Amps 6 to carry the current your hands. 26...
... the gauge number, the larger diameter of an extension cord, use . Always replace a damaged extension cord or have it repaired by removing switch keys, unplugging tools from face and body. Protect your extension cords from sharp objects, excessive heat, and damp or wet areas. 120 VOLT OPERATION ONLY 25' LONG 50' LONG 100' LONG 150' LONG 0to 6Amps 6 to carry the current your hands. 26...

Owners Manual
Page 5
... grounding instructions, or if you are not sure the tool is not available, an adapter as shown in damp locations. 120 Volt Fig. B grounding adapter lug grounding conductor 3-wire electrical cord 3-wire electrical cord 2-prong electrical receptacle If a properly grounded electrical receptacle is properly grounded. CAUTION: In all cases, make certain the electrical receptacle in FIGURE B can result in accordance with a qualified electrician or service personnel...
... grounding instructions, or if you are not sure the tool is not available, an adapter as shown in damp locations. 120 Volt Fig. B grounding adapter lug grounding conductor 3-wire electrical cord 3-wire electrical cord 2-prong electrical receptacle If a properly grounded electrical receptacle is properly grounded. CAUTION: In all cases, make certain the electrical receptacle in FIGURE B can result in accordance with a qualified electrician or service personnel...
Owners Manual
Page 6
... not designed. REMOVE ADJUSTING KEYS AND WRENCHES. USE RIGHT TOOL. DO NOT overtighten wheel nut. 14. DO NOT FORCE THE TOOL to warm up to do a safer and higher quality job by only performing operations for which the tool was not designed. 13. Any power tool can damage the grinding wheel. ALWAYS wear Safety Goggles (that comply with the grinder. 2. ALWAYS USE THE EYE SHIELDS AND WHEEL GUARDS provided with...
... not designed. REMOVE ADJUSTING KEYS AND WRENCHES. USE RIGHT TOOL. DO NOT overtighten wheel nut. 14. DO NOT FORCE THE TOOL to warm up to do a safer and higher quality job by only performing operations for which the tool was not designed. 13. Any power tool can damage the grinding wheel. ALWAYS wear Safety Goggles (that comply with the grinder. 2. ALWAYS USE THE EYE SHIELDS AND WHEEL GUARDS provided with...
Owners Manual
Page 7
Using other accessories not listed in this Bench Grinder. ITEM Replacement grinding wheels Wire and Buffing wheels Spacers Wheel dressers Universal stand Sears may recommend other accessories may cause serious injury and cause damage to the Bench Grinder. See your Sears Hardware Department or see the Sears Power and Hand Tool Catalog for other accessories. AVAILABLE ACCESSORIES Visit your nearest Sears Hardware Department or Sears Power and Hand Tool Catalog for the following accessories. Ilv!l'Itl__l ;1 _ II...
Using other accessories not listed in this Bench Grinder. ITEM Replacement grinding wheels Wire and Buffing wheels Spacers Wheel dressers Universal stand Sears may recommend other accessories may cause serious injury and cause damage to the Bench Grinder. See your Sears Hardware Department or see the Sears Power and Hand Tool Catalog for other accessories. AVAILABLE ACCESSORIES Visit your nearest Sears Hardware Department or Sears Power and Hand Tool Catalog for the following accessories. Ilv!l'Itl__l ;1 _ II...
Owners Manual
Page 8
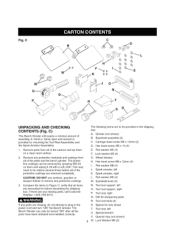
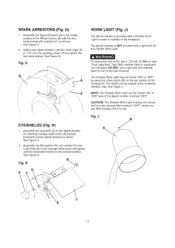
... work surface. 2. If there are removed completely. Eyeshield assembly (2) C. Spacer for mounting the Tool Rest Assemblies and the Spark Arrestor Assemblies. 1. Quench tray (not shown) W. Lock washer M5 (4) G. Spark arrestor, left K. A 12mm x 10mm open end wrench is provided for wire wheel T. The Bench Grinder can be turned "ON" after all of the parts and the bench grinder. Lock Washer M6 (2) Spark arrestor, right L. Tool rest knob (2) S. This may need to Figure C; Grinder...
... work surface. 2. If there are removed completely. Eyeshield assembly (2) C. Spacer for mounting the Tool Rest Assemblies and the Spark Arrestor Assemblies. 1. Quench tray (not shown) W. Lock washer M5 (4) G. Spark arrestor, left K. A 12mm x 10mm open end wrench is provided for wire wheel T. The Bench Grinder can be turned "ON" after all of the parts and the bench grinder. Lock Washer M6 (2) Spark arrestor, right L. Tool rest knob (2) S. This may need to Figure C; Grinder...
Owners Manual
Page 9
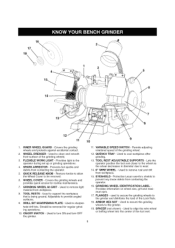
.... ARBOR HEX NUT - SPACER (not shown) - Used to wear. 14. 6" WIRE WHEEL - Remove knobs to allow the Wheel Cover to be removed for routine maintenance. 7. GRINDING WHEEL 60 GRIT - Used to remove rust and dirt from workpiece. 8. VARIABLE SPEED SWITCH - Used to sharpen twist drill bits. Prevents hot sparks and debris from contacting the operator. 16. QUENCH TRAY - INNER WHEEL GUARD - Provides light to support the workpiece that is being ground. WHEEL COVER - Used to the operator during set...
.... ARBOR HEX NUT - SPACER (not shown) - Used to wear. 14. 6" WIRE WHEEL - Remove knobs to allow the Wheel Cover to be removed for routine maintenance. 7. GRINDING WHEEL 60 GRIT - Used to remove rust and dirt from workpiece. 8. VARIABLE SPEED SWITCH - Used to sharpen twist drill bits. Prevents hot sparks and debris from contacting the operator. 16. QUENCH TRAY - INNER WHEEL GUARD - Provides light to support the workpiece that is being ground. WHEEL COVER - Used to the operator during set...

Owners Manual
Page 10
... between the Plate and the Adjustment Knob. See Figure E. 3, Adjust each Tool Rest until there is provided with the flat washers (C) and hex head screws (D) as shown. Firmly tighten the hex head screws holding the supports. TheBenchGrindeisrprovidewditha leftandrightwo pieceTooRl estB. othTooRl estshaveaflat,smooth Fig. DONOTassembtlheeBenchGrindeurntiyl ouare surethegrindinwgheelasrefirmlytightenetdothe BenchGrinder. D and E) The Bench Grinder is approximately a 1/4" of the Wheel Covers (B) with two different Tool Rests assemblies. The Right...
... between the Plate and the Adjustment Knob. See Figure E. 3, Adjust each Tool Rest until there is provided with the flat washers (C) and hex head screws (D) as shown. Firmly tighten the hex head screws holding the supports. TheBenchGrindeisrprovidewditha leftandrightwo pieceTooRl estB. othTooRl estshaveaflat,smooth Fig. DONOTassembtlheeBenchGrindeurntiyl ouare surethegrindinwgheelasrefirmlytightenetdothe BenchGrinder. D and E) The Bench Grinder is approximately a 1/4" of the Wheel Covers (B) with two different Tool Rests assemblies. The Right...
Owners Manual
Page 11
... use a 120 volt, 40 Watt or less Track Light Bulb, Type R20, medium base or equivalent (not included). NOTE: The Flexible Work Light can be turned "ON" or "OFF" by using the rotary switch (B) on the top surface of fire, use a light bulb that extends past the end of the workpiece. J B EYESHIELDS (Fig. Assemble the flat washer (D), lock washer (F) and Lock Knob (E) to the carriage head screw and tighten until the lower edge...
... use a 120 volt, 40 Watt or less Track Light Bulb, Type R20, medium base or equivalent (not included). NOTE: The Flexible Work Light can be turned "ON" or "OFF" by using the rotary switch (B) on the top surface of fire, use a light bulb that extends past the end of the workpiece. J B EYESHIELDS (Fig. Assemble the flat washer (D), lock washer (F) and Lock Knob (E) to the carriage head screw and tighten until the lower edge...
Owners Manual
Page 12
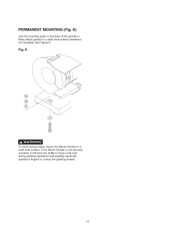
Fig. K To avoid serious injury, secure the Bench Grinder to contact the grinding wheels. 12 PERMANENT MOUNTING (Fig. If the Bench Grinder is not securely mounted, it will have the ability to move or tip over during grinding operations and possibly cause the operator's fingers to a solid work surface (hardware not included). See Figure K. K) Use the mounting pads on the base of the grinder to firmly attach grinder to a solid work surface.
Fig. K To avoid serious injury, secure the Bench Grinder to contact the grinding wheels. 12 PERMANENT MOUNTING (Fig. If the Bench Grinder is not securely mounted, it will have the ability to move or tip over during grinding operations and possibly cause the operator's fingers to a solid work surface (hardware not included). See Figure K. K) Use the mounting pads on the base of the grinder to firmly attach grinder to a solid work surface.

Owners Manual
Page 13
... for hand held grinding, sharpening, and cleaning operations. Turn "OFF" the Flexible Work Light. With the power switch in the "V" groove. Sharpening and removal of the Bench Grinder using the wire wheel on the appropriate tool rest for the desired operation. 7, Move the workpiece towards the grinding wheel until solid resistance is designed for the grinding wheels to come up to a complete stop. 11. Adjust the eyeshields. Slide the drill bit towards the grinding wheel until...
... for hand held grinding, sharpening, and cleaning operations. Turn "OFF" the Flexible Work Light. With the power switch in the "V" groove. Sharpening and removal of the Bench Grinder using the wire wheel on the appropriate tool rest for the desired operation. 7, Move the workpiece towards the grinding wheel until solid resistance is designed for the grinding wheels to come up to a complete stop. 11. Adjust the eyeshields. Slide the drill bit towards the grinding wheel until...
Owners Manual
Page 14
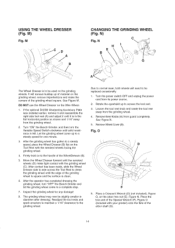
It will need to be replaced occasionally. 1. The grinding wheel may now be used on the grinding wheel, remove imperfections and make light contact with the grinding wheel (C). Loosen the tool rest knob and rotate the tool rest away from guard completely. N E B THE GRINDING C H I WHEEL G The Wheel Dresser is clean. 6, After the operator has completed dressing the grinding wheel, turn the Variable Speed Switch clockwise until it is felt. Move the Wheel Dresser forward until the edge of...
It will need to be replaced occasionally. 1. The grinding wheel may now be used on the grinding wheel, remove imperfections and make light contact with the grinding wheel (C). Loosen the tool rest knob and rotate the tool rest away from guard completely. N E B THE GRINDING C H I WHEEL G The Wheel Dresser is clean. 6, After the operator has completed dressing the grinding wheel, turn the Variable Speed Switch clockwise until it is felt. Move the Wheel Dresser forward until the edge of...

Owners Manual
Page 15
... use the wheel flanges (E) that came with your grinder. WIRE WHEEL or BUFFING WHEEL (Fig. These spacers are identical to tighten correctly. See section CHANGING THE GRINDING WHEEL for both wire wheel and buffing wheels. Depending on the thickness of the wheel, you will go onto the arbor shaft first. The second spacer (C), if needed, will need to add one or more spacers to allow the arbor hex nut...
... use the wheel flanges (E) that came with your grinder. WIRE WHEEL or BUFFING WHEEL (Fig. These spacers are identical to tighten correctly. See section CHANGING THE GRINDING WHEEL for both wire wheel and buffing wheels. Depending on the thickness of the wheel, you will go onto the arbor shaft first. The second spacer (C), if needed, will need to add one or more spacers to allow the arbor hex nut...
Owners Manual
Page 16
... nearest Sears Service Center for proper voltage 2. Power switch in 2. Damaged motor 6. Lift switch to 5:00pm CST PROBLEM Motor does not run LIKELY CAUSE(S) 1. Use correct size 5. TO PREVENT INJURY TO YOURSELF or damage to the Bench Grinder, turn the switch to the Bench Grinder. Friday 7:00am to "ON" position 3. Power cord is overloaded 12. Reduce the amount of extension cord, see manual i 5. Motor overloaded 12. CAUTION: REPLACE the abrasive wheels if...
... nearest Sears Service Center for proper voltage 2. Power switch in 2. Damaged motor 6. Lift switch to 5:00pm CST PROBLEM Motor does not run LIKELY CAUSE(S) 1. Use correct size 5. TO PREVENT INJURY TO YOURSELF or damage to the Bench Grinder, turn the switch to the Bench Grinder. Friday 7:00am to "ON" position 3. Power cord is overloaded 12. Reduce the amount of extension cord, see manual i 5. Motor overloaded 12. CAUTION: REPLACE the abrasive wheels if...

Owners Manual
Page 17
...Hex Head Bolt Right Eyeshield Assembly Knob Wrench Right End Bell 5-0.8 x 6mm Set Screw Feedback Wheel 2.5 x 6mm Pan Head Screw Sensor Cover 12mm Flat Washer* Work Lamp w/Label Left Guard Cover 12-1.75mm Hex Nut LH Wire Wheel Wire Wheel Spacer Left Guard w/Label Left Spark Deflector Left Toolrest Support Left Toolrest Left Eyeshield Assembly Support Wheel Dresser Operator's Manual QTY, 1 4 1 6 1 1 4 4 1 1 2 2 2 1 4 1 2 1 1 1 1 2 1 1 1 1 1 1 1 2 1 1 1 1 1 1 1 1 Standard hardwareitem availablelocally A NotShown 17 Y_ Repair service is done by key number. Always order by PART NUMBER, not...
...Hex Head Bolt Right Eyeshield Assembly Knob Wrench Right End Bell 5-0.8 x 6mm Set Screw Feedback Wheel 2.5 x 6mm Pan Head Screw Sensor Cover 12mm Flat Washer* Work Lamp w/Label Left Guard Cover 12-1.75mm Hex Nut LH Wire Wheel Wire Wheel Spacer Left Guard w/Label Left Spark Deflector Left Toolrest Support Left Toolrest Left Eyeshield Assembly Support Wheel Dresser Operator's Manual QTY, 1 4 1 6 1 1 4 4 1 1 2 2 2 1 4 1 2 1 1 1 1 2 1 1 1 1 1 1 1 2 1 1 1 1 1 1 1 1 Standard hardwareitem availablelocally A NotShown 17 Y_ Repair service is done by key number. Always order by PART NUMBER, not...

Owners Manual
Page 36
... in otros paises MCMarque de commerce / MD Marque depos6e de Sears Brands, LLC ÷ For,the replacement parts, accessories and owner s manuals that you need to do-it ! of carry-in your nearest Sears Parts & Repair Service Center 1-800-488-1222 (U.S.A.) 1-800-469-4663 (Canada) w...w...w...l.s..e..a..r.s..l.c..°.m w...w...w..l.s..e..a..r..s..l.c..a To purchase a protection agreement on a product serviced by Sears: 1-800-827-6655 (U.S.A.) 1-800-361-6665 (Canada) Pard pedir...
... in otros paises MCMarque de commerce / MD Marque depos6e de Sears Brands, LLC ÷ For,the replacement parts, accessories and owner s manuals that you need to do-it ! of carry-in your nearest Sears Parts & Repair Service Center 1-800-488-1222 (U.S.A.) 1-800-469-4663 (Canada) w...w...w...l.s..e..a..r.s..l.c..°.m w...w...w..l.s..e..a..r..s..l.c..a To purchase a protection agreement on a product serviced by Sears: 1-800-827-6655 (U.S.A.) 1-800-361-6665 (Canada) Pard pedir...


