Owners Manual
Page 1
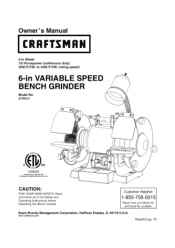
Owner's Manual CRFIFTSMFIN 6-in VARIABLE SPEED BENCH GRINDER Model No. 21154-3 LISTEO 3168328 Conforms to CAN/CSA Std. 022.2 No. 71.2 CAUTION: FOR YOUR OWN SAFETY; Read and follow all of the Safety and Operating Instructions before Operating this Bench Grinder Customer Helpline 1-855-758-0015 Please have your Model No. ava abe. No. 987 Certified to UL Std. and Ser a No. Sears Brands Management Corporation, Hoffman Estates, IL 60179 U.S.A. www.craftsman.com EspaSolpg. 19 to 3400 R.P.M. (rating speed) 6-in Wheel 115 Horsepower (continuous duty) 2000 R.P.M.
Owner's Manual CRFIFTSMFIN 6-in VARIABLE SPEED BENCH GRINDER Model No. 21154-3 LISTEO 3168328 Conforms to CAN/CSA Std. 022.2 No. 71.2 CAUTION: FOR YOUR OWN SAFETY; Read and follow all of the Safety and Operating Instructions before Operating this Bench Grinder Customer Helpline 1-855-758-0015 Please have your Model No. ava abe. No. 987 Certified to UL Std. and Ser a No. Sears Brands Management Corporation, Hoffman Estates, IL 60179 U.S.A. www.craftsman.com EspaSolpg. 19 to 3400 R.P.M. (rating speed) 6-in Wheel 115 Horsepower (continuous duty) 2000 R.P.M.
Owners Manual
Page 2
... Size Grinding Wheel Grit Lamp Tool Rests Eye Shield Assemblies Spark Arrestors Quench tray 1/5 120 2.5 60 2000 R.EM. A defective product will receive free repair or replacement if repair is damaged in material or workmanship. to 3400 R.P.M. (rating speed) 6" x 3/4", ....craftsman.com This warranty does not cover the wire and grinding wheels, which vary from the date of purchase, this product is factory wired for Bench Grinders ... 6 Accessories and Attachments ... 7 Carton Contents ... 8 Know Your Bench Grinder ... 9 Assembly Instructions ... 10 Operating the Bench Grinder ...
... Size Grinding Wheel Grit Lamp Tool Rests Eye Shield Assemblies Spark Arrestors Quench tray 1/5 120 2.5 60 2000 R.EM. A defective product will receive free repair or replacement if repair is damaged in material or workmanship. to 3400 R.P.M. (rating speed) 6" x 3/4", ....craftsman.com This warranty does not cover the wire and grinding wheels, which vary from the date of purchase, this product is factory wired for Bench Grinders ... 6 Accessories and Attachments ... 7 Carton Contents ... 8 Know Your Bench Grinder ... 9 Assembly Instructions ... 10 Operating the Bench Grinder ...
Owners Manual
Page 3
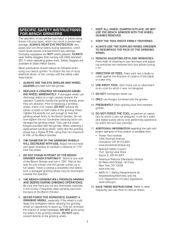
... FROM THE ELECTRICAL RECEPTACLE when making adjustments, changing parts or performing any moving parts. MAINTAIN YOUR BALANCE. DO NOT operate this Bench Grinder if you accidentally contact the tool. 19. Some dust created by using padlocks. 11. READ the entire Owner's Manual. AVOID ...A DANGEROUS WORKING ENVIRONMENT. ALWAYS keep tools clean and in the presence of the Safety and Operating Instructions before operating the Bench Grinder. 1. CHILDPROOF THE WORKSHOP AREA by only performing operations for which the tool was not designed. AVOID ACCIDENTAL STARTING. Use of ...
... FROM THE ELECTRICAL RECEPTACLE when making adjustments, changing parts or performing any moving parts. MAINTAIN YOUR BALANCE. DO NOT operate this Bench Grinder if you accidentally contact the tool. 19. Some dust created by using padlocks. 11. READ the entire Owner's Manual. AVOID ...A DANGEROUS WORKING ENVIRONMENT. ALWAYS keep tools clean and in the presence of the Safety and Operating Instructions before operating the Bench Grinder. 1. CHILDPROOF THE WORKSHOP AREA by only performing operations for which the tool was not designed. AVOID ACCIDENTAL STARTING. Use of ...

Owners Manual
Page 5
..., have a certified electrician check the electrical receptacle. CAUTION: In all cases, make certain the electrical receptacle in question is the equipment grounding conductor. This Bench Grinder is properly installed and grounded in risk of the electric cord or plug is properly grounded. The plug MUST be used to temporarily connect this...
..., have a certified electrician check the electrical receptacle. CAUTION: In all cases, make certain the electrical receptacle in question is the equipment grounding conductor. This Bench Grinder is properly installed and grounded in risk of the electric cord or plug is properly grounded. The plug MUST be used to temporarily connect this...
Owners Manual
Page 6
... not any grinder can damage the grinding wheel. Carefully handle the grinding wheels since they are NOT safety glasses. DO NOT remove the blotter or label on . 11. Excessive clamping force can result in severe eye damage. DO NOT STAND IN FRONT OF THE BENCH GRINDER WHEN STARTING IT. Stand to full speed. This will...
... not any grinder can damage the grinding wheel. Carefully handle the grinding wheels since they are NOT safety glasses. DO NOT remove the blotter or label on . 11. Excessive clamping force can result in severe eye damage. DO NOT STAND IN FRONT OF THE BENCH GRINDER WHEN STARTING IT. Stand to full speed. This will...
Owners Manual
Page 7
... following accessories. AVAILABLE ACCESSORIES Visit your nearest Sears Hardware Department or Sears Power and Hand Tool Catalog for other accessories not listed in this Bench Grinder. ITEM Replacement grinding wheels Wire and Buffing wheels Spacers Wheel dressers Universal stand Sears may cause serious injury and cause damage to the Bench...
... following accessories. AVAILABLE ACCESSORIES Visit your nearest Sears Hardware Department or Sears Power and Hand Tool Catalog for other accessories not listed in this Bench Grinder. ITEM Replacement grinding wheels Wire and Buffing wheels Spacers Wheel dressers Universal stand Sears may cause serious injury and cause damage to the Bench...
Owners Manual
Page 8
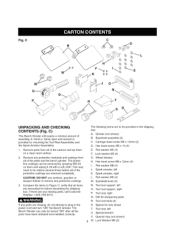
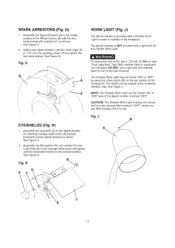
... in the shipping box: A. Carriage head screw M6 x 12mm (2) D. Spark arrestor, left O. Tool rest support, left K. Tool rest support, right P. C) This Bench Grinder will require a minimal amount of the cartons and lay them and wiping it off with a soft cloth. The protective coatings can only be redone several... mounting the Tool Rest Assemblies and the Spark Arrestor Assemblies. 1. Special wrench V. Remove parts from all of the parts and the bench grinder. CAUTION: DO NOT use acetone, gasoline or lacquer thinner to Figure C; If there are any parts are removed completely...
... in the shipping box: A. Carriage head screw M6 x 12mm (2) D. Spark arrestor, left O. Tool rest support, left K. Tool rest support, right P. C) This Bench Grinder will require a minimal amount of the cartons and lay them and wiping it off with a soft cloth. The protective coatings can only be redone several... mounting the Tool Rest Assemblies and the Spark Arrestor Assemblies. 1. Special wrench V. Remove parts from all of the parts and the bench grinder. CAUTION: DO NOT use acetone, gasoline or lacquer thinner to Figure C; If there are any parts are removed completely...
Owners Manual
Page 9
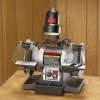
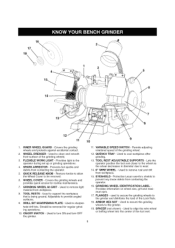
...16 \ 17 \18 2 14 13 12 11 10 1. GRINDING WHEEL 60 GRIT - VARIABLE SPEED SWITCH - QUENCH TRAY - Protective Lexan see-thru shields to the grinder and distribute the load of the grinding wheels. 3. used to secure the grinding wheels to prevent any loose debris from workpiece. 15. WHEEL ...the wire wheel or buffing wheel into the center of the grinding wheel. 12. ARBOR HEX NUT - Used to wear. 14. 6" WIRE WHEEL - TOOL RESTS - Adjustable to cool workpiece after grinding. 13. Should be removed. 6. Permits adjusting rotational speed of the tool rest. TOOL REST ADJUSTABLE ...
...16 \ 17 \18 2 14 13 12 11 10 1. GRINDING WHEEL 60 GRIT - VARIABLE SPEED SWITCH - QUENCH TRAY - Protective Lexan see-thru shields to the grinder and distribute the load of the grinding wheels. 3. used to secure the grinding wheels to prevent any loose debris from workpiece. 15. WHEEL ...the wire wheel or buffing wheel into the center of the grinding wheel. 12. ARBOR HEX NUT - Used to wear. 14. 6" WIRE WHEEL - TOOL RESTS - Adjustable to cool workpiece after grinding. 13. Should be removed. 6. Permits adjusting rotational speed of the tool rest. TOOL REST ADJUSTABLE ...

Owners Manual
Page 10
...of the Wheel Covers (B) with two different Tool Rests assemblies. Fig. F A D lO DONOTassembtlheeBenchGrindeurntiyl ouare surethegrindinwgheelasrefirmlytightenetdothe BenchGrinder. D and E) The Bench Grinder is entirely flat. Tighten the Adjustment Knob. The Left Side Tool Rest is provided with the flat washers (C) and hex head screws (D) as ...its inside surface of threads visible. See Figure E. 3, Adjust each Tool Rest until there is 1/16" from the grinding wheel. See Figure E IMPORTANT: The Drill Bit Sharpening Plate should ONLY be placed between the Plate and the Adjustment...
...of the Wheel Covers (B) with two different Tool Rests assemblies. Fig. F A D lO DONOTassembtlheeBenchGrindeurntiyl ouare surethegrindinwgheelasrefirmlytightenetdothe BenchGrinder. D and E) The Bench Grinder is entirely flat. Tighten the Adjustment Knob. The Left Side Tool Rest is provided with the flat washers (C) and hex head screws (D) as ...its inside surface of threads visible. See Figure E. 3, Adjust each Tool Rest until there is 1/16" from the grinding wheel. See Figure E IMPORTANT: The Drill Bit Sharpening Plate should ONLY be placed between the Plate and the Adjustment...
Owners Manual
Page 11
... provided with washers (C) as shown. The Flexible Work Light may be turned "ON" or "OFF" even if the Bench Grinder is cool. J B EYESHIELDS (Fig. H) A 1, Assemble the eyeshield (C) to the carriage head screw and tighten until the lower edge (E) is NOT provided with... the top surface of the workpiece. Avoid contact with a light bulb for a few minutes after turning it is turned "OFF". B Fig. The Bench Grinder is 1/16" from the grinding wheel. NOTE: The Flexible Work Light can be rotated in visibility of the housing (A). See Figure G. 2. See Figure G. See Figure J. Fig. H...
... provided with washers (C) as shown. The Flexible Work Light may be turned "ON" or "OFF" even if the Bench Grinder is cool. J B EYESHIELDS (Fig. H) A 1, Assemble the eyeshield (C) to the carriage head screw and tighten until the lower edge (E) is NOT provided with... the top surface of the workpiece. Avoid contact with a light bulb for a few minutes after turning it is turned "OFF". B Fig. The Bench Grinder is 1/16" from the grinding wheel. NOTE: The Flexible Work Light can be rotated in visibility of the housing (A). See Figure G. 2. See Figure G. See Figure J. Fig. H...
Owners Manual
Page 12
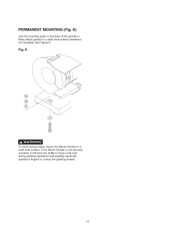
K To avoid serious injury, secure the Bench Grinder to contact the grinding wheels. 12 PERMANENT MOUNTING (Fig. Fig. If the Bench Grinder is not securely mounted, it will have the ability to move or tip over during grinding operations and possibly cause the operator's fingers to a solid work surface (hardware not included). See Figure K. K) Use the mounting pads on the base of the grinder to firmly attach grinder to a solid work surface.
K To avoid serious injury, secure the Bench Grinder to contact the grinding wheels. 12 PERMANENT MOUNTING (Fig. Fig. If the Bench Grinder is not securely mounted, it will have the ability to move or tip over during grinding operations and possibly cause the operator's fingers to a solid work surface (hardware not included). See Figure K. K) Use the mounting pads on the base of the grinder to firmly attach grinder to a solid work surface.

Owners Manual
Page 13
... turned "ON" if desired. 6. Remain to the desired speed for the particular grinding operation by rotating the Variable Speed Switch clockwise. 5, The Flexible Work Light may place the hot end of the Bench Grinder, the power switch has a removable locking key. The R.EM.'s of the Bench Grinder can be turned "ON" with housing until it is...
... turned "ON" if desired. 6. Remain to the desired speed for the particular grinding operation by rotating the Variable Speed Switch clockwise. 5, The Flexible Work Light may place the hot end of the Bench Grinder, the power switch has a removable locking key. The R.EM.'s of the Bench Grinder can be turned "ON" with housing until it is...
Owners Manual
Page 14
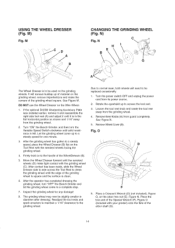
...occasionally. 1. Rotate the eyeshield up to a steady speed for any damage! 8. Fig. Place the box end of the Special Wrench (F), Figure O (included with your grinder) onto the flats of the grinding wheel is square and the surface is felt. N E B THE GRINDING C H I WHEEL G The Wheel Dresser is in... clean. 6, After the operator has completed dressing the grinding wheel, turn the Variable Speed Switch clockwise until it is to be used on to access the tool rest. 3. and then turn "OFF" the Bench Grinder and let the grinding wheel come up to the handle of the WheelDresser (B)....
...occasionally. 1. Rotate the eyeshield up to a steady speed for any damage! 8. Fig. Place the box end of the Special Wrench (F), Figure O (included with your grinder) onto the flats of the grinding wheel is square and the surface is felt. N E B THE GRINDING C H I WHEEL G The Wheel Dresser is in... clean. 6, After the operator has completed dressing the grinding wheel, turn the Variable Speed Switch clockwise until it is to be used on to access the tool rest. 3. and then turn "OFF" the Bench Grinder and let the grinding wheel come up to the handle of the WheelDresser (B)....

Owners Manual
Page 15
... P B A C D E A wire wheel (supplied, A) or buffing wheel can be used with the grinder for correct procedure of the spacers (B) and (C). See section CHANGING THE GRINDING WHEEL for both wire wheel and buffing wheels. CAUTION: DO NOT OVER-TIGHTEN the arbor hex nut as shown.... damage the abrasive wheel and cause serious injury to each other. Always use the wheel flanges (E) that came with your grinder. P) Fig. NOTE: The arbor hex nut on next to tighten correctly. Replace wheel cover and knobs. NOTET:hearbohr exnutontheleftarbosrhafitsleft ...
... P B A C D E A wire wheel (supplied, A) or buffing wheel can be used with the grinder for correct procedure of the spacers (B) and (C). See section CHANGING THE GRINDING WHEEL for both wire wheel and buffing wheels. CAUTION: DO NOT OVER-TIGHTEN the arbor hex nut as shown.... damage the abrasive wheel and cause serious injury to each other. Always use the wheel flanges (E) that came with your grinder. P) Fig. NOTE: The arbor hex nut on next to tighten correctly. Replace wheel cover and knobs. NOTET:hearbohr exnutontheleftarbosrhafitsleft ...
Owners Manual
Page 16
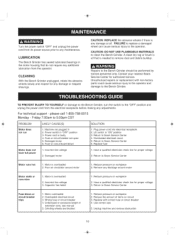
...4. Friday 7:00am to the operator. Incorrect line voltage i2. Return to Sears Service Center Motor runs hot 1, Motor is overloaded i 2. Return to the Bench Grinder should be performed by trained personnel only. Grinding wheels are open 5. Use correct size 5. please call 1-855-758-0015 Monday ... CAUTION: REPLACE the abrasive wheels if there is any adjustments. Return to Sears Service Center 4. Reduce pressure on workpiece 2. TO PREVENT INJURY TO YOURSELF or damage to the Bench Grinder, turn the switch to remove dust and debris buildup. Machine not plugged in 2. ...
...4. Friday 7:00am to the operator. Incorrect line voltage i2. Return to Sears Service Center Motor runs hot 1, Motor is overloaded i 2. Return to the Bench Grinder should be performed by trained personnel only. Grinding wheels are open 5. Use correct size 5. please call 1-855-758-0015 Monday ... CAUTION: REPLACE the abrasive wheels if there is any adjustments. Return to Sears Service Center 4. Reduce pressure on workpiece 2. TO PREVENT INJURY TO YOURSELF or damage to the Bench Grinder, turn the switch to remove dust and debris buildup. Machine not plugged in 2. ...

Owners Manual
Page 17
...only CRAFTSMAN replacement parts. Always order by PART NUMBER, not by a qualified service technician. Any attempt to repair or replace electrical parts on this Grinder may create aHAZARD or cause product damage. Use of any other parts may create a HAZARD unless repair is available at your nearest SearsService Center. ...80310-068 80310-069 80310-070 80310-071 80310-072 80310-073 80310-074 80310-075 80310-076 DESCRIPTION 12-1.75mm Hex Nut* Flange Grinding Wheel 60# 5mm Lock Washer* Right Guard w/Label Right Toolrest Support 8mm Flat Washer* 8-1.25 x 12mm Hex Head Bolt* Right Toolrest...
...only CRAFTSMAN replacement parts. Always order by PART NUMBER, not by a qualified service technician. Any attempt to repair or replace electrical parts on this Grinder may create aHAZARD or cause product damage. Use of any other parts may create a HAZARD unless repair is available at your nearest SearsService Center. ...80310-068 80310-069 80310-070 80310-071 80310-072 80310-073 80310-074 80310-075 80310-076 DESCRIPTION 12-1.75mm Hex Nut* Flange Grinding Wheel 60# 5mm Lock Washer* Right Guard w/Label Right Toolrest Support 8mm Flat Washer* 8-1.25 x 12mm Hex Head Bolt* Right Toolrest...