Owners Manual
Page 1
to 3400 R.P.M. (rating speed) 6-in Wheel 115 Horsepower (continuous duty) 2000 R.P.M. ava abe. No. 987 Certified to CAN/CSA Std. 022.2 No. 71.2 CAUTION: FOR YOUR OWN SAFETY; Owner's Manual CRFIFTSMFIN 6-in VARIABLE SPEED BENCH GRINDER Model No. 21154-3 LISTEO 3168328 Conforms to UL Std. Read and follow all of the Safety and Operating Instructions before Operating this Bench Grinder Customer Helpline 1-855-758-0015 Please have your Model No. Sears Brands Management Corporation, Hoffman Estates, IL 60179 U.S.A. www.craftsman.com EspaSolpg. 19 and Ser a No.
to 3400 R.P.M. (rating speed) 6-in Wheel 115 Horsepower (continuous duty) 2000 R.P.M. ava abe. No. 987 Certified to CAN/CSA Std. 022.2 No. 71.2 CAUTION: FOR YOUR OWN SAFETY; Owner's Manual CRFIFTSMFIN 6-in VARIABLE SPEED BENCH GRINDER Model No. 21154-3 LISTEO 3168328 Conforms to UL Std. Read and follow all of the Safety and Operating Instructions before Operating this Bench Grinder Customer Helpline 1-855-758-0015 Please have your Model No. Sears Brands Management Corporation, Hoffman Estates, IL 60179 U.S.A. www.craftsman.com EspaSolpg. 19 and Ser a No.
Owners Manual
Page 2
to 3400 R.P.M. (rating speed) 6" x 3/4", 1/2" bore 60 120V, 40...Bench Grinder, use a 15 amp time delay fuse or circuit breaker. Connect to state. Sears Brands Management Corporation, Hoffman Estates, IL 60179 Motor Continuous Duty HP Volts Amp Hertz RPM Grinding Wheel Size Grinding... Cover CRAFTSMAN PROFESSIONAL ONE YEAR FULL WARRANTY FOR ONE YEAR from the date of purchase, this product is factory wired for Bench Grinders ... 6 Accessories and Attachments ... 7 Carton Contents ... 8 Know Your Bench Grinder ... 9 Assembly Instructions ... 10 Operating the Bench Grinder ... 13...
to 3400 R.P.M. (rating speed) 6" x 3/4", 1/2" bore 60 120V, 40...Bench Grinder, use a 15 amp time delay fuse or circuit breaker. Connect to state. Sears Brands Management Corporation, Hoffman Estates, IL 60179 Motor Continuous Duty HP Volts Amp Hertz RPM Grinding Wheel Size Grinding... Cover CRAFTSMAN PROFESSIONAL ONE YEAR FULL WARRANTY FOR ONE YEAR from the date of purchase, this product is factory wired for Bench Grinders ... 6 Accessories and Attachments ... 7 Carton Contents ... 8 Know Your Bench Grinder ... 9 Assembly Instructions ... 10 Operating the Bench Grinder ... 13...
Owners Manual
Page 3
...Turn the power switch to the electrical receptacle. 15. Keep all of flammable liquids or gasses. 6. GENERAL SAFETY INSTRUCTIONS Operating a Bench Grinder can get caught in the machine during operations and pull the operator into a 3-contact electrical receptacle. Read this manual to the State...products. ° Arsenic and chromium from bricks, cement, and other reproductive harm. MAINTAIN TOOLS WITH CARE. DO NOT modify this Bench Grinder. DO NOT leave the tool until it was intended. 9. Your risk from the electrical recaptacles, and using power tools contains ...
...Turn the power switch to the electrical receptacle. 15. Keep all of flammable liquids or gasses. 6. GENERAL SAFETY INSTRUCTIONS Operating a Bench Grinder can get caught in the machine during operations and pull the operator into a 3-contact electrical receptacle. Read this manual to the State...products. ° Arsenic and chromium from bricks, cement, and other reproductive harm. MAINTAIN TOOLS WITH CARE. DO NOT modify this Bench Grinder. DO NOT leave the tool until it was intended. 9. Your risk from the electrical recaptacles, and using power tools contains ...

Owners Manual
Page 5
... FROM ELECTRIC SHOCK. The plug MUST be connected to a 2-contact ungrounded receptacle. DO NOT connect the equipment grounding conductor to rain or use only. This Bench Grinder is necessary.
... FROM ELECTRIC SHOCK. The plug MUST be connected to a 2-contact ungrounded receptacle. DO NOT connect the equipment grounding conductor to rain or use only. This Bench Grinder is necessary.
Owners Manual
Page 6
... tool rests and spark arrestors to do a safer and higher quality job by only performing operations for one side of the Bench Grinder and turn it on both sides of the grinding wheel. KEEP THE TOOL RESTS FIRMLY TIGHTENED. 9. Don't force tool or attachment to maintain a distance of 1/16" from.... Wait at the side for which it was intended. 17. Frequently clean grinding dust from toot before turning it "ON". This will do a job for cracks. DO NOT apply coolant directly to full speed. REMOVE ADJUSTING KEYS AND WRENCHES. DIRECTION OF FEED. DO NOT FORCE THE ...
... tool rests and spark arrestors to do a safer and higher quality job by only performing operations for one side of the Bench Grinder and turn it on both sides of the grinding wheel. KEEP THE TOOL RESTS FIRMLY TIGHTENED. 9. Don't force tool or attachment to maintain a distance of 1/16" from.... Wait at the side for which it was intended. 17. Frequently clean grinding dust from toot before turning it "ON". This will do a job for cracks. DO NOT apply coolant directly to full speed. REMOVE ADJUSTING KEYS AND WRENCHES. DIRECTION OF FEED. DO NOT FORCE THE ...
Owners Manual
Page 7
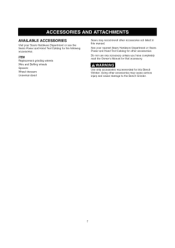
... that accessory. Ilv!l'Itl__l ;1 _ II _ [_1 Use only accessories recommended for this manual. ITEM Replacement grinding wheels Wire and Buffing wheels Spacers Wheel dressers Universal stand Sears may cause serious injury and cause damage to the Bench Grinder. AVAILABLE ACCESSORIES Visit your nearest Sears Hardware Department or Sears Power and Hand Tool Catalog...
... that accessory. Ilv!l'Itl__l ;1 _ II _ [_1 Use only accessories recommended for this manual. ITEM Replacement grinding wheels Wire and Buffing wheels Spacers Wheel dressers Universal stand Sears may cause serious injury and cause damage to the Bench Grinder. AVAILABLE ACCESSORIES Visit your nearest Sears Hardware Department or Sears Power and Hand Tool Catalog...
Owners Manual
Page 8
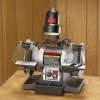
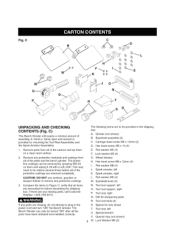
...B. Spark arrestor, left O. Tool rest, right Q. Eyeshield assembly (2) C. Tool rest, left U. verify that all of the parts and the bench grinder. The Bench Grinder can be redone several times before discarding the shipping box. The following items are accounted for before all items are to Figure C; Spark arrestor, ...right L. Flat washer M8 (4) J. Quench tray (not shown) W. The protective coatings can only be provided in the power cord and turn "ON" the Bench Grinder. Tool rest knob (2) S. Lock washer M5 (4) G. C C B K G N R UNPACKING AND CHECKING CONTENTS (Fig.
...B. Spark arrestor, left O. Tool rest, right Q. Eyeshield assembly (2) C. Tool rest, left U. verify that all of the parts and the bench grinder. The Bench Grinder can be redone several times before discarding the shipping box. The following items are accounted for before all items are to Figure C; Spark arrestor, ...right L. Flat washer M8 (4) J. Quench tray (not shown) W. The protective coatings can only be provided in the power cord and turn "ON" the Bench Grinder. Tool rest knob (2) S. Lock washer M5 (4) G. C C B K G N R UNPACKING AND CHECKING CONTENTS (Fig.

Owners Manual
Page 10
DONOTassembtlheeBenchGrindeurntiyl ouare surethetoolISNOTpluggeidn. 2. DONOTassembtlheeBenchGrindeurntiyl ouare surethepowesrwitchisinthe"OFFp" osition. 3. D and E) The Bench Grinder is provided with the flat washers (C) and hex head screws (D) as shown. See Figure E. F ...of the Wheel Covers (B) with two different Tool Rests assemblies. The Right Side Tool Rest is 1/16" from the grinding wheel. Firmly tighten the hex head screws holding the supports. DONOTassembtlheeBenchGrindeurntiyl ouare surethegrindinwgheelasrefirmlytightenetdothe BenchGrinder. Fig. Place the Plate onto...
DONOTassembtlheeBenchGrindeurntiyl ouare surethetoolISNOTpluggeidn. 2. DONOTassembtlheeBenchGrindeurntiyl ouare surethepowesrwitchisinthe"OFFp" osition. 3. D and E) The Bench Grinder is provided with the flat washers (C) and hex head screws (D) as shown. See Figure E. F ...of the Wheel Covers (B) with two different Tool Rests assemblies. The Right Side Tool Rest is 1/16" from the grinding wheel. Firmly tighten the hex head screws holding the supports. DONOTassembtlheeBenchGrindeurntiyl ouare surethegrindinwgheelasrefirmlytightenetdothe BenchGrinder. Fig. Place the Plate onto...
Owners Manual
Page 11
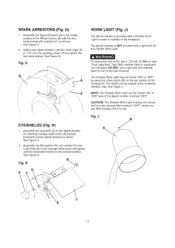
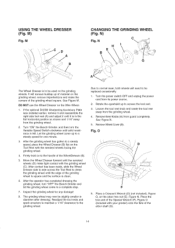
... Work Light housing will remain hot for the Flexible Work Light. See Figure H. W!Ikvlv/_;41_11_[€! See Figure G. 2. J) The Bench Grinder is 1/16" from the grinding wheel. Fig. See Figure G. To reduce the risk of fire, use a light bulb that extends past the end of the housing ...(A). See Figure J. The Bench Grinder is NOT provided with washers (C) as shown. H D EF C 11 SPARK ARRESTORS (Fig. DO NOT use a 120...
... Work Light housing will remain hot for the Flexible Work Light. See Figure H. W!Ikvlv/_;41_11_[€! See Figure G. 2. J) The Bench Grinder is 1/16" from the grinding wheel. Fig. See Figure G. To reduce the risk of fire, use a light bulb that extends past the end of the housing ...(A). See Figure J. The Bench Grinder is NOT provided with washers (C) as shown. H D EF C 11 SPARK ARRESTORS (Fig. DO NOT use a 120...
Owners Manual
Page 12
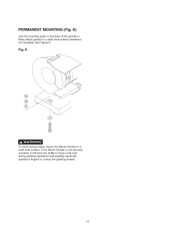
Fig. See Figure K. PERMANENT MOUNTING (Fig. K To avoid serious injury, secure the Bench Grinder to a solid work surface (hardware not included). If the Bench Grinder is not securely mounted, it will have the ability to move or tip over during grinding operations and possibly cause the operator's fingers to a solid work surface. K) Use the mounting pads on the base of the grinder to firmly attach grinder to contact the grinding wheels. 12
Fig. See Figure K. PERMANENT MOUNTING (Fig. K To avoid serious injury, secure the Bench Grinder to a solid work surface (hardware not included). If the Bench Grinder is not securely mounted, it will have the ability to move or tip over during grinding operations and possibly cause the operator's fingers to a solid work surface. K) Use the mounting pads on the base of the grinder to firmly attach grinder to contact the grinding wheels. 12

Owners Manual
Page 13
...Bench Grinder. The R.EM.'s of the Bench Grinder and turn "OFF" the Bench Grinder by moving the power switch to the up to a steady speed for the particular grinding operation by being turned all the way to the left side of the Bench Grinder and plug in the power cord to its slowest setting by rotating the Variable Speed... Switch clockwise. 5, The Flexible Work Light may place the hot end of the grinding wheels. 8, If the Drill Bit Sharpening Plate was...
...Bench Grinder. The R.EM.'s of the Bench Grinder and turn "OFF" the Bench Grinder by moving the power switch to the up to a steady speed for the particular grinding operation by being turned all the way to the left side of the Bench Grinder and plug in the power cord to its slowest setting by rotating the Variable Speed... Switch clockwise. 5, The Flexible Work Light may place the hot end of the grinding wheels. 8, If the Drill Bit Sharpening Plate was...
Owners Manual
Page 14
... (E), Figure N. and then turn the Variable Speed Switch clockwise until it is clean. 6, After the operator has completed dressing the grinding wheel, turn "OFF" the Bench Grinder and let the grinding wheel come up to the handle of the grinding wheel square. Let the grinding wheel come to a complete stop. 7, Inspect the grinding wheel for one minute. 3, After the...
... (E), Figure N. and then turn the Variable Speed Switch clockwise until it is clean. 6, After the operator has completed dressing the grinding wheel, turn "OFF" the Bench Grinder and let the grinding wheel come up to the handle of the grinding wheel square. Let the grinding wheel come to a complete stop. 7, Inspect the grinding wheel for one minute. 3, After the...
Owners Manual
Page 16
... brush is all . TO PREVENT INJURY TO YOURSELF or damage to the Bench Grinder, turn the switch to the "OFF" position and unplug the power cord from its power source prior to Sears Service Center Motor runs hot 1, Motor is overloaded i 2. Incorrect line voltage 3. ...any maintenance. CAUTION: REPLACE the abrasive wheels if there is any damage at all that do not require any additional lubrication from the operator. Grinding wheels are open 5. please call 1-855-758-0015 Monday - Reduce pressure on circuit board blown SOLUTION 1. Capacitor has failed 1. Overloaded ...
... brush is all . TO PREVENT INJURY TO YOURSELF or damage to the Bench Grinder, turn the switch to the "OFF" position and unplug the power cord from its power source prior to Sears Service Center Motor runs hot 1, Motor is overloaded i 2. Incorrect line voltage 3. ...any maintenance. CAUTION: REPLACE the abrasive wheels if there is any damage at all that do not require any additional lubrication from the operator. Grinding wheels are open 5. please call 1-855-758-0015 Monday - Reduce pressure on circuit board blown SOLUTION 1. Capacitor has failed 1. Overloaded ...