
Owners Manual
Page 5
.... USE ONLY A 3-WIRE EXTENSION CORD THAT HAS A 3-PRONG GROUNDING PLUG AND A 3-POLE RECEPTACLE THAT ACCEPTS THE TOOL'S PLUG. This tool is equipped with an electric cord that is properly installed and grounded in risk of electric shock. IMPROPER ELECTRICAL CONNECTION of... plug and electrical receptacle that MUST be used to temporarily connect this plug to a permanent earth ground, such as a properly grounded receptacle box. This Bench Grinder is necessary. If it that has a grounding conductor. A 3-prong electrical receptacle grounding conductor 0 120 Volt Fig. ...
.... USE ONLY A 3-WIRE EXTENSION CORD THAT HAS A 3-PRONG GROUNDING PLUG AND A 3-POLE RECEPTACLE THAT ACCEPTS THE TOOL'S PLUG. This tool is equipped with an electric cord that is properly installed and grounded in risk of electric shock. IMPROPER ELECTRICAL CONNECTION of... plug and electrical receptacle that MUST be used to temporarily connect this plug to a permanent earth ground, such as a properly grounded receptacle box. This Bench Grinder is necessary. If it that has a grounding conductor. A 3-prong electrical receptacle grounding conductor 0 120 Volt Fig. ...
Owners Manual
Page 8
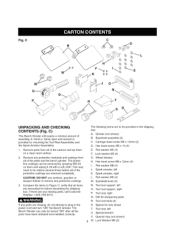
... on them on a clean work surface. 2. Spacer for mounting the Tool Rest Assemblies and the Spark Arrestor Assemblies. 1. The Bench Grinder can be redone several times before discarding the shipping box. Spark arrestor, left U. Eyeshield assembly (2) C. Flat washer M5 ...(4) F. Wheel dresser H. Spark arrestor, right L. Eyeshield knob (2) N. Tool rest knob (2) S. Tool rest, left K. Compare the items to remove any ...
... on them on a clean work surface. 2. Spacer for mounting the Tool Rest Assemblies and the Spark Arrestor Assemblies. 1. The Bench Grinder can be redone several times before discarding the shipping box. Spark arrestor, left U. Eyeshield assembly (2) C. Flat washer M5 ...(4) F. Wheel dresser H. Spark arrestor, right L. Eyeshield knob (2) N. Tool rest knob (2) S. Tool rest, left K. Compare the items to remove any ...
Owners Manual
Page 14
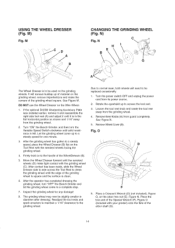
... from its power source. 2. Readjust the tool rests and spark arrestors to maintain a 1/16" clearance to access the tool rest. 3. Remove Wheel Cover (B). Place the box end of the Special Wrench (F), Figure O (included with the grinding wheel (C). The grinding wheel may now be replaced occasionally. 1. ...resistance is clean. 6, After the operator has completed dressing the grinding wheel, turn "OFF" the Bench Grinder and let the grinding wheel come up to the grinding wheel. and then turn the Variable Speed Switch clockwise until the serrated wheels (D) make the corners of...
... from its power source. 2. Readjust the tool rests and spark arrestors to maintain a 1/16" clearance to access the tool rest. 3. Remove Wheel Cover (B). Place the box end of the Special Wrench (F), Figure O (included with the grinding wheel (C). The grinding wheel may now be replaced occasionally. 1. ...resistance is clean. 6, After the operator has completed dressing the grinding wheel, turn "OFF" the Bench Grinder and let the grinding wheel come up to the grinding wheel. and then turn the Variable Speed Switch clockwise until the serrated wheels (D) make the corners of...

