Owners Manual
Page 2
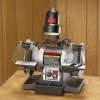
... Management Corporation, Hoffman Estates, IL 60179 Motor Continuous Duty HP Volts Amp Hertz RPM Grinding Wheel Size Grinding Wheel Grit Lamp Tool Rests Eye Shield Assemblies Spark Arrestors Quench tray 1/5 120 2.5 60 2000 R.EM. to 3400 R.P.M. (rating speed) 6" x 3/4", 1/2" bore 60 120V, 40 watt or less Track Light Bulb,... may also have any way. Connect to obtain free repair or replacement, visit the web site: www.craftsman.com This warranty does not cover the wire and grinding wheels, which vary from the date of purchase, this product is damaged in material or workmanship. To avoid...
... Management Corporation, Hoffman Estates, IL 60179 Motor Continuous Duty HP Volts Amp Hertz RPM Grinding Wheel Size Grinding Wheel Grit Lamp Tool Rests Eye Shield Assemblies Spark Arrestors Quench tray 1/5 120 2.5 60 2000 R.EM. to 3400 R.P.M. (rating speed) 6" x 3/4", 1/2" bore 60 120V, 40 watt or less Track Light Bulb,... may also have any way. Connect to obtain free repair or replacement, visit the web site: www.craftsman.com This warranty does not cover the wire and grinding wheels, which vary from the date of purchase, this product is damaged in material or workmanship. To avoid...
Owners Manual
Page 3
... Grinder in any way. Some examples of flammable liquids or gasses. 12. READ the entire Owner's Manual. LEARN how to use electrical tools in the presence of these chemicals are slippery from debris, grease, and wax. 7, KEEP VISITORS AND CHILDREN AWAY. See Grounding Instructions on...can be plugged into the moving parts. 10. CHILDPROOF THE WORKSHOP AREA by only performing operations for which it . 20. ALWAYS UNPLUG THE TOOL FROM THE ELECTRICAL RECEPTACLE when making adjustments, changing parts or performing any moving parts. Make sure that particular accessory. 17. If in doubt...
... Grinder in any way. Some examples of flammable liquids or gasses. 12. READ the entire Owner's Manual. LEARN how to use electrical tools in the presence of these chemicals are slippery from debris, grease, and wax. 7, KEEP VISITORS AND CHILDREN AWAY. See Grounding Instructions on...can be plugged into the moving parts. 10. CHILDPROOF THE WORKSHOP AREA by only performing operations for which it . 20. ALWAYS UNPLUG THE TOOL FROM THE ELECTRICAL RECEPTACLE when making adjustments, changing parts or performing any moving parts. Make sure that particular accessory. 17. If in doubt...

Owners Manual
Page 4
...larger diameter of moving parts. SAVE THESE INSTRUCTIONS. Always replace a damaged extension cord or have it repaired by removing switch keys, unplugging tools from the electrical receptacles, and using it. Carefully check all guards to indicate that it is safer than attempting to secure the workpiece.... are not damaged, and perform their intended functions. 22.EACH AND EVERY TIME, CHECK FOR DAMAGED PARTS PRIOR TO USING THE TOOL. Always operate tool in doubt of the proper size of harmful material. ALWAYS WEAR A DUST MASK TO PREVENT INHALING DANGEROUS DUST OR AIRBORNE PARTICLES,...
...larger diameter of moving parts. SAVE THESE INSTRUCTIONS. Always replace a damaged extension cord or have it repaired by removing switch keys, unplugging tools from the electrical receptacles, and using it. Carefully check all guards to indicate that it is safer than attempting to secure the workpiece.... are not damaged, and perform their intended functions. 22.EACH AND EVERY TIME, CHECK FOR DAMAGED PARTS PRIOR TO USING THE TOOL. Always operate tool in doubt of the proper size of harmful material. ALWAYS WEAR A DUST MASK TO PREVENT INHALING DANGEROUS DUST OR AIRBORNE PARTICLES,...

Owners Manual
Page 5
...question is properly grounded. USE ONLY A 3-WIRE EXTENSION CORD THAT HAS A 3-PRONG GROUNDING PLUG AND A 3-POLE RECEPTACLE THAT ACCEPTS THE TOOL'S PLUG. FIGURE A shows a 3-wire electrical plug and electrical receptacle that is not available, an adapter as shown in accordance with a... to a 2-contact ungrounded receptacle. B grounding adapter lug grounding conductor 3-wire electrical cord 3-wire electrical cord 2-prong electrical receptacle THIS TOOL MUST BE GROUNDED WHILE IN USE TO PROTECT THE OPERATOR FROM ELECTRIC SHOCK. IN THE EVENT OF A MALFUNCTION OR BREAKDOWN, grounding provides...
...question is properly grounded. USE ONLY A 3-WIRE EXTENSION CORD THAT HAS A 3-PRONG GROUNDING PLUG AND A 3-POLE RECEPTACLE THAT ACCEPTS THE TOOL'S PLUG. FIGURE A shows a 3-wire electrical plug and electrical receptacle that is not available, an adapter as shown in accordance with a... to a 2-contact ungrounded receptacle. B grounding adapter lug grounding conductor 3-wire electrical cord 3-wire electrical cord 2-prong electrical receptacle THIS TOOL MUST BE GROUNDED WHILE IN USE TO PROTECT THE OPERATOR FROM ELECTRIC SHOCK. IN THE EVENT OF A MALFUNCTION OR BREAKDOWN, grounding provides...
Owners Manual
Page 6
...EYE PROTECTION. ALWAYS wear Safety Goggles (that the grinding wheel has a higher R.P.M. A damaged wheel can damage the grinding wheel. When selecting a replacement grinding wheel, verify that comply with ANSI standard Z87.1) when operating power tools. Adjust the tool rests and spark arrestors to see that keys and ... until the grinder comes up . Only use them to full speed. THE DIAMETER OF THE GRINDING WHEELS WILL DECREASE WiTH USE. There is always a possibility that there are removed from a damaged grinding wheel may be followed when using the sides of the Bench ...
...EYE PROTECTION. ALWAYS wear Safety Goggles (that the grinding wheel has a higher R.P.M. A damaged wheel can damage the grinding wheel. When selecting a replacement grinding wheel, verify that comply with ANSI standard Z87.1) when operating power tools. Adjust the tool rests and spark arrestors to see that keys and ... until the grinder comes up . Only use them to full speed. THE DIAMETER OF THE GRINDING WHEELS WILL DECREASE WiTH USE. There is always a possibility that there are removed from a damaged grinding wheel may be followed when using the sides of the Bench ...

Owners Manual
Page 7
See your Sears Hardware Department or see the Sears Power and Hand Tool Catalog for this manual. Do not use any accessory unless you have completely read the Owner's Manual for other accessories. Ilv!l'Itl__l ;1 _ II _ [_1 ...Using other accessories not listed in this Bench Grinder. AVAILABLE ACCESSORIES Visit your nearest Sears Hardware Department or Sears Power and Hand Tool Catalog for that accessory. ITEM Replacement grinding wheels Wire and Buffing wheels Spacers Wheel dressers Universal stand Sears may recommend other accessories may cause serious injury and cause damage...
See your Sears Hardware Department or see the Sears Power and Hand Tool Catalog for this manual. Do not use any accessory unless you have completely read the Owner's Manual for other accessories. Ilv!l'Itl__l ;1 _ II _ [_1 ...Using other accessories not listed in this Bench Grinder. AVAILABLE ACCESSORIES Visit your nearest Sears Hardware Department or Sears Power and Hand Tool Catalog for that accessory. ITEM Replacement grinding wheels Wire and Buffing wheels Spacers Wheel dressers Universal stand Sears may recommend other accessories may cause serious injury and cause damage...
Owners Manual
Page 8
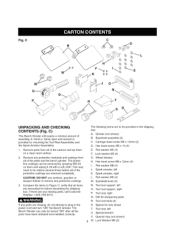
... I. The protective coatings can only be redone several times before discarding the shipping box. The following items are accounted for before all of assembly. Tool rest, right Q. This may need to be removed by spraying WD-40 on a clean work surface. 2. Carriage head screw M6 x 12mm ...knob (2) N. C) This Bench Grinder will require a minimal amount of the cartons and lay them on them and wiping it off with a soft cloth. Fig. Tool rest, left U. Grinder (not shown) B. C C B K G N R UNPACKING AND CHECKING CONTENTS (Fig. Lock Washer M6 (2) The Bench Grinder can ...
... I. The protective coatings can only be redone several times before discarding the shipping box. The following items are accounted for before all of assembly. Tool rest, right Q. This may need to be removed by spraying WD-40 on a clean work surface. 2. Carriage head screw M6 x 12mm ...knob (2) N. C) This Bench Grinder will require a minimal amount of the cartons and lay them on them and wiping it off with a soft cloth. Fig. Tool rest, left U. Grinder (not shown) B. C C B K G N R UNPACKING AND CHECKING CONTENTS (Fig. Lock Washer M6 (2) The Bench Grinder can ...
Owners Manual
Page 9
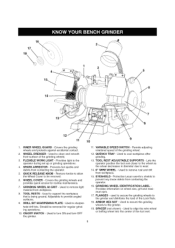
...be removed for routine maintenance. 7. Covers the grinding wheels and protects against accidental contact. 2. Remove knobs to allow the Wheel Cover to align the wire wheel or buffing wheel into the center of the grinding wheels. 3. TOOL REST ADJUSTABLE SUPPORTS - Protective Lexan see-thru shields...WHEEL DRESSER - FLEXIBLE WORK LIGHT - GRINDING WHEEL 60 GRIT - ON/OFF SWITCH - Permits adjusting rotational speed of the Lock Nuts. 18. Used to prevent any loose debris from workpiece. 8. VARIABLE SPEED SWITCH - Lets the operator position the tool rest closer to the wheel as the ...
...be removed for routine maintenance. 7. Covers the grinding wheels and protects against accidental contact. 2. Remove knobs to allow the Wheel Cover to align the wire wheel or buffing wheel into the center of the grinding wheels. 3. TOOL REST ADJUSTABLE SUPPORTS - Protective Lexan see-thru shields...WHEEL DRESSER - FLEXIBLE WORK LIGHT - GRINDING WHEEL 60 GRIT - ON/OFF SWITCH - Permits adjusting rotational speed of the Lock Nuts. 18. Used to prevent any loose debris from workpiece. 8. VARIABLE SPEED SWITCH - Lets the operator position the tool rest closer to the wheel as the ...

Owners Manual
Page 10
... is approximately a 1/4" of the Wheel Covers (B) with the flat washers (C) and hex head screws (D) as shown. See Figure D. 2. Assemble the Tool Rests (E) to the inside edge (I) is 1/16" from the grinding wheel. DONOTassembtlheeBenchGrindeurntiyl ouare surethegrindinwgheelasrefirmlytightenetdothe BenchGrinder. The Flat Washer must be used when sharpening twist drill bits. Tighten the Adjustment Knob. E surfacteo...
... is approximately a 1/4" of the Wheel Covers (B) with the flat washers (C) and hex head screws (D) as shown. See Figure D. 2. Assemble the Tool Rests (E) to the inside edge (I) is 1/16" from the grinding wheel. DONOTassembtlheeBenchGrindeurntiyl ouare surethegrindinwgheelasrefirmlytightenetdothe BenchGrinder. The Flat Washer must be used when sharpening twist drill bits. Tighten the Adjustment Knob. E surfacteo...

Owners Manual
Page 13
...out. Move the workpiece back and forth across the front surface of the grinding wheel removing the amount of the Bench Grinder, the power switch has a removable locking key. L) and the Variable Speed Switch must be turned to the left side of the Bench Grinder using ...the wire wheel on to the desired speed for hand held grinding, sharpening, and cleaning operations. To avoid serious injury, never grind on the appropriate tool rest for the grinding wheels to come up position...
...out. Move the workpiece back and forth across the front surface of the grinding wheel removing the amount of the Bench Grinder, the power switch has a removable locking key. L) and the Variable Speed Switch must be turned to the left side of the Bench Grinder using ...the wire wheel on to the desired speed for hand held grinding, sharpening, and cleaning operations. To avoid serious injury, never grind on the appropriate tool rest for the grinding wheels to come up position...
Owners Manual
Page 14
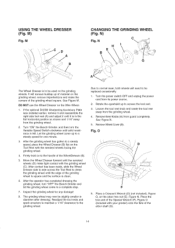
... side to side across the Tool Rest to dress the grinding wheel until the edge of the grinding wheel is square and the surface is clean. 6, After the operator has completed dressing the grinding wheel, turn the Variable Speed Switch clockwise until the serrated ...wheels (D) make the corners of the arbor shaft (G). 14 Loosen the tool rest knob and rotate the tool rest away from its power source. 2. Remove Wheel Cover (B). N E B THE GRINDING C H I WHEEL G The Wheel...
... side to side across the Tool Rest to dress the grinding wheel until the edge of the grinding wheel is square and the surface is clean. 6, After the operator has completed dressing the grinding wheel, turn the Variable Speed Switch clockwise until the serrated ...wheels (D) make the corners of the arbor shaft (G). 14 Loosen the tool rest knob and rotate the tool rest away from its power source. 2. Remove Wheel Cover (B). N E B THE GRINDING C H I WHEEL G The Wheel...
