

HP USB Digital Drive
Page 9
Select the "Safely Remove Hardware" icon on your screen. 3. Gently unplug the Digital Drive from the USB port. ✎ If the USB connector cable is flashing. 1. Select the Digital Drive and wait until the "Safe to remove the Digital Drive when the status light on the Digital Drive is in the extended position, return it on its track for safe storage. 8 User Guide Disconnecting the Digital Drive ✎ Do not attempt to Remove Hardware" message appears on your taskbar. A dialog box displays a list of connected devices. 2.
Select the "Safely Remove Hardware" icon on your screen. 3. Gently unplug the Digital Drive from the USB port. ✎ If the USB connector cable is flashing. 1. Select the Digital Drive and wait until the "Safe to remove the Digital Drive when the status light on the Digital Drive is in the extended position, return it on its track for safe storage. 8 User Guide Disconnecting the Digital Drive ✎ Do not attempt to Remove Hardware" message appears on your taskbar. A dialog box displays a list of connected devices. 2.
Software Updates - Windows Vista
Page 8
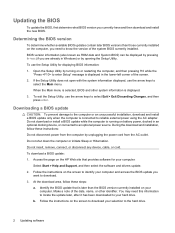
... whether available BIOS updates contain later BIOS versions than the BIOS version currently installed on the screen to an optional power source. Do not insert, remove, connect, or disconnect any device, cable, or cord. Open the Setup Utility by unplugging the power cord from the computer by ...turning on battery power, docked in the lower-left corner of the screen. 2. Downloading a BIOS update CAUTION: To prevent damage to the...
... whether available BIOS updates contain later BIOS versions than the BIOS version currently installed on the screen to an optional power source. Do not insert, remove, connect, or disconnect any device, cable, or cord. Open the Setup Utility by unplugging the power cord from the computer by ...turning on battery power, docked in the lower-left corner of the screen. 2. Downloading a BIOS update CAUTION: To prevent damage to the...
Multimedia - Windows Vista
Page 10
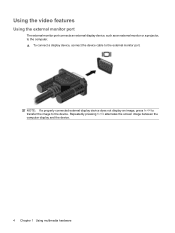
NOTE: If a properly connected external display device does not display an image, press fn+f4 to transfer the image to the external monitor port. Using the video features Using the external monitor port The external monitor port connects an external display device, such as an external monitor or a projector, to the computer. ▲ To connect a display device, connect the device cable to the device. Repeatedly pressing fn+f4 alternates the screen image between the computer display and the device. 4 Chapter 1 Using multimedia hardware
NOTE: If a properly connected external display device does not display an image, press fn+f4 to transfer the image to the external monitor port. Using the video features Using the external monitor port The external monitor port connects an external display device, such as an external monitor or a projector, to the computer. ▲ To connect a display device, connect the device cable to the device. Repeatedly pressing fn+f4 alternates the screen image between the computer display and the device. 4 Chapter 1 Using multimedia hardware


