
Wireless Setup Guide
Page 2
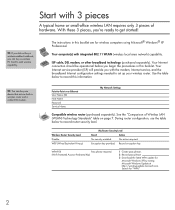
... a wireless-enabled notebook, you with integrated 802.11 WLAN (wireless local area network) capability. No action required. Encryption key provided. Your Internet connection should be operational before you 're ready to add wireless capability. ISP cable, DSL modem, or other broadband technology (purchased separately). Your computer(s) with the modem, Internet service, and the broadband Internet configuration settings needed to -Point over Ethernet User Name (ID) Host Name Password Service Name...
... a wireless-enabled notebook, you with integrated 802.11 WLAN (wireless local area network) capability. No action required. Encryption key provided. Your Internet connection should be operational before you 're ready to add wireless capability. ISP cable, DSL modem, or other broadband technology (purchased separately). Your computer(s) with the modem, Internet service, and the broadband Internet configuration settings needed to -Point over Ethernet User Name (ID) Host Name Password Service Name...

Wireless Setup Guide
Page 3
... . Location of the network and to configure the wireless router. 1 Set up and turn it off by pressing the wireless on page 2. Set up the hardware and software Now that you have tested your setup with router Ethernet cable temporarily connected (jack locations vary) PROGRESS CHECK 4 Configure the wireless router according to the manufacturer's instructions. Important: If you 're ready to connect the pieces of the wireless button and light varies by opening...
... . Location of the network and to configure the wireless router. 1 Set up and turn it off by pressing the wireless on page 2. Set up the hardware and software Now that you have tested your setup with router Ethernet cable temporarily connected (jack locations vary) PROGRESS CHECK 4 Configure the wireless router according to the manufacturer's instructions. Important: If you 're ready to connect the pieces of the wireless button and light varies by opening...

Wireless Setup Guide
Page 4
... not secure. 2 Select Connect. 1 Clear the check box for Enable IEEE 802.11x authentication for technical assistance. Highlight your network name in the network: a Select Start > Control Panel > Network and Internet Connections > Set up or change your network can access a Web site. 4 6 Run the Network Setup Wizard on the screen. If you cannot access a Web site, restart your ISP for this network. 2 Type the WEP encryption key in the Network key field. (You recorded...
... not secure. 2 Select Connect. 1 Clear the check box for Enable IEEE 802.11x authentication for technical assistance. Highlight your network name in the network: a Select Start > Control Panel > Network and Internet Connections > Set up or change your network can access a Web site. 4 6 Run the Network Setup Wizard on the screen. If you cannot access a Web site, restart your ISP for this network. 2 Type the WEP encryption key in the Network key field. (You recorded...

Wireless Setup Guide
Page 5
... your network: a Select Start > Control Panel > Network and Internet Connection > Network Connections. cable modem-A device that connects a computer to a phone line, which is capable of handling large amounts of data at night with you have not already enabled security encryption, follow the router manufacturer's instructions to set the highest level of security provided by a wireless router, gateway, or other emerging Internet threats. ■ Set security on , fast Internet connection. A unique key...
... your network: a Select Start > Control Panel > Network and Internet Connection > Network Connections. cable modem-A device that connects a computer to a phone line, which is capable of handling large amounts of data at night with you have not already enabled security encryption, follow the router manufacturer's instructions to set the highest level of security provided by a wireless router, gateway, or other emerging Internet threats. ■ Set security on , fast Internet connection. A unique key...
Wireless Setup Guide
Page 7
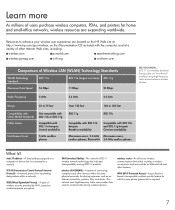
...-A fixed address assigned to a computer or device that includes a wireless access point and may include an Ethernet hub and other features. The network uses high-frequency radio waves rather than wires to a network. TCP/IP (Transmission Control Protocol/Internet Protocol)-A network protocol for transmitting data packets within the same physical proximity for sharing resources such as an Internet connection, printers, files, and drives...
...-A fixed address assigned to a computer or device that includes a wireless access point and may include an Ethernet hub and other features. The network uses high-frequency radio waves rather than wires to a network. TCP/IP (Transmission Control Protocol/Internet Protocol)-A network protocol for transmitting data packets within the same physical proximity for sharing resources such as an Internet connection, printers, files, and drives...
Security - Windows Vista
Page 8
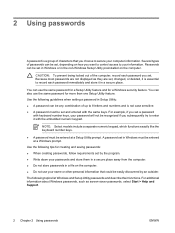
... additional information about Windows passwords, such as they are set, changed, or deleted, it in Windows must be entered at a Setup Utility prompt. NOTE: Select models include a separate numeric keypad, which functions exactly like the keyboard number keys. ● A password must be entered at a Windows prompt. Use the following topics list Windows and Setup Utility passwords and describe their functions. Because most passwords are not displayed as screen-saver passwords, select Start > Help and Support. 2 Chapter 2 Using passwords ENWW You can...
... additional information about Windows passwords, such as they are set, changed, or deleted, it in Windows must be entered at a Setup Utility prompt. NOTE: Select models include a separate numeric keypad, which functions exactly like the keyboard number keys. ● A password must be entered at a Windows prompt. Use the following topics list Windows and Setup Utility passwords and describe their functions. Because most passwords are not displayed as screen-saver passwords, select Start > Help and Support. 2 Chapter 2 Using passwords ENWW You can...

Security - Windows Vista
Page 18
...: If you need to start over the fingerprint sensor until the finger on the screen turns green. After you have registered at least 2 fingers, an error message is the default finger for a different Windows user, log on to Windows as that user and then repeat steps 1 through 8. 12 Chapter 7 Using the fingerprint reader (select models only) ENWW When the VeriSoft Access Manager Registration Wizard opens, click...
...: If you need to start over the fingerprint sensor until the finger on the screen turns green. After you have registered at least 2 fingers, an error message is the default finger for a different Windows user, log on to Windows as that user and then repeat steps 1 through 8. 12 Chapter 7 Using the fingerprint reader (select models only) ENWW When the VeriSoft Access Manager Registration Wizard opens, click...
Software Updates - Windows Vista
Page 7
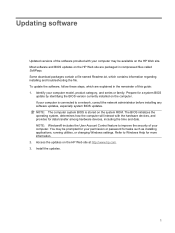
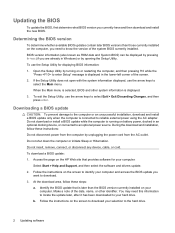
... series or family. You may be prompted for your computer. To update the software, follow these steps, which contains information regarding installing and troubleshooting the file. Most software and BIOS updates on the system ROM. Some download packages contain a file named Readme.txt, which are packaged in the remainder of this guide: 1. Prepare for more information. 2. NOTE: Windows® includes the User Account Control...
... series or family. You may be prompted for your computer. To update the software, follow these steps, which contains information regarding installing and troubleshooting the file. Most software and BIOS updates on the system ROM. Some download packages contain a file named Readme.txt, which are packaged in the remainder of this guide: 1. Prepare for more information. 2. NOTE: Windows® includes the User Account Control...
Software Updates - Windows Vista
Page 8
... need to download your hard drive. Open the Setup Utility by turning on or restarting the computer, and then pressing f10 while the "Press to enter Setup" message is later than those currently installed on the screen to know the version of the system BIOS currently installed. Do not insert, remove, connect, or disconnect any device, cable, or cord. Identify the BIOS update that provides software for displaying BIOS information: 1. To exit the Setup Utility, use...
... need to download your hard drive. Open the Setup Utility by turning on or restarting the computer, and then pressing f10 while the "Press to enter Setup" message is later than those currently installed on the screen to know the version of the system BIOS currently installed. Do not insert, remove, connect, or disconnect any device, cable, or cord. Identify the BIOS update that provides software for displaying BIOS information: 1. To exit the Setup Utility, use...
Setup Utility - Windows Vista and XP
Page 8
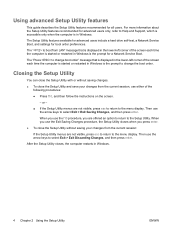
... is started or restarted in Windows is the prompt for advanced users only, refer to the menu display. When you use either of the screen each time the computer is in Windows. 4 Chapter 2 Using the Setup Utility ENWW Using advanced Setup Utility features This guide describes the Setup Utility features recommended for boot order preferences. For more information about the Setup Utility features recommended for a Network Service Boot. Closing the Setup Utility You can close the Setup Utility...
... is started or restarted in Windows is the prompt for advanced users only, refer to the menu display. When you use either of the screen each time the computer is in Windows. 4 Chapter 2 Using the Setup Utility ENWW Using advanced Setup Utility features This guide describes the Setup Utility features recommended for boot order preferences. For more information about the Setup Utility features recommended for a Network Service Boot. Closing the Setup Utility You can close the Setup Utility...
Setup Utility - Windows Vista and XP
Page 10
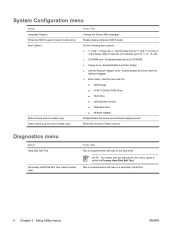
... two hard drives, this menu option is called the Primary Hard Disk Self Test. Enable/disable enhanced SATA mode. Set the following boot options: ● f10 and f12 Delay (sec.)―Set the delay for : ● USB Floppy ● ATAPI CD/DVD ROM Drive ● Hard drive ● USB Diskette on the hard drive. Run a comprehensive self-test on a secondary hard drive. 6 Chapter 3 Setup Utility menus ENWW System Configuration menu Select Language Support Enhanced SATA support (select models only) Boot Options Button Sound (select models only) Video memory...
... two hard drives, this menu option is called the Primary Hard Disk Self Test. Enable/disable enhanced SATA mode. Set the following boot options: ● f10 and f12 Delay (sec.)―Set the delay for : ● USB Floppy ● ATAPI CD/DVD ROM Drive ● Hard drive ● USB Diskette on the hard drive. Run a comprehensive self-test on a secondary hard drive. 6 Chapter 3 Setup Utility menus ENWW System Configuration menu Select Language Support Enhanced SATA support (select models only) Boot Options Button Sound (select models only) Video memory...
Drives - Windows Vista
Page 13
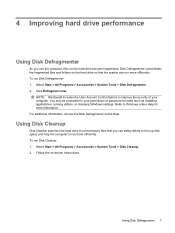
... -screen instructions. Follow the on the hard drive become fragmented. You may be prompted for unnecessary files that the system can safely delete to free up disk space and help the computer to Windows online Help for tasks such as installing applications, running utilities, or changing Windows settings. Select Start > All Programs > Accessories > System Tools > Disk Defragmenter. 2. For additional information, access the Disk Defragmenter online Help. Using Disk Defragmenter...
... -screen instructions. Follow the on the hard drive become fragmented. You may be prompted for unnecessary files that the system can safely delete to free up disk space and help the computer to Windows online Help for tasks such as installing applications, running utilities, or changing Windows settings. Select Start > All Programs > Accessories > System Tools > Disk Defragmenter. 2. For additional information, access the Disk Defragmenter online Help. Using Disk Defragmenter...
Drives - Windows Vista
Page 14
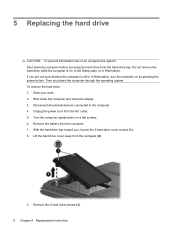
... pressing the power button. Lift the hard drive cover away from the computer. 7. Do not remove the hard drive while the computer is off or in Hibernation. Disconnect all external devices connected to the computer. 4. With the hard drive bay toward you are not sure whether the computer is on, in the Sleep state, or in Hibernation, turn the computer on a flat surface. 6. Remove the battery from...
... pressing the power button. Lift the hard drive cover away from the computer. 7. Do not remove the hard drive while the computer is off or in Hibernation. Disconnect all external devices connected to the computer. 4. With the hard drive bay toward you are not sure whether the computer is on, in the Sleep state, or in Hibernation, turn the computer on a flat surface. 6. Remove the battery from...
Notebook Tour - Windows Vista
Page 15
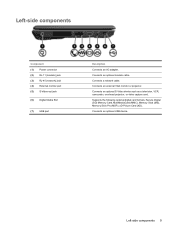
Connects a network cable. Left-side components 9 Connects an optional S-Video device such as a television, VCR, camcorder, overhead projector, or video capture card. Connects an optional USB device. Left-side components Component (1) Power connector (2) RJ-11 (modem) jack (3) RJ-45 (network) jack (4) External monitor port (5) S-Video-out jack (6) Digital Media Slot (7) USB port Description Connects an AC adapter. Connects an external VGA monitor or projector. Connects an optional modem cable. Supports the following optional digital card formats: Secure Digital (SD) Memory Card, ...
Connects a network cable. Left-side components 9 Connects an optional S-Video device such as a television, VCR, camcorder, overhead projector, or video capture card. Connects an optional USB device. Left-side components Component (1) Power connector (2) RJ-11 (modem) jack (3) RJ-45 (network) jack (4) External monitor port (5) S-Video-out jack (6) Digital Media Slot (7) USB port Description Connects an AC adapter. Connects an external VGA monitor or projector. Connects an optional modem cable. Supports the following optional digital card formats: Secure Digital (SD) Memory Card, ...
Pointing Devices and Keyboard - Windows Vista
Page 15
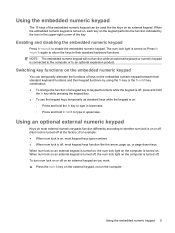
... can temporarily alternate the functions of keys on . Using an optional external numeric keypad Keys on most external numeric keypads function differently according to whether num lock is on or off. (Num lock is turned off , most keypad keys type numbers. ● When num lock is turned on, each key on the computer is connected to the computer or to enable the embedded numeric keypad. Enabling and disabling the embedded numeric...
... can temporarily alternate the functions of keys on . Using an optional external numeric keypad Keys on most external numeric keypads function differently according to whether num lock is on or off. (Num lock is turned off , most keypad keys type numbers. ● When num lock is turned on, each key on the computer is connected to the computer or to enable the embedded numeric keypad. Enabling and disabling the embedded numeric...
Wireless (Select Models Only) - Windows Vista
Page 13
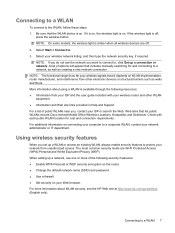
..., see the network you set up a connection or network. Check with your wireless router and other electronic devices or structural barriers such as creating a new network connection. If the wireless light is on connecting your computer to . 3. Select your network from your ISP and the user guide included with each public WLAN location for and connecting to protect your wireless network listing, and then type the network security key, if required. A list of public WLANs...
..., see the network you set up a connection or network. Check with your wireless router and other electronic devices or structural barriers such as creating a new network connection. If the wireless light is on connecting your computer to . 3. Select your network from your ISP and the user guide included with each public WLAN location for and connecting to protect your wireless network listing, and then type the network security key, if required. A list of public WLANs...
Power Management - Windows Vista
Page 9
... to memory, letting you stopped working. CAUTION: To prevent possible audio and video degradation, loss of audio or video playback functionality, or loss of the following ways: ● Close the display. ● Click Start, and then click the Power button. ● Click Start, click the arrow next to the Lock button, and then click Sleep. 2 Setting power options Using power-saving states The computer has two power-saving states enabled at the factory...
... to memory, letting you stopped working. CAUTION: To prevent possible audio and video degradation, loss of audio or video playback functionality, or loss of the following ways: ● Close the display. ● Click Start, and then click the Power button. ● Click Start, click the arrow next to the Lock button, and then click Sleep. 2 Setting power options Using power-saving states The computer has two power-saving states enabled at the factory...
Power Management - Windows Vista
Page 21
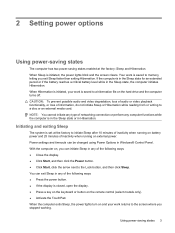
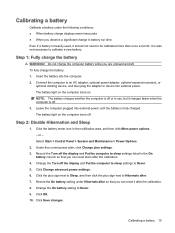
... computer to sleep settings listed in battery run time Even if a battery is off the display and Put the computer to an AC adapter, optional power adapter, optional expansion product, or optional docking device, and then plug the adapter or device into external power. or - Record the Turn off . 3. Calibrating a battery 15 Leave the computer plugged into the computer. 2. Select Start > Control Panel > System and Maintenance > Power Options. 2. Insert the battery into external power until the battery is also...
... computer to sleep settings listed in battery run time Even if a battery is off the display and Put the computer to an AC adapter, optional power adapter, optional expansion product, or optional docking device, and then plug the adapter or device into external power. or - Record the Turn off . 3. Calibrating a battery 15 Leave the computer plugged into the computer. 2. Select Start > Control Panel > System and Maintenance > Power Options. 2. Insert the battery into external power until the battery is also...
Power Management - Windows Vista
Page 23
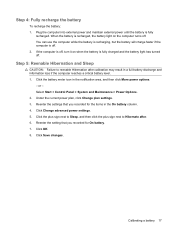
Plug the computer into external power and maintain external power until the battery is recharged, the battery light on when the battery is off . Select Start > Control Panel > System and Maintenance > Power Options. 2. or - Under the current power plan, click Change plan settings. 3. Click the plus sign next to Sleep, and then click the plus sign next to reenable Hibernation after . 6. Reenter the setting that you recorded for the items...
Plug the computer into external power and maintain external power until the battery is recharged, the battery light on when the battery is off . Select Start > Control Panel > System and Maintenance > Power Options. 2. or - Under the current power plan, click Change plan settings. 3. Click the plus sign next to Sleep, and then click the plus sign next to reenable Hibernation after . 6. Reenter the setting that you recorded for the items...
Power Management - Windows Vista
Page 29
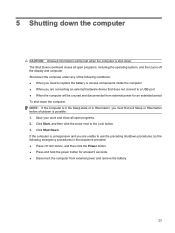
... under any of the following conditions: ● When you need to replace the battery or access components inside the computer ● When you are unable to use the preceding shutdown procedures, try the following emergency procedures in Hibernation, you are connecting an external hardware device that does not connect to the Lock button. 3. 5 Shutting down the computer CAUTION: Unsaved information will be...
... under any of the following conditions: ● When you need to replace the battery or access components inside the computer ● When you are unable to use the preceding shutdown procedures, try the following emergency procedures in Hibernation, you are connecting an external hardware device that does not connect to the Lock button. 3. 5 Shutting down the computer CAUTION: Unsaved information will be...


